ItemsControl.ItemContainerStyle Properti
Definisi
Penting
Beberapa informasi terkait produk prarilis yang dapat diubah secara signifikan sebelum dirilis. Microsoft tidak memberikan jaminan, tersirat maupun tersurat, sehubungan dengan informasi yang diberikan di sini.
Mendapatkan atau mengatur Style yang diterapkan ke elemen kontainer yang dihasilkan untuk setiap item.
public:
 property System::Windows::Style ^ ItemContainerStyle { System::Windows::Style ^ get(); void set(System::Windows::Style ^ value); };
[System.ComponentModel.Bindable(true)]
public System.Windows.Style ItemContainerStyle { get; set; }[<System.ComponentModel.Bindable(true)>]
member this.ItemContainerStyle : System.Windows.Style with get, setPublic Property ItemContainerStyle As StyleNilai Properti
Style yang diterapkan ke elemen kontainer yang dihasilkan untuk setiap item. Default adalah null.
- Atribut
Contoh
Contoh berikut menunjukkan cara menggunakan properti ini. Pertimbangkan terikat ListBoxdata berikut:
<ListBox ItemsSource="{Binding Source={StaticResource MyPhotos}}"
         Background="Silver" Width="600" Margin="10" SelectedIndex="0"/>
Untuk membuat gaya untuk elemen yang berisi item data, buat ListBoxItem gaya, seperti yang diperlihatkan dalam contoh berikut. Gaya diterapkan ke semua ListBoxItem elemen dalam lingkup gaya ditentukan.
<Style TargetType="ListBoxItem">
  <Setter Property="Opacity" Value="0.5" />
  <Setter Property="MaxHeight" Value="75" />
  <Style.Triggers>
    <Trigger Property="IsSelected" Value="True">
      <Trigger.Setters>
        <Setter Property="Opacity" Value="1.0" />
      </Trigger.Setters>
    </Trigger>
    <EventTrigger RoutedEvent="Mouse.MouseEnter">
      <EventTrigger.Actions>
        <BeginStoryboard>
          <Storyboard>
            <DoubleAnimation
              Duration="0:0:0.2"
              Storyboard.TargetProperty="MaxHeight"
              To="90"  />
          </Storyboard>
        </BeginStoryboard>
      </EventTrigger.Actions>
    </EventTrigger>
    <EventTrigger RoutedEvent="Mouse.MouseLeave">
      <EventTrigger.Actions>
        <BeginStoryboard>
          <Storyboard>
            <DoubleAnimation
              Duration="0:0:1"
              Storyboard.TargetProperty="MaxHeight"  />
          </Storyboard>
        </BeginStoryboard>
      </EventTrigger.Actions>
    </EventTrigger>
  </Style.Triggers>
</Style>
ListBoxItem adalah elemen kontainer untuk ListBox kontrol. Oleh karena itu, alternatif untuk sebelumnya adalah mengatur ItemContainerStyle properti dari ListBox ke gaya yang ditentukan. Untuk melakukannya, berikan ListBoxItem gaya x:Key sehingga tersedia sebagai sumber daya:
<Style TargetType="ListBoxItem" x:Key="ContainerStyle">
  <Setter Property="Opacity" Value="0.5" />
  <Setter Property="Opacity" Value="0.5" />
  <Setter Property="MaxHeight" Value="75" />
  <Style.Triggers>
    <Trigger Property="IsSelected" Value="True">
      <Setter Property="Opacity" Value="1.0" />
    </Trigger>
Selanjutnya, atur ItemContainerStyle properti ke sumber daya, seperti dalam contoh berikut:
<ListBox ItemsSource="{Binding Source={StaticResource MyPhotos}}"
         ItemContainerStyle="{StaticResource ContainerStyle}"
         Background="Silver" Width="600" Margin="10" SelectedIndex="0"/>
Kedua skenario sebelumnya menghasilkan hasil yang sama. Namun, salah satu keuntungan membuat gaya tersedia sebagai sumber daya adalah Anda dapat menggunakan kembali gaya. ItemContainerStyle Mengatur properti secara eksplisit juga dapat memberikan keterbacaan yang lebih besar.
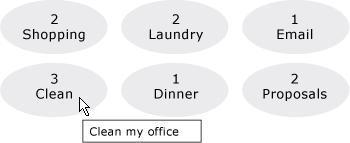
Contoh berikut dirancang untuk mengilustrasikan fungsi dari berbagai properti terkait gaya dan templat yang disediakan oleh ItemsControl.
ItemsControl dalam contoh ini terikat pada kumpulan Task objek. Untuk tujuan demonstrasi, gaya dan templat dalam contoh ini semuanya dinyatakan sebaris.
<ItemsControl Margin="10"
              ItemsSource="{Binding Source={StaticResource myTodoList}}">
  <!--The ItemsControl has no default visual appearance.
      Use the Template property to specify a ControlTemplate to define
      the appearance of an ItemsControl. The ItemsPresenter uses the specified
      ItemsPanelTemplate (see below) to layout the items. If an
      ItemsPanelTemplate is not specified, the default is used. (For ItemsControl,
      the default is an ItemsPanelTemplate that specifies a StackPanel.-->
  <ItemsControl.Template>
    <ControlTemplate TargetType="ItemsControl">
      <Border BorderBrush="Aqua" BorderThickness="1" CornerRadius="15">
        <ItemsPresenter/>
      </Border>
    </ControlTemplate>
  </ItemsControl.Template>
  <!--Use the ItemsPanel property to specify an ItemsPanelTemplate
      that defines the panel that is used to hold the generated items.
      In other words, use this property if you want to affect
      how the items are laid out.-->
  <ItemsControl.ItemsPanel>
    <ItemsPanelTemplate>
      <WrapPanel />
    </ItemsPanelTemplate>
  </ItemsControl.ItemsPanel>
  <!--Use the ItemTemplate to set a DataTemplate to define
      the visualization of the data objects. This DataTemplate
      specifies that each data object appears with the Priority
      and TaskName on top of a silver ellipse.-->
  <ItemsControl.ItemTemplate>
    <DataTemplate>
      <DataTemplate.Resources>
        <Style TargetType="TextBlock">
          <Setter Property="FontSize" Value="18"/>
          <Setter Property="HorizontalAlignment" Value="Center"/>
        </Style>
      </DataTemplate.Resources>
      <Grid>
        <Ellipse Fill="Silver"/>
        <StackPanel>
          <TextBlock Margin="3,3,3,0"
                     Text="{Binding Path=Priority}"/>
          <TextBlock Margin="3,0,3,7"
                     Text="{Binding Path=TaskName}"/>
        </StackPanel>
      </Grid>
    </DataTemplate>
  </ItemsControl.ItemTemplate>
  <!--Use the ItemContainerStyle property to specify the appearance
      of the element that contains the data. This ItemContainerStyle
      gives each item container a margin and a width. There is also
      a trigger that sets a tooltip that shows the description of
      the data object when the mouse hovers over the item container.-->
  <ItemsControl.ItemContainerStyle>
    <Style>
      <Setter Property="Control.Width" Value="100"/>
      <Setter Property="Control.Margin" Value="5"/>
      <Style.Triggers>
        <Trigger Property="Control.IsMouseOver" Value="True">
          <Setter Property="Control.ToolTip"
                  Value="{Binding RelativeSource={x:Static RelativeSource.Self},
                          Path=Content.Description}"/>
        </Trigger>
      </Style.Triggers>
    </Style>
  </ItemsControl.ItemContainerStyle>
</ItemsControl>
Berikut ini adalah cuplikan layar contoh saat dirender:

Dua properti terkait gaya lainnya dari ItemsControl yang tidak ditampilkan di sini adalah GroupStyle dan GroupStyleSelector.
Keterangan
Anda menggunakan properti ini atau ItemContainerStyleSelector properti untuk mengatur gaya agar memengaruhi tampilan elemen yang berisi item data. Misalnya, untuk ListBox, kontainer yang dihasilkan adalah ListBoxItem kontrol; untuk ComboBox, kontainer adalah ComboBoxItem kontrol.
memberikan ItemsControl fleksibilitas yang besar untuk kustomisasi visual dan menyediakan banyak properti gaya dan templat. Untuk memengaruhi tata letak item, gunakan ItemsPanel properti . Jika Anda menggunakan pengelompokan pada kontrol, Anda dapat menggunakan GroupStyle properti atau GroupStyleSelector . Untuk menentukan visualisasi objek data, gunakan ItemTemplate properti atau ItemTemplateSelector . Untuk informasi selengkapnya tentang kapan menentukan ItemTemplate, lihat Gambaran Umum Templat Data.
Penggunaan Atribut XAML
<object ItemContainerStyle="ResourceExtension StyleResourceKey"/>
Nilai XAML
ResourceExtension Salah satu hal berikut: StaticResource, atau DynamicResource. Kecuali gaya itu sendiri berisi referensi ke referensi run-time potensial seperti sumber daya sistem atau preferensi pengguna, StaticResource referensi ke gaya biasanya direkomendasikan untuk performa.
StyleResourceKeyx:Key nilai string yang mengacu pada gaya yang diminta sebagai sumber daya.
Informasi Properti Dependensi
| Bidang pengidentifikasi | ItemContainerStyleProperty |
Properti metadata diatur ke true |
Tidak ada |
