Tampilan Koleksi di Xamarin.Mac
Artikel ini menjelaskan cara menggunakan tampilan koleksi di aplikasi Xamarin.Mac. Ini mencakup pembuatan dan pemeliharaan tampilan koleksi di Xcode dan Interface Builder dan bekerja dengannya secara terprogram.
Saat bekerja dengan C# dan .NET di aplikasi Xamarin.Mac, pengembang memiliki akses ke kontrol AppKit Collection View yang sama dengan yang digunakan Objective-C pengembang dan Xcode . Karena Xamarin.Mac terintegrasi langsung dengan Xcode, pengembang menggunakan Penyusun Antarmuka Xcode untuk membuat dan memelihara Tampilan Koleksi.
Menampilkan NSCollectionView kisi subview yang diatur menggunakan NSCollectionViewLayout. Setiap subview dalam kisi diwakili oleh NSCollectionViewItem yang mengelola pemuatan konten tampilan dari .xib file.

Artikel ini membahas dasar-dasar bekerja dengan Tampilan Koleksi di aplikasi Xamarin.Mac. Sangat disarankan agar Anda bekerja melalui artikel Hello, Mac terlebih dahulu, khususnya bagian Pengenalan Xcode dan Penyusun Antarmuka dan Outlet dan Tindakan , karena mencakup konsep dan teknik utama yang digunakan di seluruh artikel ini.
Anda mungkin ingin melihat kelas / metode Exposing C# keObjective-Cbagian dari dokumen Xamarin.Mac Internals juga, ini menjelaskan Register perintah dan Export yang digunakan untuk menyambungkan kelas C# Anda ke Objective-C objek dan Elemen UI.
Tentang Tampilan Koleksi
Tujuan utama Tampilan Koleksi (NSCollectionView) adalah untuk secara visual mengatur sekelompok objek secara terorganisir menggunakan Tata Letak Tampilan Koleksi (NSCollectionViewLayout), dengan setiap objek individu (NSCollectionViewItem) mendapatkan Tampilannya sendiri dalam koleksi yang lebih besar. Tampilan Koleksi berfungsi melalui teknik Pengikatan Data dan Pengkodian Nilai Kunci dan dengan demikian, Anda harus membaca dokumentasi Pengikatan Data dan Pengkodian Nilai Kunci sebelum melanjutkan artikel ini.
Tampilan Koleksi tidak memiliki Item Tampilan Koleksi bawaan standar (seperti Kerangka atau Tampilan Tabel), sehingga pengembang bertanggung jawab untuk merancang dan menerapkan Tampilan Prototipe menggunakan kontrol AppKit lainnya seperti Bidang Gambar, Bidang Teks, Label, dll. Tampilan Prototipe ini akan digunakan untuk menampilkan dan bekerja dengan setiap item yang dikelola oleh Tampilan Koleksi dan disimpan dalam .xib file.
Karena pengembang bertanggung jawab atas tampilan dan nuansa Item Tampilan Koleksi, Tampilan Koleksi tidak memiliki dukungan bawaan untuk menyoroti item yang dipilih di kisi. Menerapkan fitur ini akan dibahas dalam artikel ini.
Menentukan Model Data
Sebelum Data Mengikat Tampilan Koleksi di Penyusun Antarmuka, kelas yang sesuai dengan Key-Value Coding (KVC)/Key-Value Observing (KVO) harus didefinisikan dalam aplikasi Xamarin.Mac untuk bertindak sebagai Model Data untuk pengikatan. Model Data menyediakan semua data yang akan ditampilkan dalam koleksi dan menerima modifikasi apa pun pada data yang dibuat pengguna di UI saat menjalankan aplikasi.
Ambil contoh aplikasi yang mengelola sekelompok karyawan, kelas berikut dapat digunakan untuk menentukan Model Data:
using System;
using Foundation;
using AppKit;

namespace MacDatabinding
{
    [Register("PersonModel")]
    public class PersonModel : NSObject
    {
        #region Private Variables
        private string _name = "";
        private string _occupation = "";
        private bool _isManager = false;
        private NSMutableArray _people = new NSMutableArray();
        #endregion

        #region Computed Properties
        [Export("Name")]
        public string Name {
            get { return _name; }
            set {
                WillChangeValue ("Name");
                _name = value;
                DidChangeValue ("Name");
            }
        }

        [Export("Occupation")]
        public string Occupation {
            get { return _occupation; }
            set {
                WillChangeValue ("Occupation");
                _occupation = value;
                DidChangeValue ("Occupation");
            }
        }

        [Export("isManager")]
        public bool isManager {
            get { return _isManager; }
            set {
                WillChangeValue ("isManager");
                WillChangeValue ("Icon");
                _isManager = value;
                DidChangeValue ("isManager");
                DidChangeValue ("Icon");
            }
        }

        [Export("isEmployee")]
        public bool isEmployee {
            get { return (NumberOfEmployees == 0); }
        }

        [Export("Icon")]
        public NSImage Icon
        {
            get
            {
                if (isManager)
                {
                    return NSImage.ImageNamed("IconGroup");
                }
                else
                {
                    return NSImage.ImageNamed("IconUser");
                }
            }
        }

        [Export("personModelArray")]
        public NSArray People {
            get { return _people; }
        }

        [Export("NumberOfEmployees")]
        public nint NumberOfEmployees {
            get { return (nint)_people.Count; }
        }
        #endregion

        #region Constructors
        public PersonModel ()
        {
        }

        public PersonModel (string name, string occupation)
        {
            // Initialize
            this.Name = name;
            this.Occupation = occupation;
        }

        public PersonModel (string name, string occupation, bool manager)
        {
            // Initialize
            this.Name = name;
            this.Occupation = occupation;
            this.isManager = manager;
        }
        #endregion

        #region Array Controller Methods
        [Export("addObject:")]
        public void AddPerson(PersonModel person) {
            WillChangeValue ("personModelArray");
            isManager = true;
            _people.Add (person);
            DidChangeValue ("personModelArray");
        }

        [Export("insertObject:inPersonModelArrayAtIndex:")]
        public void InsertPerson(PersonModel person, nint index) {
            WillChangeValue ("personModelArray");
            _people.Insert (person, index);
            DidChangeValue ("personModelArray");
        }

        [Export("removeObjectFromPersonModelArrayAtIndex:")]
        public void RemovePerson(nint index) {
            WillChangeValue ("personModelArray");
            _people.RemoveObject (index);
            DidChangeValue ("personModelArray");
        }

        [Export("setPersonModelArray:")]
        public void SetPeople(NSMutableArray array) {
            WillChangeValue ("personModelArray");
            _people = array;
            DidChangeValue ("personModelArray");
        }
        #endregion
    }
}
PersonModel Model Data akan digunakan di seluruh bagian artikel ini.
Bekerja dengan Tampilan Koleksi
Pengikatan Data dengan Tampilan Koleksi sangat mirip dengan pengikatan dengan Tampilan Tabel, seperti NSCollectionViewDataSource yang digunakan untuk menyediakan data untuk pengumpulan. Karena tampilan koleksi tidak memiliki format tampilan prasetel, lebih banyak pekerjaan diperlukan untuk memberikan umpan balik interaksi pengguna dan untuk melacak pilihan pengguna.
Membuat Prototipe Sel
Karena Tampilan Koleksi tidak menyertakan prototipe sel default, pengembang harus menambahkan satu atau beberapa .xib file ke aplikasi Xamarin.Mac untuk menentukan tata letak dan konten masing-masing sel.
Lakukan:
Di Penjelajah Solusi, klik kanan pada nama proyek dan pilih Tambahkan>File Baru...
Pilih Pengontrol Tampilan Mac>, beri nama (seperti
EmployeeItemdalam contoh ini) dan klik tombol Baru untuk membuat: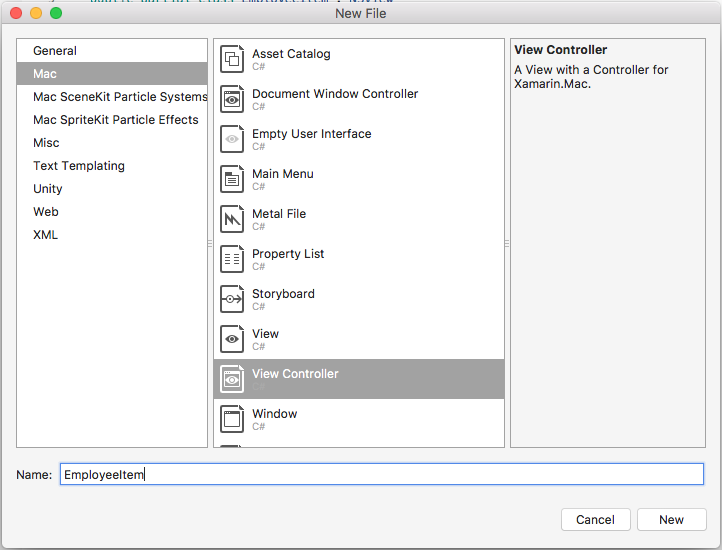
Ini akan menambahkan
EmployeeItem.csfile ,EmployeeItemController.csdanEmployeeItemController.xibke solusi proyek.EmployeeItemController.xibKlik dua kali file untuk membukanya untuk pengeditan di Penyusun Antarmuka Xcode.NSBoxTambahkan ,NSImageViewdan duaNSLabelkontrol ke Tampilan dan letakkan sebagai berikut: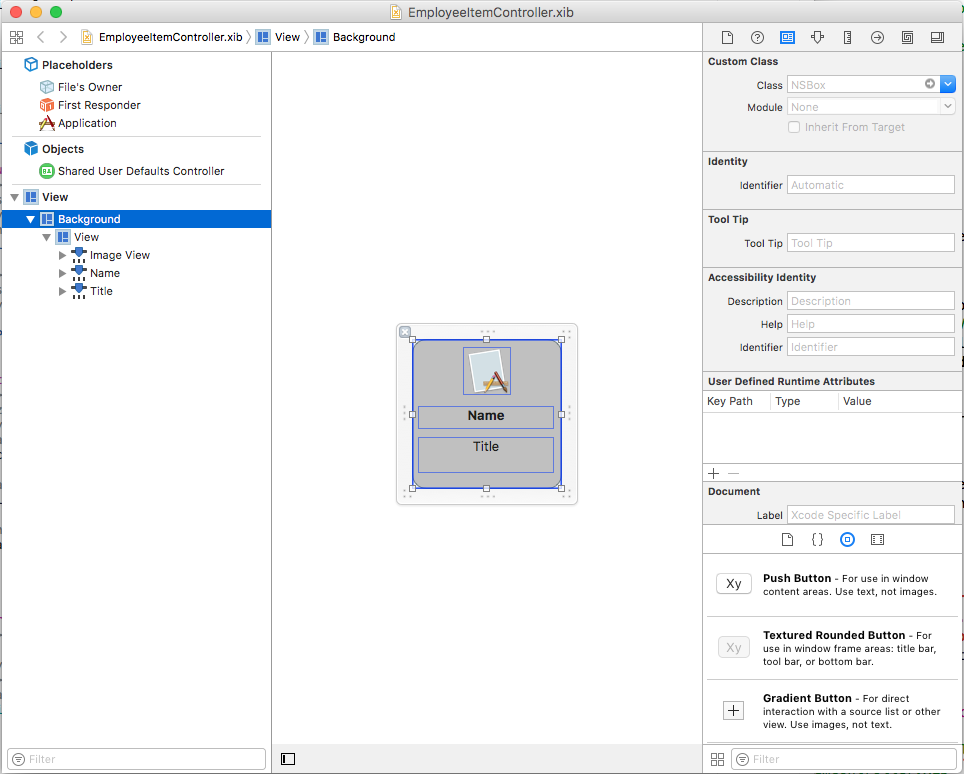
Buka Editor Asisten dan buat Outlet untuk
NSBoxsehingga dapat digunakan untuk menunjukkan status pilihan sel: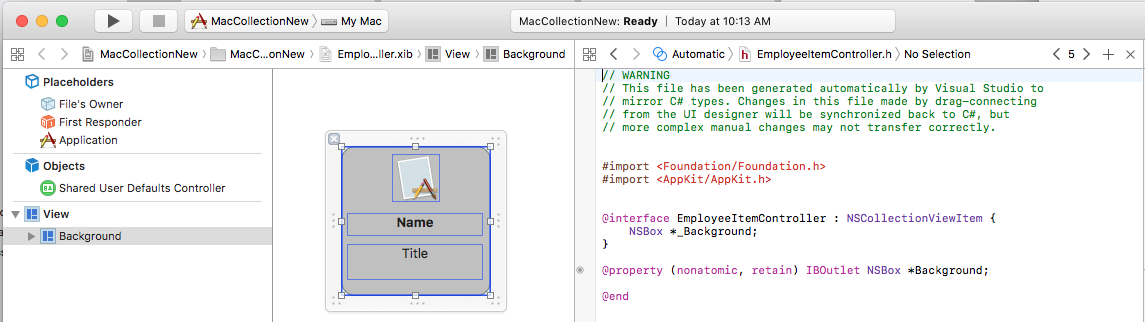
Kembali ke Editor Standar dan pilih Tampilan Gambar.
Di Pemeriksa Pengikatan, pilih Ikat Ke>Pemilik File dan masukkan Jalur Kunci Model dari
self.Person.Icon: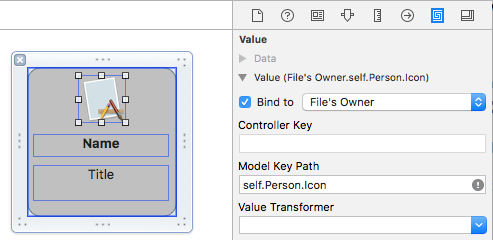
Pilih Label pertama dan di Pemeriksa Pengikatan, pilih Ikat Ke>Pemilik File dan masukkan Jalur Kunci Model dari
self.Person.Name:
Pilih Label kedua dan di Pemeriksa Pengikatan, pilih Ikat Ke>Pemilik File dan masukkan Jalur Kunci Model dari
self.Person.Occupation: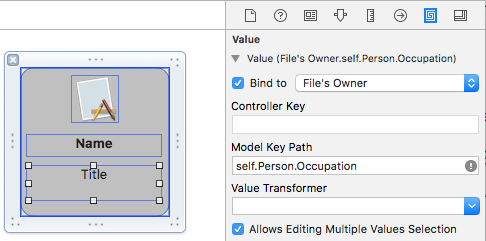
Simpan perubahan ke
.xibfile dan kembali ke Visual Studio untuk menyinkronkan perubahan.
EmployeeItemController.cs Edit file dan buat terlihat seperti berikut ini:
using System;
using System.Collections.Generic;
using System.Linq;
using Foundation;
using AppKit;

namespace MacCollectionNew
{
    /// <summary>
    /// The Employee item controller handles the display of the individual items that will
    /// be displayed in the collection view as defined in the associated .XIB file.
    /// </summary>
    public partial class EmployeeItemController : NSCollectionViewItem
    {
        #region Private Variables
        /// <summary>
        /// The person that will be displayed.
        /// </summary>
        private PersonModel _person;
        #endregion

        #region Computed Properties
        // strongly typed view accessor
        public new EmployeeItem View
        {
            get
            {
                return (EmployeeItem)base.View;
            }
        }

        /// <summary>
        /// Gets or sets the person.
        /// </summary>
        /// <value>The person that this item belongs to.</value>
        [Export("Person")]
        public PersonModel Person
        {
            get { return _person; }
            set
            {
                WillChangeValue("Person");
                _person = value;
                DidChangeValue("Person");
            }
        }

        /// <summary>
        /// Gets or sets the color of the background for the item.
        /// </summary>
        /// <value>The color of the background.</value>
        public NSColor BackgroundColor {
            get { return Background.FillColor; }
            set { Background.FillColor = value; }
        }

        /// <summary>
        /// Gets or sets a value indicating whether this <see cref="T:MacCollectionNew.EmployeeItemController"/> is selected.
        /// </summary>
        /// <value><c>true</c> if selected; otherwise, <c>false</c>.</value>
        /// <remarks>This also changes the background color based on the selected state
        /// of the item.</remarks>
        public override bool Selected
        {
            get
            {
                return base.Selected;
            }
            set
            {
                base.Selected = value;

                // Set background color based on the selection state
                if (value) {
                    BackgroundColor = NSColor.DarkGray;
                } else {
                    BackgroundColor = NSColor.LightGray;
                }
            }
        }
        #endregion

        #region Constructors
        // Called when created from unmanaged code
        public EmployeeItemController(IntPtr handle) : base(handle)
        {
            Initialize();
        }

        // Called when created directly from a XIB file
        [Export("initWithCoder:")]
        public EmployeeItemController(NSCoder coder) : base(coder)
        {
            Initialize();
        }

        // Call to load from the XIB/NIB file
        public EmployeeItemController() : base("EmployeeItem", NSBundle.MainBundle)
        {
            Initialize();
        }

        // Added to support loading from XIB/NIB
        public EmployeeItemController(string nibName, NSBundle nibBundle) : base(nibName, nibBundle) {

            Initialize();
        }

        // Shared initialization code
        void Initialize()
        {
        }
        #endregion
    }
}
Melihat kode ini secara rinci, kelas mewarisi sehingga NSCollectionViewItem dapat bertindak sebagai prototipe untuk sel Tampilan Koleksi. Properti Person mengekspos kelas yang digunakan untuk mengikat data ke Tampilan Gambar dan Label di Xcode. Ini adalah instans dari yang PersonModel dibuat di atas.
Properti BackgroundColor adalah pintasan ke NSBox kontrol FillColor yang akan digunakan untuk memperlihatkan status pilihan sel. Dengan mengambil alih Selected properti NSCollectionViewItem, kode berikut menetapkan atau menghapus status pilihan ini:
public override bool Selected
{
    get
    {
        return base.Selected;
    }
    set
    {
        base.Selected = value;

        // Set background color based on the selection state
        if (value) {
            BackgroundColor = NSColor.DarkGray;
        } else {
            BackgroundColor = NSColor.LightGray;
        }
    }
}
Membuat Sumber Data Tampilan Koleksi
Sumber Data Tampilan Koleksi (NSCollectionViewDataSource) menyediakan semua data untuk Tampilan Koleksi dan membuat dan mengisi Sel Tampilan Koleksi (menggunakan .xib prototipe) sesuai kebutuhan untuk setiap item dalam koleksi.
Tambahkan kelas baru proyek, panggil CollectionViewDataSource dan buat terlihat seperti berikut:
using System;
using System.Collections.Generic;
using AppKit;
using Foundation;

namespace MacCollectionNew
{
    /// <summary>
    /// Collection view data source provides the data for the collection view.
    /// </summary>
    public class CollectionViewDataSource : NSCollectionViewDataSource
    {
        #region Computed Properties
        /// <summary>
        /// Gets or sets the parent collection view.
        /// </summary>
        /// <value>The parent collection view.</value>
        public NSCollectionView ParentCollectionView { get; set; }

        /// <summary>
        /// Gets or sets the data that will be displayed in the collection.
        /// </summary>
        /// <value>A collection of PersonModel objects.</value>
        public List<PersonModel> Data { get; set; } = new List<PersonModel>();
        #endregion

        #region Constructors
        /// <summary>
        /// Initializes a new instance of the <see cref="T:MacCollectionNew.CollectionViewDataSource"/> class.
        /// </summary>
        /// <param name="parent">The parent collection that this datasource will provide data for.</param>
        public CollectionViewDataSource(NSCollectionView parent)
        {
            // Initialize
            ParentCollectionView = parent;

            // Attach to collection view
            parent.DataSource = this;

        }
        #endregion

        #region Override Methods
        /// <summary>
        /// Gets the number of sections.
        /// </summary>
        /// <returns>The number of sections.</returns>
        /// <param name="collectionView">The parent Collection view.</param>
        public override nint GetNumberOfSections(NSCollectionView collectionView)
        {
            // There is only one section in this view
            return 1;
        }

        /// <summary>
        /// Gets the number of items in the given section.
        /// </summary>
        /// <returns>The number of items.</returns>
        /// <param name="collectionView">The parent Collection view.</param>
        /// <param name="section">The Section number to count items for.</param>
        public override nint GetNumberofItems(NSCollectionView collectionView, nint section)
        {
            // Return the number of items
            return Data.Count;
        }

        /// <summary>
        /// Gets the item for the give section and item index.
        /// </summary>
        /// <returns>The item.</returns>
        /// <param name="collectionView">The parent Collection view.</param>
        /// <param name="indexPath">Index path specifying the section and index.</param>
        public override NSCollectionViewItem GetItem(NSCollectionView collectionView, NSIndexPath indexPath)
        {
            var item = collectionView.MakeItem("EmployeeCell", indexPath) as EmployeeItemController;
            item.Person = Data[(int)indexPath.Item];

            return item;
        }
        #endregion
    }
}
Melihat kode ini secara rinci, kelas mewarisi dan NSCollectionViewDataSource mengekspos Daftar PersonModel instans melalui propertinya Data .
Karena koleksi ini hanya memiliki satu bagian, kode mengambil alih GetNumberOfSections metode dan selalu mengembalikan 1. Selain itu, GetNumberofItems metode ditimpa karena mengembalikan jumlah item dalam Data daftar properti.
Metode GetItem ini dipanggil setiap kali sel baru diperlukan dan terlihat seperti berikut ini:
public override NSCollectionViewItem GetItem(NSCollectionView collectionView, NSIndexPath indexPath)
{
    var item = collectionView.MakeItem("EmployeeCell", indexPath) as EmployeeItemController;
    item.Person = Data[(int)indexPath.Item];

    return item;
}
Metode MakeItem Tampilan Koleksi dipanggil untuk membuat atau mengembalikan instans EmployeeItemController yang dapat digunakan kembali dan propertinya Person diatur ke item yang ditampilkan di sel yang diminta.
EmployeeItemController harus didaftarkan dengan Pengontrol Tampilan Koleksi sebelumnya menggunakan kode berikut:
EmployeeCollection.RegisterClassForItem(typeof(EmployeeItemController), "EmployeeCell");
Pengidentifikasi (EmployeeCell) yang MakeItem digunakan dalam panggilan harus cocok dengan nama Pengontrol Tampilan yang terdaftar dengan Tampilan Koleksi. Langkah ini akan dibahas secara rinci di bawah ini.
Menangani Pilihan Item
Untuk menangani pemilihan dan penghapusan item dalam koleksi, NSCollectionViewDelegate akan diperlukan. Karena contoh ini akan menggunakan jenis tata letak bawaan NSCollectionViewFlowLayout , NSCollectionViewDelegateFlowLayout versi tertentu dari delegasi ini akan diperlukan.
Tambahkan kelas baru ke proyek, panggil CollectionViewDelegate dan buat terlihat seperti berikut ini:
using System;
using Foundation;
using AppKit;

namespace MacCollectionNew
{
    /// <summary>
    /// Collection view delegate handles user interaction with the elements of the
    /// collection view for the Flow-Based layout type.
    /// </summary>
    public class CollectionViewDelegate : NSCollectionViewDelegateFlowLayout
    {
        #region Computed Properties
        /// <summary>
        /// Gets or sets the parent view controller.
        /// </summary>
        /// <value>The parent view controller.</value>
        public ViewController ParentViewController { get; set; }
        #endregion

        #region Constructors
        /// <summary>
        /// Initializes a new instance of the <see cref="T:MacCollectionNew.CollectionViewDelegate"/> class.
        /// </summary>
        /// <param name="parentViewController">Parent view controller.</param>
        public CollectionViewDelegate(ViewController parentViewController)
        {
            // Initialize
            ParentViewController = parentViewController;
        }
        #endregion

        #region Override Methods
        /// <summary>
        /// Handles one or more items being selected.
        /// </summary>
        /// <param name="collectionView">The parent Collection view.</param>
        /// <param name="indexPaths">The Index paths of the items being selected.</param>
        public override void ItemsSelected(NSCollectionView collectionView, NSSet indexPaths)
        {
            // Dereference path
            var paths = indexPaths.ToArray<NSIndexPath>();
            var index = (int)paths[0].Item;

            // Save the selected item
            ParentViewController.PersonSelected = ParentViewController.Datasource.Data[index];

        }

        /// <summary>
        /// Handles one or more items being deselected.
        /// </summary>
        /// <param name="collectionView">The parent Collection view.</param>
        /// <param name="indexPaths">The Index paths of the items being deselected.</param>
        public override void ItemsDeselected(NSCollectionView collectionView, NSSet indexPaths)
        {
            // Dereference path
            var paths = indexPaths.ToArray<NSIndexPath>();
            var index = paths[0].Item;

            // Clear selection
            ParentViewController.PersonSelected = null;
        }
        #endregion
    }
}
Metode ItemsSelected dan ItemsDeselected ditimpa dan digunakan untuk mengatur atau menghapus PersonSelected properti Pengontrol Tampilan yang menangani Tampilan Koleksi saat pengguna memilih atau membatalkan pilihan item. Ini akan ditampilkan secara rinci di bawah ini.
Membuat Tampilan Koleksi di Penyusun Antarmuka
Dengan semua bagian pendukung yang diperlukan, papan cerita utama dapat diedit dan Tampilan Koleksi ditambahkan ke dalamnya.
Lakukan:
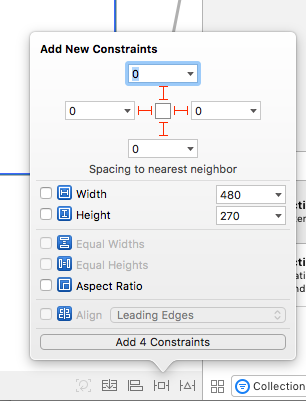
Main.StoryboardKlik dua kali file di Penjelajah Solusi untuk membukanya untuk diedit di Penyusun Antarmuka Xcode.Seret Tampilan Koleksi ke tampilan Utama dan mengubah ukurannya untuk mengisi Tampilan:
Dengan Tampilan Koleksi dipilih, gunakan Editor Batasan untuk menyematkannya ke Tampilan saat diubah ukurannya:
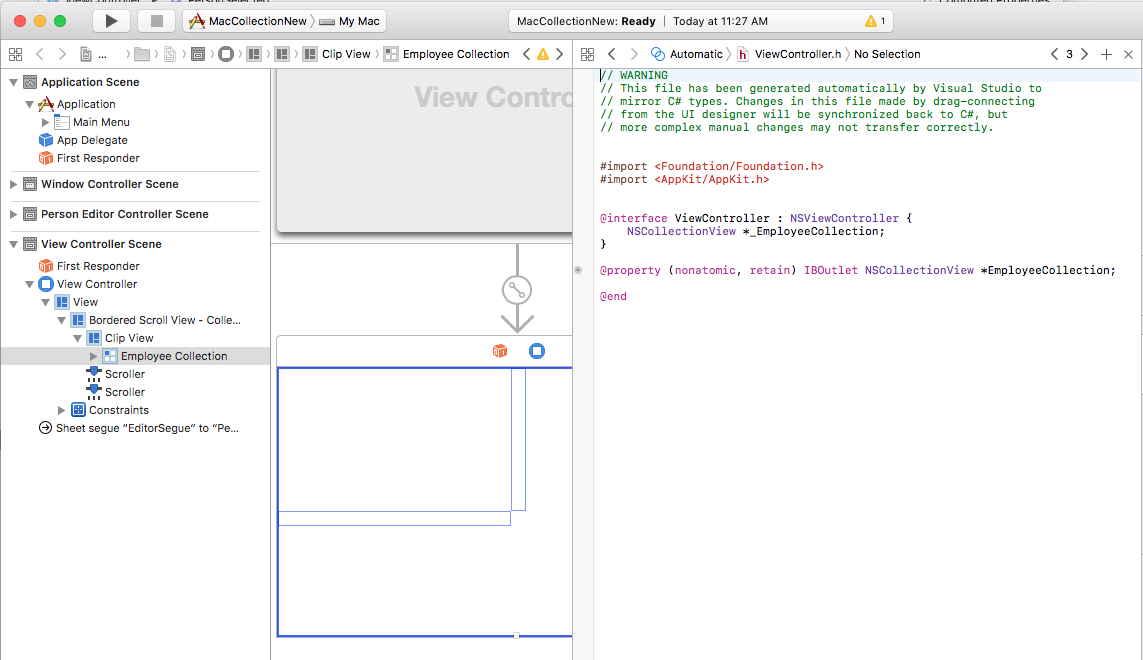
Pastikan bahwa Tampilan Koleksi dipilih di Permukaan Desain (dan bukan Tampilan Gulir Berbatas atau Tampilan Klip yang berisinya), beralihlah ke Editor Asisten dan buat Outlet untuk tampilan koleksi:
Simpan perubahan dan kembali ke Visual Studio untuk disinkronkan.
Membawa semuanya Bersama-sama
Semua bagian pendukung sekarang telah diberlakukan dengan kelas untuk bertindak sebagai model data (PersonModel), telah ditambahkan ke data pasokan, NSCollectionViewDelegateFlowLayout dibuat untuk menangani pemilihan item dan NSCollectionView ditambahkan ke Papan Cerita Utama dan diekspos sebagai Outlet (EmployeeCollectionNSCollectionViewDataSource).
Langkah terakhir adalah mengedit Pengontrol Tampilan yang berisi Tampilan Koleksi dan menyatukan semua bagian untuk mengisi koleksi dan menangani pilihan item.
ViewController.cs Edit file dan buat terlihat seperti berikut ini:
using System;
using AppKit;
using Foundation;
using CoreGraphics;

namespace MacCollectionNew
{
    /// <summary>
    /// The View controller controls the main view that houses the Collection View.
    /// </summary>
    public partial class ViewController : NSViewController
    {
        #region Private Variables
        private PersonModel _personSelected;
        private bool shouldEdit = true;
        #endregion

        #region Computed Properties
        /// <summary>
        /// Gets or sets the datasource that provides the data to display in the
        /// Collection View.
        /// </summary>
        /// <value>The datasource.</value>
        public CollectionViewDataSource Datasource { get; set; }

        /// <summary>
        /// Gets or sets the person currently selected in the collection view.
        /// </summary>
        /// <value>The person selected or <c>null</c> if no person is selected.</value>
        [Export("PersonSelected")]
        public PersonModel PersonSelected
        {
            get { return _personSelected; }
            set
            {
                WillChangeValue("PersonSelected");
                _personSelected = value;
                DidChangeValue("PersonSelected");
                RaiseSelectionChanged();
            }
        }
        #endregion

        #region Constructors
        /// <summary>
        /// Initializes a new instance of the <see cref="T:MacCollectionNew.ViewController"/> class.
        /// </summary>
        /// <param name="handle">Handle.</param>
        public ViewController(IntPtr handle) : base(handle)
        {
        }
        #endregion

        #region Override Methods
        /// <summary>
        /// Called after the view has finished loading from the Storyboard to allow it to
        /// be configured before displaying to the user.
        /// </summary>
        public override void ViewDidLoad()
        {
            base.ViewDidLoad();

            // Initialize Collection View
            ConfigureCollectionView();
            PopulateWithData();
        }
        #endregion

        #region Private Methods
        /// <summary>
        /// Configures the collection view.
        /// </summary>
        private void ConfigureCollectionView()
        {
            EmployeeCollection.RegisterClassForItem(typeof(EmployeeItemController), "EmployeeCell");

            // Create a flow layout
            var flowLayout = new NSCollectionViewFlowLayout()
            {
                ItemSize = new CGSize(150, 150),
                SectionInset = new NSEdgeInsets(10, 10, 10, 20),
                MinimumInteritemSpacing = 10,
                MinimumLineSpacing = 10
            };
            EmployeeCollection.WantsLayer = true;

            // Setup collection view
            EmployeeCollection.CollectionViewLayout = flowLayout;
            EmployeeCollection.Delegate = new CollectionViewDelegate(this);

        }

        /// <summary>
        /// Populates the Datasource with data and attaches it to the collection view.
        /// </summary>
        private void PopulateWithData()
        {
            // Make datasource
            Datasource = new CollectionViewDataSource(EmployeeCollection);

            // Build list of employees
            Datasource.Data.Add(new PersonModel("Craig Dunn", "Documentation Manager", true));
            Datasource.Data.Add(new PersonModel("Amy Burns", "Technical Writer"));
            Datasource.Data.Add(new PersonModel("Joel Martinez", "Web & Infrastructure"));
            Datasource.Data.Add(new PersonModel("Kevin Mullins", "Technical Writer"));
            Datasource.Data.Add(new PersonModel("Mark McLemore", "Technical Writer"));
            Datasource.Data.Add(new PersonModel("Tom Opgenorth", "Technical Writer"));
            Datasource.Data.Add(new PersonModel("Larry O'Brien", "API Docs Manager", true));
            Datasource.Data.Add(new PersonModel("Mike Norman", "API Documentor"));

            // Populate collection view
            EmployeeCollection.ReloadData();
        }
        #endregion

        #region Events
        /// <summary>
        /// Selection changed delegate.
        /// </summary>
        public delegate void SelectionChangedDelegate();

        /// <summary>
        /// Occurs when selection changed.
        /// </summary>
        public event SelectionChangedDelegate SelectionChanged;

        /// <summary>
        /// Raises the selection changed event.
        /// </summary>
        internal void RaiseSelectionChanged() {
            // Inform caller
            if (this.SelectionChanged != null) SelectionChanged();
        }
        #endregion
    }
}
Melihat kode ini secara rinci, Datasource properti didefinisikan untuk menyimpan instans CollectionViewDataSource yang akan menyediakan data untuk Tampilan Koleksi. Properti PersonSelected didefinisikan untuk menahan PersonModel yang mewakili item yang saat ini dipilih dalam Tampilan Koleksi. Properti ini juga menaikkan SelectionChanged peristiwa ketika pilihan berubah.
Kelas ConfigureCollectionView digunakan untuk mendaftarkan Pengontrol Tampilan yang bertindak sebagai prototipe sel dengan Tampilan Koleksi menggunakan baris berikut:
EmployeeCollection.RegisterClassForItem(typeof(EmployeeItemController), "EmployeeCell");
Perhatikan bahwa Pengidentifikasi () yang digunakan untuk mendaftarkan prototipe cocok dengan yang disebut dalam GetItem metode yang CollectionViewDataSource ditentukan diEmployeeCell atas:
var item = collectionView.MakeItem("EmployeeCell", indexPath) as EmployeeItemController;
...
Selain itu, jenis Pengontrol Tampilan harus cocok dengan nama .xib file yang menentukan prototipe dengan tepat. Dalam kasus contoh ini, EmployeeItemController dan EmployeeItemController.xib.
Tata letak aktual item dalam Tampilan Koleksi dikontrol oleh kelas Tata Letak Tampilan Koleksi dan dapat diubah secara dinamis saat runtime dengan menetapkan instans baru ke CollectionViewLayout properti . Mengubah properti ini memperbarui tampilan Tampilan Koleksi tanpa menganimasikan perubahan.
Apple mengirimkan dua jenis tata letak bawaan dengan Tampilan Koleksi yang akan menangani penggunaan paling umum: NSCollectionViewFlowLayout dan NSCollectionViewGridLayout. Jika pengembang memerlukan format kustom, seperti meletakkan item dalam lingkaran, mereka dapat membuat instans NSCollectionViewLayout kustom dan mengambil alih metode yang diperlukan untuk mencapai efek yang diinginkan.
Contoh ini menggunakan tata letak alur default sehingga membuat instans NSCollectionViewFlowLayout kelas dan mengonfigurasinya sebagai berikut:
var flowLayout = new NSCollectionViewFlowLayout()
{
    ItemSize = new CGSize(150, 150),
    SectionInset = new NSEdgeInsets(10, 10, 10, 20),
    MinimumInteritemSpacing = 10,
    MinimumLineSpacing = 10
};
Properti ItemSize menentukan ukuran setiap sel individual dalam koleksi. Properti SectionInset mendefinisikan inset dari tepi koleksi tempat sel akan ditata. MinimumInteritemSpacing menentukan penspasian minimum antara item dan MinimumLineSpacing menentukan penspasian minimum antar baris dalam koleksi.
Tata letak ditetapkan ke Tampilan Koleksi dan instans CollectionViewDelegate dilampirkan untuk menangani pilihan item:
// Setup collection view
EmployeeCollection.CollectionViewLayout = flowLayout;
EmployeeCollection.Delegate = new CollectionViewDelegate(this);
Metode ini PopulateWithData membuat instans baru dari CollectionViewDataSource, mengisinya dengan data, melampirkannya ke Tampilan Koleksi dan memanggil ReloadData metode untuk menampilkan item:
private void PopulateWithData()
{
    // Make datasource
    Datasource = new CollectionViewDataSource(EmployeeCollection);

    // Build list of employees
    Datasource.Data.Add(new PersonModel("Craig Dunn", "Documentation Manager", true));
    ...

    // Populate collection view
    EmployeeCollection.ReloadData();
}
Metode ViewDidLoad ini ditimpa dan memanggil ConfigureCollectionView metode dan PopulateWithData untuk menampilkan Tampilan Koleksi akhir kepada pengguna:
public override void ViewDidLoad()
{
    base.ViewDidLoad();

    // Initialize Collection View
    ConfigureCollectionView();
    PopulateWithData();
}
Ringkasan
Artikel ini telah melihat secara rinci tentang bekerja dengan Tampilan Koleksi dalam aplikasi Xamarin.Mac. Pertama, ia melihat mengekspos kelas C# dengan Objective-C menggunakan Key-Value Coding (KVC) dan Key-Value Observing (KVO). Selanjutnya, ini menunjukkan cara menggunakan kelas yang sesuai dengan KVO dan Mengikat Data ke Tampilan Koleksi di Penyusun Antarmuka Xcode. Terakhir, ini menunjukkan cara berinteraksi dengan Tampilan Koleksi dalam kode C#.