Configure scheduled data refresh for Power Pivot by using the unattended data refresh account (SharePoint Server 2013)
APPLIES TO:  2013
2013  2016
2016  2019
2019  Subscription Edition
  SharePoint in Microsoft 365
Important
This scenario applies only to SharePoint Server 2013.
In this article, we'll take a look at configuring scheduled data refresh in SQL Server 2012 Power Pivot for SharePoint 2013 by using the unattended data refresh account.
By using the unattended data refresh account, you can have the data in your workbooks refreshed using an account that was configured by your administrator.
Before you begin
Before starting, you will need:
The user name of the unattended data refresh account that was configured when you set up Power Pivot for SharePoint originally.
Contribute access to the SharePoint document library that you will be using.
Additionally, be sure that Excel Services is configured in your SharePoint Server 2013 farm.
Video demonstration
This video shows the steps involved in configuring scheduled data refresh in SQL Server 2012 Power Pivot for SharePoint 2013 by using the unattended data refresh account, as described in this article.
Video: Configure scheduled data refresh for Power Pivot by using the unattended data refresh account
Configure access to your data source
The first step in setting up scheduled data refresh by using the unattended data refresh account is to ensure that it has the proper access to the data source used in your report. We'll take a look at SQL Server and Analysis Services data sources.
Use a SQL Server data source
If you're using SQL Server for your data source, you'll need to make sure that your unattended data refresh account has read permissions to the SQL Server database where your data resides.
To set read permission on a SQL Server database
In SQL Server Management Studio, connect to the database engine.
Expand Security.
Right-click Logins, and then choose New Login.
In the Login name box, type the domain and user name of your unattended data refresh account.
On the User Mapping page, select the Map check box for the database to which you want to grant access.
Select the db_datareader check box.
Choose OK.
If you're also using Analysis Services, see the next section for information about how to set up access to Analysis Services data sources. If you're not using Analysis Services, skip ahead to Set up a data refresh schedule in Power Pivot for SharePoint.
Use an Analysis Services data source
If you're using Analysis Services, you'll need to make sure that your data access account is a member of the proper Analysis Services role and that the role has read access to the Analysis Services cube.
To set read permission on an Analysis Services cube
In SQL Server Management Studio, connect to Analysis Services.
Expand Databases, and expand the database to which you want to grant access.
Right-click Roles, and then choose New Role.
Type a name for the role.
On the Membership page:
Choose Add.
Type your unattended data refresh account, and then choose OK.
On the Cubes page, select Read access for the cubes to which you want to grant access.
Choose OK.
Set up a data refresh schedule in Power Pivot for SharePoint
Now that everything is configured, we can set up the refresh schedule and other settings in Power Pivot for SharePoint. We'll start by building a test workbook with a data model in Excel and publishing it to a document library in a site collection where Power Pivot for SharePoint is enabled. Then, we can set the refresh schedule.
To create a test workbook
In Excel, on the Data tab, choose From Other Sources, and then choose From SQL Server.
Type the name of the instance of SQL Server where your data resides.
Follow the wizard through to connect to the table that contains your data.
When the wizard completes, you should see the Import Data dialog. Choose the Only Create Connection option, and then select the Add this data to the Data Model check box.
Choose OK.
On the Power Pivot tab, choose Manage.
On the Power Pivot ribbon, choose PivotTable.
On the Insert Pivot dialog, choose the Existing Worksheet option, and then choose OK.
Select the fields that you want in the PivotTable report.
Save the workbook to a document library on the site collection where you enabled Power Pivot.
Now that the workbook has been saved to a SharePoint document library, let's configure the refresh settings.
To configure refresh settings for a workbook
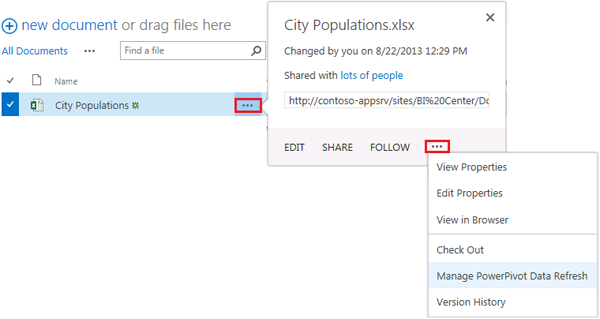
In the document library where your Excel workbook is stored, choose the ellipsis (...) control twice, and then choose Manage Power Pivot Data Refresh.

On the Manage Data Refresh page, select the Enable check box.
In the Schedule Details section, choose the schedule options that you want for refreshing the data in this workbook.
Optionally, if you want the workbook to refresh right away, select the Also refresh as soon as possible check box.
In the Credentials section, choose the Use the data refresh account configured by the administrator option.
Choose OK.
You can test if data refresh is working properly by making some changes to your data, and then setting the workbook to refresh right away by using the Also refresh as soon as possible option.