Note
Access to this page requires authorization. You can try signing in or changing directories.
Access to this page requires authorization. You can try changing directories.
The quickstart and tutorial articles focus on building applications that use the MIP SDK libraries and APIs. This article shows you how to set up and configure your Microsoft 365 subscription and client workstation before you use the SDK.
Prerequisites
Review the following topics before getting started:
Important
To honor user privacy, you must ask the user to consent before enabling automatic logging. The following example is a standard message Microsoft uses for logging notification:
By turning on error and performance logging, you agree to send error and performance data to Microsoft. Microsoft collects error and performance data over the internet (“Data”). Microsoft uses this Data to provide and improve the quality, security, and integrity of Microsoft products and services. For example, Microsoft analyzes performance and reliability, such as what features you use, how quickly the features respond, device performance, user interface interactions, and any problems you experience with the product. Data also includes information about the configuration of your software like the software you're currently running, and the IP address.
Sign up for an Office 365 subscription
Many of the SDK samples require access to an Office 365 subscription. Sign up for one of the following subscription types:
| Name | Sign-up |
|---|---|
| Office 365 Enterprise E3 Trial (30-day free trial) | https://go.microsoft.com/fwlink/p/?LinkID=403802 |
| Office 365 Enterprise E3 or E5 | https://www.microsoft.com/microsoft-365/enterprise/office-365-e3 |
| Enterprise Mobility and Security E3 or E5 | https://www.microsoft.com/security |
| Azure Information Protection Premium P1 or P2 | Microsoft 365 licensing guidance for security & compliance |
| Microsoft 365 E3, E5, or F1 | https://www.microsoft.com/microsoft-365/enterprise/microsoft365-plans-and-pricing |
Note
Azure Information Protection Premium P1 or P2 are no longer included as standalone offers. You can purchase them as part of Microsoft 365 E3 or E5, or Enterprise Mobility and Security E3 or E5.
Configure sensitivity labels
If you're currently using legacy label configurations, you must migrate your labels to Microsoft Purview. For more information on the process, see Create and configure sensitivity labels and their policies.
Configure your client workstation
Next, complete the following steps to set up and configure your client computer correctly.
If you're using a Windows 10 workstation:
Use Windows Update to update your machine to Windows 10 Fall Creators Update (version 1709) or later. To verify your current version:
- Select the Windows icon in the lower left.
- Type About your PC and press Enter.
- Scroll down to Windows specifications and look under Version.
If you're using a Windows 11 or Windows 10 workstation:
Turn on Developer Mode on your workstation:
- Select the Windows icon in the lower left.
- Type Use developer features, and press Enter when the Use developer features item appears.
- On the Settings dialog, on the For developers tab, under Use developer features, select the Developer mode option.
- Close the Settings dialog.
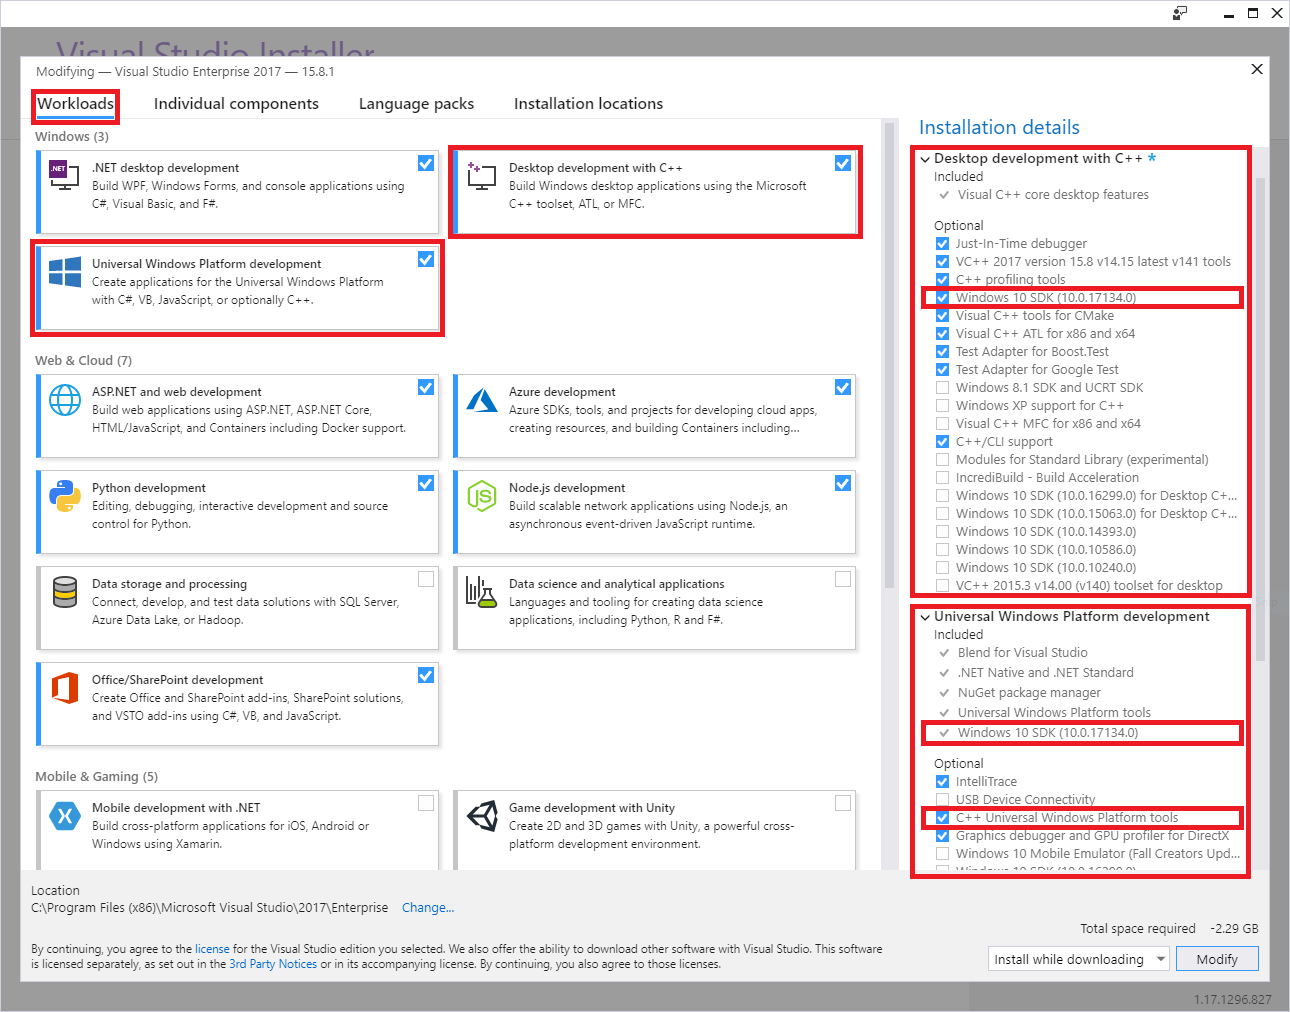
Install Visual Studio 2022, with the following workloads and optional components:
Universal Windows Platform development Windows workload, plus the following optional components:
- C++ Universal Windows Platform tools
- Windows 10 SDK 10.0.16299.0 SDK or later, if not included by default
Desktop development with C++ Windows workload, plus the following optional components:
- Windows 10 SDK 10.0.16299.0 SDK or later, if not included by default
Install the MSAL.PS PowerShell Module:
Because installation requires administrator rights, use one of these options:
- Sign in to your computer with an account that has administrator rights.
- Run the Windows PowerShell session with elevated rights (Run as Administrator).
Run the
Install-Module -Name MSAL.PScmdlet:PS C:\WINDOWS\system32> Install-Module -Name MSAL.PS Untrusted repository You are installing the modules from an untrusted repository. If you trust this repository, change its InstallationPolicy value by running the Set-PSRepository cmdlet. Are you sure you want to install the modules from 'PSGallery'? [Y] Yes [A] Yes to All [N] No [L] No to All [S] Suspend [?] Help (default is "N"): A PS C:\WINDOWS\system32>
Download files:
The MIP SDK is supported on the following platforms, with separate downloads for each supported platform and language:
Operating system Versions Downloads Notes Ubuntu 22.04 C++ tar.gz
Java (Preview) tar.gz
.NET CoreUbuntu 24.04 C++ tar.gz
Java (Preview) tar.gz
.NET CoreRedHat Enterprise Linux 8 and 9 C++ tar.gz Debian 10 and 11 C++ tar.gz macOS All supported versions C++ .zip Xcode development requires 13 or greater. Windows All supported versions, 32/64 bit C++
C++/.NET NuGet
Java (Preview) .zipAndroid 9.0 and later C++ .zip Protection and Policy SDKs only. iOS All supported versions C++ .zip Protection and Policy SDKs only. Tar.gz/.zip downloads
Tar.gz and .zip downloads contain compressed files, one for each API. The compressed files use the following naming convention, where <API> =
file,protection, orupe, and <OS> = the platform:mip_sdk_<API>_<OS>_1.0.0.0.zip (or .tar.gz). For example, the file for Protection SDK binaries and headers on Debian ismip_sdk_protection_debian9_1.0.0.0.tar.gz. Each contained .tar.gz/.zip file is split into three directories:- Bins: Compiled binaries for each platform architecture, where applicable.
- Include: Header files (C++).
- Samples: Source code for sample applications.
NuGet packages
If you're doing Visual Studio development, you can also install the SDK by using the NuGet Package Manager Console:
Install-Package Microsoft.InformationProtection.File
Install-Package Microsoft.InformationProtection.Policy
Install-Package Microsoft.InformationProtection.Protection
If you're not using the NuGet package, add the paths of the SDK binaries to the PATH environment variable. The PATH variable lets client applications find dependent binaries (DLLs) at runtime. This step is optional.
If you're using a Windows 11 or Windows 10 workstation:
Select the Windows icon in the lower left.
Type Path, and press Enter when the Edit the system environment variables item appears.
On the System Properties dialog, select Environment Variables.
On the Environment Variables dialog, select the Path variable row under User variables for <user>, then select Edit.
On the Edit environment variable dialog, select New, which creates an editable row. Add a new row for each full path to the
file\bins\debug\amd64,protection\bins\debug\amd64, andupe\bins\debug\amd64subdirectories. The SDK directories are stored in a<API>\bins\<target>\<platform>format, where:- <API> =
file,protection,upe - <target> =
debug,release - <platform> =
amd64(x64),x86, etc.
- <API> =
When you finish updating the Path variable, select OK. Then select OK when you return to the Environment Variables dialog.
Download SDK samples from GitHub. This step is optional.
- If you don't have one already, first create a GitHub profile.
- Install the latest version of Software Freedom Conservancy's Git client tools (Git Bash).
- By using Git Bash, download the samples of interest:
- Use the following query to view the repositories: Azure-Samples MipSdk repositories.
- In Git Bash, use
git clone https://github.com/azure-samples/<repo-name>to download each sample repository.
Register a client application with Microsoft Entra ID
As part of the Microsoft 365 subscription provisioning process, Microsoft creates an associated Microsoft Entra tenant. The Microsoft Entra tenant provides identity and access management for Microsoft 365 user accounts and application accounts. Applications that require access to secured APIs (such as MIP APIs) require an application account.
For authentication and authorization at runtime, a security principal represents an account and derives from the account's identity information. Security principals that represent an application account are called service principals.
To register an application account in Microsoft Entra ID for use with the quickstarts and MIP SDK samples:
Important
To access Microsoft Entra tenant management for account creation, sign in to the Azure portal with a user account that's a member of the Owner role on the subscription. Depending on the configuration of your tenant, you might also need to be a member of the Global Administrator directory role to register an application. Test with a restricted account. Give the account only the rights that it needs to access the necessary SCC endpoints. Logging systems might collect cleartext passwords passed through the command line.
Follow the steps in the Register a new application section. For testing purposes, use the following values for the given properties as you go through the guide steps:
- Supported account types - Select Accounts in this organizational directory only.
- Redirect URI - Set the redirect URI type to Public client (mobile & desktop). If your application uses the Microsoft Authentication Library (MSAL), use
http://localhost. Otherwise, use something in the format<app-name>://authorize.
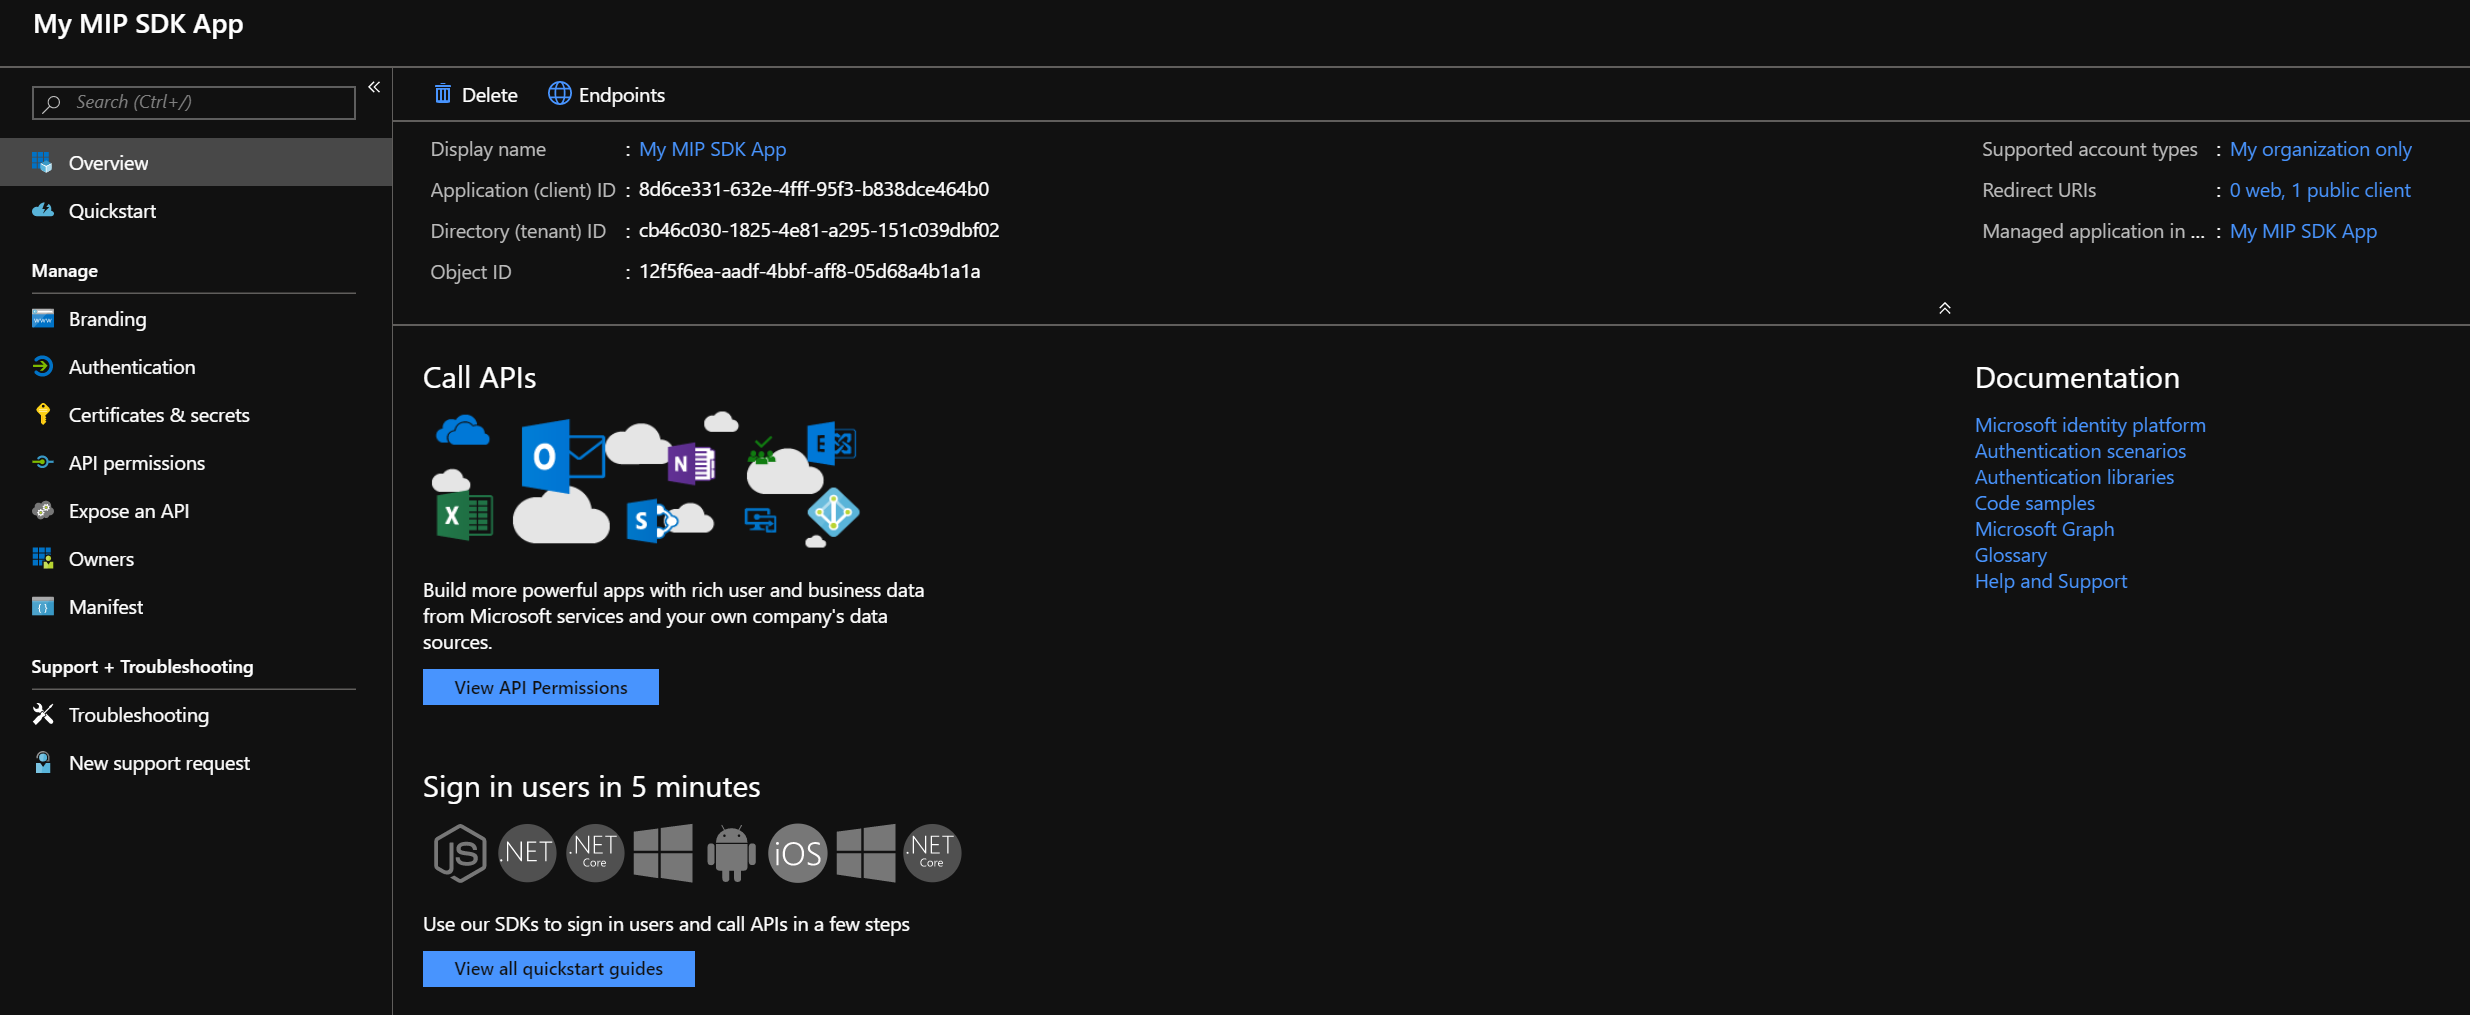
When finished, you return to the Registered app page for your new application registration. Copy and save the GUID in the Application (client) ID field, as you need it for the quickstarts.
Select API permissions to add the APIs and permissions that the client needs to access. Select Add a permission to open the Request API permissions pane.
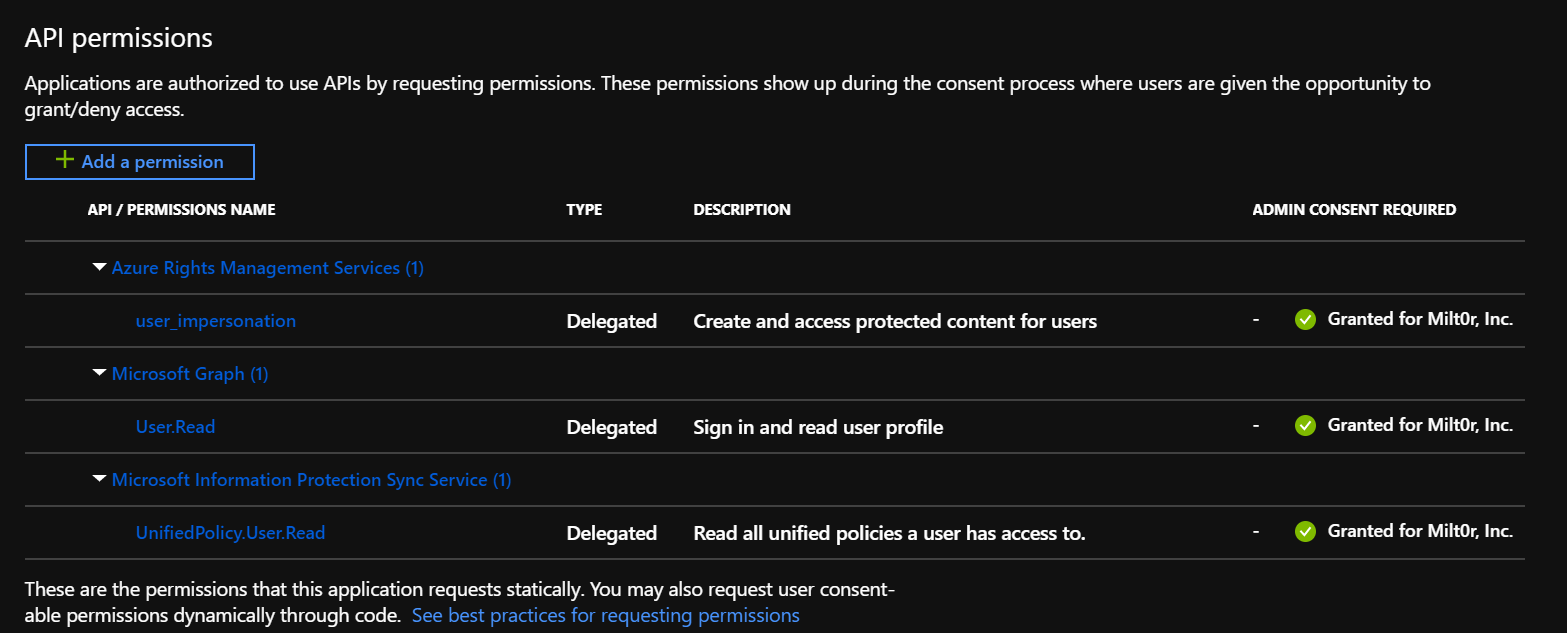
Add the MIP APIs and permissions that the application requires at runtime:
- On the Select an API page, select Azure Rights Management Services.
- On the Azure Rights Management Services API page, select Delegated permissions.
- In the Select permissions section, select the user_impersonation permission. This right lets the application create and access protected content on behalf of a user.
- Select Add permissions to save.
Repeat step 4, but this time when you get to the Select an API page, search for the API.
- On the Select an API page, select APIs my organization uses. Then in the search box, type Microsoft Information Protection Sync Service, and select it.
- On the Microsoft Information Protection Sync Service API page, select Delegated permissions.
- Expand the UnifiedPolicy node, and select UnifiedPolicy.User.Read.
- Select Add permissions to save.
When you're back on the API permissions page, select Grant admin consent for (Tenant Name), then Yes. This step gives pre-consent to the application that uses this registration to access the APIs under the specified permissions. If you signed in as a global administrator, consent is recorded for all users in the tenant that run the application. Otherwise, it applies only to your user account.
When finished, application registration and API permissions should look similar to the following examples:
For more information about adding the APIs and permissions needed by a client application, see Configure a client application to access web APIs.
Request an Information Protection Integration Agreement (IPIA)
Before you release an application developed with MIP to the public, you must apply for and complete a formal agreement with Microsoft.
Note
You don't need this agreement for applications intended only for internal use.
Obtain your IPIA by sending an email to IPIA@microsoft.com with the following information:
Subject: Requesting IPIA for Company Name
In the body of the email, include:
- Application and product name
- First and last name of the requester
- Email address of the requester
After Microsoft receives your IPIA request, Microsoft sends you a form as a Word document. Review the terms and conditions of the IPIA, and return the form to IPIA@microsoft.com with the following information:
- Legal name of the company
- State/province (US/Canada) or country/region of incorporation
- Company URL
- Email address of the contact person
- Other addresses of the company (optional)
- Name of the company application
- Brief description of the application
- Azure Tenant ID
- App ID for the application
- Company contacts, email, and phone for critical situation correspondence
After Microsoft receives your form, Microsoft sends you the final IPIA link to digitally sign. After you sign, the appropriate Microsoft representative signs the agreement.
Already have a signed IPIA?
If you already have a signed IPIA and want to add a new App ID for an application you're releasing, send an email to IPIA@microsoft.com and provide the following information:
- Name of the company application
- Brief description of the application
- Azure Tenant ID (even if the same one as before)
- App ID for the application
- Company contacts, email, and phone for critical situation correspondence
After you send the email, wait up to 72 hours for an acknowledgment of receipt.
Ensure your app has the required dependencies
Applications built with the MIP SDK on Windows require the Visual C++ Runtime component if it isn't already installed:
- Microsoft Visual C++ Redistributable for Visual Studio 2022 with MSVC 14.44 or higher
These dependencies only work if you build the application as Release. If you build the application as Debug, include the Visual C++ runtime debug DLLs with the application or install them on the machine.
Applications built with the MIP SDK on Linux require supported versions of these dependencies:
- curl
- libsecret
- OpenSSL libssl core library
- UUID
- GMIME for apps using the file SDK
- Libgsf for apps using the file SDK
The binaries include a samples folder with a how-to-build-and-run.txt file that contains commands to install the required dependencies for each OS.
Next steps
- If you're a C++ developer.
- Read Observers concepts before you start the quickstart section to learn about the asynchronous nature of the C++ APIs.
- To get experience with the SDK, start with Quickstart: Client application initialization (C++).
- If you're a C# developer, start with Quickstart: Client application initialization (C#).