Nóta
Aðgangur að þessari síðu krefst heimildar. Þú getur prófað aðskrá þig inn eða breyta skráasöfnum.
Aðgangur að þessari síðu krefst heimildar. Þú getur prófað að breyta skráasöfnum.
This tutorial shows you how to configure a function app using Microsoft Entra identities instead of secrets or connection strings, where possible. Using identities helps you avoid accidentally leaking sensitive secrets and can provide better visibility into how data is accessed. To learn more about identity-based connections, see configure an identity-based connection.
While the procedures shown work generally for all languages, this tutorial currently supports C# class library functions on Windows specifically.
In this tutorial, you learn how to:
- Create a function app in Azure using an ARM template
- Enable both system-assigned and user-assigned managed identities on the function app
- Create role assignments that give permissions to other resources
- Move secrets that can't be replaced with identities into Azure Key Vault
- Configure an app to connect to the default host storage using its managed identity
After you complete this tutorial, you should complete the follow-on tutorial that shows how to use identity-based connections instead of secrets with triggers and bindings.
Prerequisites
- An Azure account with an active subscription. Create an account for free.
Why use identity?
Managing secrets and credentials is a common challenge for teams of all sizes. Secrets need to be secured against theft or accidental disclosure, and they might need to be periodically rotated. Many Azure services allow you to instead use an identity in Microsoft Entra ID to authenticate clients and check against permissions, which can be modified and revoked quickly. Doing so allows for greater control over application security with less operational overhead. An identity could be a human user, such as the developer of an application, or a running application in Azure with a managed identity.
Because some services don't support Microsoft Entra authentication, your applications might still require secrets in certain cases. However, these secrets can be stored in Azure Key Vault, which helps simplify the management lifecycle for your secrets. Access to a key vault is also controlled with identities.
By understanding how to use identities instead of secrets when you can, and to use Key Vault when you can't, you reduce risk, decrease operational overhead, and generally improve the security posture for your applications.
Create a function app that uses Key Vault for necessary secrets
Azure Files is an example of a service that doesn't yet support Microsoft Entra authentication for Server Message Block (SMB) file shares. Azure Files is the default file system for Windows deployments on Premium and Consumption plans. While we could remove Azure Files entirely, doing so introduces limitations you might not want. Instead, you move the Azure Files connection string into Azure Key Vault. That way it's centrally managed, with access controlled by the identity.
Create an Azure Key Vault
First you need a key vault to store secrets in. You configure it to use Azure role-based access control (RBAC) for determining who can read secrets from the vault.
In the Azure portal, choose Create a resource (+).
On the Create a resource page, select Security > Key Vault.
On the Basics page, use the following table to configure the key vault.
Option Suggested value Description Subscription Your subscription Subscription under which this new function app is created. Resource Group myResourceGroup Name for the new resource group where you create your function app. Key vault name Globally unique name Name that identifies your new key vault. The vault name must only contain alphanumeric characters and dashes and can't start with a number. Pricing Tier Standard Options for billing. Standard is sufficient for this tutorial. Region Preferred region Choose a region near you or near other services that your functions access. Use the default selections for the "Recovery options" sections.
Make a note of the name you used, for use later.
Select Next: Access Policy to navigate to the Access Policy tab.
Under Permission model, choose Azure role-based access control
Select Review + create. Review the configuration, and then select Create.
Set up an identity and permissions for the app
In order to use Azure Key Vault, your app needs to have an identity that can be granted permission to read secrets. This app uses a user-assigned identity so that the permissions can be set up before the app is even created. For more information about managed identities for Azure Functions, see How to use managed identities in Azure Functions.
In the Azure portal, choose Create a resource (+).
On the Create a resource page, select Identity > User Assigned Managed Identity.
On the Basics page, use the following table to configure the identity.
Option Suggested value Description Subscription Your subscription Subscription under which this new function app is created. Resource Group myResourceGroup Name for the new resource group where you create your function app. Region Preferred region Choose a region near you or near other services that your functions access. Name Globally unique name Name that identifies your new user-assigned identity. Select Review + create. Review the configuration, and then select Create.
When the identity is created, navigate to it in the portal. Select Properties, and make note of the Resource ID for use later.
Select Azure Role Assignments, and select Add role assignment (Preview).
In the Add role assignment (Preview) page, use options as shown in the following table.
Option Suggested value Description Scope Key Vault Scope is a set of resources that the role assignment applies to. Scope has levels that are inherited at lower levels. For example, if you select a subscription scope, the role assignment applies to all resource groups and resources in the subscription. Subscription Your subscription Subscription under which this new function app is created. Resource Your key vault The key vault you created earlier. Role Key Vault Secrets User A role is a collection of permissions that are being granted. Key Vault Secrets User gives permission for the identity to read secret values from the vault. Select Save. It might take a minute or two for the role to show up when you refresh the role assignments list for the identity.
The identity is now able to read secrets stored in the key vault. Later in the tutorial, you add additional role assignments for different purposes.
Generate a template for creating a function app
Because the portal experience for creating a function app doesn't interact with Azure Key Vault, you need to generate and edit an Azure Resource Manager template. You can then use this template to create your function app referencing the Azure Files connection string from your key vault.
Important
Don't create the function app until after you edit the ARM template. The Azure Files configuration needs to be set up at app creation time.
In the Azure portal, choose Create a resource (+).
On the Create a resource page, select Compute > Function App.
On the Basics page, use the following table to configure the function app.
Option Suggested value Description Subscription Your subscription Subscription under which this new function app is created. Resource Group myResourceGroup Name for the new resource group where you create your function app. Function App name Globally unique name Name that identifies your new function app. Valid characters are a-z(case insensitive),0-9, and-.Publish Code Choose to publish code files or a Docker container. Runtime stack .NET This tutorial uses .NET. Region Preferred region Choose a region near you or near other services that your functions access. Select Review + create. Your app uses the default values on the Hosting and Monitoring page. Review the default options, which are included in the ARM template that you generate.
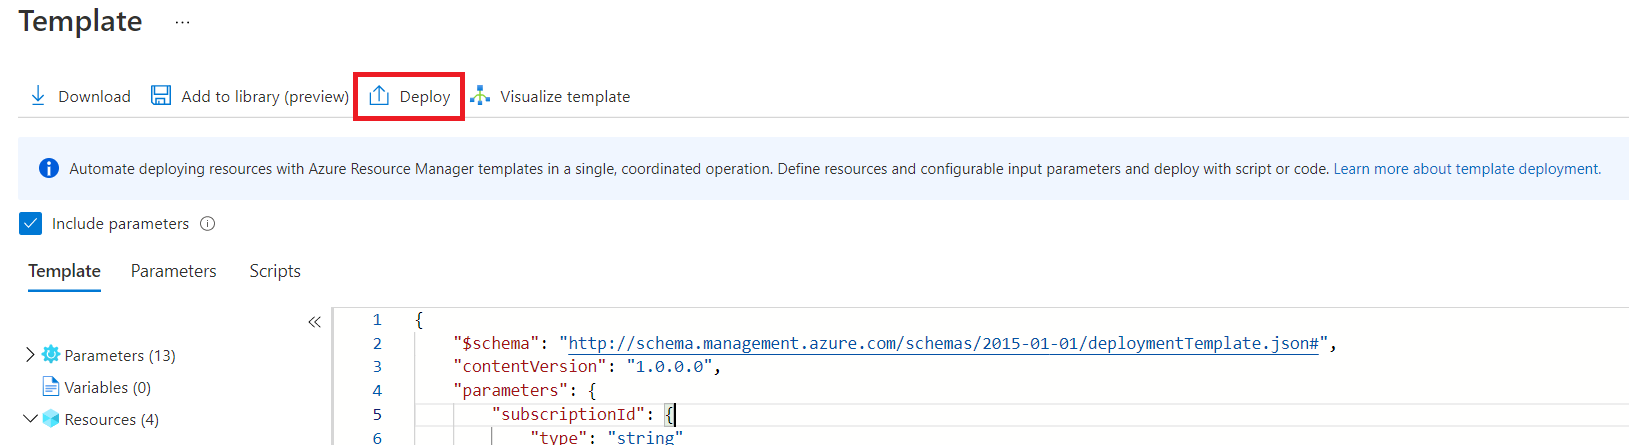
Instead of creating your function app here, choose Download a template for automation, which is to the right of the Next button.
In the template page, select Deploy, then in the Custom deployment page, select Edit template.
Edit the template
You now edit the template to store the Azure Files connection string in Key Vault and allow your function app to reference it. Make sure that you have the following values from the earlier sections before proceeding:
- The resource ID of the user-assigned identity
- The name of your key vault
Note
If you were to create a full template for automation, you would want to include definitions for the identity and role assignment resources, with the appropriate dependsOn clauses. This would replace the earlier steps which used the portal. Consult the Azure Resource Manager guidance and the documentation for each service.
In the editor, find where the
resourcesarray begins. Before the function app definition, add the following section, which puts the Azure Files connection string into Key Vault. Substitute "VAULT_NAME" with the name of your key vault.{ "type": "Microsoft.KeyVault/vaults/secrets", "apiVersion": "2016-10-01", "name": "VAULT_NAME/azurefilesconnectionstring", "properties": { "value": "[concat('DefaultEndpointsProtocol=https;AccountName=',parameters('storageAccountName'),';AccountKey=',listKeys(resourceId('Microsoft.Storage/storageAccounts', parameters('storageAccountName')), '2019-06-01').keys[0].value,';EndpointSuffix=','core.windows.net')]" }, "dependsOn": [ "[concat('Microsoft.Storage/storageAccounts/', parameters('storageAccountName'))]" ] },In the definition for the function app resource (which has
typeset toMicrosoft.Web/sites), addMicrosoft.KeyVault/vaults/VAULT_NAME/secrets/azurefilesconnectionstringto thedependsOnarray. Again, substitute "VAULT_NAME" with the name of your key vault. Doing so prevents your app from being created before the secret is defined. ThedependsOnarray should look like the following example:{ "type": "Microsoft.Web/sites", "apiVersion": "2018-11-01", "name": "[parameters('name')]", "location": "[parameters('location')]", "tags": null, "dependsOn": [ "microsoft.insights/components/idcxntut", "Microsoft.KeyVault/vaults/VAULT_NAME/secrets/azurefilesconnectionstring", "[concat('Microsoft.Web/serverfarms/', parameters('hostingPlanName'))]", "[concat('Microsoft.Storage/storageAccounts/', parameters('storageAccountName'))]" ], // ... }Add the
identityblock from the following example into the definition for your function app resource. Substitute "IDENTITY_RESOURCE_ID" for the resource ID of your user-assigned identity.{ "apiVersion": "2018-11-01", "name": "[parameters('name')]", "type": "Microsoft.Web/sites", "kind": "functionapp", "location": "[parameters('location')]", "identity": { "type": "SystemAssigned,UserAssigned", "userAssignedIdentities": { "IDENTITY_RESOURCE_ID": {} } }, "tags": null, // ... }This
identityblock also sets up a system-assigned identity, which you use later in this tutorial.Add the
keyVaultReferenceIdentityproperty to thepropertiesobject for the function app, as in the following example. Substitute "IDENTITY_RESOURCE_ID" for the resource ID of your user-assigned identity.{ // ... "properties": { "name": "[parameters('name')]", "keyVaultReferenceIdentity": "IDENTITY_RESOURCE_ID", // ... } }You need this configuration because an app could have multiple user-assigned identities configured. Whenever you want to use a user-assigned identity, you must specify it with an ID. System-assigned identities don't need to be specified this way, because an app can only ever have one. Many features that use managed identity assume they should use the system-assigned one by default.
Find the JSON objects that define the
WEBSITE_CONTENTAZUREFILECONNECTIONSTRINGapplication setting, which should look like the following example:{ "name": "WEBSITE_CONTENTAZUREFILECONNECTIONSTRING", "value": "[concat('DefaultEndpointsProtocol=https;AccountName=',parameters('storageAccountName'),';AccountKey=',listKeys(resourceId('Microsoft.Storage/storageAccounts', parameters('storageAccountName')), '2019-06-01').keys[0].value,';EndpointSuffix=','core.windows.net')]" },Replace the
valuefield with a reference to the secret as shown in the following example. Substitute "VAULT_NAME" with the name of your key vault.{ "name": "WEBSITE_CONTENTAZUREFILECONNECTIONSTRING", "value": "[concat('@Microsoft.KeyVault(SecretUri=', reference(resourceId('Microsoft.KeyVault/vaults/secrets', 'VAULT_NAME', 'azurefilesconnectionstring')).secretUri, ')')]" },Select Save to save the updated ARM template.
Deploy the modified template
Make sure that your create options, including Resource Group, are still correct and select Review + create.
After your template validates, make a note of your Storage Account Name, since you'll use this account later. Finally, select Create to create your Azure resources and deploy your code to the function app.
After deployment completes, select Go to resource group and then select the new function app.
Congratulations! You've successfully created your function app to reference the Azure Files connection string from Azure Key Vault.
Whenever your app would need to add a reference to a secret, you would just need to define a new application setting pointing to the value stored in Key Vault. For more information, see Key Vault references for Azure Functions.
Tip
The Application Insights connection string and its included instrumentation key are not considered secrets and can be retrieved from App Insights using Reader permissions. You do not need to move them into an Azure Key Vault instance, although you certainly can. If you choose to use Key Vault, your function app must have a managed identity that can be used to securely retrieve the secret using a Key Vault reference in the app settings.
Use managed identity for AzureWebJobsStorage
Next, you use the system-assigned identity you configured in the previous steps for the AzureWebJobsStorage connection. AzureWebJobsStorage is used by the Functions runtime and by several triggers and bindings to coordinate between multiple running instances. It's required for your function app to operate, and like Azure Files, is configured with a connection string by default when you create a new function app.
Grant the system-assigned identity access to the storage account
Similar to the steps you previously followed with the user-assigned identity and your key vault, you now create a role assignment granting the system-assigned identity access to your storage account.
In the Azure portal, navigate to the storage account that was created with your function app earlier.
Select Access Control (IAM). This page is where you can view and configure who has access to the resource.
Select Add and select add role assignment.
Search for Storage Blob Data Owner, select it, and select Next
On the Members tab, under Assign access to, choose Managed Identity
Select Select members to open the Select managed identities panel.
Confirm that the Subscription is the one in which you created the resources earlier.
In the Managed identity selector, choose Function App from the System-assigned managed identity category. The Function App label might have a number in parentheses next to it, indicating the number of apps in the subscription with system-assigned identities.
Your app should appear in a list below the input fields. If you don't see it, you can use the Select box to filter the results with your app's name.
Select your application. It should move down into the Selected members section. Choose Select.
On the Add role assignment screen, select Review + assign. Review the configuration, and then select Review + assign.
Tip
If you intend to use the function app for a blob-triggered function, you will need to repeat these steps for the Storage Account Contributor and Storage Queue Data Contributor roles over the account used by AzureWebJobsStorage. To learn more, see Blob trigger identity-based connections.
Edit the AzureWebJobsStorage configuration
Next you update your function app to use its system-assigned identity when it uses the blob service for host storage.
Important
The AzureWebJobsStorage configuration is used by some triggers and bindings, and those extensions must be able to use identity-based connections, too. Apps that use blob triggers or event hub triggers may need to update those extensions. Because no functions have been defined for this app, there isn't a concern yet. To learn more about this requirement, see Connecting to host storage with an identity.
Similarly, AzureWebJobsStorage is used for deployment artifacts when using server-side build in Linux Consumption. When you enable identity-based connections for AzureWebJobsStorage in Linux Consumption, you will need to deploy via an external deployment package.
In the Azure portal, navigate to your function app.
In your function app, expand Settings, and then select Environment variables.
In the App settings tab, select the AzureWebJobsStorage app setting, and edit it according to the following table:
Option Suggested value Description Name AzureWebJobsStorage__accountName Change the name from AzureWebJobsStorage to the exact name AzureWebJobsStorage__accountName. This setting instructs the host to use the identity instead of searching for a stored secret. The new setting uses a double underscore (__), which is a special character in application settings.Value Your account name Update the name from the connection string to just your StorageAccountName. This configuration tells the system to use an identity to connect to the resource.
Select Apply, and then select Apply and Confirm to save your changes and restart the app function.
You've now removed the storage connection string requirement for AzureWebJobsStorage by configuring your app to instead connect to blobs using managed identities.
Note
The __accountName syntax is unique to the AzureWebJobsStorage connection and cannot be used for other storage connections. To learn to define other connections, check the reference for each trigger and binding your app uses.
Next steps
This tutorial showed how to create a function app without storing secrets in its configuration.
Advance to the next tutorial to learn how to use identities in trigger and binding connections.