Set up your Onboarding model-driven app
You can use Power Apps to set up an Onboarding model-driven app. The process of setting up the app involves the following steps:
2. Define the business scenario
3. Configure your app settings
4. Create security roles for your model-driven app based on entity mapping
5. Add components to your model-driven app and configure them
7. Include additional Power Apps components (optional)
1. Create a model-driven app
Using Power Apps, create a model-driven application and a sitemap. For more information, go to Power Apps model-driven apps documentation.
In the Application table, create a form.
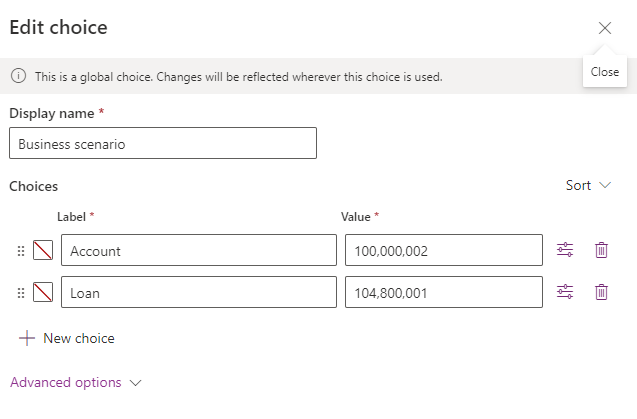
2. Define the business scenario
A business scenario describes the app-created subject matter and the applications to handle within the app.
The following steps provide an example of the Open a bank account onboarding app:
Sign in to Power Apps.
Go to Choices, and select Business scenario. Edit the choice as specified in the following image:

3. Configure your app settings
Configure your app settings to enable the queue to link to the relevant business scenario and the tasks to link to the relevant stage within the business scenario.
Sign in to Power Apps, select Solutions from the left navigation pane, and select your solution.
Select Add Existing > More > Setting

- Select Add to add a setting for the associated business scenario.

Add the business scenario value from the option set to the setting of the model-driven app.
The following image shows an example of the app value setting:

The following image shows an example of the business scenario value:
4. Create security roles for your model-driven app based on entity mapping
The out-of-the-box security role is the Onboarding agent. Therefore, you must create the security role with these permissions and additional permissions for the extended data model entities.
5. Add components to your model-driven app and configure them
This process involves adding and configuring the key components for your model-driven app. The components are based on the Onboarding essentials components and out-of-the-box Power platform components.
The business admin can decide which component to configure in the Onboarding app. There are prerequisites that the business admin must consider when adding and configuring certain components.
5 a. Set up the key parameters in the header of the main form
As part of the configuration process, you must set up the key parameters to display in the header of your app's main form. The data for display must be taken from the core application entity. If the relevant data for display is part of the extended application table, you can define the four attributes also in the application table and create a workflow that updates the key parameters from the extended Application table to the core Application table.
5 b. Configure a business process flow
You can add a business process workflow (BPF) to the Onboarding application. For example in the Bank account opening scenario, the process can contains a verification stage and the completion stage.
To connect the application record in the application table to the relevant MDA and BPF, you need to set the configuration table, which is solution-aware. To update the configuration table, follow these steps:
Sign into Power Apps, select Solutions from the left navigation pane, and select your solution.
Select New.
Select More > Other.
Select Onboarding scenario definition.

The definition table includes the following columns:
Business scenario: The global option set.
Business process flow: A lookup to all the process in the environment.
Note
You can set only one BPF to a business scenario and a model-driven application.

Note
You need to define a BPF to embed the Application queue and Application task manager components. For more information on the BPF configuration steps, go to Tutorial: Create a business process flow.
We recommend using the business rules to lock the application data according to the different stages in the business process flow: Lock stages BPF - model-driven app.
Configure the application setting
Link the business scenario to the relevant BPF. Each business scenario can be linked to only one BPF. This connection is required and essential for the Application queue display and the Application task manager.
a. Add a new record to the Onboarding scenario definition table (msfsi_onboardingscenariodefinition) and save it. The table is solution-aware.
b. In Power Apps, for the selected solution, go to New > More > Other > Onboarding scenario definition.
c. Set the value of the business scenario and the BPF.
Configure the app setting.
a. Add the app setting to your solution.
b. Insert the value of the business scenario.
c. Republish the app.
5 c. Embed the Customer snapshot control component
The Customer snapshot control component (CustomerSnapshotControl) allows flexibility in determining the entity to present and the fields to expose. For the Onboarding app, you need to use the Application contact entity. For more information, go to Configure a customer snapshot.
5 d. Configure the Additional applicants grid view
The additional applicants include an out-of-the-box Power Platform grid view that displays the applicant's name and role. The Onboarding agent can view the additional parties on top of the primary applicant. Further, the agent can add or remove applicants.
5 e. Embed the Application task progress overview control in your model-driven app
The Task progress overview control summarizes the status of all the grouped application tasks. For more information, go to Configure the Task progress overview control.
5 f. Set up Application task manager and content tabs
Create multiple content tabs and forms to display information as part of the onboarding process. You can link a content tab to a task by using special controls. In addition, configure the Application task manager user interface to display the Tasks tab.
For more information, go to Configure Application task manager.
5 g. Embed Declared assets and liabilities
You can add the Declared assets and liabilities component to your model-driven app, if necessary. For more information, go to Embed Declared assets and liabilities.
5 h. Embed Declared income and expense
You can add the Declared income and expense component to your model-driven app, if necessary. For more information, go to Embed the Declared income and expense controls.
5 i. Set up your Document intelligence controls
You need to configure the Document intelligence management controls and the Document intelligence details controls. For more information, go to Document intelligence controls.
6. Add the application queue
The Application queue is based on the Power platform queue capabilities and enables to display queues that include the Onboarding applications' list, which the Onboarding agents need to handle.
Adding the Application queue requires you to perform the following steps:
Create a view on the queue item
Add custom control properties
Define the application queue attributes to display
For more information, go to Add an Application queue.
7. Include additional Power Apps components (optional)
Depending on your requirements, you can include additional Power Apps components such as audit, timeline, and so on. For more information, go to Set up the timeline control.
See also
Configure Application task manager
Deploy Microsoft Cloud for Financial Services
What is Microsoft Cloud for Financial Services?