Using multimedia files in canvas apps
You can add images, audio and video files to a canvas app. Add video from streaming services such as Microsoft Stream, Azure Media Services, or 3rd party streaming services, such as YouTube. Or use input controls such as Pen Input to collect signatures.
This article walks you through working with multimedia, streaming, and input control scenarios. The data source used in this article is an Excel file in OneDrive for Business.
Prerequisites
Sign up for Power Apps, and then sign in using the same credentials that you used to sign up.
Watch this video to learn how to use multimedia files in canvas apps:
Add media from a file or the cloud
You can choose the kind of media file to add (for example, images, video, or audio). You can add images using the media pane, or using the images control.

Note
When adding media files by URL,
- Use HTTPS to ensure compatibility with modern browsers.
- Ensure the URL is accessible anonymously without any authentication. Try to enter the URL in private browsing mode to verify that it's accessible without signing in.
Add images, audio, or video using the media pane
To use the Media pane to add, remove or use media files in your app:
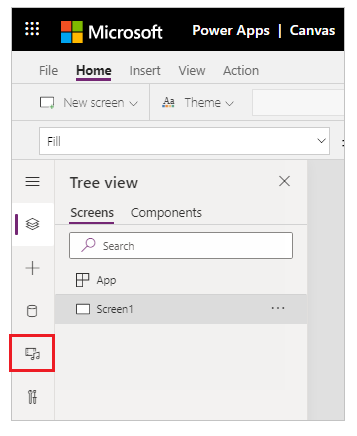
Select Media from the left pane.

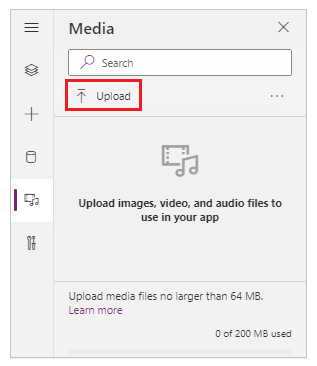
Select Upload from the media panel.

Select the file(s) that you want to add, and then select Open.
Select the file from the media pane to insert into the screen.

Save and publish your app.
Share app with others.
Add images, audio, or video using the controls
To add images, audio or video using the Image, Audio or Video controls:
Select Insert from the top menu.
Select Media drop-down.
Choose from Image, Audio, or Video controls.
For Image control, update the Image property with the image file name, without extension. For Audio or Video control, update the Media property with the file name, or the URL such as YouTube video URL in double quotation marks.
Add media from Azure Media Services
From your Azure Media Services account, upload and publish your video asset from AMS > Settings > Assets.
After the video is published, copy its URL.
From Power Apps, add the Video control from Insert > Media.
Set the Media property to the URL that you copied.
As this graphic shows, you can choose any streaming URL that Azure Media Services supports:

Save and publish your app.
Share app with others.
Add Microsoft Stream media
To learn how to add a Microsoft Stream video control, go to Microsoft Stream video control example.
Add images from the cloud to your app
In this scenario, you save images in a cloud storage account, OneDrive for Business. You use an Excel table to contain the path to the images, and you display the images in a gallery control in your app.
This scenario uses the CreateFirstApp.zip that contains some .jpeg files.
Note
The path to these images in the Excel file must use forward slashes. When Power Apps saves image paths in an Excel table, the path uses backslashes. If you use image paths from such a table, change the paths in the Excel table to use forward slashes instead of backslashes. Otherwise, the images won't display.
Download CreateFirstApp.zip, and extract the Assets folder to your cloud storage account.
Rename the Assets folder to Assets_images.
In an Excel spreadsheet, create a one-column table, and fill it with the following data.

To copy the file path from OneDrive for Business, select a file, and then select Path (Copy direct link) from the details pane on the right side of the screen.
Name the table Jackets, and name the Excel file Assets.xlsx.
In your app, add the Jackets table as a data source.
Optionally, update your app orientation to Landscape.
Select Insert > Gallery, and then select Horizontal.
Optionally, select text field and then the heading field under the first image, and delete them to keep only images on the screen.

If you see a formula error, press Ctrl+Z to undo the delete and then ensure to first delete the Subtitle field and then the Title field.
Set the gallery's Items property of the gallery to
Jackets.
Select the first image in the gallery, and set its Image property to
ThisItem.Images:
The gallery is automatically updated with the images:

When you set the Items property, a column named PowerAppsId is automatically added to the Excel table.
Save and publish your app.
Share app with others.
Upload pen drawings to the cloud
In this scenario, you learn how to upload pen drawings to your data source, OneDrive for Business, and examine how the drawings are stored there.
In Excel, add Image [image] to cell A1.
Create a table using the following steps:
Select cell A1.
On the Insert ribbon, select Table.
In the dialog box, select My table has headers, and then select OK.

Your Excel file is now in a table format. For more information about table formatting in Excel, see Format the data as a table.
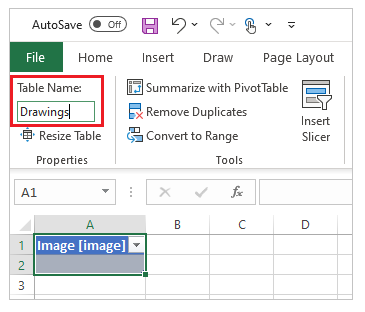
Name the table Drawings:

Save the Excel file to OneDrive for Business as SavePen.xlsx.
In Power Apps, create a blank app with Tablet layout.
In your app, add the OneDrive for Business account as a data source:
Select View menu, and then select Data sources.

Select Add data source, and then select OneDrive for Business.
Select SavePen.xlsx.
Select the Drawings table, and then select Connect.

Now, the Drawings table is listed as a data source.
Select Insert > Input, and then select Pen Input.
Rename the new control MyPen:

On the Insert tab, add a Button control, and set its OnSelect property to this formula:
Patch(Drawings, Defaults(Drawings), {Image:MyPen.Image})

Add a Horizontal gallery control (Insert tab > Gallery).
Optionally, select text field and then the heading field under the first image, and delete them to keep only images on the screen.

If you see a formula error, press Ctrl+Z to undo the delete and then ensure to first delete the Subtitle field and then the Title field.
Set gallery Items property to
Drawings. The Image property of the gallery control is automatically set toThisItem.Image.Arrange the controls so that your screen resembles as shown below:

Press F5, or select Preview (
 ).
).Draw something in MyPen, and then select the button.
The first image in the gallery control displays what you drew.
Add something else to your drawing, and select the button.
The second image in the gallery control displays what you drew.
Close the preview window by pressing Esc.
In your cloud storage account, a SavePen_images folder has been automatically created. This folder contains your saved images with IDs for their file names. To show the folder, you may need to refresh the browser window by, for example, pressing F5.
Note
The folder name may be different if your Excel file name is different. For example, if your file name is Pen.xlsx, the folder name will be Pen_images.
In SavePen.xlsx, the Image column specifies the path to the new images.
Save and publish your app.
Share app with others.
Remove unused media
You can remove all unused media from the app to clean up or reduce the size of the app using Media > Remove unused media option.

Known limitations
- To enable better performance while loading an app, following size restrictions apply:
- The total size of all media files uploaded to an app can't exceed 200 MB.
- Maximum size of an individual media file in an app can't exceed 64 MB.
- Supported media file types:
.jpg, .jpeg, .gif, .png, .bmp, .tif, .tiff, .svg, .wav, .mp3, .mp4. - Cloud-storage known limitations apply when connecting your app with cloud-based storage.