Nota
L'accesso a questa pagina richiede l'autorizzazione. È possibile provare ad accedere o modificare le directory.
L'accesso a questa pagina richiede l'autorizzazione. È possibile provare a modificare le directory.
- Androide
- Cordova
- Ios
- Finestre
- Xamarin.Android
- Xamarin.iOS
- Xamarin.Forms
Informazioni generali
In questa esercitazione si aggiungono notifiche push al progetto di avvio rapido iOS in modo che venga inviata una notifica push al dispositivo ogni volta che viene inserito un record.
Se non si usa il progetto server di avvio rapido scaricato, sarà necessario il pacchetto di estensione per le notifiche push. Per altre informazioni, vedere Usare l'SDK del server back-end .NET per app per dispositivi mobili di Azure .
Il simulatore iOS non supporta le notifiche push. Sono necessari un dispositivo iOS fisico e un'appartenenza a Apple Developer Program.
Configurare l'hub di notifica
La funzionalità App per dispositivi mobili del servizio app di Azure usa Hub di notifica di Azure per inviare push, quindi si configurerà un hub di notifica per l'app per dispositivi mobili.
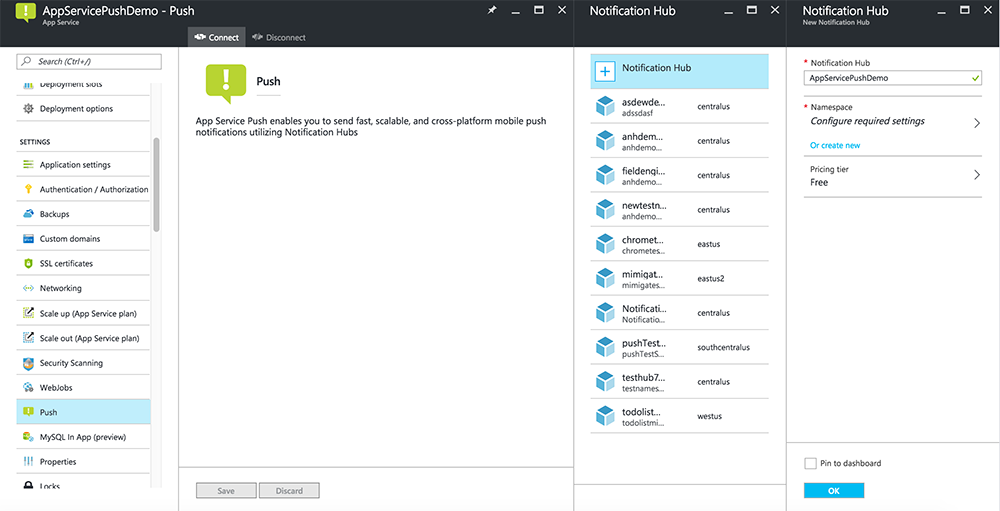
Nel portale di Azure , vai a App servicese quindi seleziona il back-end della tua app. Nelle Impostazioni, selezionare Push.
Per aggiungere una risorsa hub di notifica all'app, selezionare Connetti. È possibile creare un hub o connettersi a un hub esistente.
A questo punto è stato connesso un hub di notifica al progetto back-end di App per dispositivi mobili. Successivamente si configura questo hub di notifica per connettersi a un sistema di notifica della piattaforma (PNS) per eseguire il push nei dispositivi.
Registrare l'app per le notifiche push
- Registrare un ID app per la tua app. Creare un ID app esplicito (non un ID app con caratteri jolly) e, per ID bundle, usare l'ID bundle esatto presente nel progetto quickstart di Xcode. È anche fondamentale selezionare l'opzione notifiche push.
- Successivamente, per preparare la configurazione delle notifiche push, creare un certificato SSL di "Sviluppo" o di "Distribuzione".
Configurare Azure per l'invio di notifiche push
- Sul tuo Mac, avvia Keychain Access. Nella barra di navigazione a sinistra, sotto Categoria, aprire I miei certificati. Trovare il certificato SSL scaricato nella sezione precedente e quindi divulgarne il contenuto. Selezionare solo il certificato (non selezionare la chiave privata). Quindi esportarlo.
- Nel portale di Azure selezionare Esplora tutti i Servizi App>. Selezionare quindi il back-end delle app per dispositivi mobili.
- In Impostazioni, selezionare Push del Servizio App. Selezionare quindi il nome dell'hub di notifica.
- Passare a Apple Push Notification Services>Carica certificato. Caricare il file con estensione .p12, selezionando la modalità corretta (a seconda che il certificato client SSL ottenuto in precedenza sia di produzione o sandbox). Salvare eventuali modifiche.
Il servizio è ora configurato per l'uso delle notifiche push in iOS.
Aggiornare il back-end per inviare notifiche push
Backend .NET (C#):
In Visual Studio fare clic con il pulsante destro del mouse sul progetto server e scegliere Gestisci pacchetti NuGet, cercare
Microsoft.Azure.NotificationHubs, quindi fare clic su Installa. Verrà installata la libreria di Hub di notifica per l'invio di notifiche dal back-end.Nel progetto di Visual Studio del backend apri Controllers>TodoItemController.cs. Nella parte superiore del file aggiungere l'istruzione seguente
using:using Microsoft.Azure.Mobile.Server.Config; using Microsoft.Azure.NotificationHubs;Sostituire il metodo
PostTodoItemcon il codice seguente:public async Task<IHttpActionResult> PostTodoItem(TodoItem item) { TodoItem current = await InsertAsync(item); // Get the settings for the server project. HttpConfiguration config = this.Configuration; MobileAppSettingsDictionary settings = this.Configuration.GetMobileAppSettingsProvider().GetMobileAppSettings(); // Get the Notification Hubs credentials for the Mobile App. string notificationHubName = settings.NotificationHubName; string notificationHubConnection = settings .Connections[MobileAppSettingsKeys.NotificationHubConnectionString].ConnectionString; // Create a new Notification Hub client. NotificationHubClient hub = NotificationHubClient .CreateClientFromConnectionString(notificationHubConnection, notificationHubName); // iOS payload var appleNotificationPayload = "{\"aps\":{\"alert\":\"" + item.Text + "\"}}"; try { // Send the push notification and log the results. var result = await hub.SendAppleNativeNotificationAsync(appleNotificationPayload); // Write the success result to the logs. config.Services.GetTraceWriter().Info(result.State.ToString()); } catch (System.Exception ex) { // Write the failure result to the logs. config.Services.GetTraceWriter() .Error(ex.Message, null, "Push.SendAsync Error"); } return CreatedAtRoute("Tables", new { id = current.Id }, current); }Ripubblica il progetto del server.
Node.js back-end:
Configurare il progetto backend.
Sostituire lo script di tabella todoitem.js con il codice seguente:
var azureMobileApps = require('azure-mobile-apps'),
    promises = require('azure-mobile-apps/src/utilities/promises'),
    logger = require('azure-mobile-apps/src/logger');

var table = azureMobileApps.table();

// When adding record, send a push notification via APNS
table.insert(function (context) {
    // For details of the Notification Hubs JavaScript SDK,
    // see https://aka.ms/nodejshubs
    logger.info('Running TodoItem.insert');

    // Create a payload that contains the new item Text.
    var payload = "{\"aps\":{\"alert\":\"" + context.item.text + "\"}}";

    // Execute the insert; Push as a post-execute action when results are returned as a Promise.
    return context.execute()
        .then(function (results) {
            // Only do the push if configured
            if (context.push) {
                context.push.apns.send(null, payload, function (error) {
                    if (error) {
                        logger.error('Error while sending push notification: ', error);
                    } else {
                        logger.info('Push notification sent successfully!');
                    }
                });
            }
            return results;
        })
        .catch(function (error) {
            logger.error('Error while running context.execute: ', error);
        });
});

module.exports = table;
Quando si modifica il file nel computer locale, ripubblicare il progetto sul server.
Aggiungere notifiche push all'app
Objective-C:
In QSAppDelegate.m importare iOS SDK e QSTodoService.h:
#import <MicrosoftAzureMobile/MicrosoftAzureMobile.h>
#import "QSTodoService.h"
In
didFinishLaunchingWithOptionsin QSAppDelegate.m inserire le righe seguenti subito prima direturn YES;:UIUserNotificationSettings* notificationSettings = [UIUserNotificationSettings settingsForTypes:UIUserNotificationTypeAlert | UIUserNotificationTypeBadge | UIUserNotificationTypeSound categories:nil]; [[UIApplication sharedApplication] registerUserNotificationSettings:notificationSettings]; [[UIApplication sharedApplication] registerForRemoteNotifications];In QSAppDelegate.m aggiungere i metodi del gestore seguenti. L'app è ora aggiornata per supportare le notifiche push.
// Registration with APNs is successful
- (void)application:(UIApplication *)application
didRegisterForRemoteNotificationsWithDeviceToken:(NSData *)deviceToken {

    QSTodoService *todoService = [QSTodoService defaultService];
    MSClient *client = todoService.client;

    [client.push registerDeviceToken:deviceToken completion:^(NSError *error) {
        if (error != nil) {
            NSLog(@"Error registering for notifications: %@", error);
        }
    }];
}

// Handle any failure to register
- (void)application:(UIApplication *)application didFailToRegisterForRemoteNotificationsWithError:
(NSError *)error {
    NSLog(@"Failed to register for remote notifications: %@", error);
}

// Use userInfo in the payload to display an alert.
- (void)application:(UIApplication *)application
        didReceiveRemoteNotification:(NSDictionary *)userInfo {
    NSLog(@"%@", userInfo);

    NSDictionary *apsPayload = userInfo[@"aps"];
    NSString *alertString = apsPayload[@"alert"];

    // Create alert with notification content.
    UIAlertController *alertController = [UIAlertController
                                    alertControllerWithTitle:@"Notification"
                                    message:alertString
                                    preferredStyle:UIAlertControllerStyleAlert];

    UIAlertAction *cancelAction = [UIAlertAction
                                    actionWithTitle:NSLocalizedString(@"Cancel", @"Cancel")
                                    style:UIAlertActionStyleCancel
                                    handler:^(UIAlertAction *action)
                                    {
                                        NSLog(@"Cancel");
                                    }];

    UIAlertAction *okAction = [UIAlertAction
                                actionWithTitle:NSLocalizedString(@"OK", @"OK")
                                style:UIAlertActionStyleDefault
                                handler:^(UIAlertAction *action)
                                {
                                    NSLog(@"OK");
                                }];

    [alertController addAction:cancelAction];
    [alertController addAction:okAction];

    // Get current view controller.
    UIViewController *currentViewController = [[[[UIApplication sharedApplication] delegate] window] rootViewController];
    while (currentViewController.presentedViewController)
    {
        currentViewController = currentViewController.presentedViewController;
    }

    // Display alert.
    [currentViewController presentViewController:alertController animated:YES completion:nil];

}
Swift:
Aggiungere il file ClientManager.swift con il contenuto seguente. Sostituire %AppUrl% con l'URL del back-end dell'app per dispositivi mobili di Azure.
class ClientManager {
    static let sharedClient = MSClient(applicationURLString: "%AppUrl%")
}
In ToDoTableViewController.swift sostituire la
let clientriga che inizializza un oggettoMSClientcon questa riga:let client = ClientManager.sharedClientIn AppDelegate.swift sostituire il corpo di
func applicationcome segue:func application(application: UIApplication, didFinishLaunchingWithOptions launchOptions: [NSObject: AnyObject]?) -> Bool { application.registerUserNotificationSettings( UIUserNotificationSettings(forTypes: [.Alert, .Badge, .Sound], categories: nil)) application.registerForRemoteNotifications() return true }In AppDelegate.swift aggiungere i metodi del gestore seguenti. L'app è ora aggiornata per supportare le notifiche push.
func application(application: UIApplication,
    didRegisterForRemoteNotificationsWithDeviceToken deviceToken: NSData) {
    ClientManager.sharedClient.push?.registerDeviceToken(deviceToken) { error in
        print("Error registering for notifications: ", error?.description)
    }
}

func application(application: UIApplication,
    didFailToRegisterForRemoteNotificationsWithError error: NSError) {
    print("Failed to register for remote notifications: ", error.description)
}

func application(application: UIApplication,
    didReceiveRemoteNotification userInfo: [NSObject: AnyObject]) {

    print(userInfo)

    let apsNotification = userInfo["aps"] as? NSDictionary
    let apsString       = apsNotification?["alert"] as? String

    let alert = UIAlertController(title: "Alert", message: apsString, preferredStyle: .Alert)
    let okAction = UIAlertAction(title: "OK", style: .Default) { _ in
        print("OK")
    }
    let cancelAction = UIAlertAction(title: "Cancel", style: .Default) { _ in
        print("Cancel")
    }

    alert.addAction(okAction)
    alert.addAction(cancelAction)

    var currentViewController = self.window?.rootViewController
    while currentViewController?.presentedViewController != nil {
        currentViewController = currentViewController?.presentedViewController
    }

    currentViewController?.presentViewController(alert, animated: true) {}

}
Notifiche push di test
- In Xcode premere Esegui e avviare l'app in un dispositivo iOS (si noti che il push non funzionerà nei simulatori). Fare clic su OK per accettare le notifiche push; questa richiesta viene eseguita la prima volta che l'app viene eseguita.
- Nell'app aggiungere un nuovo elemento e fare clic su +.
- Verificare che venga ricevuta una notifica, quindi fare clic su OK per ignorare la notifica. Questa esercitazione è stata completata correttamente.
Altri
- I modelli offrono flessibilità per l'invio di push multipiattaforma e push localizzati. Come usare la libreria client iOS per app per dispositivi mobili di Azure illustra come registrare i modelli.