このチュートリアルでは、Azure Web PubSub サービスと Azure Functions を使用して、IoT Hub からのリアルタイム データの視覚化を行うサーバーレス アプリケーションを作成する方法について説明します。
このチュートリアルでは、次の作業を行う方法について説明します。
- サーバーレス データ視覚化アプリを構築する
- Web PubSub 関数の入出力バインドおよび Azure IoT Hub と連携する
- サンプル関数をローカルで実行する
重要
この記事に示す生の接続文字列は、デモンストレーションのみを目的としています。
接続文字列には、アプリケーションが Azure Web PubSub サービスにアクセスするために必要な認可情報が含まれています。 接続文字列内のアクセス キーは、サービスのルート パスワードに似ています。 運用環境では、常にアクセス キーを保護してください。 Azure Key Vault を使ってキーの管理とローテーションを安全に行い、WebPubSubServiceClient を使って接続をセキュリティ保護します。
アクセス キーを他のユーザーに配布したり、ハードコーディングしたり、他のユーザーがアクセスできるプレーンテキストで保存したりしないでください。 キーが侵害された可能性があると思われる場合は、キーをローテーションしてください。
前提条件
コード エディター (Visual Studio Code など)。
Node.js、バージョン 18.x 以上。
メモ
サポートされているバージョンの Node.js の詳細については、Azure Functions ランタイム バージョンのドキュメントを参照してください。
Azure Function アプリをローカルで実行して Azure にデプロイするための Azure Functions Core Tools (v3 以上を推奨)。
Azure リソースを管理するための Azure CLI。
Azure アカウントをお持ちでない場合は、開始する前に無料アカウントを作成してください。
IoT Hub の作成
このセクションでは、Azure CLI を使用して IoT ハブとリソース グループを作成します。 Azure リソース グループとは、Azure リソースのデプロイと管理に使用する論理コンテナーです。 IoT ハブは、IoT アプリケーションとデバイスの間の双方向通信に対する中央メッセージ ハブとして機能します。
Azure サブスクリプションに IoT ハブが既にある場合は、このセクションをスキップできます。
IoT ハブとリソース グループを作成するには、次のようにします。
CLI アプリを起動します。 この記事の以降の部分で CLI コマンドを実行するには、コマンド構文をコピーして CLI アプリに貼り付け、変数の値を編集して
Enterを押します。- Cloud Shell を使用する場合は、CLI コマンドの [Try It](試してみる) ボタンを選択すると、分割されたブラウザー ウィンドウで Cloud Shell が起動します。 また、別のブラウザー タブで Cloud Shell を開くこともできます。
- Azure CLI をローカルで使用している場合は、CLI コンソール アプリを起動し、Azure CLI にサインインします。
az extension add を実行して、azure-iot 拡張機能をインストールするか、最新バージョンにアップグレードします。
az extension add --upgrade --name azure-iotCLI アプリで az group create コマンドを実行してリソース グループを作成します。 次のコマンドは、myResourceGroup という名前のリソース グループを eastus という場所に作成します。
メモ
必要に応じて、別の場所を設定できます。 選択できる場所を確認するには、
az account list-locationsを実行します。 コマンド例を見るとわかるように、このクイックスタートでは eastus を使用しています。az group create --name MyResourceGroup --location eastusaz iot hub create コマンドを実行して、IoT ハブを作成します。 IoT ハブの作成には数分かかることがあります。
YourIoTHubName。 以下のコマンドでは、選択した IoT ハブの名前に合わせて、プレースホルダーとそれを囲む中かっこを置き換えます。 IoT ハブ名は Azure でグローバルに一意である必要があります。 以降、このクイックスタートに出現しているプレースホルダーにはすべて、実際の IoT ハブの名前を使用してください。
az iot hub create --resource-group MyResourceGroup --name {YourIoTHubName}
Web PubSub インスタンスを作成する
Azure サブスクリプションに Web PubSub インスタンスが既にある場合は、このセクションをスキップできます。
az extension add を実行して、webpubsub 拡張機能をインストールするか、最新バージョンにアップグレードします。
az extension add --upgrade --name webpubsub
Azure CLI の az webpubsub create コマンドを使用して、作成したリソース グループに Web PubSub を作成します。 次のコマンドは、EastUS のリソース グループ myResourceGroup の下に "無料の" Web PubSub リソースを作成します。
重要
Web PubSub リソースには、それぞれ一意の名前を付ける必要があります。 次の例では、<your-unique-resource-name> をお使いの Web PubSub の名前に置き換えてください。
az webpubsub create --name "<your-unique-resource-name>" --resource-group "myResourceGroup" --location "EastUS" --sku Free_F1
このコマンドの出力では、新しく作成したリソースのプロパティが表示されます。 次の 2 つのプロパティをメモしておきます。
-
Resource Name: 上記の
--nameパラメーターに指定した名前です。 -
hostName: この例では、ホスト名は
<your-unique-resource-name>.webpubsub.azure.com/です。
この時点で、お使いの Azure アカウントのみが、この新しいリソースで任意の操作を実行することを許可されています。
関数をローカルで作成して実行する
プロジェクト用の空のフォルダーを作成し、新しいフォルダーで次のコマンドを実行します。
func init --worker-runtime javascript --model V4クライアントの静的 Web ページを読み取ってホストする
index関数を作成します。func new -n index -t HttpTriggersrc/functions/index.jsを、HTML コンテンツを静的サイトとして提供する次のコードで更新します。const { app } = require('@azure/functions'); const { readFile } = require('fs/promises'); app.http('index', { methods: ['GET', 'POST'], authLevel: 'anonymous', handler: async (context) => { const content = await readFile('index.html', 'utf8', (err, data) => { if (err) { context.err(err) return } }); return { status: 200, headers: { 'Content-Type': 'text/html' }, body: content, }; } });ルート フォルダーに
index.htmlファイルを作成します。<!doctype html> <html lang="en"> <head> <!-- Required meta tags --> <meta charset="utf-8"> <meta name="viewport" content="width=device-width, initial-scale=1, shrink-to-fit=no"> <script src="https://cdn.jsdelivr.net/npm/chart.js@2.8.0/dist/Chart.min.js" type="text/javascript" charset="utf-8"></script> <script> document.addEventListener("DOMContentLoaded", async function (event) { const res = await fetch(`/api/negotiate?id=${1}`); const data = await res.json(); const webSocket = new WebSocket(data.url); class TrackedDevices { constructor() { // key as the deviceId, value as the temperature array this.devices = new Map(); this.maxLen = 50; this.timeData = new Array(this.maxLen); } // Find a device temperature based on its Id findDevice(deviceId) { return this.devices.get(deviceId); } addData(time, temperature, deviceId, dataSet, options) { let containsDeviceId = false; this.timeData.push(time); for (const [key, value] of this.devices) { if (key === deviceId) { containsDeviceId = true; value.push(temperature); } else { value.push(null); } } if (!containsDeviceId) { const data = getRandomDataSet(deviceId, 0); let temperatures = new Array(this.maxLen); temperatures.push(temperature); this.devices.set(deviceId, temperatures); data.data = temperatures; dataSet.push(data); } if (this.timeData.length > this.maxLen) { this.timeData.shift(); this.devices.forEach((value, key) => { value.shift(); }) } } getDevicesCount() { return this.devices.size; } } const trackedDevices = new TrackedDevices(); function getRandom(max) { return Math.floor((Math.random() * max) + 1) } function getRandomDataSet(id, axisId) { return getDataSet(id, axisId, getRandom(255), getRandom(255), getRandom(255)); } function getDataSet(id, axisId, r, g, b) { return { fill: false, label: id, yAxisID: axisId, borderColor: `rgba(${r}, ${g}, ${b}, 1)`, pointBoarderColor: `rgba(${r}, ${g}, ${b}, 1)`, backgroundColor: `rgba(${r}, ${g}, ${b}, 0.4)`, pointHoverBackgroundColor: `rgba(${r}, ${g}, ${b}, 1)`, pointHoverBorderColor: `rgba(${r}, ${g}, ${b}, 1)`, spanGaps: true, }; } function getYAxy(id, display) { return { id: id, type: "linear", scaleLabel: { labelString: display || id, display: true, }, position: "left", }; } // Define the chart axes const chartData = { datasets: [], }; // Temperature (ºC), id as 0 const chartOptions = { responsive: true, animation: { duration: 250 * 1.5, easing: 'linear' }, scales: { yAxes: [ getYAxy(0, "Temperature (ºC)"), ], }, }; // Get the context of the canvas element we want to select const ctx = document.getElementById("chart").getContext("2d"); chartData.labels = trackedDevices.timeData; const chart = new Chart(ctx, { type: "line", data: chartData, options: chartOptions, }); webSocket.onmessage = function onMessage(message) { try { const messageData = JSON.parse(message.data); console.log(messageData); // time and either temperature or humidity are required if (!messageData.MessageDate || !messageData.IotData.temperature) { return; } trackedDevices.addData(messageData.MessageDate, messageData.IotData.temperature, messageData.DeviceId, chartData.datasets, chartOptions.scales); const numDevices = trackedDevices.getDevicesCount(); document.getElementById("deviceCount").innerText = numDevices === 1 ? `${numDevices} device` : `${numDevices} devices`; chart.update(); } catch (err) { console.error(err); } }; }); </script> <style> body { font: 14px "Lucida Grande", Helvetica, Arial, sans-serif; padding: 50px; margin: 0; text-align: center; } .flexHeader { display: flex; flex-direction: row; flex-wrap: nowrap; justify-content: space-between; } #charts { display: flex; flex-direction: row; flex-wrap: wrap; justify-content: space-around; align-content: stretch; } .chartContainer { flex: 1; flex-basis: 40%; min-width: 30%; max-width: 100%; } a { color: #00B7FF; } </style> <title>Temperature Real-time Data</title> </head> <body> <h1 class="flexHeader"> <span>Temperature Real-time Data</span> <span id="deviceCount">0 devices</span> </h1> <div id="charts"> <canvas id="chart"></canvas> </div> </body> </html>クライアントがサービス接続 URL とアクセス トークンを取得するために使用する
negotiate関数を作成します。func new -n negotiate -t HttpTrigger生成されたトークンを含む
src/functions/negotiate.jsを使うようにWebPubSubConnectionを更新します。const { app, input } = require('@azure/functions'); const connection = input.generic({ type: 'webPubSubConnection', name: 'connection', hub: '%hubName%' }); app.http('negotiate', { methods: ['GET', 'POST'], authLevel: 'anonymous', extraInputs: [connection], handler: async (request, context) => { return { body: JSON.stringify(context.extraInputs.get('connection')) }; }, });messagehandlerテンプレート を使用して、通知を生成する"IoT Hub (Event Hub)"関数を作成します。この記事に示す生の接続文字列は、デモンストレーションのみを目的としています。 運用環境では、常にアクセス キーを保護してください。 Azure Key Vault を使ってキーの管理とローテーションを安全に行い、
WebPubSubServiceClientを使って接続をセキュリティ保護します。func new --template "Azure Event Hub trigger" --name messagehandlersrc/functions/messagehandler.jsを更新し、次の json コードを使って Web PubSub 出力バインドを追加します。 IoT eventHubName と Web PubSub ハブの両方のハブ名として変数%hubName%を使用しています。const { app, output } = require('@azure/functions'); const wpsAction = output.generic({ type: 'webPubSub', name: 'action', hub: '%hubName%' }); app.eventHub('messagehandler', { connection: 'IOTHUBConnectionString', eventHubName: '%hubName%', cardinality: 'many', extraOutputs: [wpsAction], handler: (messages, context) => { var actions = []; if (Array.isArray(messages)) { context.log(`Event hub function processed ${messages.length} messages`); for (const message of messages) { context.log('Event hub message:', message); actions.push({ actionName: "sendToAll", data: JSON.stringify({ IotData: message, MessageDate: message.date || new Date().toISOString(), DeviceId: message.deviceId, })}); } } else { context.log('Event hub function processed message:', messages); actions.push({ actionName: "sendToAll", data: JSON.stringify({ IotData: message, MessageDate: message.date || new Date().toISOString(), DeviceId: message.deviceId, })}); } context.extraOutputs.set(wpsAction, actions); } });
関数の設定を更新します。
hubName設定を追加し、{YourIoTHubName}を IoT Hub の作成時に使用したハブ名に置き換えます。func settings add hubName "{YourIoTHubName}"IoT Hub のサービス接続文字列を取得します。
az iot hub connection-string show --policy-name service --hub-name {YourIoTHubName} --output table --default-eventhubIOTHubConnectionStringを設定し、<iot-connection-string>を値に置き換えます。func settings add IOTHubConnectionString "<iot-connection-string>"- Web PubSub の接続文字列を取得します。
az webpubsub key show --name "<your-unique-resource-name>" --resource-group "<your-resource-group>" --query primaryConnectionStringWebPubSubConnectionStringを設定し、<webpubsub-connection-string>を値に置き換えます。func settings add WebPubSubConnectionString "<webpubsub-connection-string>"メモ
このサンプルで使用している
Azure Event Hub trigger関数トリガーには Azure Storage への依存関係がありますが、関数がローカルで実行されているときは、ローカル ストレージ エミュレーターを使用できます。There was an error performing a read operation on the Blob Storage Secret Repository. Please ensure the 'AzureWebJobsStorage' connection string is valid.のようなエラーが発生した場合は、Storage Emulator をダウンロードして有効にする必要があります。関数をローカルで実行します。
これで、ローカル関数を次のコマンドで実行できます。
func starthttps://localhost:7071/api/indexにアクセスしてローカル ホストの静的ページにアクセスできます。
デバイスを実行してデータを送信する
デバイスの登録
デバイスを IoT Hub に接続するには、あらかじめ IoT Hub に登録しておく必要があります。 IoT ハブにデバイスが既に登録されている場合は、このセクションをスキップできます。
Azure Cloud Shell で az iot hub device-identity create コマンドを実行して、デバイス ID を作成します。
YourIoTHubName: このプレースホルダーは、実際の IoT ハブに対して選んだ名前に置き換えてください。
az iot hub device-identity create --hub-name {YourIoTHubName} --device-id simDeviceAzure Cloud Shell で Az PowerShell module iot hub device-identity connection-string show コマンドを実行して、登録したデバイスの "デバイス接続文字列" を取得します。
YourIoTHubName: このプレースホルダーは、実際の IoT Hub に対して選んだ名前に置き換えてください。
az iot hub device-identity connection-string show --hub-name {YourIoTHubName} --device-id simDevice --output table次のようなデバイス接続文字列をメモしておきます。
HostName={YourIoTHubName}.azure-devices.net;DeviceId=simDevice;SharedAccessKey={YourSharedAccessKey}
最も迅速に結果を得るには、Raspberry Pi Azure IoT オンライン シミュレーターを使用して温度データをシミュレートします。 デバイス接続文字列を貼り付け、[実行] ボタンを選択します。
物理的な Raspberry Pi と BME280 センサーがある場合は、「Raspberry Pi の Azure IoT Hub への接続 (Node.js)」のチュートリアルに従って、実際の温度と湿度の値を測定して報告できます。
視覚化 Web サイトを実行する
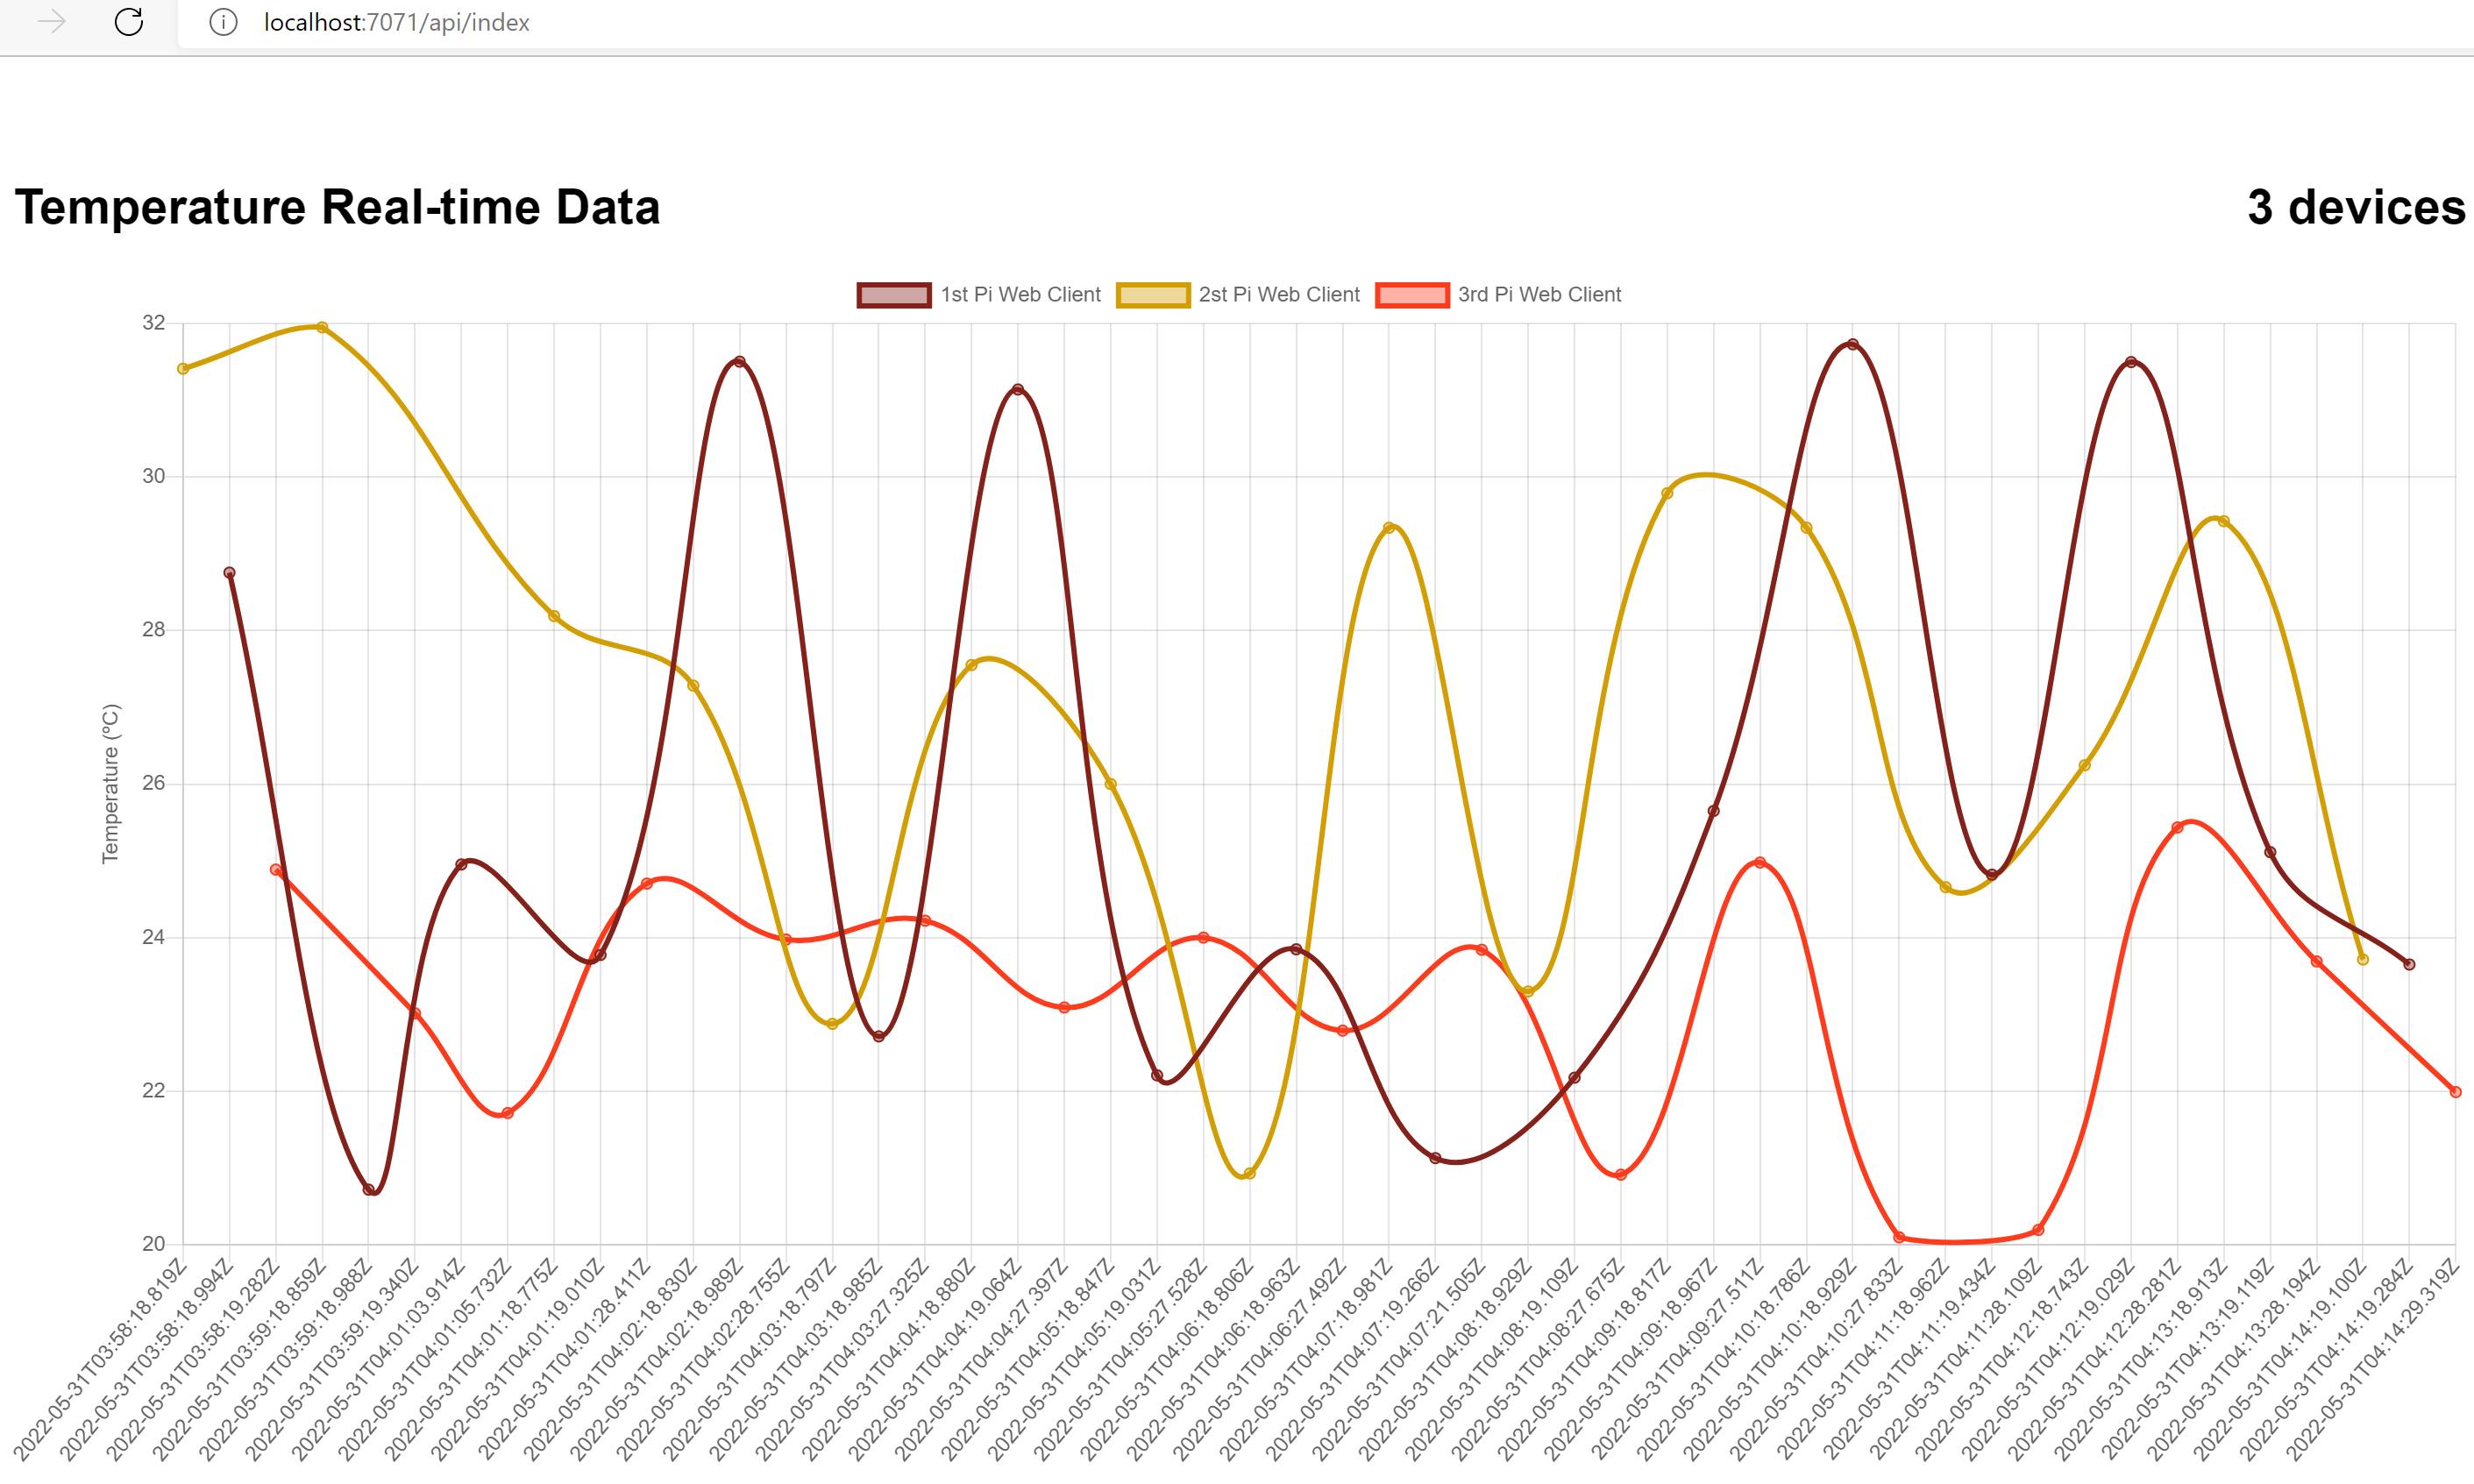
関数ホスト インデックス ページ: http://localhost:7071/api/index を開いて、リアルタイム ダッシュボードを表示します。 複数のデバイスを登録すると、ダッシュボードで複数のデバイスのリアルタイムの更新を確認できます。 複数のブラウザーを開くと、すべてのページがリアルタイムで更新されていることを確認できます。
リソースをクリーンアップする
後続のクイック スタートおよびチュートリアルを引き続き実行する場合は、これらのリソースをそのまま残しておくことをお勧めします。
必要がなくなったら、Azure CLI の az group delete コマンドを使用して、リソース グループおよびすべての関連リソースを削除できます。
az group delete --name "myResourceGroup"