接続された GitHub リポジトリまたは Azure DevOps プロジェクトをスキャンするように Microsoft Security DevOps を設定できます。 GitHub アクションまたは Azure DevOps 拡張機能を使用して、コードとしてのインフラストラクチャ (IaC) ソース コードでのみ Microsoft Security DevOps を実行し、パイプラインのランタイムを減らすのに役立ちます。
この記事では、Microsoft Security DevOps ルールを使用して、テンプレート YAML 構成ファイルを適用して、接続されているリポジトリまたはプロジェクトをスキャンし、特に IaC セキュリティの問題を検出する方法について説明します。
[前提条件]
- Microsoft Security DevOps の場合は、ソース コード管理システムに基づいて GitHub アクションまたは Azure DevOps 拡張機能を設定します。
- リポジトリが GitHub にある場合は、 Microsoft Security DevOps GitHub アクションを設定します。
- Azure DevOps でソース コードを管理する場合は、 Microsoft Security DevOps Azure DevOps 拡張機能を設定します。
- リポジトリに IaC テンプレートがあることを確認します。
接続されている IaC ソース コードをスキャンするための GitHub アクションを設定して実行する
GitHub でアクションを設定し、スキャン結果を表示するには:
GitHub にサインインします。
リポジトリのメイン ページに移動します。
ファイル ディレクトリで、 .github>workflows>msdevopssec.yml を選択します。
GitHub でのアクションの操作の詳細については、「 前提条件」を参照してください。
[ このファイルの編集] (鉛筆) アイコンを選択します。
![msdevopssec.yml ファイルの [このファイルの編集] アイコンが強調表示されているスクリーンショット。](media/tutorial-iac-vulnerabilities/workflow-yaml.png)
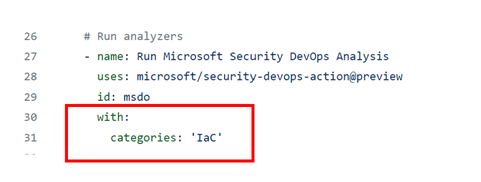
YAML ファイル の [アナライザーの実行 ] セクションで、次のコードを追加します。
with:
    categories: 'IaC'
注
値は、大文字と小文字が区別されます。
次に例を示します。
[ 変更のコミット] を 選択します。 . .
[Commit changes] を選択します。
![GitHub ページで [変更のコミット] を選択する場所を示すスクリーンショット。](media/tutorial-iac-vulnerabilities/commit-change.png)
(省略可能)リポジトリに IaC テンプレートを追加します。 リポジトリに IaC テンプレートが既にある場合は、この手順をスキップします。
たとえば、 基本的な Linux Web アプリケーションのデプロイに使用できる IaC テンプレートをコミットします。
azuredeploy.json ファイルを選択します。
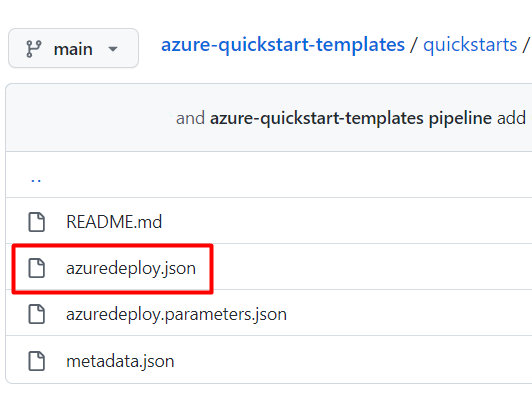
[Raw] を選択します。
次の例のように、ファイル内のすべての情報をコピーします。
{
  "$schema": "https://schema.management.azure.com/schemas/2019-04-01/deploymentTemplate.json#",
  "contentVersion": "1.0.0.0",
  "parameters": {
    "webAppName": {
      "type": "string",
      "defaultValue": "AzureLinuxApp",
      "metadata": {
        "description": "The base name of the resource, such as the web app name or the App Service plan."
      },
      "minLength": 2
    },
    "sku": {
      "type": "string",
      "defaultValue": "S1",
      "metadata": {
        "description": "The SKU of the App Service plan."
      }
    },
    "linuxFxVersion": {
      "type": "string",
      "defaultValue": "php|7.4",
      "metadata": {
        "description": "The runtime stack of the current web app."
      }
    },
    "location": {
      "type": "string",
      "defaultValue": "[resourceGroup().location]",
      "metadata": {
        "description": "The location for all resources."
      }
    }
  },
  "variables": {
    "webAppPortalName": "[concat(parameters('webAppName'), '-webapp')]",
    "appServicePlanName": "[concat('AppServicePlan-', parameters('webAppName'))]"
  },
  "resources": [
    {
      "type": "Microsoft.Web/serverfarms",
      "apiVersion": "2020-06-01",
      "name": "[variables('appServicePlanName')]",
      "location": "[parameters('location')]",
      "sku": {
        "name": "[parameters('sku')]"
      },
      "kind": "linux",
      "properties": {
        "reserved": true
      }
    },
    {
      "type": "Microsoft.Web/sites",
      "apiVersion": "2020-06-01",
      "name": "[variables('webAppPortalName')]",
      "location": "[parameters('location')]",
      "kind": "app",
      "dependsOn": [
        "[resourceId('Microsoft.Web/serverfarms', variables('appServicePlanName'))]"
      ],
      "properties": {
        "serverFarmId": "[resourceId('Microsoft.Web/serverfarms', variables('appServicePlanName'))]",
        "siteConfig": {
          "linuxFxVersion": "[parameters('linuxFxVersion')]"
        }
      }
    }
  ]
}
GitHub リポジトリで、 .github/workflows フォルダーに移動します。
[ ファイルの追加]>[新しいファイルの作成]を選択します。
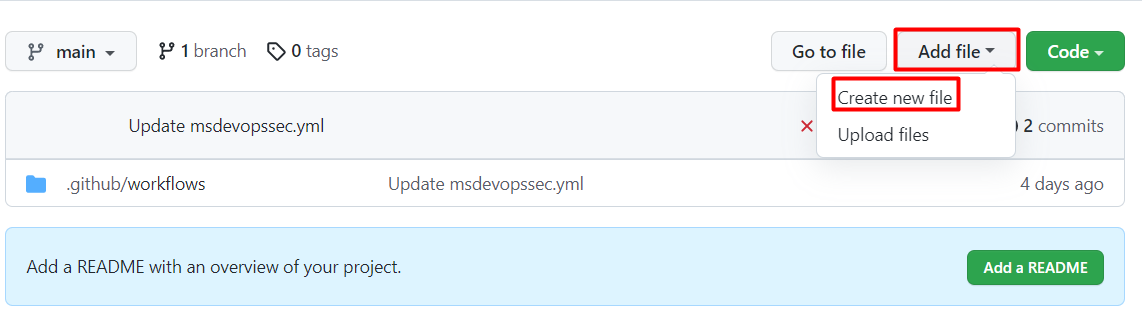
ファイルの名前を入力します。
コピーした情報をファイルに貼り付けます。
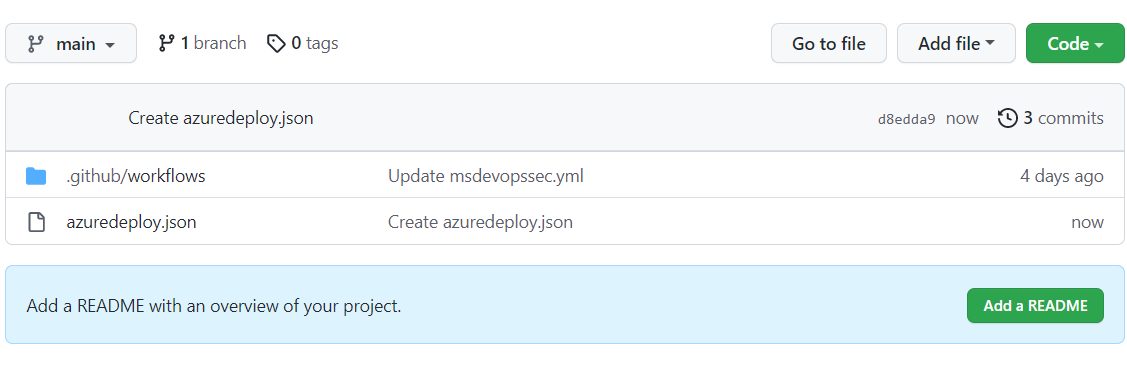
[ 新しいファイルのコミット] を選択します。
テンプレート ファイルがリポジトリに追加されます。
Microsoft Security DevOps スキャンが完了したことを確認します。
リポジトリの場合は、[ アクション] を選択します。
ワークフローを選択すると、アクションの状態が表示されます。
スキャンの結果を表示するには、 Defender for Cloud>DevOps セキュリティ (GHAS 前提条件なし) または Security>Code スキャン アラート を GitHub でネイティブに表示する (GHAS ライセンスが必要) に移動します。
![msdevopssec.yml ファイルの [このファイルの編集] アイコンが強調表示されているスクリーンショット。](media/tutorial-iac-vulnerabilities/workflow-yaml.png#lightbox)

Azure DevOps 拡張機能を設定して実行し、接続されている IaC ソース コードをスキャンする
拡張機能を設定し、Azure DevOps でスキャン結果を表示するには:
Azure DevOps にサインインします。
プロジェクトを選択します。
パイプラインを選択します。
Microsoft Security DevOps 用の Azure DevOps 拡張機能が構成されているパイプラインを選択します。
[ パイプラインの編集] を選択します。
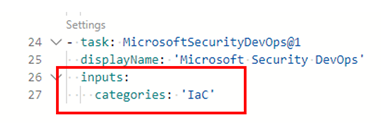
パイプライン YAML 構成ファイルで、
displayName行の下に、次のコードを追加します。inputs: categories: 'IaC'次に例を示します。
保存 を選択します。
(省略可能)Azure DevOps プロジェクトに IaC テンプレートを追加します。 プロジェクトに IaC テンプレートが既にある場合は、この手順をスキップします。
メイン ブランチに直接コミットするか、コミット用に新しいブランチを作成するかを選択し、[保存] を選択 します。
IaC スキャンの結果を表示するには、[ パイプライン] を選択し、変更したパイプラインを選択します。
詳細を表示するには、特定のパイプライン実行を選択します。
適用された IaC ルールの詳細と修復情報を表示する
Microsoft Security DevOps に含まれる IaC スキャン ツールは 、Template Analyzer (PSRule は Template Analyzer に含まれています)、 Checkov 、 Terrascan です。
Template Analyzer は、Azure Resource Manager テンプレート (ARM テンプレート) と Bicep テンプレートに対してルールを実行します。 詳細については、 Template Analyzer のルールと修復の詳細を参照してください。
Terrascan は、CloudFormation、Docker、Helm、Kubernetes、Kustomize、Terraform の ARM テンプレートとテンプレートに対してルールを実行します。 詳細については、 Terrascan ルールを参照してください。
Chekov は、CloudFormation、Docker、Helm、Kubernetes、Kustomize、Terraform の ARM テンプレートとテンプレートに対してルールを実行します。 詳細については、 Checkov ルールを参照してください。
Microsoft Security DevOps に含まれている IaC スキャン ツールの詳細については、次を参照してください。
関連コンテンツ
この記事では、Microsoft Security DevOps 用に GitHub アクションと Azure DevOps 拡張機能を設定して IaC セキュリティの構成ミスをスキャンする方法と、結果を表示する方法について説明しました。
詳細については、以下を参照してください。
- DevOps セキュリティの詳細情報。
- GitHub リポジトリを Defender for Cloud に接続する方法について説明します。
- Azure DevOps プロジェクトを Defender for Cloud に接続する方法について説明します。