チュートリアル: Azure DevOps を使用してマルチステージ パイプラインを作成する
Azure DevOps Services | Azure DevOps Server 2022 - Azure DevOps Server 2019
Azure DevOps マルチステージ パイプラインを使用して、CI/CD プロセスを開発サイクルのさまざまな部分に対応するステージに分割できます。 マルチステージ パイプラインを使用すると、デプロイ プロセスの可視性が向上し、承認とチェックを簡単に統合できます。
この記事では、2 つの App Service インスタンスを作成し、3 つのステージで YAML パイプラインを構築します:
実際のシナリオでは、DevOps プロセスに応じて、運用環境にデプロイするために別のステージがある場合もあります。
この演習のコード例は .NET Web アプリケーションで、ハイ スコアのランキング表示を含む架空の宇宙ゲームです。 Azure Web App for Linux の開発とステージング インスタンスの両方にデプロイします。
[前提条件]
- リポジトリを作成できる GitHub アカウント。 無料で作成できます。
- アクティブなサブスクリプションが含まれる Azure アカウント。 無料でアカウントを作成できます。
- Azure DevOps 組織とプロジェクト。 無料で作成できます。
- Microsoft によってホストされるエージェントでパイプラインを実行する機能。 並列ジョブを購入するか、Free レベルを要求できます。
プロジェクトをフォークする
GitHub で次のサンプル リポジトリをフォークします。
https://github.com/MicrosoftDocs/mslearn-tailspin-spacegame-web-deploy
App Service インスタンスを作成する
パイプラインをデプロイする前に、まずデプロイ先の App Service インスタンスを作成する必要があります。 Azure CLI を使用してインスタンスを作成します。
Azure portal にサインインします。
メニューから、[Cloud Shell] と [Bash] エクスペリエンスを選びます。
Web アプリのドメイン名を一意にするランダムな数値を生成します。 一意の値を持つ利点は、App Service インスタンスに、このチュートリアルを実行している他の学習者との名前の競合が発生しなくなることです。
webappsuffix=$RANDOMコマンド プロンプトを開き、
az group createコマンドを使用して、すべての App Service インスタンスを含む tailspin-space-game-rg という名前のリソース グループを作成します。locationの値を更新して、最も近いリージョンを使用します。az group create --location eastus --name tailspin-space-game-rgコマンド プロンプトを使用して、App Service プランを作成します。
az appservice plan create \
  --name tailspin-space-game-asp \
  --resource-group tailspin-space-game-rg \
  --sku B1 \
  --is-linux
コマンド プロンプトで、
az webapp createコマンドを使用して 2 つの App Service インスタンスを作成します。1 つはインスタンスごとに 1 つ (Dev と Staging) です。az webapp create \ --name tailspin-space-game-web-dev-$webappsuffix \ --resource-group tailspin-space-game-rg \ --plan tailspin-space-game-asp \ --runtime "DOTNET|6.0" az webapp create \ --name tailspin-space-game-web-staging-$webappsuffix \ --resource-group tailspin-space-game-rg \ --plan tailspin-space-game-asp \ --runtime "DOTNET|6.0"コマンド プロンプトを使って、
az webapp listコマンドを使用して両方の App Service インスタンスを一覧表示し、実行されていることを確認します。az webapp list \ --resource-group tailspin-space-game-rg \ --query "[].{hostName: defaultHostName, state: state}" \ --output table次のセクションで変数として使用するため、App Service インスタンスの名前をコピーします。
Azure DevOps プロジェクトと変数を作成する
Azure DevOps プロジェクトとビルド パイプラインを設定します。 また、開発インスタンスとステージング インスタンスの変数も追加します。
ビルド パイプライン:
- ブランチへのコード変更がある場合に実行されるトリガーが含まれます
- 2 つの変数、
buildConfigurationとreleaseBranchNameを定義します - Web アプリケーションをビルドする、"Build" という名前のステージが含まれます
- 後のステージで使用する成果物を公開します
ビルド ステージを追加する
Azure DevOps 組織にサインインし、プロジェクトに移動します。
[パイプライン] に移動し、最初のパイプラインを作成する場合は [新しいパイプライン] または [[パイプラインの作成] を選択します。
最初に、ソース コードの場所として GitHub を選択し、ウィザードの手順を実行します。
サインインするために GitHub にリダイレクトされる場合があります。 その場合は、GitHub の資格情報を入力します。
リポジトリの一覧が表示されたら、目的のリポジトリを選択します。
Azure Pipelines アプリをインストールするために、GitHub にリダイレクトされる場合があります。 その場合は、[承認してインストール] を選択します。
[構成] タブが表示されたら、[スタート パイプライン] を選びます。
azure-pipelines.yml のコンテンツを次のコードに置き換えます。
trigger: - '*' variables: buildConfiguration: 'Release' releaseBranchName: 'release' stages: - stage: 'Build' displayName: 'Build the web application' jobs: - job: 'Build' displayName: 'Build job' pool: vmImage: 'ubuntu-20.04' demands: - npm variables: wwwrootDir: 'Tailspin.SpaceGame.Web/wwwroot' dotnetSdkVersion: '6.x' steps: - task: UseDotNet@2 displayName: 'Use .NET SDK $(dotnetSdkVersion)' inputs: version: '$(dotnetSdkVersion)' - task: Npm@1 displayName: 'Run npm install' inputs: verbose: false - script: './node_modules/.bin/node-sass $(wwwrootDir) --output $(wwwrootDir)' displayName: 'Compile Sass assets' - task: gulp@1 displayName: 'Run gulp tasks' - script: 'echo "$(Build.DefinitionName), $(Build.BuildId), $(Build.BuildNumber)" > buildinfo.txt' displayName: 'Write build info' workingDirectory: $(wwwrootDir) - task: DotNetCoreCLI@2 displayName: 'Restore project dependencies' inputs: command: 'restore' projects: '**/*.csproj' - task: DotNetCoreCLI@2 displayName: 'Build the project - $(buildConfiguration)' inputs: command: 'build' arguments: '--no-restore --configuration $(buildConfiguration)' projects: '**/*.csproj' - task: DotNetCoreCLI@2 displayName: 'Publish the project - $(buildConfiguration)' inputs: command: 'publish' projects: '**/*.csproj' publishWebProjects: false arguments: '--no-build --configuration $(buildConfiguration) --output $(Build.ArtifactStagingDirectory)/$(buildConfiguration)' zipAfterPublish: true - publish: '$(Build.ArtifactStagingDirectory)' artifact: drop準備ができたら、[保存および実行] を選択します。
インスタンス変数を追加する
Azure DevOps で、[パイプライン]>[ライブラリ] に移動します。
[+ Variable group] を選択します。
[プロパティ] の下で、変数グループ名に「Release」を追加します。
開発ホスト名とステージング ホスト名を参照する 2 つの変数を作成します。 値
1234をインスタンスに適切な値に置き換えます。変数名 値の例 WebAppNameDev tailspin-space-game-web-dev-1234 WebAppNameStaging tailspin-space-game-web-staging-1234 [保存] を選んで変数を保存します。
開発ステージを追加する
次に、パイプラインを更新して、ビルドを Dev ステージに昇格します。
Azure Pipelines で、[パイプライン]>[パイプライン] に移動します。
コンテキスト メニューの [編集] を選び、パイプラインを編集します。
![[編集] メニュー項目を選ぶスクリーンショット。](media/mutistage-pipeline/multistage-pipeline-edit-contextual-menu.png?view=azure-devops)
azure-pipelines.yml を更新して Dev ステージを含めます。 Dev ステージでは、パイプラインで次の処理が行われます。
条件に応じて、Build ステージが成功した場合に実行します
dropから成果物をダウンロードしますAzure Resource Manager サービス接続を使用して Azure App Service にデプロイします
trigger:
- '*'

variables:
  buildConfiguration: 'Release'
  releaseBranchName: 'release'

stages:
- stage: 'Build'
  displayName: 'Build the web application'
  jobs:
  - job: 'Build'
    displayName: 'Build job'
    pool:
      vmImage: 'ubuntu-20.04'
      demands:
      - npm

    variables:
      wwwrootDir: 'Tailspin.SpaceGame.Web/wwwroot'
      dotnetSdkVersion: '6.x'

    steps:
    - task: UseDotNet@2
      displayName: 'Use .NET SDK $(dotnetSdkVersion)'
      inputs:
        version: '$(dotnetSdkVersion)'

    - task: Npm@1
      displayName: 'Run npm install'
      inputs:
        verbose: false

    - script: './node_modules/.bin/node-sass $(wwwrootDir) --output $(wwwrootDir)'
      displayName: 'Compile Sass assets'

    - task: gulp@1
      displayName: 'Run gulp tasks'

    - script: 'echo "$(Build.DefinitionName), $(Build.BuildId), $(Build.BuildNumber)" > buildinfo.txt'
      displayName: 'Write build info'
      workingDirectory: $(wwwrootDir)

    - task: DotNetCoreCLI@2
      displayName: 'Restore project dependencies'
      inputs:
        command: 'restore'
        projects: '**/*.csproj'

    - task: DotNetCoreCLI@2
      displayName: 'Build the project - $(buildConfiguration)'
      inputs:
        command: 'build'
        arguments: '--no-restore --configuration $(buildConfiguration)'
        projects: '**/*.csproj'

    - task: DotNetCoreCLI@2
      displayName: 'Publish the project - $(buildConfiguration)'
      inputs:
        command: 'publish'
        projects: '**/*.csproj'
        publishWebProjects: false
        arguments: '--no-build --configuration $(buildConfiguration) --output $(Build.ArtifactStagingDirectory)/$(buildConfiguration)'
        zipAfterPublish: true

    - publish: '$(Build.ArtifactStagingDirectory)'
      artifact: drop

- stage: 'Dev'
  displayName: 'Deploy to the dev environment'
  dependsOn: Build
  condition:  succeeded()
  jobs:
  - deployment: Deploy
    pool:
      vmImage: 'ubuntu-20.04'
    environment: dev
    variables:
    - group: Release
    strategy:
      runOnce:
        deploy:
          steps:
          - download: current
            artifact: drop
          - task: AzureWebApp@1
            displayName: 'Azure App Service Deploy: dev website'
            inputs:
              azureSubscription: 'your-subscription'
              appType: 'webAppLinux'
              appName: '$(WebAppNameDev)'
              package: '$(Pipeline.Workspace)/drop/$(buildConfiguration)/*.zip'
AzureWebApp@1タスクを、自分のサブスクリプションを使用するように変更します。タスクの [設定] を選びます。
![YAML エディターでのタスクの [設定] オプションのスクリーンショット。](media/mutistage-pipeline/select-settings-azurewebapptask.png?view=azure-devops)
独自のサブスクリプションを使用するように、[Azure サブスクリプション] で
your-subscriptionの値を更新します。 このプロセスの一環としてアクセスの認可が必要な場合があります。 YAML エディター内でリソースの承認に問題が発生した場合は、サービス接続を作成するという別の方法もあります。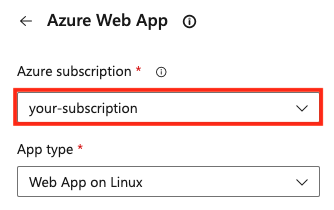
[アプリの種類] を [Web App on Linux] に設定します。
[追加] を選んでタスクを更新します。
パイプラインを保存して実行します。
ステージング ステージを追加する
最後に、Dev ステージを Staging に昇格します。 Dev 環境とは異なり、Staging 環境ではより多く制御する必要があるため、手動承認を追加します。
Staging 環境を作成する
Azure Pipelines で、[Environments] を選択します。
[New environment] (新しい環境) を選択します。
Staging という名前で、リソースに "なし" が設定された新しい環境を作成します。
Staging 環境のページで、[承認とチェック] を選びます。
![[承認とチェック] メニュー オプションのスクリーンショット。](media/mutistage-pipeline/pipeline-add-check-to-environment.png?view=azure-devops)
[Approvals] を選択します。
[承認者] で [ユーザーおよびグループの追加] を選び、アカウントを選びます。
[承認者への指示] に「Staging の準備ができたら、この変更を承認してください」と入力します。
[保存] を選択します。
パイプラインに新しいステージを追加する
手動承認を含むパイプラインに Staging という新しいステージを追加します。
パイプライン ファイルを編集し、
Stagingセクションを追加します。trigger: - '*' variables: buildConfiguration: 'Release' releaseBranchName: 'release' stages: - stage: 'Build' displayName: 'Build the web application' jobs: - job: 'Build' displayName: 'Build job' pool: vmImage: 'ubuntu-20.04' demands: - npm variables: wwwrootDir: 'Tailspin.SpaceGame.Web/wwwroot' dotnetSdkVersion: '6.x' steps: - task: UseDotNet@2 displayName: 'Use .NET SDK $(dotnetSdkVersion)' inputs: version: '$(dotnetSdkVersion)' - task: Npm@1 displayName: 'Run npm install' inputs: verbose: false - script: './node_modules/.bin/node-sass $(wwwrootDir) --output $(wwwrootDir)' displayName: 'Compile Sass assets' - task: gulp@1 displayName: 'Run gulp tasks' - script: 'echo "$(Build.DefinitionName), $(Build.BuildId), $(Build.BuildNumber)" > buildinfo.txt' displayName: 'Write build info' workingDirectory: $(wwwrootDir) - task: DotNetCoreCLI@2 displayName: 'Restore project dependencies' inputs: command: 'restore' projects: '**/*.csproj' - task: DotNetCoreCLI@2 displayName: 'Build the project - $(buildConfiguration)' inputs: command: 'build' arguments: '--no-restore --configuration $(buildConfiguration)' projects: '**/*.csproj' - task: DotNetCoreCLI@2 displayName: 'Publish the project - $(buildConfiguration)' inputs: command: 'publish' projects: '**/*.csproj' publishWebProjects: false arguments: '--no-build --configuration $(buildConfiguration) --output $(Build.ArtifactStagingDirectory)/$(buildConfiguration)' zipAfterPublish: true - publish: '$(Build.ArtifactStagingDirectory)' artifact: drop - stage: 'Dev' displayName: 'Deploy to the dev environment' dependsOn: Build condition: succeeded() jobs: - deployment: Deploy pool: vmImage: 'ubuntu-20.04' environment: dev variables: - group: Release strategy: runOnce: deploy: steps: - download: current artifact: drop - task: AzureWebApp@1 displayName: 'Azure App Service Deploy: dev website' inputs: azureSubscription: 'your-subscription' appType: 'webAppLinux' appName: '$(WebAppNameDev)' package: '$(Pipeline.Workspace)/drop/$(buildConfiguration)/*.zip' - stage: 'Staging' displayName: 'Deploy to the staging environment' dependsOn: Dev jobs: - deployment: Deploy pool: vmImage: 'ubuntu-20.04' environment: staging variables: - group: 'Release' strategy: runOnce: deploy: steps: - download: current artifact: drop - task: AzureWebApp@1 displayName: 'Azure App Service Deploy: staging website' inputs: azureSubscription: 'your-subscription' appType: 'webAppLinux' appName: '$(WebAppNameStaging)' package: '$(Pipeline.Workspace)/drop/$(buildConfiguration)/*.zip'Staging ステージで
AzureWebApp@1タスクを変更して、自分のサブスクリプションを使用します。タスクの [設定] を選びます。
独自のサブスクリプションを使用するように、[Azure サブスクリプション] で
your-subscriptionの値を更新します。 このプロセスの一環としてアクセスの認可が必要な場合があります。
[アプリの種類] を [Web App on Linux] に設定します。
[追加] を選んでタスクを更新します。
パイプライン実行に移動します。 実行中のビルドを監視します。
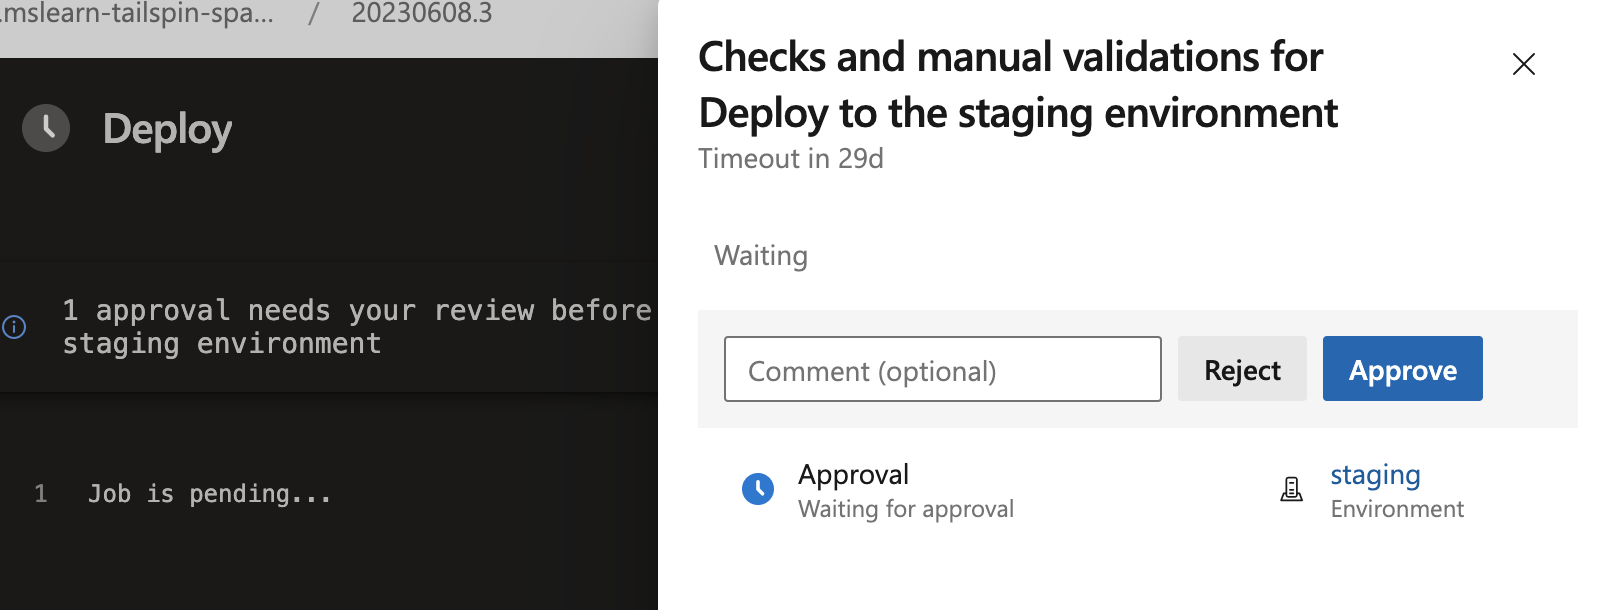
Stagingに達すると、パイプラインは手動リリース承認待ちになります。 また、承認待ちのパイプラインがあることを通知するメールも自分宛てに届きます。
承認を確認し、パイプラインの実行を許可します。
リソースをクリーンアップする
このアプリケーションを引き続き使用しない場合は、次の手順に従って、Azure portal のリソース グループと Azure DevOps のプロジェクトを削除します。
リソース グループをクリーンアップするには、次のようにします。
Azure Portal にアクセスしてサインインします。
メニュー バーで、[Cloud Shell] を選択します。 プロンプトが表示されたら、[Bash] エクスペリエンスを選択します。
![[Cloud Shell] メニュー項目の選択を示す Azure portal のスクリーンショット。](../apps/cd/azure/media/azure-portal-menu-cloud-shell.png?view=azure-devops)
次の az group delete コマンドを実行して、使ったリソース グループ
tailspin-space-game-rgを削除します。az group delete --name tailspin-space-game-rg
ビルド パイプラインを含めて Azure DevOps プロジェクトを削除するには、「プロジェクトの削除」を参照してください 。