適用対象: Azure CLI ML 拡張機能 v2 (現行)
 Python SDK azure-ai-ml v2 (現行)
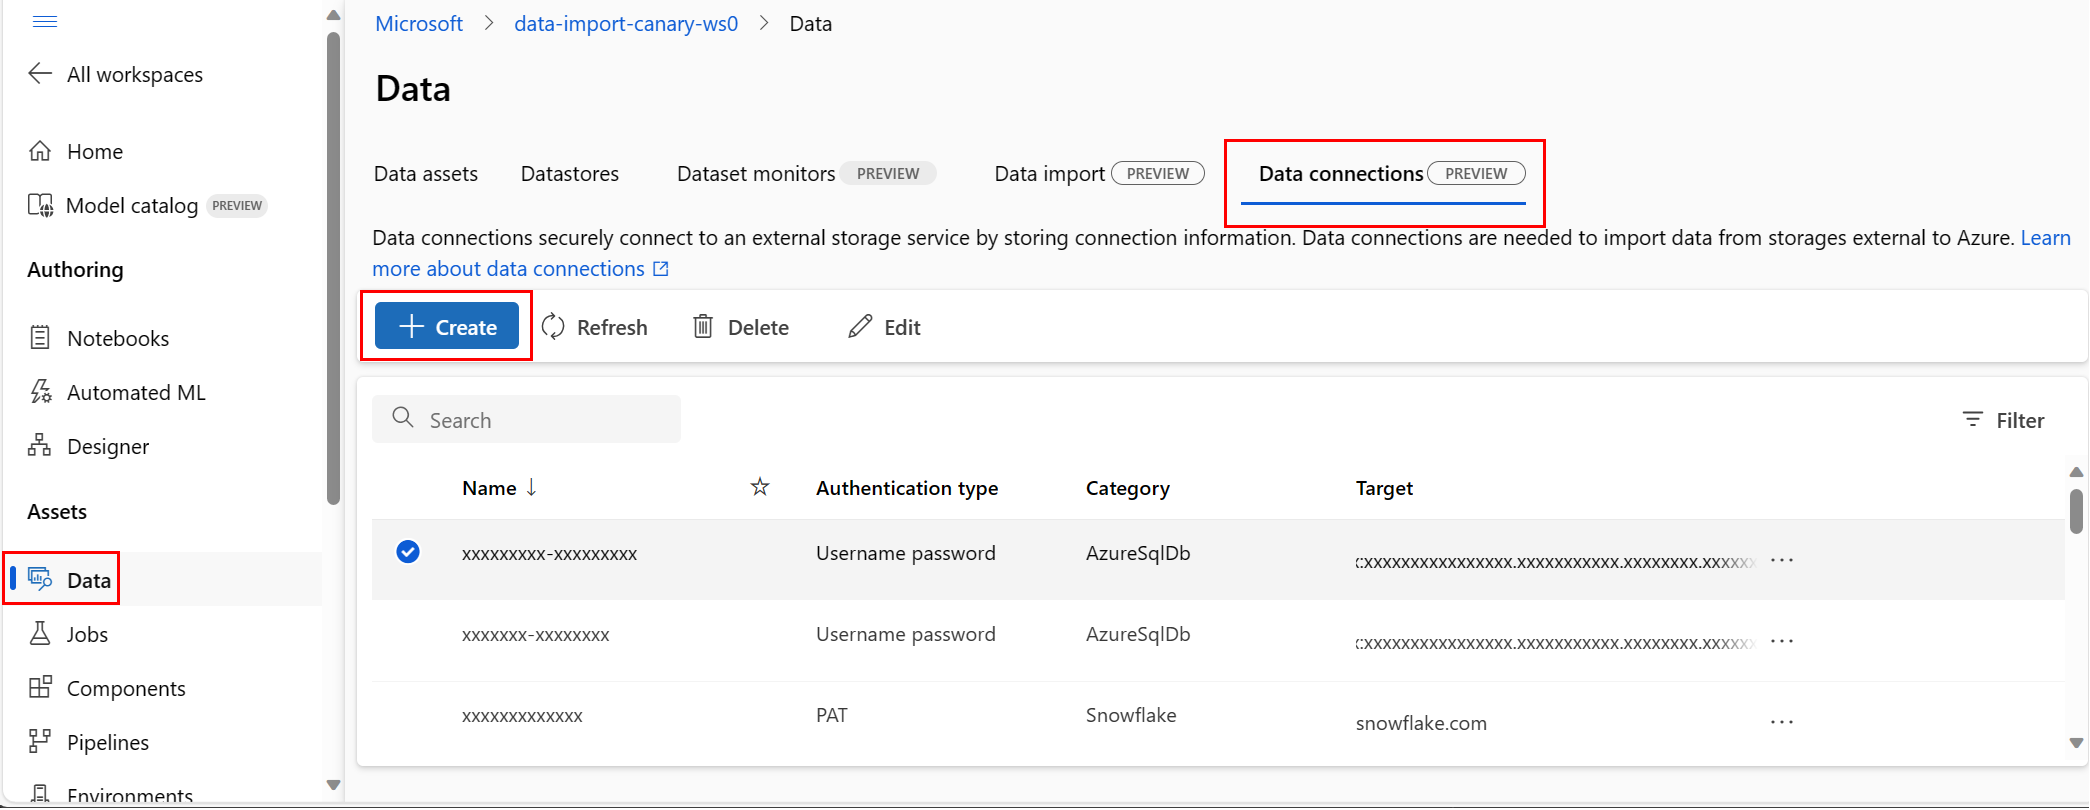
この記事では、Azure の外部にあるデータ ソースに接続して、そのデータを Azure Machine Learning サービスで使用できるようにする方法について学習します。 Azure 接続はキー コンテナーのプロキシとして機能し、接続とのやり取りは、Azure キー コンテナーとの直接のやり取りになります。 Azure Machine Learning 接続では、ユーザー名とパスワードのデータ リソースが、シークレットとしてキー コンテナーに安全に格納されます。 キー コンテナー RBAC では、これらのデータ リソースへのアクセスが制御されます。 Azure では、このデータの可用性のために、次の外部ソースへの接続がサポートされています。
- Snowflake DB
- Amazon S3
- Azure SQL DB
重要
現在、この機能はパブリック プレビュー段階にあります。 このプレビュー バージョンはサービス レベル アグリーメントなしで提供されており、運用環境のワークロードに使用することは推奨されません。 特定の機能はサポート対象ではなく、機能が制限されることがあります。
詳しくは、Microsoft Azure プレビューの追加使用条件に関するページをご覧ください。
前提条件
Azure サブスクリプション。 Azure サブスクリプションをお持ちでない場合は、開始する前に無料アカウントを作成してください。 無料版または有料版の Azure Machine Learning をお試しください。
Azure Machine Learning ワークスペース。
重要
Azure Machine Learning 接続では、接続の作成時に渡される資格情報をワークスペース Azure Key Vault に安全に保存します。 接続は、さらなる使用のためにキー コンテナーの保存場所から資格情報を参照します。 資格情報は、キー コンテナーに格納された後は直接処理する必要はありません。 資格情報を YAML ファイルに保存するオプションがあります。 CLI コマンドまたは SDK は、それらをオーバーライドできます。 セキュリティ侵害があると資格情報が漏洩する可能性があるため、YAML ファイルに資格情報を保存することを回避することをお勧めします。
注
データを正常にインポートするには、SDK 用の最新の azure-ai-ml パッケージ (バージョン 1.5.0 以降) と ml 拡張機能 (バージョン 2.15.1 以降) がインストールされていることを確認してください。
以前の SDK パッケージまたは CLI 拡張機能がある場合は、以前のものを削除し、タブ セクションに表示されているコードを使用して新しいものをインストールしてください。 次に示す SDK および CLI 向けの手順に従います。
コードのバージョン
- Azure CLI
- Python SDK
-
[ スタジオ](#tab/azure-studio)
az extension remove -n ml
az extension add -n ml --yes
az extension show -n ml #(the version value needs to be 2.15.1 or later)
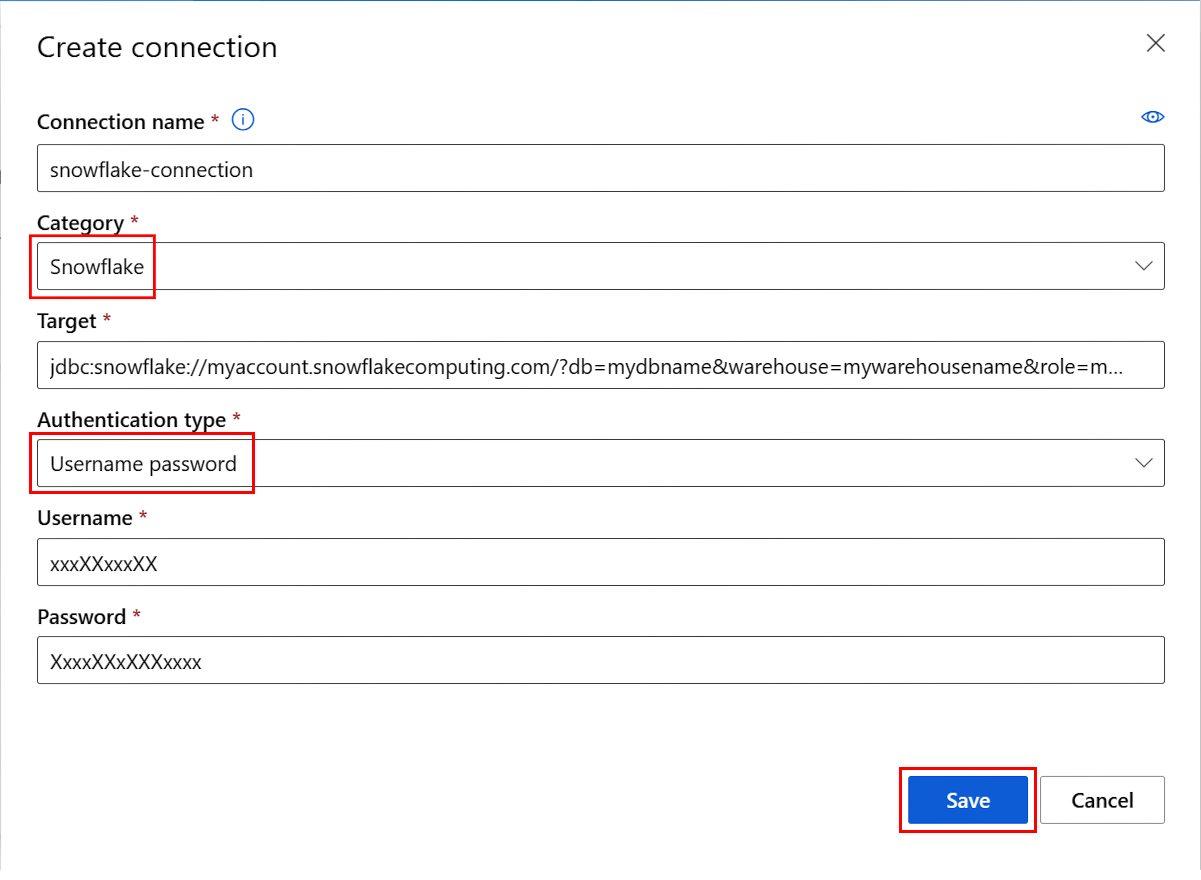
Snowflake DB 接続を作成する
- Azure CLI
- Python SDK
-
[ スタジオ](#tab/azure-studio)
この YAML ファイルでは、Snowflake DB 接続を作成します。 必ず、該当する値を更新してください。
# my_snowflakedb_connection.yaml
$schema: http://azureml/sdk-2-0/Connection.json
type: snowflake
name: my-sf-db-connection # add your datastore name here

target: jdbc:snowflake://<myaccount>.snowflakecomputing.com/?db=<mydb>&warehouse=<mywarehouse>&role=<myrole>
# add the Snowflake account, database, warehouse name and role name here. If no role name provided it will default to PUBLIC
credentials:
    type: username_password
    username: <username> # add the Snowflake database user name here or leave this blank and type in CLI command line
    password: <password> # add the Snowflake database password here or leave this blank and type in CLI command line
CLI で Azure Machine Learning 接続を作成します。
オプション 1: YAML ファイルでユーザー名とパスワードを使用する
az ml connection create --file my_snowflakedb_connection.yaml
オプション 2: コマンド ラインでユーザー名とパスワードをオーバーライドする
az ml connection create --file my_snowflakedb_connection.yaml --set credentials.
username="<username>" credentials.
password="<password>"
OAuth を使用する Snowflake DB 接続を作成する
このセクションでは、OAuth を使用して認証する Snowflake DB 接続を作成する方法について説明します。
重要
このセクションの手順を実行する前に、まずクライアントに代わって OAuth トークンを発行するように Azure を構成する必要があります。 この構成により、OAuth 接続に必要なサービス プリンシパルが作成されます。 接続を作成するには、次の情報が必要です。
- クライアント ID: サービス プリンシパルの ID
- クライアント シークレット: サービス プリンシパルのシークレット
- テナント ID: Microsoft Entra ID テナントの ID
- Azure CLI
- Python SDK
-
[ スタジオ](#tab/azure-studio)
この YAML ファイルにより、OAuth を使用する Snowflake DB 接続が作成されます。 必ず、該当する値を更新してください。
# my_snowflakedb_connection.yaml
name: snowflake_service_principal_connection
type: snowflake
# Add the Snowflake account, database, warehouse name, and role name here. If no role name is provided, it will default to PUBLIC.
target: jdbc:snowflake://<myaccount>.snowflakecomputing.com/?db=<mydb>&warehouse=<mywarehouse>&scope=<scopeForServicePrincipal>
credentials:
  type: service_principal
  client_id: <client-id>          # The service principal's client id
  client_secret: <client-secret>  # The service principal's client secret
  tenant_id: <tenant-id>          # The Microsoft Entra ID tenant id
CLI で Azure Machine Learning 接続を作成します。
az ml connection create --file my_snowflakedb_connection.yaml
コマンド ラインで YAML ファイル内の情報をオーバーライドすることもできます。
az ml connection create --file my_snowflakedb_connection.yaml --set credentials.client_id="my-client-id" credentials.client_secret="my-client-secret" credentials.tenant_id="my-tenant-id"
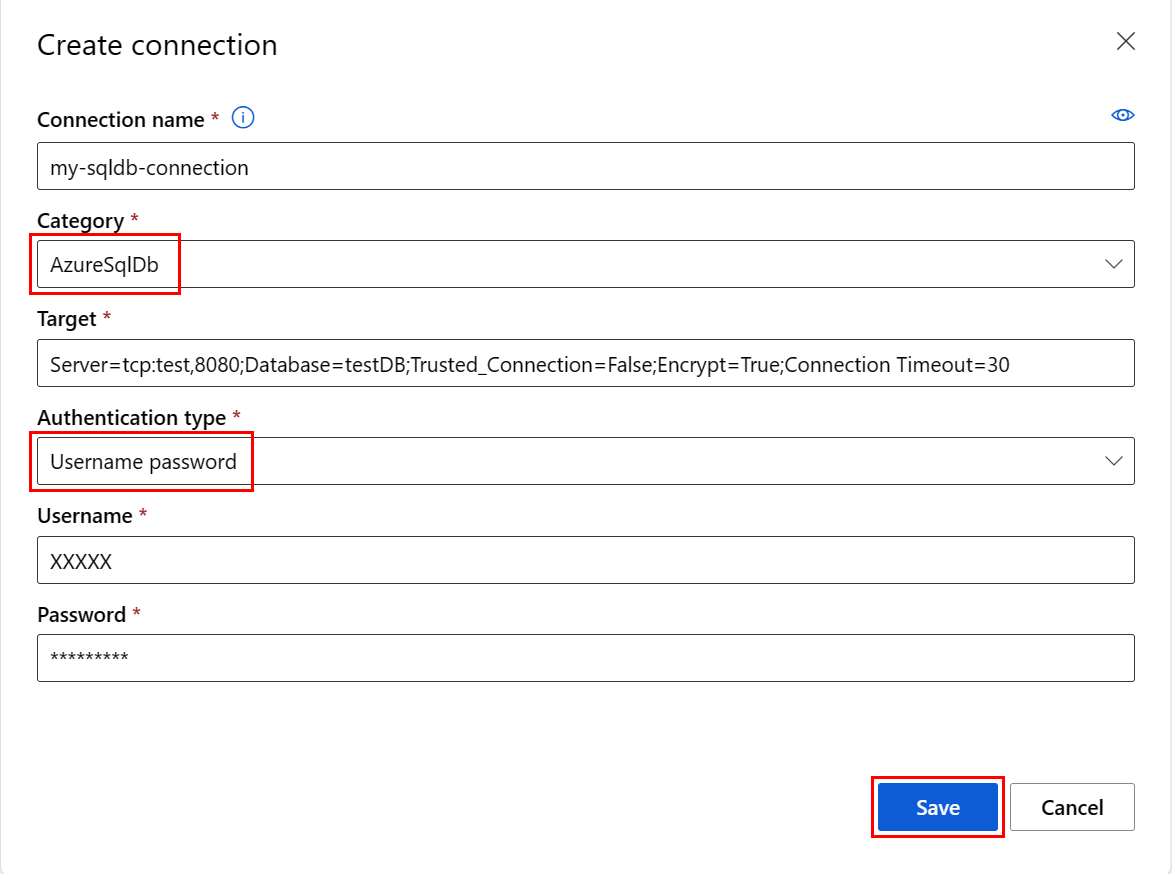
Azure SQL DB 接続を作成する
- Azure CLI
- Python SDK
-
[ スタジオ](#tab/azure-studio)
この YAML スクリプトでは、Azure SQL DB 接続を作成します。 必ず、該当する値を更新してください。
# my_sqldb_connection.yaml
$schema: http://azureml/sdk-2-0/Connection.json

type: azure_sql_db
name: my-sqldb-connection

target: Server=tcp:<myservername>,<port>;Database=<mydatabase>;Trusted_Connection=False;Encrypt=True;Connection Timeout=30
# add the sql servername, port addresss and database
credentials:
    type: sql_auth
    username: <username> # add the sql database user name here or leave this blank and type in CLI command line
    password: <password> # add the sql database password here or leave this blank and type in CLI command line
CLI で Azure Machine Learning 接続を作成します。
オプション 1: YAML ファイルからのユーザー名/パスワードを使用する
az ml connection create --file my_sqldb_connection.yaml
オプション 2: YAML ファイルでユーザー名とパスワードをオーバーライドする
az ml connection create --file my_sqldb_connection.yaml --set credentials.
username="<username>" credentials.
password="<password>"
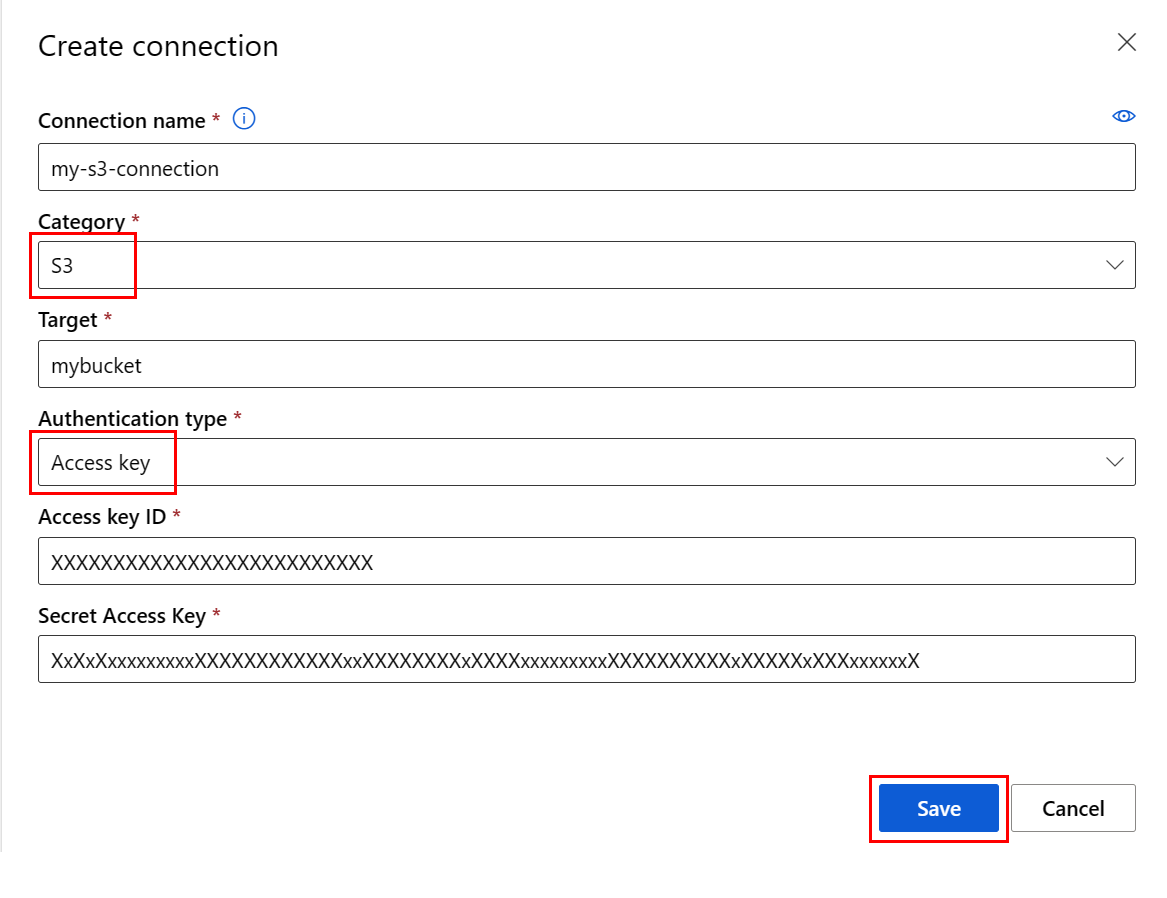
Amazon S3 接続を作成する
- Azure CLI
- Python SDK
-
[ スタジオ](#tab/azure-studio)
次の YAML ファイルを使用して Amazon S3 接続を作成します。 必ず、該当する値を更新してください。
# my_s3_connection.yaml
$schema: http://azureml/sdk-2-0/Connection.json

type: s3
name: my_s3_connection

target: <mybucket> # add the s3 bucket details
credentials:
    type: access_key
    access_key_id: bbbbbbbb-1c1c-2d2d-3e3e-444444444444 # add access key id
    secret_access_key: H4iJ5kL6mN7oP8qR9sT0uV1wX2yZ3a # add access key secret
CLI で Azure Machine Learning 接続を作成します。
az ml connection create --file my_s3_connection.yaml
非データ接続
次の接続の種類を使用して Git に接続できます。
- Python フィード
- Azure Container Registry(アジュール コンテナ レジストリ)
- API キーを使用する接続
これらの接続はデータ接続ではありませんが、コードで使うための外部サービスへの接続に使われます。
Git
- Azure CLI
- Python SDK
-
[ スタジオ](#tab/azure-studio)
次のいずれかの YAML ファイルを使って Git 接続を作成します。 必ず、該当する値を更新してください。
個人用アクセス トークン (PAT) を使って接続します。
#Connection.yml
name: test_ws_conn_git_pat
type: git
target: https://github.com/contoso/contosorepo
credentials:
    type: pat
    pat: dummy_pat
パブリック リポジトリに接続します (資格情報なし)。
#Connection.yml

name: git_no_cred_conn
type: git
target: https://https://github.com/contoso/contosorepo
CLI で Azure Machine Learning 接続を作成します。
az ml connection create --file connection.yaml
Python フィード
- Azure CLI
- Python SDK
-
[ スタジオ](#tab/azure-studio)
次のいずれかの YAML ファイルを使って Python フィードへの接続を作成します。 必ず、該当する値を更新してください。
個人用アクセス トークン (PAT) を使って接続します。
#Connection.yml
name: test_ws_conn_python_pat
type: python_feed
target: https://test-feed.com
credentials:
    type: pat
    pat: dummy_pat
ユーザー名とパスワードを使って接続します。
name: test_ws_conn_python_user_pass
type: python_feed
target: https://test-feed.com
credentials:
    type: username_password
    username: <username>
    password: <password>
パブリック フィードに接続します (資格情報なし)。
name: test_ws_conn_python_no_cred
type: python_feed
target: https://test-feed.com3
CLI で Azure Machine Learning 接続を作成します。
az ml connection create --file connection.yaml
コンテナレジストリ
- Azure CLI
- Python SDK
-
[ スタジオ](#tab/azure-studio)
次のいずれかの YAML ファイルを使って Azure Container Registry への接続を作成します。 必ず、該当する値を更新してください。
ユーザー名とパスワードを使って接続します。
name: test_ws_conn_cr_user_pass
type: container_registry
target: https://test-feed.com2
credentials:
    type: username_password
    username: <username>
    password: <password>
CLI で Azure Machine Learning 接続を作成します。
az ml connection create --file connection.yaml
API キー
次の例では、API キー接続を作成します。
from azure.ai.ml.entities import WorkspaceConnection
from azure.ai.ml.entities import UsernamePasswordConfiguration, ApiKeyConfiguration


name = "my_api_key"

target = "https://L6mN7oP8q.core.windows.net/mycontainer"

wps_connection = WorkspaceConnection(
    name=name,
    type="apikey",
    target=target,
    credentials=ApiKeyConfiguration(key="9sT0uV1wX"),
)
ml_client.connections.create_or_update(workspace_connection=wps_connection)
汎用コンテナー レジストリ
GenericContainerRegistry ワークスペース接続を使用して、イメージ ビルド用に Nexus や Artifactory などの外部レジストリを指定できます。 環境イメージは指定されたレジストリからプッシュされ、以前のキャッシュは無視されます。
- Azure CLI
- Python SDK
-
[ スタジオ](#tab/azure-studio)
次の YAML ファイルを使用して接続を作成します。 必ず、該当する値を更新してください。
#myenv.yml
$schema: https://azuremlschemas.azureedge.net/latest/environment.schema.json
name: docker-image-plus-conda-example
image: mcr.microsoft.com/azureml/openmpi4.1.0-ubuntu20.04
type: python_feed
conda_file: conda_dep.yml
description: Environment created from a Docker image plus Conda environment
#conda_dep.yml
name: project_environment
dependencies:
  - python=3.10
  - pip:
    - azureml-defaults
channels:
  - anaconda
  - conda-forge
#connection.yml
name: ws_conn_generic_container_registry
type: container_registry
target: https://test-registry.com
credentials:
  type: username_password
  username: <username>
  password: <password>
#hello_world_job.yml
$schema: https://azuremlschemas.azureedge.net/latest/commandJob.schema.json
command: echo "hello world"
environment: azureml:<env name>@latest
資格情報を使用して YAML ファイルから接続を作成します。
az ml connection create --file connection.yaml --credentials username=<username> password=<password> --resource-group my-resource-group --workspace-name my-workspace
環境を作成する
az ml environment create --name my-env --version 1 --file my_env.yml --conda-file conda_dep.yml --image mcr.microsoft.com/azureml/openmpi4.1.0-ubuntu20.04 --resource-group my-resource-group --workspace-name my-workspace
環境が正常に作成されたことを確認できます
az ml environment show --name my-env --version 1 --resource-group my-resource-group --workspace-name my-workspace
関連するコンテンツ
データ接続 (Snowflake DB、Amazon S3、または Azure SQL DB) を使用する場合、詳細については次の記事を参照してください。


