適用対象:  Python SDK azure-ai-ml v2 (現行)
注
SDK v1 を使用してパイプラインを構築するチュートリアルについては、「 チュートリアル: 画像分類用の Azure Machine Learning パイプラインを構築する」を参照してください。
機械学習パイプラインは、完全な機械学習タスクを複数のステップのワークフローに分割します。 各手順は、個別に開発、最適化、構成、自動化できる管理可能なコンポーネントです。 明確に定義されたインターフェイスは、ステップを接続します。 Azure Machine Learning パイプライン サービスは、パイプライン ステップ間のすべての依存関係を調整します。
パイプラインを使用する利点は、標準化された MLOps プラクティス、スケーラブルなチームコラボレーション、トレーニング効率、コスト削減です。 パイプラインの利点の詳細については、「Azure Machine Learning パイプラインとは」をご覧ください。
このチュートリアルでは、Azure Machine Learning を使用して、Azure Machine Learning Python SDK v2 を使用して、運用対応の機械学習プロジェクトを作成します。 このチュートリアルの後、Azure Machine Learning Python SDK を使用して次の操作を行うことができます。
- Azure Machine Learning ワークスペースへのハンドルを取得する
- Azure Machine Learning データ資産を作成する
- 再利用可能な Azure Machine Learning コンポーネントを作成する
- Azure Machine Learning パイプラインを作成、検証、実行する
このチュートリアルでは、クレジットの不履行予測に関するモデルをトレーニングする Azure Machine Learning パイプラインを作成します。 このパイプラインには、次の 2 つのステップがあります。
- データ準備
- モデルのトレーニングとトレーニング済みモデルの登録
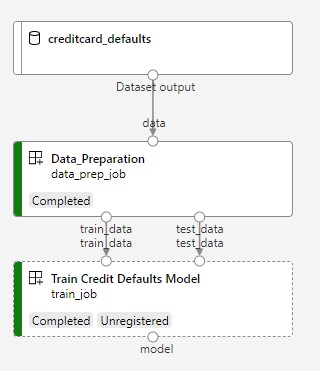
次の図は、送信後に Azure Studio に表示される単純なパイプラインを示しています。
2 つの手順は、データの準備とトレーニングです。
この動画では、Azure Machine Learning スタジオでチュートリアルの手順を実行できるように準備する方法について説明します。 この動画では、ノートブックの作成、コンピューティング インスタンスの作成、ノートブックの複製を行う方法について説明します。 以降のセクションでは、これらの手順についても説明します。
前提条件
-
Azure Machine Learning を使用するには、ワークスペースが必要です。 まだない場合は、作業を開始するために必要なリソースの作成を完了し、ワークスペースを作成してその使用方法の詳細を確認してください。
重要
Azure Machine Learning ワークスペースがマネージド仮想ネットワークを使用して構成されている場合、パブリック Python パッケージ リポジトリへのアクセスを許可するアウトバウンド規則の追加が必要になることがあります。 詳細については、「シナリオ: パブリック機械学習パッケージにアクセスする」を参照してください。
-
スタジオにサインインして、ワークスペースを選択します (まだ開いていない場合)。
チュートリアル「データのアップロード、アクセス、探索」を完了して、このチュートリアルで必要なデータ資産を作成します。 必ずすべてのコードを実行して初期データ資産を作成してください。 必要に応じてデータを探索して変更できますが、このチュートリアルでは最初のデータのみが必要です。
-
ワークスペースでノートブックを開くか作成します。
- コードをコピーしてセルに貼り付ける場合は、新しいノートブックを作成します。
- または、スタジオの [サンプル] セクションから tutorials/get-started-notebooks/pipeline.ipynb を開きます。 次に、[複製] を選択してノートブックを [ファイル] に追加します。 サンプル ノートブックを見つけるには、「サンプル ノートブックから学習する」を参照してください。
カーネルを設定して Visual Studio Code (VS Code) で開く
コンピューティング インスタンスがまだない場合は、開いているノートブックの最上部のバーで作成します。

コンピューティング インスタンスが停止している場合は、[コンピューティングの開始] を選択して、実行されるまで待ちます。

コンピューティング インスタンスが実行中になるまで待ちます。 次に、右上にあるカーネルが
Python 3.10 - SDK v2であることを確認します。 そうでない場合は、ドロップダウン リストを使用してこのカーネルを選択します。
このカーネルが表示されない場合は、コンピューティング インスタンスが実行中であることを確認します。 そうである場合は、ノートブックの右上にある [更新] ボタンを選択します。
認証が必要であることを示すバナーが表示された場合は、[認証] を選択します。
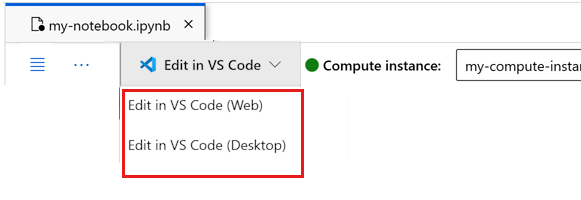
ここでノートブックを実行するか、それを VS Code で開いて、Azure Machine Learning リソースの機能を備えた完全な統合開発環境 (IDE) を使用することができます。 [VS Code で開く] を選択し、Web またはデスクトップのオプションを選択します。 この方法で起動すると、コンピューティング インスタンス、カーネル、ワークスペース ファイル システムに VS Code がアタッチされます。


重要
このチュートリアルの残りの部分には、チュートリアル ノートブックのセルが含まれています。 それらをコピーして新しいノートブックに貼り付けるか、複製した場合はここでそのノートブックに切り替えます。
パイプライン リソースを設定する
Azure CLI、Python SDK、または Studio インターフェイスから Azure Machine Learning フレームワークを使用できます。 この例では、Azure Machine Learning Python SDK v2 を使ってパイプラインを作成します。
パイプラインを作成する前に、次のリソースが必要です。
- トレーニング用のデータ資産
- パイプラインを実行するソフトウェア環境
- ジョブが実行されるコンピューティング リソース
ワークスペースへのハンドルを作成する
コードを使用する前に、ワークスペースを参照する方法が必要です。 ワークスペースのハンドルとして ml_client を作成します。 その後、 ml_client を使用してリソースとジョブを管理します。
次のセルに、サブスクリプション ID、リソース グループ名、ワークスペース名を入力します。 これらの値を見つけるには:
- 右上隅の Azure Machine Learning スタジオ ツール バーで、ワークスペース名を選びます。
- ワークスペース、リソース グループ、サブスクリプション ID の値をコードにコピーします。 1 つの値をコピーし、領域を閉じて貼り付け、次の値を返す必要があります。
from azure.ai.ml import MLClient
from azure.identity import DefaultAzureCredential, InteractiveBrowserCredential

# authenticate
try:
    credential = DefaultAzureCredential()
    credential.get_token("https://management.azure.com/.default")
except Exception:
    credential = InteractiveBrowserCredential()

SUBSCRIPTION = "<SUBSCRIPTION_ID>"
RESOURCE_GROUP = "<RESOURCE_GROUP>"
WS_NAME = "<AML_WORKSPACE_NAME>"
# Get a handle to the workspace
ml_client = MLClient(
    credential=credential,
    subscription_id=SUBSCRIPTION,
    resource_group_name=RESOURCE_GROUP,
    workspace_name=WS_NAME,
)
SDK リファレンス:
注
MLClient を作成しても、ワークスペースに接続されません。 クライアントの初期化は遅延されます。 最初に呼び出しを行う必要がある場合は、待機します。 初期化は、次のコード セルで行われます。
ml_client の呼び出しを行って接続を確認します。 この呼び出しはワークスペースへの呼び出しを初めて行うので、認証を求められる場合があります。
# Verify that the handle works correctly.
# If you get an error here, modify your SUBSCRIPTION, RESOURCE_GROUP, and WS_NAME in the previous cell.
ws = ml_client.workspaces.get(WS_NAME)
print(ws.location, ":", ws.resource_group)
SDK リファレンス:
登録済みデータ資産にアクセスする
まず、「 チュートリアル: Azure Machine Learning でデータをアップロード、アクセス、探索する」で以前に登録したデータを取得します。
注
Azure Machine Learning では、 Data オブジェクトを使用して、再利用可能なデータ定義を登録し、パイプライン内でデータを使用します。
# get a handle of the data asset and print the URI
credit_data = ml_client.data.get(name="credit-card", version="initial")
print(f"Data asset URI: {credit_data.path}")
SDK リファレンス:
パイプライン ステップに対応するジョブ環境を作成する
ここまでは、開発マシンであるコンピューティング インスタンスに開発環境を作成しました。 パイプラインの各ステップで使う環境も必要になります。 各ステップには独自の環境を設定することや、複数のステップに共通の環境を使うことができます。
この例では、conda yaml ファイルを使って、ジョブ用の conda 環境を作成します。 まず、ファイルを格納するディレクトリを作成します。
import os

dependencies_dir = "./dependencies"
os.makedirs(dependencies_dir, exist_ok=True)
次に、依存関係ディレクトリにファイルを作成します。
%%writefile {dependencies_dir}/conda.yaml
name: model-env
channels:
  - conda-forge
dependencies:
    - python=3.10
  - numpy=1.21.2
  - pip=21.2.4
  - scikit-learn=0.24.2
  - scipy=1.7.1
  - pandas>=1.1,<1.2
  - pip:
    - inference-schema[numpy-support]==1.3.0
    - xlrd==2.0.1
    - mlflow== 2.4.1
    - azureml-mlflow==1.51.0
この仕様には、パイプラインで使用する通常のパッケージ (numpy、 pip) と、いくつかの Azure Machine Learning 固有のパッケージ (azureml-mlflow) が含まれています。
Azure Machine Learning ジョブを実行するために Azure Machine Learning パッケージは必要ありません。 これらのパッケージを追加することで、Azure Machine Learning と対話して、メトリックのログ記録とモデルの登録を、すべて Azure Machine Learning ジョブ内で行うことができます。 これらをこのチュートリアルの後半のトレーニング スクリプトで使います。
yaml ファイルを使ってこのカスタム環境を作成し、ワークスペースに登録します。
from azure.ai.ml.entities import Environment

custom_env_name = "aml-scikit-learn"

pipeline_job_env = Environment(
    name=custom_env_name,
    description="Custom environment for Credit Card Defaults pipeline",
    tags={"scikit-learn": "0.24.2"},
    conda_file=os.path.join(dependencies_dir, "conda.yaml"),
    image="mcr.microsoft.com/azureml/openmpi4.1.0-ubuntu22.04:latest",
    version="0.2.0",
)
pipeline_job_env = ml_client.environments.create_or_update(pipeline_job_env)

print(
    f"Environment with name {pipeline_job_env.name} is registered to workspace, the environment version is {pipeline_job_env.version}"
)
SDK リファレンス:
トレーニング パイプラインを構築する
パイプラインの実行に必要なすべての資産が揃ったら、次はパイプライン自体をビルドします。
Azure Machine Learning パイプラインは、通常は複数のコンポーネントで構成される再利用可能な ML ワークフローです。 コンポーネントの一般的なライフ サイクルは次のとおりです。
- コンポーネントの YAML 仕様を記述するか、
ComponentMethodを使用してプログラムで作成します。 - 必要に応じて、コンポーネントをワークスペース内の名前とバージョンに登録して、再利用可能で共有可能にします。
- パイプライン コードからそのコンポーネントを読み込みます。
- コンポーネントの入力、出力、およびパラメーターを使用してパイプラインを実装します。
- パイプラインを送信します。
コンポーネントは、 プログラムによる定義 と YAML 定義の 2 つの方法で作成できます。 次の 2 つのセクションでは、両方の方法でコンポーネントを作成する方法について説明します。 両方のオプションを試して 2 つのコンポーネントを作成するか、好みの方法を選択できます。
注
このチュートリアルでは、わかりやすくするために、すべてのコンポーネントに同じコンピューティングを使用します。 ただし、コンポーネントごとに異なるコンピューティングを設定できます。 たとえば、 train_step.compute = "cpu-cluster"のような行を追加できます。 コンポーネントごとに異なるコンピューティングを使用してパイプラインを構築する例については、cifar-10 パイプライン チュートリアルの「Basic pipeline job (基本的なパイプライン ジョブ)」セクションを参照してください。
コンポーネント 1 の作成: データの準備 (プログラムによる定義の使用)
最初のコンポーネントを作成することから始めます。 このコンポーネントはデータの前処理を担当します。 前処理タスクは、data_prep.py Python ファイルで実行されます。
まず、data_prep コンポーネントのソース フォルダーを作成します。
import os

data_prep_src_dir = "./components/data_prep"
os.makedirs(data_prep_src_dir, exist_ok=True)
このスクリプトを使って、データをトレーニングとテストのデータセットに分割するというシンプルなタスクを実行します。 Azure Machine Learning は、データセットをフォルダーとしてコンピューティングにマウントします。 マウントされた入力フォルダー内のデータ ファイルにアクセスするための補助 select_first_file 関数を作成しました。
MLFlow は、パイプラインの実行中にパラメーターとメトリックをログに記録するために使用されます。
%%writefile {data_prep_src_dir}/data_prep.py
import os
import argparse
import pandas as pd
from sklearn.model_selection import train_test_split
import logging
import mlflow


def main():
    """Main function of the script."""

    # input and output arguments
    parser = argparse.ArgumentParser()
    parser.add_argument("--data", type=str, help="path to input data")
    parser.add_argument("--test_train_ratio", type=float, required=False, default=0.25)
    parser.add_argument("--train_data", type=str, help="path to train data")
    parser.add_argument("--test_data", type=str, help="path to test data")
    args = parser.parse_args()

    # Start Logging
    mlflow.start_run()

    print(" ".join(f"{k}={v}" for k, v in vars(args).items()))

    print("input data:", args.data)

    credit_df = pd.read_csv(args.data, header=1, index_col=0)

    mlflow.log_metric("num_samples", credit_df.shape[0])
    mlflow.log_metric("num_features", credit_df.shape[1] - 1)

    credit_train_df, credit_test_df = train_test_split(
        credit_df,
        test_size=args.test_train_ratio,
    )

    # output paths are mounted as folder, therefore, we are adding a filename to the path
    credit_train_df.to_csv(os.path.join(args.train_data, "data.csv"), index=False)

    credit_test_df.to_csv(os.path.join(args.test_data, "data.csv"), index=False)

    # Stop Logging
    mlflow.end_run()


if __name__ == "__main__":
    main()
目的のタスクを実行できるスクリプトができたので、そこから Azure Machine Learning コンポーネントを作成します。
コマンドライン アクションを実行できる汎用の CommandComponent を使います。 このコマンドライン アクションを使って、直接システム コマンドを呼び出すことや、スクリプトを実行することができます。 入力と出力は、 ${{ ... }} 表記を使用してコマンド ラインで指定します。
from azure.ai.ml import command
from azure.ai.ml import Input, Output

data_prep_component = command(
    name="data_prep_credit_defaults",
    display_name="Data preparation for training",
    description="reads a .xl input, split the input to train and test",
    inputs={
        "data": Input(type="uri_folder"),
        "test_train_ratio": Input(type="number"),
    },
    outputs=dict(
        train_data=Output(type="uri_folder", mode="rw_mount"),
        test_data=Output(type="uri_folder", mode="rw_mount"),
    ),
    # The source folder of the component
    code=data_prep_src_dir,
    command="""python data_prep.py \
            --data ${{inputs.data}} --test_train_ratio ${{inputs.test_train_ratio}} \
            --train_data ${{outputs.train_data}} --test_data ${{outputs.test_data}} \
            """,
    environment=f"{pipeline_job_env.name}:{pipeline_job_env.version}",
)
SDK リファレンス:
必要に応じて、将来再利用できるようにコンポーネントをワークスペースに登録します。
# Now register the component to the workspace
data_prep_component = ml_client.create_or_update(data_prep_component.component)

# Create and register the component in your workspace
print(
    f"Component {data_prep_component.name} with Version {data_prep_component.version} is registered"
)
SDK リファレンス:
コンポーネント 2 の作成: トレーニング (yaml 定義の使用)
作成する 2 番目のコンポーネントは、トレーニング データとテスト データを使用し、ツリー ベースのモデルをトレーニングし、出力モデルを返します。 Azure Machine Learning のログ機能を使って学習の進行状況を記録し、視覚化します。
最初のコンポーネントを作成するときには CommandComponent クラスを使いました。 今回は、yaml 定義を使用して 2 番目のコンポーネントを定義します。 それぞれ方法に独自の利点があります。 コードに沿って yaml 定義をチェックインし、読み取り可能な履歴追跡を提供できます。
CommandComponent を使ったプログラムによる方法は、組み込みのクラス ドキュメントとコード補完を使って、より簡単に行うことができます。
このコンポーネント用のディレクトリを作成します。
import os

train_src_dir = "./components/train"
os.makedirs(train_src_dir, exist_ok=True)
このディレクトリ内にトレーニング スクリプトを作成します。
%%writefile {train_src_dir}/train.py
import argparse
from sklearn.ensemble import GradientBoostingClassifier
from sklearn.metrics import classification_report
import os
import pandas as pd
import mlflow


def select_first_file(path):
    """Selects first file in folder, use under assumption there is only one file in folder
    Args:
        path (str): path to directory or file to choose
    Returns:
        str: full path of selected file
    """
    files = os.listdir(path)
    return os.path.join(path, files[0])


# Start Logging
mlflow.start_run()

# enable autologging
mlflow.sklearn.autolog()

os.makedirs("./outputs", exist_ok=True)


def main():
    """Main function of the script."""

    # input and output arguments
    parser = argparse.ArgumentParser()
    parser.add_argument("--train_data", type=str, help="path to train data")
    parser.add_argument("--test_data", type=str, help="path to test data")
    parser.add_argument("--n_estimators", required=False, default=100, type=int)
    parser.add_argument("--learning_rate", required=False, default=0.1, type=float)
    parser.add_argument("--registered_model_name", type=str, help="model name")
    parser.add_argument("--model", type=str, help="path to model file")
    args = parser.parse_args()

    # paths are mounted as folder, therefore, we are selecting the file from folder
    train_df = pd.read_csv(select_first_file(args.train_data))

    # Extracting the label column
    y_train = train_df.pop("default payment next month")

    # convert the dataframe values to array
    X_train = train_df.values

    # paths are mounted as folder, therefore, we are selecting the file from folder
    test_df = pd.read_csv(select_first_file(args.test_data))

    # Extracting the label column
    y_test = test_df.pop("default payment next month")

    # convert the dataframe values to array
    X_test = test_df.values

    print(f"Training with data of shape {X_train.shape}")

    clf = GradientBoostingClassifier(
        n_estimators=args.n_estimators, learning_rate=args.learning_rate
    )
    clf.fit(X_train, y_train)

    y_pred = clf.predict(X_test)

    print(classification_report(y_test, y_pred))

    # Registering the model to the workspace
    print("Registering the model via MLFlow")
    mlflow.sklearn.log_model(
        sk_model=clf,
        registered_model_name=args.registered_model_name,
        artifact_path=args.registered_model_name,
    )

    # Saving the model to a file
    mlflow.sklearn.save_model(
        sk_model=clf,
        path=os.path.join(args.model, "trained_model"),
    )

    # Stop Logging
    mlflow.end_run()


if __name__ == "__main__":
    main()
このトレーニング スクリプトでわかるように、モデルのトレーニング後、モデル ファイルが保存され、ワークスペースに登録されます。 これで、登録したモデルを推論エンドポイントで使用できるようになりました。
このステップの環境には、組み込みの (キュレーションされた) Azure Machine Learning 環境のいずれかを使います。 タグ azureml は、キュレーションされた環境で名前を検索するようにシステムに指示します。
まずコンポーネントを記述する yaml ファイルを作成します。
%%writefile {train_src_dir}/train.yml
# <component>
name: train_credit_defaults_model
display_name: Train Credit Defaults Model
# version: 1 # Not specifying a version will automatically update the version
type: command
inputs:
  train_data:
    type: uri_folder
  test_data:
    type: uri_folder
  learning_rate:
    type: number
  registered_model_name:
    type: string
outputs:
  model:
    type: uri_folder
code: .
environment:
  # for this step, we'll use an AzureML curate environment
  azureml://registries/azureml/environments/sklearn-1.0/labels/latest
command: >-
  python train.py
  --train_data ${{inputs.train_data}}
  --test_data ${{inputs.test_data}}
  --learning_rate ${{inputs.learning_rate}}
  --registered_model_name ${{inputs.registered_model_name}}
  --model ${{outputs.model}}
# </component>
次に、コンポーネントを作成して登録します。 登録すると、他のパイプラインで再利用できます。 ワークスペースにアクセスできる他のユーザーも、登録済みコンポーネントを使用できます。
# importing the Component Package
from azure.ai.ml import load_component

# Loading the component from the yml file
train_component = load_component(source=os.path.join(train_src_dir, "train.yml"))

# Now register the component to the workspace
train_component = ml_client.create_or_update(train_component)

# Create and register the component in your workspace
print(
    f"Component {train_component.name} with Version {train_component.version} is registered"
)
SDK リファレンス:
コンポーネントからパイプラインを作成する
コンポーネントを定義して登録したら、パイプラインの実装を開始します。
load_component()返される Python 関数は、通常の Python 関数と同様に機能します。 それらをパイプラインで使用して、各ステップを呼び出します。
パイプラインをコーディングするには、Azure Machine Learning パイプラインを識別する特定の @dsl.pipeline デコレーターを使用します。 デコレーターで、パイプラインの説明と、コンピューティングやストレージなどの既定のリソースを指定します。 Python 関数と同様に、パイプラインには入力を含めることができます。 入力が異なる 1 つのパイプラインの複数のインスタンスを作成できます。
次の例では、 入力変数として入力データ、 分割率、および 登録済みモデル名 を使用します。 次に、コンポーネントを呼び出し、入力と出力の識別子を使用して接続します。
.outputs プロパティを使用して、各ステップの出力にアクセスします。
# the dsl decorator tells the sdk that we are defining an Azure Machine Learning pipeline
from azure.ai.ml import dsl, Input, Output


@dsl.pipeline(
    compute="serverless",  # "serverless" value runs pipeline on serverless compute
    description="E2E data_perp-train pipeline",
)
def credit_defaults_pipeline(
    pipeline_job_data_input,
    pipeline_job_test_train_ratio,
    pipeline_job_learning_rate,
    pipeline_job_registered_model_name,
):
    # using data_prep_function like a python call with its own inputs
    data_prep_job = data_prep_component(
        data=pipeline_job_data_input,
        test_train_ratio=pipeline_job_test_train_ratio,
    )

    # using train_func like a python call with its own inputs
    train_job = train_component(
        train_data=data_prep_job.outputs.train_data,  # note: using outputs from previous step
        test_data=data_prep_job.outputs.test_data,  # note: using outputs from previous step
        learning_rate=pipeline_job_learning_rate,  # note: using a pipeline input as parameter
        registered_model_name=pipeline_job_registered_model_name,
    )

    # a pipeline returns a dictionary of outputs
    # keys will code for the pipeline output identifier
    return {
        "pipeline_job_train_data": data_prep_job.outputs.train_data,
        "pipeline_job_test_data": data_prep_job.outputs.test_data,
    }
SDK リファレンス:
次に、パイプライン定義を使用して、データセット、選択した分割レート、およびモデルに対して選択した名前を使用してパイプラインをインスタンス化します。
registered_model_name = "credit_defaults_model"

# Let's instantiate the pipeline with the parameters of our choice
pipeline = credit_defaults_pipeline(
    pipeline_job_data_input=Input(type="uri_file", path=credit_data.path),
    pipeline_job_test_train_ratio=0.25,
    pipeline_job_learning_rate=0.05,
    pipeline_job_registered_model_name=registered_model_name,
)
SDK リファレンス:
ジョブを送信する
次に、Azure Machine Learning で実行するジョブを送信します。 今回は、create_or_update に対して ml_client.jobs を使用します。
実験名を渡します。 実験は、特定のプロジェクトで行われるすべてのイテレーションのコンテナーです。 Azure Machine Learning Studio では、同じ実験名で送信されたすべてのジョブが隣り合って表示されます。
完了すると、パイプラインはトレーニングの結果としてワークスペースにモデルを登録します。
# submit the pipeline job
pipeline_job = ml_client.jobs.create_or_update(
    pipeline,
    # Project's name
    experiment_name="e2e_registered_components",
)
ml_client.jobs.stream(pipeline_job.name)
SDK リファレンス:
- JobOperations.create_or_update(ジョブ操作の作成または更新)
- JobOperations.stream
前のセルで生成されたリンクを使用して、パイプラインの進行状況を追跡できます。 このリンクを最初に選択すると、パイプラインがまだ実行されていることがわかります。 完了したら、各コンポーネントの結果を調べることができます。
[Train Credit Defaults Model] コンポーネントをダブルクリックします。
トレーニングについて確認する 2 つの重要な結果:
ログを表示する。
- [出力 + ログ] タブを選択します。
- フォルダーを
user_logs>std_log.txtの順に開きます。このセクションに、スクリプト実行の stdout が表示されます。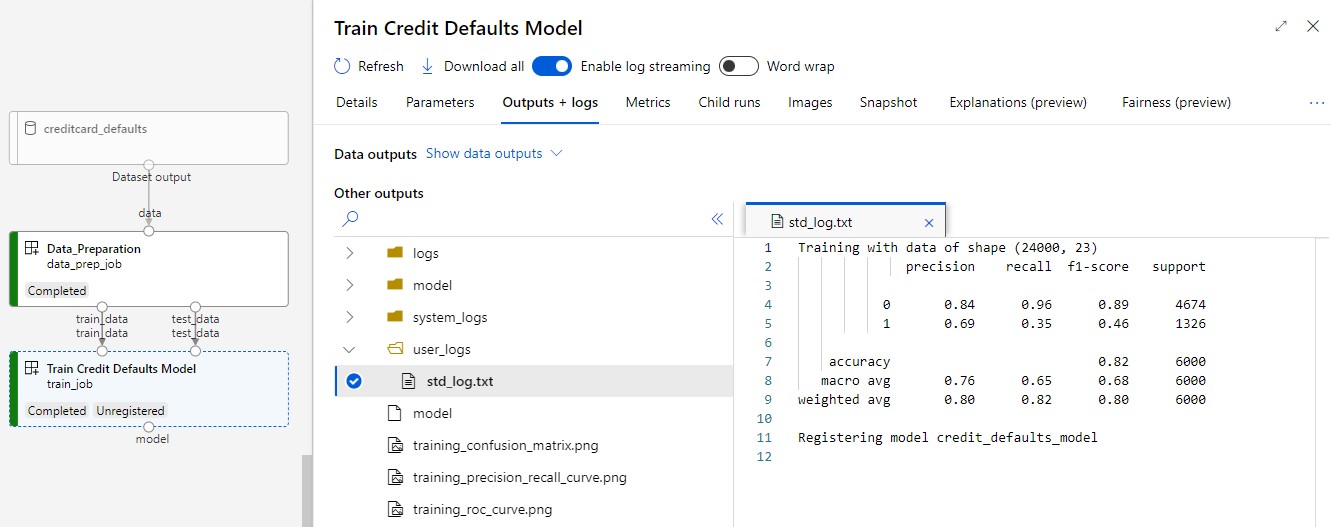
メトリックを表示する。[メトリック] タブを選択します。このセクションには、ログに記録されたさまざまなメトリックが表示されます。 この例では、mlflow
autologgingによってトレーニング メトリックが自動的にログに記録されます。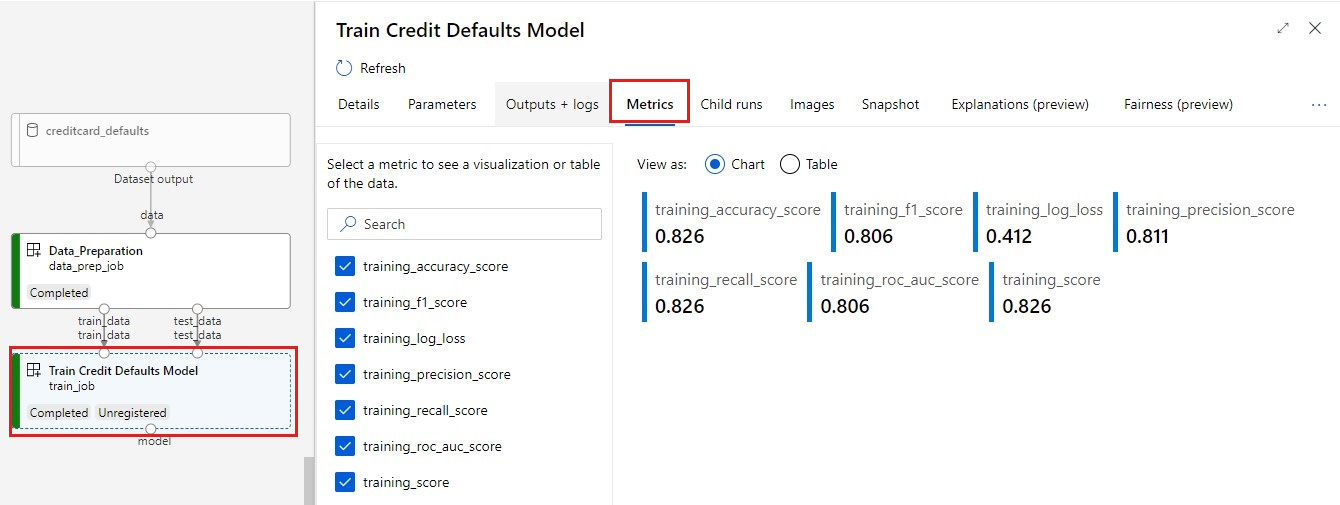


モデルをオンライン エンドポイントとしてデプロイする
モデルをオンライン エンドポイントにデプロイする方法の詳細については、オンライン エンドポイント としてのモデルのデプロイに関するチュートリアルを参照してください。
リソースをクリーンアップする
他のチュートリアルに進む場合は、「 次のステップ」に進んでください。
コンピューティング インスタンスを停止する
コンピューティング インスタンスを今すぐ使用しない場合は、停止します。
- スタジオの左側のウィンドウで、[ コンピューティング] を選択します。
- 上部のタブで、[コンピューティング インスタンス] を選択します。
- 一覧からコンピューティング インスタンスを選択します。
- 上部のツールバーで、 [停止] を選択します。
すべてのリソースの削除
重要
作成したリソースは、Azure Machine Learning に関連したその他のチュートリアルおよびハウツー記事の前提条件として使用できます。
作成したどのリソースも今後使用する予定がない場合は、課金が発生しないように削除します。
Azure portal の検索ボックスに「リソース グループ」と入力し、それを結果から選択します。
一覧から、作成したリソース グループを選択します。
[概要] ページで、[リソース グループの削除] を選択します。
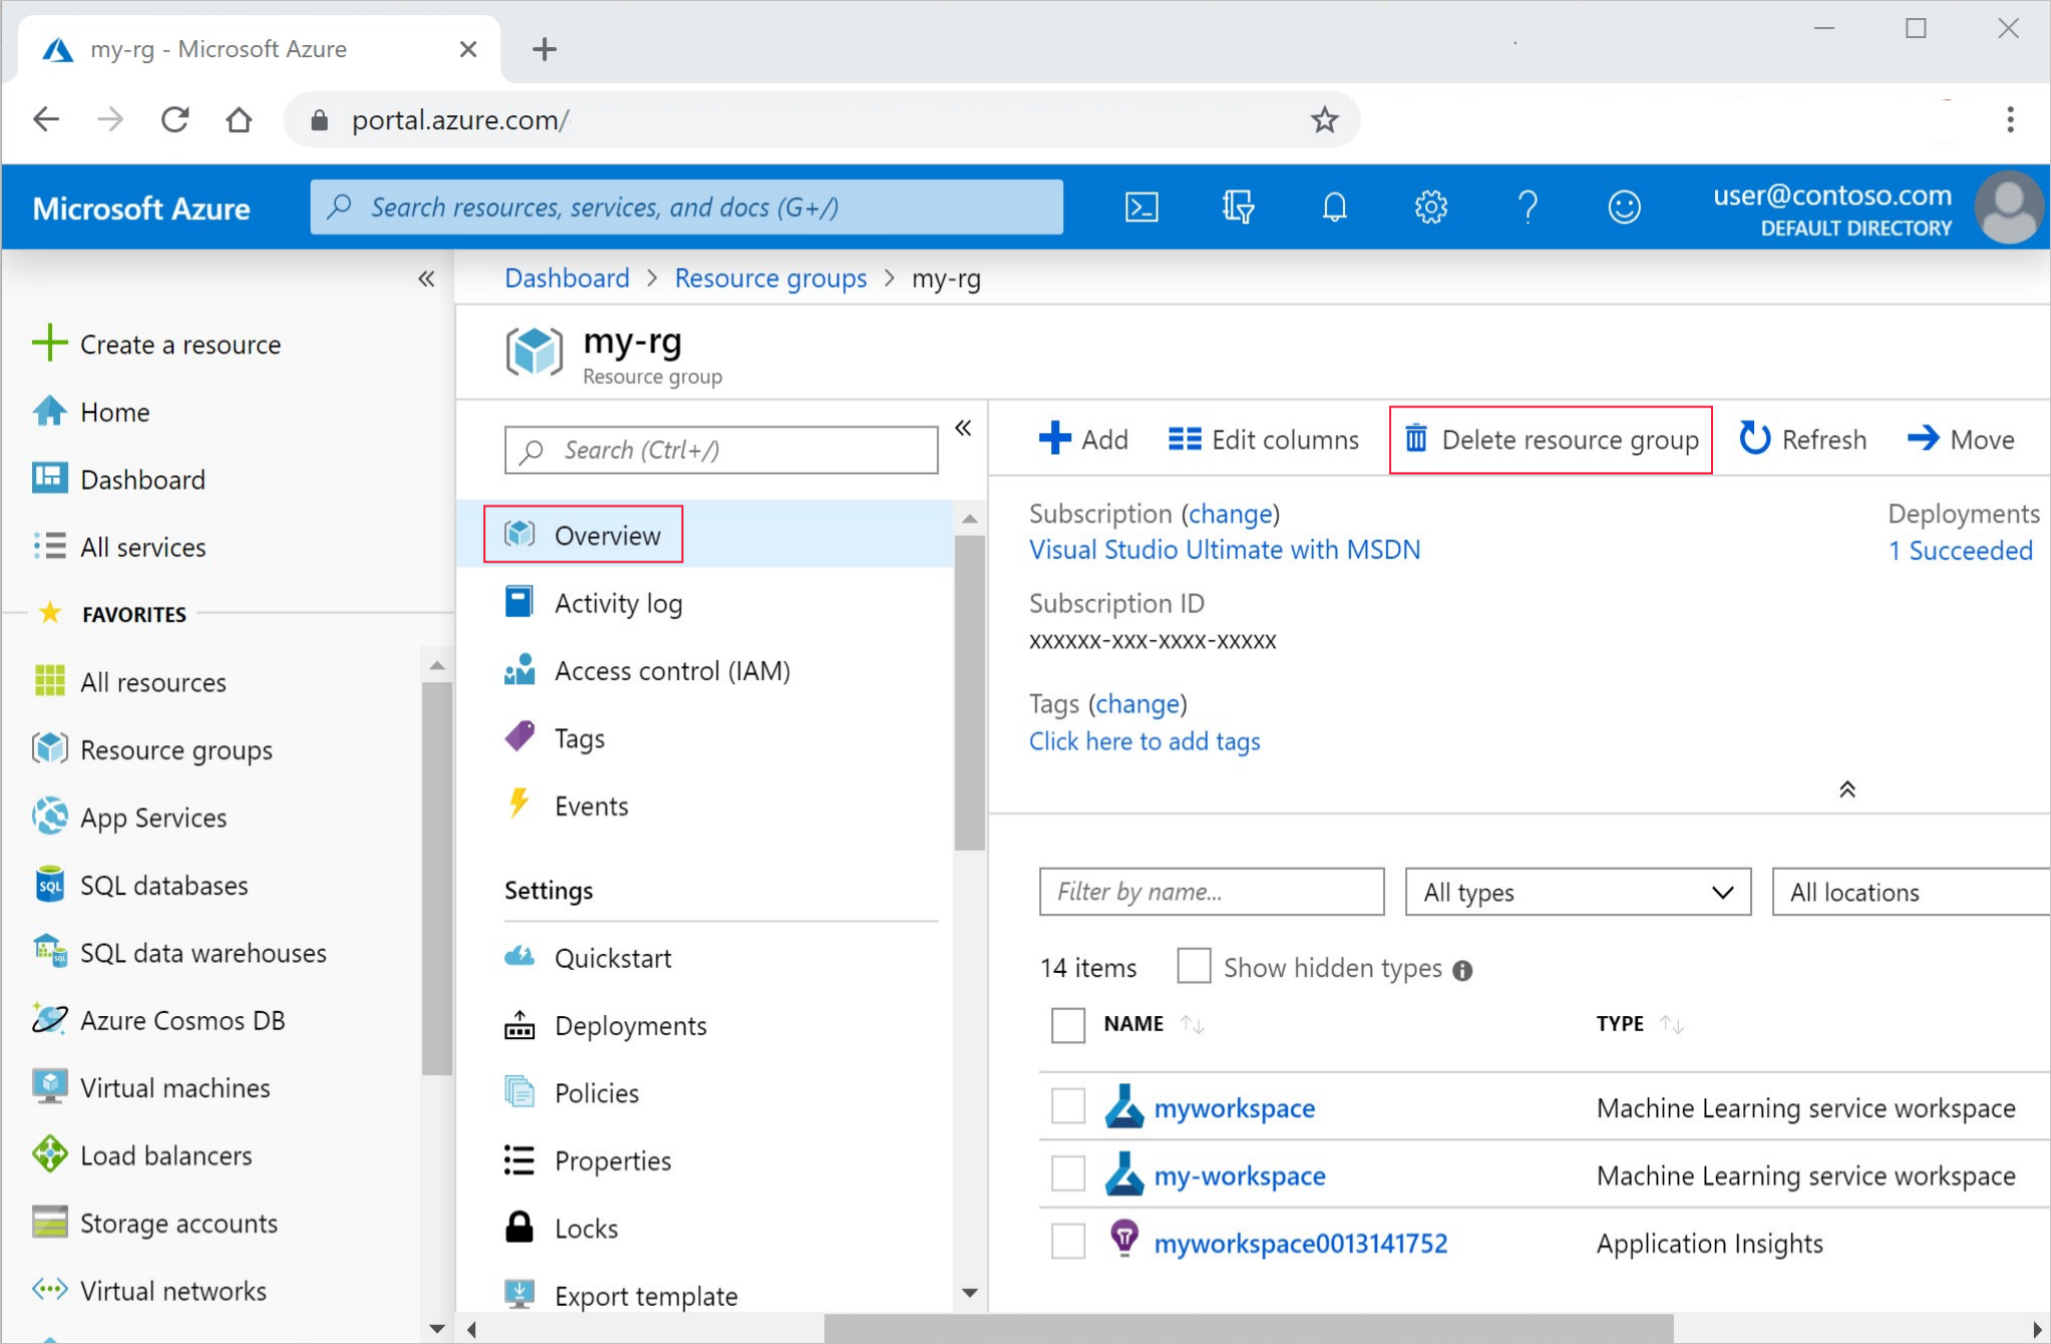
リソース グループ名を入力します。 次に、 [削除] を選択します。