チュートリアル:Azure Spatial Anchors を使用して新しい Android アプリを作成する手順
このチュートリアルでは、ARCore 機能を Azure Spatial Anchors と統合する新しい Android アプリの作成方法を示します。
前提条件
このチュートリアルを完了するには、以下のものが必要です。
- Android Studio 3.4 以降がインストールされている Windows または macOS マシン。
- 開発者向けの ARCore 対応 Android デバイス。
作業の開始
Android Studio を起動します。 [Android Studio へようこそ] ウィンドウで、 [新規 Android Studio プロジェクトの開始] を選択します。
- [ファイル]-> [新しいプロジェクト] を選択します。
- [新規プロジェクトの作成] ウィンドウの [スマホおよびタブレット] セクションで、 [空のアクティビティ] を選択し、 [次へ] をクリックします。
- [New Project - Empty Activity]\(新しいアクティビティ - 空のアクティビティ\) ウィンドウで、次の値を変更します。
- [名前] 、 [パッケージ名] 、 [保存場所] を、希望する値に変更します
- [言語] を
Javaに設定します - [最小 API レベル] を
API 26: Android 8.0 (Oreo)に設定します - 他のオプションはそのままにします
- [完了] をクリックします。
- コンポーネント インストーラーが実行されます。 いくつかの処理の後、Android Studio によって IDE が開かれます。
![Android Studio - [新しいプロジェクト]](../../includes/media/spatial-anchors-androidstudio/androidstudio-newproject.png)
試してみる
新しいアプリをテストするには、USB ケーブルを使用して開発用マシンに開発者向けのデバイスを接続します。 Android Studio の右上で、接続されているデバイスを選択して [Run 'app'](アプリの実行) アイコンをクリックします。 Android Studio によって、接続されているデバイスにアプリがインストールされて起動されます。 これで、デバイスで実行されているアプリに "Hello World!" と表示されます。 [実行]->[アプリの停止] をクリックします。
![Android Studio - [実行]](../../includes/media/spatial-anchors-androidstudio/androidstudio-run.png)
ARCore との統合
ARCore は、Augmented Reality エクスペリエンスを構築するための Google のプラットフォームであり、お使いのデバイスが移動するときにその位置を追跡し、現実世界の独自の認識を構築できるようにします。
ルート <manifest> ノード内に次のエントリを含むように app\manifests\AndroidManifest.xml を変更します。 このコード スニペットではいくつかのことを行います。
- アプリにデバイスのカメラへのアクセスを許可します。
- Google Play ストア内で、ARCore をサポートするデバイスに対してのみアプリが表示されるようにもします。
- アプリのインストール時に ARCore がまだインストールされていない場合は ARCore をダウンロードしてインストールするように Google Play ストアを構成します。
<manifest ...>

    <uses-permission android:name="android.permission.CAMERA" />
    <uses-feature android:name="android.hardware.camera.ar" />

    <application>
        ...
        <meta-data android:name="com.google.ar.core" android:value="required" />
        ...
    </application>

</manifest>
次のエントリを含むように Gradle Scripts\build.gradle (Module: app) を変更します。 このコードにより、ご自分のアプリは確実に ARCore バージョン 1.25 を対象とするようになります。 この変更の後に、Gradle から同期を求める通知を受け取ることがあります。 [Sync now](今すぐ同期) をクリックします。
dependencies {
    ...
    implementation 'com.google.ar:core:1.25.0'
    ...
}
Sceneform の統合
Sceneform により、OpenGL を習得しなくても、Augmented Reality アプリ内でリアルな 3D シーンを簡単にレンダリングできます。
次のエントリを含むように Gradle Scripts\build.gradle (Module: app) を変更します。 このコードにより、アプリは Sceneform に必要な Java 8 の言語コンストラクトの使用を許可されます。 また、アプリが Sceneform バージョン 1.15 をターゲットとします。 この変更の後に、Gradle から同期を求める通知を受け取ることがあります。 [Sync now](今すぐ同期) をクリックします。
android {
    ...

    compileOptions {
        sourceCompatibility JavaVersion.VERSION_1_8
        targetCompatibility JavaVersion.VERSION_1_8
    }
}

dependencies {
    ...
    implementation 'com.google.ar.sceneform.ux:sceneform-ux:1.15.0'
    ...
}
app\res\layout\activity_main.xml を開き、既存の Hello World <TextView ... /> 要素を次の ArFragment に置き換えます。 このコードにより、カメラ フィードが画面に表示され、お使いのデバイスが移動するときにその位置を ARCore で追跡できます。
<fragment android:name="com.google.ar.sceneform.ux.ArFragment"
    android:id="@+id/ux_fragment"
    android:layout_width="match_parent"
    android:layout_height="match_parent" />
注意
メイン アクティビティの Raw xml を表示するためには、Android Studio の右上にある [コード] または [分割] のボタンをクリックします。
お使いのデバイスにアプリを再デプロイして、もう一度検証します。 今回は、カメラのアクセス許可を求められます。 承認されると、画面上にカメラ フィードのレンダリングが表示されます。
現実世界でのオブジェクトの配置
アプリを使用してオブジェクトを作成し、配置しましょう。 まず、以下の import を app\java\<PackageName>\MainActivity に追加します。
import com.google.ar.core.HitResult;
import com.google.ar.core.Plane;
import com.google.ar.sceneform.AnchorNode;
import com.google.ar.sceneform.math.Vector3;
import com.google.ar.sceneform.rendering.Color;
import com.google.ar.sceneform.rendering.MaterialFactory;
import com.google.ar.sceneform.rendering.Renderable;
import com.google.ar.sceneform.rendering.ShapeFactory;
import com.google.ar.sceneform.ux.ArFragment;

import android.view.MotionEvent;
続いて、以下のメンバー変数を MainActivity クラスに追加します。
private boolean tapExecuted = false;
private final Object syncTaps = new Object();
private ArFragment arFragment;
private AnchorNode anchorNode;
private Renderable nodeRenderable = null;
private float recommendedSessionProgress = 0f;
次に、以下のコードを app\java\<PackageName>\MainActivity onCreate() メソッドに追加します。 このコードでは、ユーザーがデバイスの画面をタップしたときにそれを検出する handleTap() というリスナーをフックします。 ARCore の追跡によって既に認識されている現実世界のサーフェス上でタップが行われると、リスナーが実行されます。
@Override
protected void onCreate(Bundle savedInstanceState) {
    super.onCreate(savedInstanceState);
    setContentView(R.layout.activity_main);

    this.arFragment = (ArFragment) getSupportFragmentManager().findFragmentById(R.id.ux_fragment);
    this.arFragment.setOnTapArPlaneListener(this::handleTap);
}
最後に、すべてをまとめる次の handleTap() メソッド追加します。 これにより球体が作成されて、タップされた位置に配置されます。 this.recommendedSessionProgress は現在 0 に設定されているので、最初は球体が黒くなります。 この値は後で調整されます。
protected void handleTap(HitResult hitResult, Plane plane, MotionEvent motionEvent) {
    synchronized (this.syncTaps) {
        if (this.tapExecuted) {
            return;
        }

        this.tapExecuted = true;
    }

    this.anchorNode = new AnchorNode();
    this.anchorNode.setAnchor(hitResult.createAnchor());

    MaterialFactory.makeOpaqueWithColor(this, new Color(
            this.recommendedSessionProgress,
            this.recommendedSessionProgress,
            this.recommendedSessionProgress))
            .thenAccept(material -> {
                this.nodeRenderable = ShapeFactory.makeSphere(0.1f, new Vector3(0.0f, 0.15f, 0.0f), material);
                this.anchorNode.setRenderable(nodeRenderable);
                this.anchorNode.setParent(arFragment.getArSceneView().getScene());
            });
}
お使いのデバイスにアプリを再デプロイして、もう一度検証します。 今回は、ARCore が環境の認識を開始するようにお使いのデバイスを移動できます。 次に、画面をタップして黒い球体を作成し、任意のサーフェス上に配置します。
ローカル Azure Spatial Anchor のアタッチ
次のエントリを含むように Gradle Scripts\build.gradle (Module: app) を変更します。 このサンプル コード スニペットは、Azure Spatial Anchors SDK バージョン 2.10.2 を対象としています。 現在、SDK バージョン 2.7.0 がサポートされる最小バージョンであり、それより新しいバージョンの Azure Spatial Anchors を参照している場合も同様に機能するはずです。 最新バージョンの Azure Spatial Anchors SDK を使用することをお勧めします。 SDK のリリース ノートはこちらで確認できます。
dependencies {
    ...
    implementation 'com.microsoft.azure.spatialanchors:spatialanchors_jni:[2.10.2]'
    implementation 'com.microsoft.azure.spatialanchors:spatialanchors_java:[2.10.2]'
    ...
}
Azure Spatial Anchors SDK 2.10.0 以降を対象としている場合は、プロジェクトの settings.gradle ファイルの repositories セクションに次のエントリを追加します。 これには、SDK 2.10.0 以降用の Azure Spatial Anchors Android パッケージがホストされている Maven パッケージ フィードの URL が含まれます。
dependencyResolutionManagement {
    ...
    repositories {
        ...
        maven {
            url 'https://pkgs.dev.azure.com/aipmr/MixedReality-Unity-Packages/_packaging/Maven-packages/maven/v1'
        }
        ...
    }
}
app\java\<PackageName>->[新規]->[Java Class](Java クラス) を右クリックします。 [名前] を MyFirstApp に設定し、 [クラス] を選択します。 MyFirstApp.java というファイルが作成されます。 そこに次の import を追加します。
import com.microsoft.CloudServices;
android.app.Application をスーパークラスとして定義します。
public class MyFirstApp extends android.app.Application {...
次に、新しい MyFirstApp クラス内に次のコードを追加します。このコードにより、Azure Spatial Anchors がアプリケーションのコンテキストで初期化されます。
    @Override
    public void onCreate() {
        super.onCreate();
        CloudServices.initialize(this);
    }
ここで、ルート <application> ノード内に次のエントリを含むように app\manifests\AndroidManifest.xml を変更します。 このコードでは、作成したアプリケーション クラスがアプリにフックされます。
    <application
        android:name=".MyFirstApp"
        ...
    </application>
app\java\<PackageName>\MainActivity に戻り、そこに以下の import を追加します。
import android.view.MotionEvent;
import android.util.Log;

import com.google.ar.sceneform.ArSceneView;
import com.google.ar.sceneform.Scene;
import com.microsoft.azure.spatialanchors.CloudSpatialAnchor;
import com.microsoft.azure.spatialanchors.CloudSpatialAnchorSession;
import com.microsoft.azure.spatialanchors.SessionLogLevel;
続いて、以下のメンバー変数を MainActivity クラスに追加します。
private float recommendedSessionProgress = 0f;

private ArSceneView sceneView;
private CloudSpatialAnchorSession cloudSession;
private boolean sessionInitialized = false;
次に、以下の initializeSession() メソッドを mainActivity クラス内に追加しましょう。 これが呼び出されると、Azure Spatial Anchors セッションが作成され、アプリの起動時に適切に初期化されます。 このコードにより、cloudSession.setSession 呼び出しを介して ASA セッションに渡された sceneView セッションは、早期リターンが設定されているため、null ではありません。
private void initializeSession() {
    if (sceneView.getSession() == null) {
        //Early return if the ARCore Session is still being set up
        return;
    }

    if (this.cloudSession != null) {
        this.cloudSession.close();
    }
    this.cloudSession = new CloudSpatialAnchorSession();
    this.cloudSession.setSession(sceneView.getSession());
    this.cloudSession.setLogLevel(SessionLogLevel.Information);
    this.cloudSession.addOnLogDebugListener(args -> Log.d("ASAInfo", args.getMessage()));
    this.cloudSession.addErrorListener(args -> Log.e("ASAError", String.format("%s: %s", args.getErrorCode().name(), args.getErrorMessage())));

    sessionInitialized = true;
}
sceneView セッションがまだ設定されていない場合 (つまり、sceneView.getSession() が null の場合) に initializeSession() が早期リターンを行えるため、onUpdate 呼び出しを追加して、sceneView セッションが作成されたら ASA セッションが初期化されるようにします。
private void scene_OnUpdate(FrameTime frameTime) {
    if (!sessionInitialized) {
        //retry if initializeSession did an early return due to ARCore Session not yet available (i.e. sceneView.getSession() == null)
        initializeSession();
    }
}
次に、initializeSession() および scene_OnUpdate(...) メソッドを onCreate() メソッドにフックしましょう。 また、カメラ フィードからのフレームが処理のために Azure Spatial Anchors SDK に送信されるようにします。
@Override
protected void onCreate(Bundle savedInstanceState) {
    super.onCreate(savedInstanceState);
    setContentView(R.layout.activity_main);

    this.arFragment = (ArFragment) getSupportFragmentManager().findFragmentById(R.id.ux_fragment);
    this.arFragment.setOnTapArPlaneListener(this::handleTap);

    this.sceneView = arFragment.getArSceneView();
    Scene scene = sceneView.getScene();
    scene.addOnUpdateListener(frameTime -> {
        if (this.cloudSession != null) {
            this.cloudSession.processFrame(sceneView.getArFrame());
        }
    });
    scene.addOnUpdateListener(this::scene_OnUpdate);
    initializeSession();
}
最後に、以下のコードを handleTap() メソッドに追加します。 これにより、現実世界に配置している黒い球体にローカルの Azure 空間アンカーがアタッチされます。
protected void handleTap(HitResult hitResult, Plane plane, MotionEvent motionEvent) {
    synchronized (this.syncTaps) {
        if (this.tapExecuted) {
            return;
        }

        this.tapExecuted = true;
    }

    this.anchorNode = new AnchorNode();
    this.anchorNode.setAnchor(hitResult.createAnchor());
    CloudSpatialAnchor cloudAnchor = new CloudSpatialAnchor();
    cloudAnchor.setLocalAnchor(this.anchorNode.getAnchor());

    MaterialFactory.makeOpaqueWithColor(this, new Color(
            this.recommendedSessionProgress,
            this.recommendedSessionProgress,
            this.recommendedSessionProgress))
            .thenAccept(material -> {
                this.nodeRenderable = ShapeFactory.makeSphere(0.1f, new Vector3(0.0f, 0.15f, 0.0f), material);
                this.anchorNode.setRenderable(nodeRenderable);
                this.anchorNode.setParent(arFragment.getArSceneView().getScene());
            });
}
アプリをもう一度再デプロイします。 お使いのデバイスを移動し、画面をタップして黒い球体を配置します。 ただし今回は、コードによりローカルの Azure 空間アンカーが作成されて球体にアタッチされます。
先に進む前に、アカウント識別子、キー、ドメインがまだない場合は、Azure Spatial Anchors アカウントを作成してこれらを取得する必要があります。 次のセクションに従ってこれらを取得します。
Spatial Anchors リソースを作成する
Azure ポータルにアクセスします。
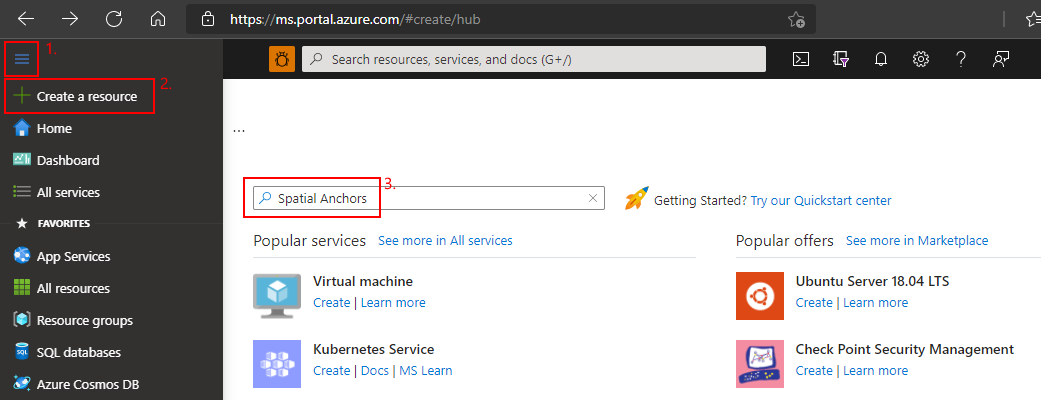
左側のウィンドウで、 [リソースの作成] を選択します。
検索ボックスを使用して、「Spatial Anchors」を検索します。

[Spatial Anchors] を選択し、 [作成] を選択します。
[Spatial Anchors アカウント] ウィンドウで次を行います。
通常の英数字を使用して一意のリソース名を入力します。
リソースをアタッチするサブスクリプションを選択します。
[新規作成] を選択して、リソース グループを作成します。 「myResourceGroup」と名前を付け、 [OK] を選択します。
リソース グループとは、Web アプリ、データベース、ストレージ アカウントなどの Azure リソースのデプロイと管理に使用する論理コンテナーです。 たとえば、後から簡単な手順で一度にリソース グループ全体を削除することもできます。
リソースを配置する場所 (リージョン) を選択します。
[作成] を選択して、リソースの作成を開始します。
![リソースを作成するための [Spatial Anchors] ウィンドウのスクリーンショット。](../../includes/media/spatial-anchors-get-started-create-resource/create-resource-form.png)
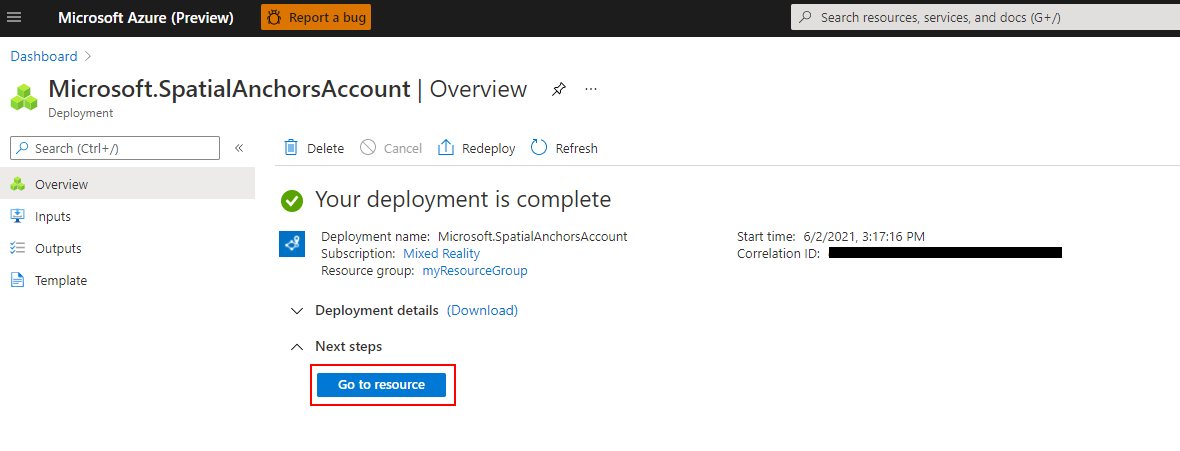
リソースが作成されると、Azure portal に、デプロイが完了したことが表示されます。

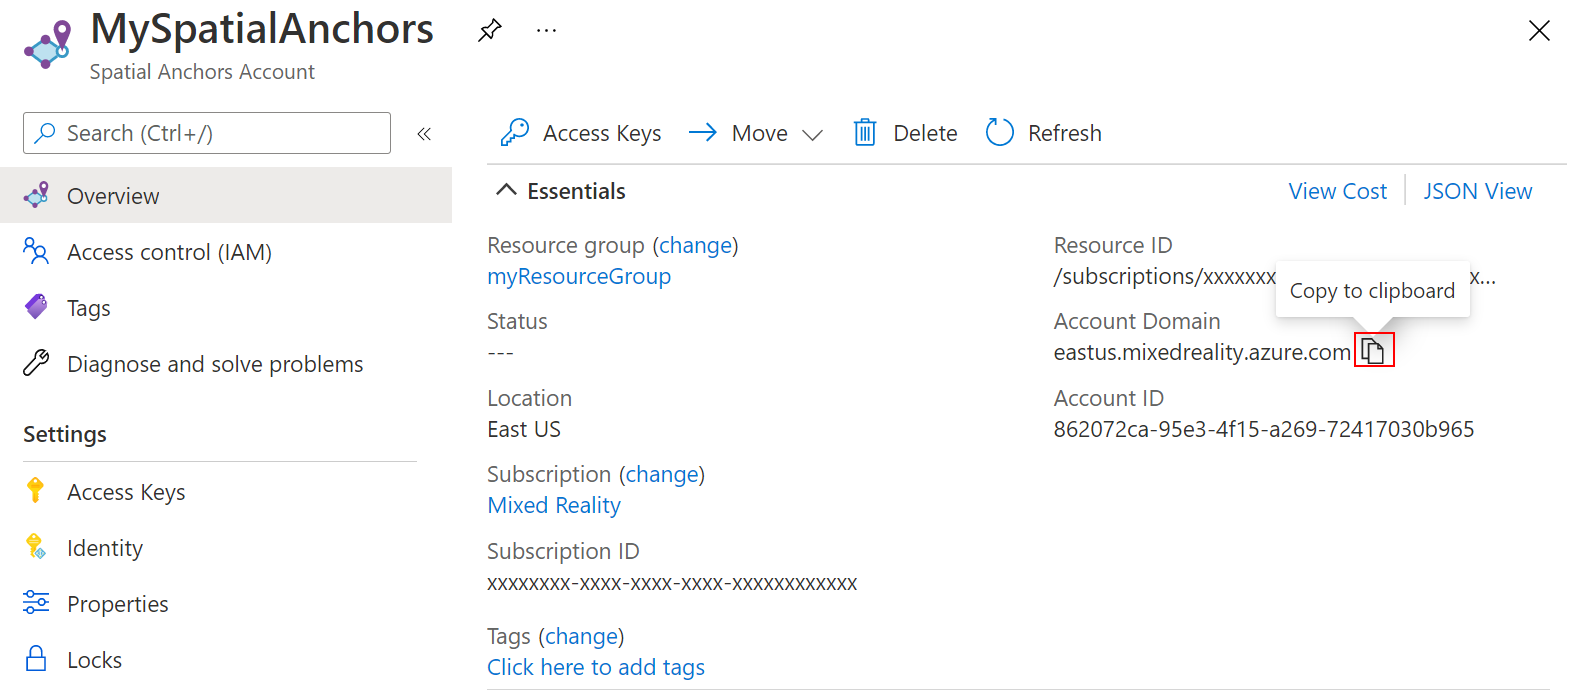
[リソースに移動] を選択します。 これでリソースのプロパティを表示できます。
リソースの [アカウント ID] 値は後で使用するためにテキスト エディターにコピーしておきます。
![[リソース プロパティ] ウィンドウのスクリーンショット。](../../includes/media/spatial-anchors-get-started-create-resource/view-resource-accountid.png)
また、リソースの [アカウント ドメイン] 値を後で使用するためにテキスト エディターにコピーします。

[設定] で [アクセス キー] を選択します。 [主キー] 値の [アカウント キー] を後で使用するためにテキスト エディターにコピーします。
![アカウントの [キー] ウィンドウのスクリーンショット。](../../includes/media/spatial-anchors-get-started-create-resource/view-account-key.png)
クラウドへのローカル アンカーのアップロード
自分の Azure Spatial Anchors アカウント識別子、キー、ドメインを作成したら、app\java\<PackageName>\MainActivity に戻り、そこに以下の import を追加できます。
import com.microsoft.azure.spatialanchors.SessionLogLevel;

import java.util.concurrent.CompletableFuture;
import java.util.concurrent.ExecutionException;
import java.util.concurrent.ExecutorService;
import java.util.concurrent.Executors;
続いて、以下のメンバー変数を MainActivity クラスに追加します。
private boolean sessionInitialized = false;

private String anchorId = null;
private boolean scanningForUpload = false;
private final Object syncSessionProgress = new Object();
private ExecutorService executorService = Executors.newSingleThreadExecutor();
次に、以下のコードを initializeSession() メソッドに追加します。 まず、このコードにより、Azure Spatial Anchors SDK によってカメラ フィードからフレームが収集される際の進行状況をアプリで監視できます。 その際、球体の色が当初の黒から灰色に変化し始めます。 さらに、アンカーをクラウドに送信するための十分なフレームが収集されると、白に変わります。 次に、このコードでは、クラウド バックエンドとの通信に必要な資格情報が提供されます。 ここでは、アカウント識別子、キー、ドメインを使用するようにアプリを構成します。 これらの情報は、Spatial Anchors リソースを設定するときにテキスト エディターにコピーしました。
private void initializeSession() {
    if (sceneView.getSession() == null) {
        //Early return if the ARCore Session is still being set up
        return;
    }

    if (this.cloudSession != null) {
        this.cloudSession.close();
    }
    this.cloudSession = new CloudSpatialAnchorSession();
    this.cloudSession.setSession(sceneView.getSession());
    this.cloudSession.setLogLevel(SessionLogLevel.Information);
    this.cloudSession.addOnLogDebugListener(args -> Log.d("ASAInfo", args.getMessage()));
    this.cloudSession.addErrorListener(args -> Log.e("ASAError", String.format("%s: %s", args.getErrorCode().name(), args.getErrorMessage())));

    sessionInitialized = true;

    this.cloudSession.addSessionUpdatedListener(args -> {
        synchronized (this.syncSessionProgress) {
            this.recommendedSessionProgress = args.getStatus().getRecommendedForCreateProgress();
            Log.i("ASAInfo", String.format("Session progress: %f", this.recommendedSessionProgress));
            if (!this.scanningForUpload) {
                return;
            }
        }

        runOnUiThread(() -> {
            synchronized (this.syncSessionProgress) {
                MaterialFactory.makeOpaqueWithColor(this, new Color(
                        this.recommendedSessionProgress,
                        this.recommendedSessionProgress,
                        this.recommendedSessionProgress))
                        .thenAccept(material -> {
                            this.nodeRenderable.setMaterial(material);
                        });
            }
        });
    });

    this.cloudSession.getConfiguration().setAccountId(/* Copy your account Identifier in here */);
    this.cloudSession.getConfiguration().setAccountKey(/* Copy your account Key in here */);
    this.cloudSession.getConfiguration().setAccountDomain(/* Copy your account Domain in here */);
    this.cloudSession.start();
}
次に、以下の uploadCloudAnchorAsync() メソッドを mainActivity クラスに追加します。 呼び出されると、このメソッドは、お使いのデバイスから十分なフレームが収集されるまで非同期的に待機します。 この状況が発生するとすぐに、球体の色が黄色に切り替わってから、クラウドへのローカル Azure 空間アンカーのアップロードが開始されます。 アップロードが完了すると、コードによってアンカー識別子が返されます。
private CompletableFuture<String> uploadCloudAnchorAsync(CloudSpatialAnchor anchor) {
    synchronized (this.syncSessionProgress) {
        this.scanningForUpload = true;
    }


    return CompletableFuture.runAsync(() -> {
        try {
            float currentSessionProgress;
            do {
                synchronized (this.syncSessionProgress) {
                    currentSessionProgress = this.recommendedSessionProgress;
                }
                if (currentSessionProgress < 1.0) {
                    Thread.sleep(500);
                }
            }
            while (currentSessionProgress < 1.0);

            synchronized (this.syncSessionProgress) {
                this.scanningForUpload = false;
            }
            runOnUiThread(() -> {
                MaterialFactory.makeOpaqueWithColor(this, new Color(android.graphics.Color.YELLOW))
                        .thenAccept(yellowMaterial -> {
                            this.nodeRenderable.setMaterial(yellowMaterial);
                        });
            });

            this.cloudSession.createAnchorAsync(anchor).get();
        } catch (InterruptedException | ExecutionException e) {
            Log.e("ASAError", e.toString());
            throw new RuntimeException(e);
        }
    }, executorService).thenApply(ignore -> anchor.getIdentifier());
}
最後に、すべてをつなげましょう。 handleTap() メソッドに次のコードを追加します。 これにより、球体が作成されるとすぐに uploadCloudAnchorAsync() メソッドが呼び出されます。 メソッドから戻ると、次のコードによって球体への最終的な更新が実行され、色が青色に変わります。
protected void handleTap(HitResult hitResult, Plane plane, MotionEvent motionEvent) {
    synchronized (this.syncTaps) {
        if (this.tapExecuted) {
            return;
        }

        this.tapExecuted = true;
    }

    this.anchorNode = new AnchorNode();
    this.anchorNode.setAnchor(hitResult.createAnchor());
    CloudSpatialAnchor cloudAnchor = new CloudSpatialAnchor();
    cloudAnchor.setLocalAnchor(this.anchorNode.getAnchor());

    MaterialFactory.makeOpaqueWithColor(this, new Color(
            this.recommendedSessionProgress,
            this.recommendedSessionProgress,
            this.recommendedSessionProgress))
            .thenAccept(material -> {
                this.nodeRenderable = ShapeFactory.makeSphere(0.1f, new Vector3(0.0f, 0.15f, 0.0f), material);
                this.anchorNode.setRenderable(nodeRenderable);
                this.anchorNode.setParent(arFragment.getArSceneView().getScene());
            });


    uploadCloudAnchorAsync(cloudAnchor)
            .thenAccept(id -> {
                this.anchorId = id;
                Log.i("ASAInfo", String.format("Cloud Anchor created: %s", this.anchorId));
                runOnUiThread(() -> {
                    MaterialFactory.makeOpaqueWithColor(this, new Color(android.graphics.Color.BLUE))
                            .thenAccept(blueMaterial -> {
                                this.nodeRenderable.setMaterial(blueMaterial);
                                synchronized (this.syncTaps) {
                                    this.tapExecuted = false;
                                }
                            });
                });
            });
}
アプリをもう一度再デプロイします。 お使いのデバイスを移動し、画面をタップして球体を配置します。 ただし今回は、カメラ フレームの収集時に球体の色が黒から白に変化します。 十分なフレーム数を取得すると、球体が黄色に変わり、クラウドのアップロードが開始されます。 電話がインターネットに接続されていることを確認します。 アップロードの完了後に、球体は青色になります。 必要に応じて、Android Studio で Logcat ウィンドウを監視して、アプリによって送信されているログ メッセージを見ることもできます。 ログに記録されるメッセージの例として、フレーム キャプチャ中のセッションの進行状況や、アップロード完了後にクラウドが返すアンカー識別子などがあります。
注意
recommendedSessionProgress の値 (デバッグ ログで Session progress と呼ばれている) が表示されない場合は、自分が配置した球体の周りで電話を動かして回転していることを確認します。
クラウド空間アンカーの配置
アンカーがクラウドにアップロードされると、それを再度配置する準備ができています。 まず、以下の import をコードに追加しましょう。
import java.util.concurrent.Executors;

import com.microsoft.azure.spatialanchors.AnchorLocateCriteria;
import com.microsoft.azure.spatialanchors.LocateAnchorStatus;
次に、以下のコードを handleTap() メソッドに追加しましょう。 このコードでは、次のことが行われます。
- 既存の青い球体を画面から削除します。
- Azure Spatial Anchors セッションをもう一度初期化します。 このアクションにより、配置しようとしているアンカーは、作成したローカル アンカーではなくクラウドから取得されます。
- クラウドにアップロードしたアンカーに対するクエリを発行します。
protected void handleTap(HitResult hitResult, Plane plane, MotionEvent motionEvent) {
    synchronized (this.syncTaps) {
        if (this.tapExecuted) {
            return;
        }

        this.tapExecuted = true;
    }

    if (this.anchorId != null) {
        this.anchorNode.getAnchor().detach();
        this.anchorNode.setParent(null);
        this.anchorNode = null;
        initializeSession();
        AnchorLocateCriteria criteria = new AnchorLocateCriteria();
        criteria.setIdentifiers(new String[]{this.anchorId});
        cloudSession.createWatcher(criteria);
        return;
    }

    this.anchorNode = new AnchorNode();
    this.anchorNode.setAnchor(hitResult.createAnchor());
    CloudSpatialAnchor cloudAnchor = new CloudSpatialAnchor();
    cloudAnchor.setLocalAnchor(this.anchorNode.getAnchor());

    MaterialFactory.makeOpaqueWithColor(this, new Color(
            this.recommendedSessionProgress,
            this.recommendedSessionProgress,
            this.recommendedSessionProgress))
            .thenAccept(material -> {
                this.nodeRenderable = ShapeFactory.makeSphere(0.1f, new Vector3(0.0f, 0.15f, 0.0f), material);
                this.anchorNode.setRenderable(nodeRenderable);
                this.anchorNode.setParent(arFragment.getArSceneView().getScene());
            });


    uploadCloudAnchorAsync(cloudAnchor)
            .thenAccept(id -> {
                this.anchorId = id;
                Log.i("ASAInfo", String.format("Cloud Anchor created: %s", this.anchorId));
                runOnUiThread(() -> {
                    MaterialFactory.makeOpaqueWithColor(this, new Color(android.graphics.Color.BLUE))
                            .thenAccept(blueMaterial -> {
                                this.nodeRenderable.setMaterial(blueMaterial);
                                synchronized (this.syncTaps) {
                                    this.tapExecuted = false;
                                }
                            });
                });
            });
}
ここで、クエリの実行対象のアンカーが配置されたときに呼び出されるコードをフックしましょう。 initializeSession() メソッド内に次のコードを追加します。 このスニペットでは、クラウド空間アンカーが配置された後に緑色の球体が作成され、配置されます。 これにより、画面をもう一度タップできるようになるので、シナリオ全体をもう一度繰り返すことができます。別のローカル アンカーを作成し、アップロードして、もう一度配置します。
private void initializeSession() {
    if (sceneView.getSession() == null) {
        //Early return if the ARCore Session is still being set up
        return;
    }

    if (this.cloudSession != null) {
        this.cloudSession.close();
    }
    this.cloudSession = new CloudSpatialAnchorSession();
    this.cloudSession.setSession(sceneView.getSession());
    this.cloudSession.setLogLevel(SessionLogLevel.Information);
    this.cloudSession.addOnLogDebugListener(args -> Log.d("ASAInfo", args.getMessage()));
    this.cloudSession.addErrorListener(args -> Log.e("ASAError", String.format("%s: %s", args.getErrorCode().name(), args.getErrorMessage())));

    sessionInitialized = true;

    this.cloudSession.addSessionUpdatedListener(args -> {
        synchronized (this.syncSessionProgress) {
            this.recommendedSessionProgress = args.getStatus().getRecommendedForCreateProgress();
            Log.i("ASAInfo", String.format("Session progress: %f", this.recommendedSessionProgress));
            if (!this.scanningForUpload) {
                return;
            }
        }

        runOnUiThread(() -> {
            synchronized (this.syncSessionProgress) {
                MaterialFactory.makeOpaqueWithColor(this, new Color(
                        this.recommendedSessionProgress,
                        this.recommendedSessionProgress,
                        this.recommendedSessionProgress))
                        .thenAccept(material -> {
                            this.nodeRenderable.setMaterial(material);
                        });
            }
        });
    });

    this.cloudSession.addAnchorLocatedListener(args -> {
        if (args.getStatus() == LocateAnchorStatus.Located) {
            runOnUiThread(() -> {
                this.anchorNode = new AnchorNode();
                this.anchorNode.setAnchor(args.getAnchor().getLocalAnchor());
                MaterialFactory.makeOpaqueWithColor(this, new Color(android.graphics.Color.GREEN))
                        .thenAccept(greenMaterial -> {
                            this.nodeRenderable = ShapeFactory.makeSphere(0.1f, new Vector3(0.0f, 0.15f, 0.0f), greenMaterial);
                            this.anchorNode.setRenderable(nodeRenderable);
                            this.anchorNode.setParent(arFragment.getArSceneView().getScene());

                            this.anchorId = null;
                            synchronized (this.syncTaps) {
                                this.tapExecuted = false;
                            }
                        });
            });
        }
    });

    this.cloudSession.getConfiguration().setAccountId(/* Copy your account Identifier in here */);
    this.cloudSession.getConfiguration().setAccountKey(/* Copy your account Key in here */);
    this.cloudSession.getConfiguration().setAccountDomain(/* Copy your account Domain in here */);
    this.cloudSession.start();
}
これで完了です。 最後にアプリを再デプロイし、シナリオ全体をエンド ツー エンドで試します。 お使いのデバイスを移動し、黒い球体を配置します。 次に、球体が黄色に変わるまでデバイスを移動し続けてカメラ フレームをキャプチャします。 ローカル アンカーがアップロードされ、球体が青色に変わります。 最後に、ローカル アンカーが削除されるように画面をもう一度タップしてから、対応するクラウド アンカーに対してクエリを実行します。 クラウド空間アンカーが配置されるまで、デバイスの移動を続けます。 正しい場所に緑色の球体が表示され、シナリオ全体をもう一度繰り返すことができます。
すべてをまとめる
ここでは、さまざまな要素がすべてまとめられた後に MainActivity クラス ファイルがどのように見えるかを示します。 これを参照用に使用してご自身のファイルと比較し、違いが残っているかどうかを特定できます。
package com.example.myfirstapp;

import android.os.Bundle;
import android.util.Log;
import android.view.MotionEvent;

import androidx.appcompat.app.AppCompatActivity;

import com.google.ar.core.HitResult;
import com.google.ar.core.Plane;
import com.google.ar.sceneform.AnchorNode;
import com.google.ar.sceneform.ArSceneView;
import com.google.ar.sceneform.FrameTime;
import com.google.ar.sceneform.Scene;
import com.google.ar.sceneform.math.Vector3;
import com.google.ar.sceneform.rendering.Color;
import com.google.ar.sceneform.rendering.MaterialFactory;
import com.google.ar.sceneform.rendering.Renderable;
import com.google.ar.sceneform.rendering.ShapeFactory;
import com.google.ar.sceneform.ux.ArFragment;

import com.microsoft.azure.spatialanchors.AnchorLocateCriteria;
import com.microsoft.azure.spatialanchors.CloudSpatialAnchor;
import com.microsoft.azure.spatialanchors.CloudSpatialAnchorSession;
import com.microsoft.azure.spatialanchors.LocateAnchorStatus;
import com.microsoft.azure.spatialanchors.SessionLogLevel;

import java.util.concurrent.CompletableFuture;
import java.util.concurrent.ExecutionException;
import java.util.concurrent.ExecutorService;
import java.util.concurrent.Executors;

public class MainActivity extends AppCompatActivity {

    private boolean tapExecuted = false;
    private final Object syncTaps = new Object();
    private ArFragment arFragment;
    private AnchorNode anchorNode;
    private Renderable nodeRenderable = null;
    private float recommendedSessionProgress = 0f;

    private ArSceneView sceneView;
    private CloudSpatialAnchorSession cloudSession;
    private boolean sessionInitialized = false;

    private String anchorId = null;
    private boolean scanningForUpload = false;
    private final Object syncSessionProgress = new Object();
    private ExecutorService executorService = Executors.newSingleThreadExecutor();

    @Override
    protected void onCreate(Bundle savedInstanceState) {
        super.onCreate(savedInstanceState);
        setContentView(R.layout.activity_main);

        this.arFragment = (ArFragment) getSupportFragmentManager().findFragmentById(R.id.ux_fragment);
        this.arFragment.setOnTapArPlaneListener(this::handleTap);

        this.sceneView = arFragment.getArSceneView();
        Scene scene = sceneView.getScene();
        scene.addOnUpdateListener(frameTime -> {
            if (this.cloudSession != null) {
                this.cloudSession.processFrame(sceneView.getArFrame());
            }
        });
        scene.addOnUpdateListener(this::scene_OnUpdate);
        initializeSession();
    }

    // <scene_OnUpdate>
    private void scene_OnUpdate(FrameTime frameTime) {
        if (!sessionInitialized) {
            //retry if initializeSession did an early return due to ARCore Session not yet available (i.e. sceneView.getSession() == null)
            initializeSession();
        }
    }
    // </scene_OnUpdate>

    // <initializeSession>
    private void initializeSession() {
        if (sceneView.getSession() == null) {
            //Early return if the ARCore Session is still being set up
            return;
        }

        if (this.cloudSession != null) {
            this.cloudSession.close();
        }
        this.cloudSession = new CloudSpatialAnchorSession();
        this.cloudSession.setSession(sceneView.getSession());
        this.cloudSession.setLogLevel(SessionLogLevel.Information);
        this.cloudSession.addOnLogDebugListener(args -> Log.d("ASAInfo", args.getMessage()));
        this.cloudSession.addErrorListener(args -> Log.e("ASAError", String.format("%s: %s", args.getErrorCode().name(), args.getErrorMessage())));

        sessionInitialized = true;

        this.cloudSession.addSessionUpdatedListener(args -> {
            synchronized (this.syncSessionProgress) {
                this.recommendedSessionProgress = args.getStatus().getRecommendedForCreateProgress();
                Log.i("ASAInfo", String.format("Session progress: %f", this.recommendedSessionProgress));
                if (!this.scanningForUpload) {
                    return;
                }
            }

            runOnUiThread(() -> {
                synchronized (this.syncSessionProgress) {
                    MaterialFactory.makeOpaqueWithColor(this, new Color(
                            this.recommendedSessionProgress,
                            this.recommendedSessionProgress,
                            this.recommendedSessionProgress))
                            .thenAccept(material -> {
                                this.nodeRenderable.setMaterial(material);
                            });
                }
            });
        });

        this.cloudSession.addAnchorLocatedListener(args -> {
            if (args.getStatus() == LocateAnchorStatus.Located) {
                runOnUiThread(() -> {
                    this.anchorNode = new AnchorNode();
                    this.anchorNode.setAnchor(args.getAnchor().getLocalAnchor());
                    MaterialFactory.makeOpaqueWithColor(this, new Color(android.graphics.Color.GREEN))
                            .thenAccept(greenMaterial -> {
                                this.nodeRenderable = ShapeFactory.makeSphere(0.1f, new Vector3(0.0f, 0.15f, 0.0f), greenMaterial);
                                this.anchorNode.setRenderable(nodeRenderable);
                                this.anchorNode.setParent(arFragment.getArSceneView().getScene());

                                this.anchorId = null;
                                synchronized (this.syncTaps) {
                                    this.tapExecuted = false;
                                }
                            });
                });
            }
        });

        this.cloudSession.getConfiguration().setAccountId(/* Copy your account Identifier in here */);
        this.cloudSession.getConfiguration().setAccountKey(/* Copy your account Key in here */);
        this.cloudSession.getConfiguration().setAccountDomain(/* Copy your account Domain in here */);
        this.cloudSession.start();
    }
    // </initializeSession>

    // <handleTap>
    protected void handleTap(HitResult hitResult, Plane plane, MotionEvent motionEvent) {
        synchronized (this.syncTaps) {
            if (this.tapExecuted) {
                return;
            }

            this.tapExecuted = true;
        }

        if (this.anchorId != null) {
            this.anchorNode.getAnchor().detach();
            this.anchorNode.setParent(null);
            this.anchorNode = null;
            initializeSession();
            AnchorLocateCriteria criteria = new AnchorLocateCriteria();
            criteria.setIdentifiers(new String[]{this.anchorId});
            cloudSession.createWatcher(criteria);
            return;
        }

        this.anchorNode = new AnchorNode();
        this.anchorNode.setAnchor(hitResult.createAnchor());
        CloudSpatialAnchor cloudAnchor = new CloudSpatialAnchor();
        cloudAnchor.setLocalAnchor(this.anchorNode.getAnchor());

        MaterialFactory.makeOpaqueWithColor(this, new Color(
                this.recommendedSessionProgress,
                this.recommendedSessionProgress,
                this.recommendedSessionProgress))
                .thenAccept(material -> {
                    this.nodeRenderable = ShapeFactory.makeSphere(0.1f, new Vector3(0.0f, 0.15f, 0.0f), material);
                    this.anchorNode.setRenderable(nodeRenderable);
                    this.anchorNode.setParent(arFragment.getArSceneView().getScene());
                });


        uploadCloudAnchorAsync(cloudAnchor)
                .thenAccept(id -> {
                    this.anchorId = id;
                    Log.i("ASAInfo", String.format("Cloud Anchor created: %s", this.anchorId));
                    runOnUiThread(() -> {
                        MaterialFactory.makeOpaqueWithColor(this, new Color(android.graphics.Color.BLUE))
                                .thenAccept(blueMaterial -> {
                                    this.nodeRenderable.setMaterial(blueMaterial);
                                    synchronized (this.syncTaps) {
                                        this.tapExecuted = false;
                                    }
                                });
                    });
                });
    }
    // </handleTap>

    // <uploadCloudAnchorAsync>
    private CompletableFuture<String> uploadCloudAnchorAsync(CloudSpatialAnchor anchor) {
        synchronized (this.syncSessionProgress) {
            this.scanningForUpload = true;
        }


        return CompletableFuture.runAsync(() -> {
            try {
                float currentSessionProgress;
                do {
                    synchronized (this.syncSessionProgress) {
                        currentSessionProgress = this.recommendedSessionProgress;
                    }
                    if (currentSessionProgress < 1.0) {
                        Thread.sleep(500);
                    }
                }
                while (currentSessionProgress < 1.0);

                synchronized (this.syncSessionProgress) {
                    this.scanningForUpload = false;
                }
                runOnUiThread(() -> {
                    MaterialFactory.makeOpaqueWithColor(this, new Color(android.graphics.Color.YELLOW))
                            .thenAccept(yellowMaterial -> {
                                this.nodeRenderable.setMaterial(yellowMaterial);
                            });
                });

                this.cloudSession.createAnchorAsync(anchor).get();
            } catch (InterruptedException | ExecutionException e) {
                Log.e("ASAError", e.toString());
                throw new RuntimeException(e);
            }
        }, executorService).thenApply(ignore -> anchor.getIdentifier());
    }
    // </uploadCloudAnchorAsync>

}
次の手順
このチュートリアルでは、ARCore 機能を Azure Spatial Anchors と統合する新しい Android アプリの作成方法を説明しました。 Azure Spatial Anchors ライブラリの詳細については、アンカーの作成と配置方法に関するガイドを引き続き参照してください。
