Azure マネージド ディスクの概要
適用対象: ✔️ Linux VM ✔️ Windows VM ✔️ フレキシブル スケール セット ✔️ 均一スケール セット
Azure マネージド ディスクは、Azure によって管理されて Azure Virtual Machines で使用されるブロックレベルの記憶域ボリュームです。 マネージド ディスクは、オンプレミス サーバーの物理ディスクと似ていますが、仮想化されています。 マネージド ディスクでユーザーが行う必要があるのは、ディスクのサイズの指定、ディスクの種類の指定、ディスクのプロビジョニングだけです。 ユーザーがディスクをプロビジョニングした後、残りの作業は Azure によって行われます。
利用できるマネージド ディスクの種類は、Ultra Disks、Premium ソリッド ステート ドライブ (SSD)、Standard SSD、Standard ハード ディスク ドライブ (HDD) です。 各ディスクの種類については、「Azure マネージド ディスクの種類」をご覧ください。
別の方法としては、仮想マシン (VM) のストレージとして Azure Elastic SAN を使います。 Elastic SAN を使うと、すべてのワークロードのストレージを 1 つのストレージ バックエンドに統合できます。 多くの大規模な I/O 集中型ワークロードと最上位レベルのデータベースがある場合、これを選ぶとコスト効率がよくなる可能性があります。 詳しくは、「Azure Elastic SAN とは」をご覧ください。
マネージド ディスクの利点
マネージド ディスクを使うと得られるいくつかの利点を見ていきましょう。
高い持続性と可用性
マネージド ディスクは、99.999% の可用性で設計されています。 マネージド ディスクでは、この可用性を実現するために、データの 3 つのレプリカが提供されます。 1 つまたは 2 つのレプリカで問題が発生した場合でも、残りのレプリカによって、データの永続化と障害に対する高い耐性が保証されます。
このアーキテクチャにより、Azure はサービスとしてのインフラストラクチャ (IaaS) ディスクの高い持続性を、年間故障率 0% で一貫して提供できます。 ローカル冗長ストレージ (LRS) ディスクは、1 年間に 99.999999999% (イレブン ナイン) 以上の持続性を提供します。 ゾーン冗長ストレージ (ZRS) ディスクは、1 年間に 99.9999999999% (トウェルブ ナイン) 以上の持続性を提供します。
シンプルでスケーラブルな VM のデプロイ
マネージド ディスクを使うと、リージョンごとに 1 つのサブスクリプションで特定の種類の VM ディスクを最大 50,000 個作成できます。 その後、1 つのサブスクリプションに何千もの VM を作成できます。
マネージド ディスクにより、仮想マシン スケール セットのスケーラビリティが向上します。 Azure Marketplace イメージまたは Azure Compute Gallery イメージとマネージド ディスクを使って、1 つの仮想マシン スケール セットに最大 1,000 個の VM を作成できます。
可用性セットとの統合
マネージド ディスクは可用性セットと統合されており、可用性セット内の VM のディスクを相互に十分に分離して単一障害点にならないようにするのに役立ちます。
ディスクはさまざまなストレージ スケール ユニット (スタンプ) に自動的に配置されます。 ハードウェアやソフトウェアの障害によってスタンプが機能しなくなった場合、そのスタンプ上のディスクを使用する VM インスタンスだけが機能しなくなります。
たとえば、5 台の VM 上で実行されているアプリケーションがあり、VM は可用性セットに含まれているとします。 それらの VM のディスクがすべて同じスタンプに格納されることはありません。 そのため、1 つのスタンプがダウンしても、アプリケーションの他のインスタンスは実行し続けます。
可用性ゾーンとの統合
マネージド ディスクでは可用性ゾーンがサポートされており、アプリケーションをデータセンターの障害から保護するのに役立ちます。
可用性ゾーンは、Azure リージョン内の一意の物理的な場所です。 それぞれのゾーンは、独立した電源、冷却手段、ネットワークを備えた 1 つまたは複数のデータセンターで構成されています。 回復性を確保するため、有効になっているリージョンにはいずれも最低 3 つのゾーンが別個に存在しています。
可用性ゾーンでの VM のアップタイムに対するサービス レベル アグリーメント (SLA) について詳しくは、Azure SLA のページをご覧ください。
Azure Backup のサポート
リージョンの災害から保護するには、Azure Backup を使い、時間ベースのバックアップとバックアップ保存ポリシーを指定してバックアップ ジョブを作成します。 その後は、VM またはマネージド ディスクの復元をいつでも実行できます。
現在、Azure Backup では、最大 32 テビバイト (TiB) のディスク サイズがサポートされています。 Azure VM バックアップ サポートについて詳しく確認してください。
Azure ディスク バックアップ
Azure Backup では、マネージド ディスク内のデータを保護するのに役立つクラウドベースのバックアップ ソリューションである Azure Disk Backup がネイティブとして提供されています。 このソリューションを使うと、わずか数ステップでマネージド ディスクの保護を構成できます。
Azure Disk Backup は、マネージド ディスク用のスナップショット ライフサイクル管理を備えています。 それにより、スナップショットの定期的な作成が自動化されて、バックアップ ポリシーを使って構成された期間だけ保持されます。 詳細については、「Azure Disk Backup の概要」 を参照してください。
詳細なアクセス制御
Azure のロールベースのアクセス制御 (Azure RBAC) を使用して、マネージド ディスクに対する特定のアクセス許可を 1 人以上のユーザーに割り当てることができます。
マネージド ディスク では、ディスクの読み取り、書き込み (作成と更新)、削除、および Shared Access Signature (SAS) URI の取得など、さまざまな操作が公開されています。 ユーザーが仕事するのに必要な操作へのアクセスだけを許可できます。
たとえば、ユーザーがマネージド ディスクをストレージ アカウントにコピーするのが望ましくない場合は、そのマネージド ディスクに対するエクスポート アクションへのアクセスを許可しないようにします。 同様に、ユーザーが SAS URI を使ってマネージド ディスクをコピーできないようにする場合は、マネージド ディスクに対するそのアクセス許可を付与しないようにします。
VHD をアップロードする機能
直接アップロードを使って、VHD を Azure マネージド ディスクに転送できます。 これまでは、ストレージ アカウントへのデータのステージングを含むプロセスを実行する必要がありました。 現在、手順は少なくなっています。 オンプレミスの VM の Azure へのアップロードや、大きなマネージド ディスクへの VM のアップロードがいっそう簡単になります。 バックアップと復元のプロセスも簡素化されます。
VM にマネージド ディスクをアタッチせず、データをそこに直接アップロードすると、コストを削減できます。 直接アップロードでは、最大 32 TiB のサイズの VHD をアップロードできます。
VHD を Azure に転送する方法については、Azure CLI または Azure PowerShell の記事を参照してください。
セキュリティ
Private Link
マネージド ディスクで Azure Private Link のサポートを使うと、ネットワークの内部にあるマネージド ディスクをインポートまたはエクスポートできます。 Private Link を使うと、アタッチされていないマネージド ディスクとスナップショット用に時間制限のある SAS URI を生成できます。 その後、その SAS URI を使って、リージョンの拡張、ディザスター リカバリー、フォレンジック分析のために、他のリージョンにデータをエクスポートできます。 SAS URI は、オンプレミスから空のディスクに VHD を直接アップロードするために使用することもできます。
Private Link は、マネージド ディスクのエクスポートとインポートがユーザーの Azure 仮想ネットワーク内でのみ行われるように制限するのに役立ちます。 Private Link を使うと、セキュリティで保護された Microsoft バックボーン ネットワークのみをデータが移動することが保証されます。
マネージド ディスクのインポートまたはエクスポートのために Private Link を有効にする方法については、Azure CLI または Azure portal の記事をご覧ください。
暗号化
マネージド ディスクでは 2 種類の暗号化が提供されます。 1 つ目は、ストレージ サービスによって実行されるサーバー側暗号化です。 2 つ目は、VM 用の OS とデータのディスクで有効にできる Azure Disk Encryption です。
サーバー側暗号化
サーバー側暗号化は、保存時の暗号化を提供し、組織のセキュリティとコンプライアンスの要件を満たすようにデータを保護するのに役立ちます。 サーバー側暗号化は、マネージド ディスクを使用できるすべてのリージョンのすべてのマネージド ディスク、スナップショット、イメージに対して既定で有効になっています
ホストで暗号化を有効にしない限り、サーバー側暗号化では一時ディスクは暗号化されません。 詳しくは、この記事で後述する「一時ディスク」セクションをご覧ください。
キー管理には、次のオプションがあります。
- プラットフォーム マネージド キー: Azure がユーザーのキーを自動的に管理します。
- カスタマー マネージド キー: ユーザーが自分でキーを管理します。
詳しくは、「Azure Disk Storage のサーバー側暗号化」をご覧ください。
Azure Disk Encryption
Azure Disk Encryption を使うと、IaaS 仮想マシンで使われる OS とデータのディスクを暗号化できます。 この暗号化には、マネージド ディスクが含まれます。
Windows VM では、ドライブは業界標準の BitLocker 暗号化テクノロジを使って暗号化されます。 Linux VM では、ディスクは DM-Crypt テクノロジを使って暗号化されます。 暗号化プロセスは Azure Key Vault と統合されているので、ディスク暗号化キーをユーザーが制御および管理できます。 詳細については、「Linux VM に対する Azure Disk Encryption」または「Windows VM 用の Azure Disk Encryption」をご覧ください。
ディスク ロール
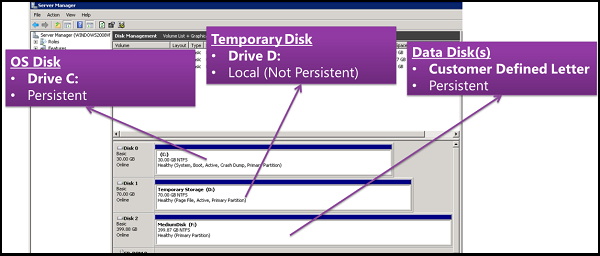
Azure には、OS ディスク、データ ディスク、一時ディスクという 3 つのメイン ディスク ロールがあります。 これらのロールは、ご利用の仮想マシンに接続されているディスクにマップされます。

OS ディスク
すべての仮想マシンに 1 つの OS ディスクがアタッチされています。 このディスクには、VM の作成時に選択されたオペレーティング システムがプリインストールされています。 このディスクにはブートボリュームが含まれています。
一般に、OS ディスクには OS の情報だけを格納する必要があります。 すべてのアプリケーションとデータはデータ ディスクに格納する必要があります。 ただし、コストが懸念される場合は、データ ディスクを作成する代わりに OS ディスクを使用できます。
OS ディスクの最大容量は 4,095 ギビバイト (GiB) です。 ただし、多くのオペレーティング システムは既定でマスター ブート レコード (MBR) を使ってパーティション分割されます。 MBR では、使用可能なサイズが 2 TiB に制限されます。 2 TiB 以上必要な場合は、データディスクを作成して接続し、データストレージ用に使用します。 OS ディスクにデータを格納する必要があり、追加の領域が必要な場合は、GUID パーティション テーブル (GPT)に変換します。 Windows デプロイでの MBR と GPT の違いについては、「Windows と GPT のよくあるご質問」をご覧ください。
Azure Windows VM では、エフェメラル OS ディスクを使っていない限り、ドライブ C が OS ディスクであり、永続的ストレージです。
データ ディスク
データ ディスクは、ユーザーが保持する必要のあるアプリケーション データや他のデータを格納するために仮想マシンにアタッチされるマネージド ディスクです。 データ ディスクは SCSI ドライブとして登録され、ユーザーが選択した文字のラベルが付けられます。 仮想マシンのサイズにより、それにアタッチできるデータ ディスクの数と、ディスクをホストするために使用できるストレージの種類が決まります。
一般に、OS ディスクに保存するのではなく、データ ディスクを使用してアプリケーションとデータを保存する必要があります。 データ ディスクを使ってアプリケーションとデータを格納すると、OS ディスクを使うよりも次のような利点があります。
- バックアップとディザスター リカバリーの向上
- 柔軟性とスケーラビリティの向上
- パフォーマンスの分離
- メンテナンスの簡素化
- セキュリティとアクセス制御の強化
これらの利点について詳しくは、「アプリケーションとデータの保存に OS ディスクではなくデータ ディスクを使用する必要があるのはなぜですか?」をご覧ください。
一時ディスク
ほとんどの VM には、マネージド ディスクではない一時ディスクが含まれています。 一時ディスクは、アプリケーションとプロセス用に短期間のストレージを提供します。 その目的は、ページ ファイル、スワップ ファイル、SQL Server tempdb ファイルなどのデータのみを格納することです。
一時ディスクのデータは、メンテナンス イベントの間、VM の再デプロイ時、または VM の停止時に、失われる可能性があります。 VM の正常な標準再起動の間は、一時ディスク上のディスクは保持されます。 一時ディスクのない VM に関する詳細については、「ローカル一時ディスクを持たない Azure VM のサイズ」を参照してください。
Azure Linux VM では、通常、一時ディスクは /dev/sdb です。 Windows VM では、既定の一時ディスクはドライブ D です。 一時ディスクは、次の場合を除き暗号化されません。
- サーバー側暗号化の場合、ユーザーがホストで暗号化を有効にします。
- Azure Disk Encryption の場合、ユーザーが
VolumeTypeパラメーターを、Windows で All に、または Linux で EncryptFormatAll に設定します。
マネージド ディスクのスナップショット
マネージド ディスクのスナップショットは、マネージド ディスクの読み取り専用の完全なクラッシュ整合性コピーであり、既定では Standard マネージド ディスクとして格納されます。 スナップショットを使用すると、任意の時点のマネージド ディスクのバックアップを作成できます。 これらのスナップショットはソース ディスクとは独立して存在し、ユーザーはそれを使って新しいマネージド ディスクを作成できます。
スナップショットは、使用されるサイズに基づいて請求されます。 たとえば、64 GiB のプロビジョニング済み容量でマネージド ディスクのスナップショットを作成し、実際に使われたデータ サイズが 10 GiB である場合、スナップショットは使われたデータ サイズである 10 GiB 分のみ課金されます。 スナップショットの使用サイズは、Azure 利用状況レポートで確認できます。 たとえば、スナップショットの使用データ サイズが 10 GiB の場合、毎日の利用状況レポートには、使用量として 10 GiB/(31 日) = 0.3226 が表示されます。
マネージド ディスクのスナップショットを作成する方法について詳しくは、「仮想ハード ディスクのスナップショットを作成する」をご覧ください。
画像
マネージド ディスクでは、マネージド カスタム イメージの作成がサポートされています。 イメージは、ストレージ アカウント内のカスタム VHD から、または直接 (Sysprep を使って) 一般化された VM から、作成できます。 イメージには、OS とデータ両方のディスクなど、VM に関連付けられているすべてのマネージド ディスクが含まれます。 マネージド カスタム イメージを使うと、ストレージ アカウントをコピーまたは管理する必要なしに、数百の VM を作成できます。
イメージの作成については、「Azure で一般化された VM のレガシ マネージド イメージを作成する」をご覧ください。
イメージとスナップショット
イメージとスナップショットの違いを理解しておくことが重要です。 マネージド ディスクを使うと、割り当てを解除した、一般化された VM のイメージを取得できます。 このイメージには、VM に接続されているすべてのディスクが含まれます。 このイメージを使って VM を作成できます。
スナップショットは、特定の時点でのディスクのコピーです。 1 つのディスクにのみ適用されます。 VM が使用しているディスク (OS ディスク) が 1 つの場合、スナップショットまたはイメージを作成し、そのスナップショットまたはイメージから VM を作成できます。
スナップショットでは、それに含まれるもの以外のディスクは認識されません。 ストライピングなど、複数のディスクの調整が必要なシナリオでスナップショットを使うと、問題が発生します。 スナップショットが相互に調整できる必要がありますが、現在はサポートされていません。
ディスクの割り当てとパフォーマンス
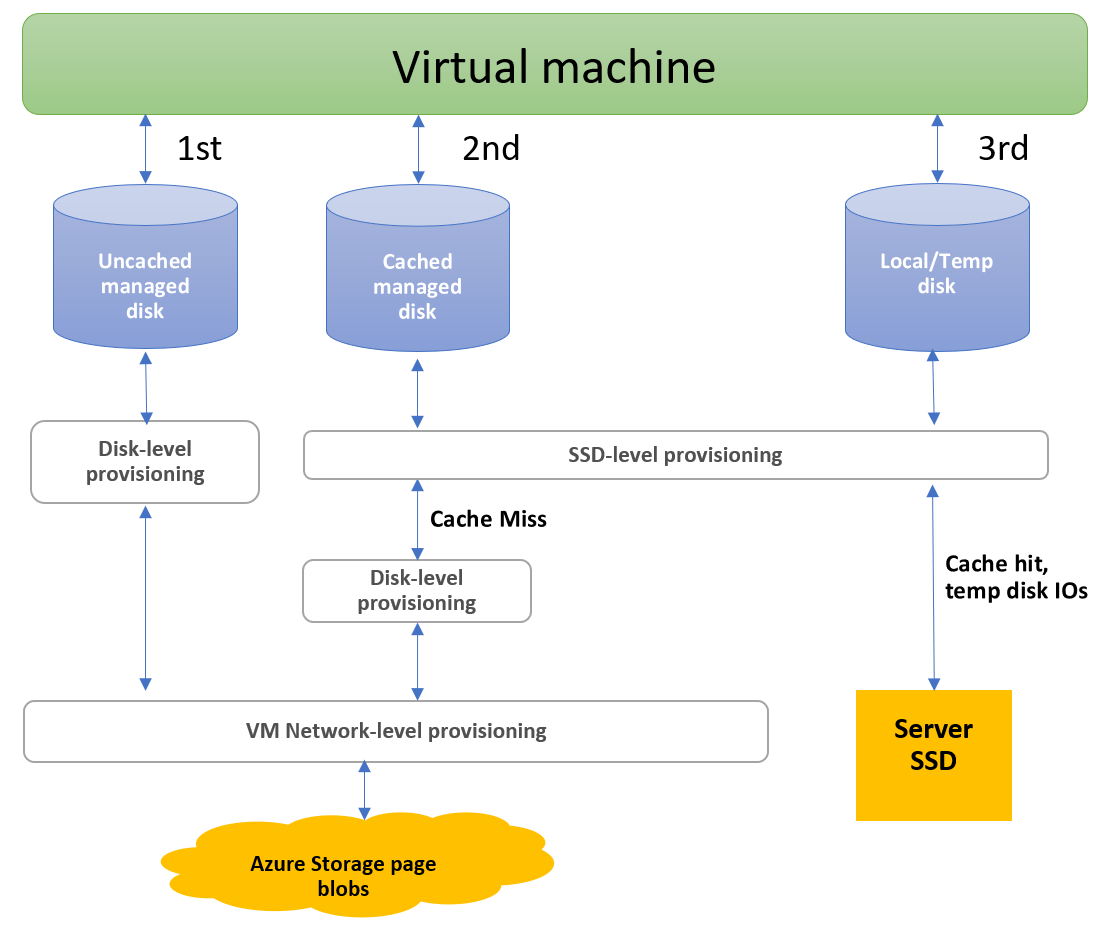
次の図は、I/O で使用できる 3 つのパスについて、ディスクに対する帯域幅と 1 秒あたり I/O 操作数 (IOPS) のリアルタイムの割り当てを示したものです。

1 番目の I/O パスは、キャッシュされないマネージド ディスクのパスです。 マネージド ディスクを使っていて、ホスト キャッシュを none に設定した場合、このパスが I/O 操作で使われます。 このパスを使う I/O 操作は、ディスク レベルのプロビジョニングに基づいて実行された後、IOPS とスループットの VM ネットワーク レベルのプロビジョニングに基づいて実行されます。
2 番目の I/O パスは、キャッシュされるマネージド ディスクのパスです。 キャッシュされるマネージド ディスクの I/O では、VM に近い SSD が使われます。 この SSD には専用の IOPS とスループットがプロビジョニングされ、図では "SSD レベルのプロビジョニング" と示されています。
キャッシュされたマネージド ディスクが読み取りを開始すると、要求は最初にデータがサーバー SSD 内にあるかどうかの確認を実行します。 データが存在しない場合、これはキャッシュ ミスになります。 その場合、I/O は SSD レベルのプロビジョニング、ディスク レベルのプロビジョニング、その後で IOPS とスループットの VM ネットワーク レベルのプロビジョニングに基づいて実行されます。
サーバー SSD は、サーバー SSD 上に存在するキャッシュされた I/O に対する読み取りを開始するとき、キャッシュ ヒットを作成します。 その場合、I/O は SSD レベルのプロビジョニングに基づいて実行されます。 キャッシュされたマネージド ディスクが開始する書き込みは、常にキャッシュ ミスのパスに従います。 それは、SSD レベル、ディスク レベル、VM ネットワーク レベルのプロビジョニングを経由する必要があります。
3 番目のパスは、"ローカルまたは一時" ディスクに関するものです。 これは、"ローカルまたは一時" ディスクをサポートする VM でのみ使用できます。 このパスを使う I/O 操作は、IOPS とスループットの SSD レベルのプロビジョニングに基づいて実行されます。
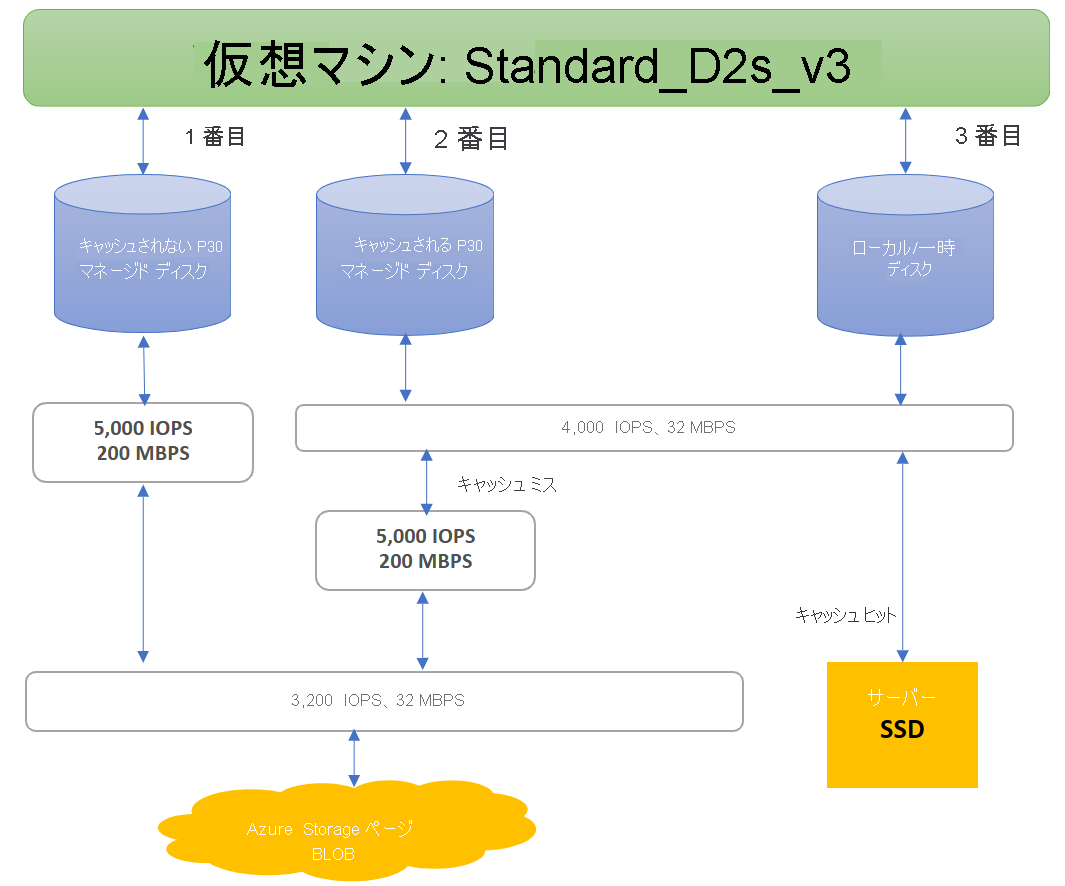
次の図は、これらの制限の例を示したものです。 このシステムでは、SSD とネットワーク レベルの制限のため、キャッシュされるかどうかにかかわらず、Standard_D2s_v3 VM が P30 ディスクで可能な 5,000 IOPS を達成することはできません。

Azure は、ディスク トラフィックに優先ネットワーク チャネルを使います。 ディスク トラフィックは、優先順位の低いネットワーク トラフィックより優先されます。 この優先順位は、ネットワークの競合が発生した場合に、ディスクが期待されるパフォーマンスを維持するのに役立ちます。
同様に、Azure Storage では、自動負荷分散により、リソースの競合やその他の問題がバックグラウンドで処理されます。 Azure Storage は、ディスクの作成時に必要なリソースを割り当て、リソースの事前と事後の分散を適用してトラフィック レベルを処理します。 この動作により、ディスクは期待される IOPS とスループットの目標をいっそう確実に維持できます。 VM レベルとディスク レベルのメトリックを使ってパフォーマンスを追跡し、必要に応じてアラートを設定できます。
目的のパフォーマンスを実現できるように VM とディスクの構成を最適化するためのベスト プラクティスについては、ハイ パフォーマンス用の設計に関する記事をご覧ください。
関連するコンテンツ
- マネージド ディスクの詳細がわかるビデオをご覧になりたい場合は、「マネージド ディスクを使用した Azure VM の回復性の向上」を参照してください。
- Azure で提供される個々のディスクの種類、ご自分のニーズに適した種類、パフォーマンス目標について詳しくは、IaaS VM 用のディスクの種類の選択に関する記事をご覧ください。