このトピックでは、 ImageBrush、 DrawingBrush、および VisualBrush オブジェクトを使用して、イメージ、 Drawing、または Visualで領域を描画する方法について説明します。
[前提条件]
このトピックを理解するには、Windows Presentation Foundation (WPF) で提供されるさまざまな種類のブラシとその基本的な機能について理解している必要があります。 概要については、「 WPF ブラシの概要」を参照してください。
画像を使って領域をペイントする
ImageBrushはImageSourceを使って領域を塗ります。 ImageSourceで使用するImageBrushの最も一般的な種類は、ビットマップ グラフィックを記述するBitmapImageです。 DrawingImageを使用してDrawing オブジェクトを使用して描画できますが、代わりにDrawingBrushを使用する方が簡単です。 ImageSourceオブジェクトの詳細については、「イメージングの概要」を参照してください。
ImageBrushで描画するには、BitmapImageを作成し、それを使用してビットマップ コンテンツを読み込みます。 次に、BitmapImageを使用して、ImageSourceのImageBrush プロパティを設定します。 最後に、描画するオブジェクトに ImageBrush を適用します。 拡張アプリケーション マークアップ言語 (XAML) では、読み込むイメージのパスを使用してImageSourceのImageBrush プロパティを設定することもできます。
すべての Brush オブジェクトと同様に、 ImageBrush を使用して、図形、パネル、コントロール、テキストなどのオブジェクトを描画できます。 次の図は、ImageBrushで実現できるいくつかの効果を示しています。

ImageBrush によって描画されたオブジェクト
既定では、 ImageBrush はイメージを引き伸ばして、塗りつぶされている領域を完全に塗りつぶします。塗りつぶされた領域の縦横比がイメージと異なる場合は、イメージが歪む可能性があります。 この動作を変更するには、 Stretch プロパティを既定値の Fill から None、 Uniform、または UniformToFillに変更します。 ImageBrushはTileBrushの一種であるため、イメージ ブラシで出力領域を塗りつぶす方法を正確に指定したり、パターンを作成したりできます。 高度な TileBrush 機能の詳細については、 TileBrush の概要を参照してください。
例: ビットマップ イメージを使用してオブジェクトを描画する
次の例では、ImageBrush を使用して、Backgroundの Canvas を描画します。
<Page
  xmlns="http://schemas.microsoft.com/winfx/2006/xaml/presentation"
  xmlns:x="http://schemas.microsoft.com/winfx/2006/xaml"
  x:Class="Microsoft.Samples.BrushExamples.ImageBrushExample"
  WindowTitle="ImageBrush Example"
  Background="White">

  <StackPanel>

    <Canvas
      Height="200" Width="300">
      <Canvas.Background>
        <ImageBrush ImageSource="sampleImages\Waterlilies.jpg" />
      </Canvas.Background>
    </Canvas>


  </StackPanel>
</Page>
using System;
using System.Windows;
using System.Windows.Controls;
using System.Windows.Media;
using System.Windows.Media.Imaging;

namespace Microsoft.Samples.BrushExamples
{

    public class ImageBrushExample : Page
    {

        public ImageBrushExample()
        {

            StackPanel mainPanel = new StackPanel();
            canvasBackgroundExample(mainPanel);
            this.Content = mainPanel;
        }

        private void canvasBackgroundExample(Panel mainPanel)
        {

            BitmapImage theImage = new BitmapImage
                (new Uri("sampleImages\\Waterlilies.jpg", UriKind.Relative));

            ImageBrush myImageBrush = new ImageBrush(theImage);

            Canvas myCanvas = new Canvas();
            myCanvas.Width = 300;
            myCanvas.Height = 200;
            myCanvas.Background = myImageBrush;

            mainPanel.Children.Add(myCanvas);
        }
    }
}
Imports System.Windows
Imports System.Windows.Controls
Imports System.Windows.Media
Imports System.Windows.Media.Imaging

Namespace Microsoft.Samples.BrushExamples

    Public Class ImageBrushExample
        Inherits Page

        Public Sub New()

            Dim mainPanel As New StackPanel()
            canvasBackgroundExample(mainPanel)
            Me.Content = mainPanel

        End Sub


        Private Sub canvasBackgroundExample(ByVal mainPanel As Panel)

            Dim theImage As New BitmapImage(New Uri("sampleImages\Waterlilies.jpg", UriKind.Relative))

            Dim myImageBrush As New ImageBrush(theImage)

            Dim myCanvas As New Canvas()
            myCanvas.Width = 300
            myCanvas.Height = 200
            myCanvas.Background = myImageBrush

            mainPanel.Children.Add(myCanvas)


        End Sub

    End Class

End Namespace
絵を使って領域を彩る
DrawingBrushを使用すると、図形、テキスト、画像、ビデオで領域を描画できます。 描画ブラシ内の図形自体は、単色、グラデーション、画像、または別の DrawingBrushで描画できます。 次の図は、 DrawingBrushの使用方法を示しています。

DrawingBrush によって描画されたオブジェクト
DrawingBrush は、Drawing オブジェクトを使って領域を塗ります。 Drawing オブジェクトは、図形、ビットマップ、ビデオ、テキスト行などの表示コンテンツを表します。 異なる種類の図面は、さまざまな種類のコンテンツを記述します。 さまざまな種類の描画オブジェクトの一覧を次に示します。
GeometryDrawing – 図形を描画します。
ImageDrawing – 画像を描画します。
GlyphRunDrawing – テキストを描画します。
VideoDrawing – オーディオまたはビデオ ファイルを再生します。
DrawingGroup – 他の描画を描画します。 図面グループを使用して、他の図面を 1 つの複合図面に結合します。
Drawing オブジェクトの詳細については、「図面オブジェクトの概要」を参照してください。
ImageBrushと同様に、DrawingBrushはそのDrawingを引き伸ばして出力領域を埋めます。 この動作をオーバーライドするには、 Stretch プロパティを既定の設定の Fill から変更します。 詳細については、 Stretch プロパティを参照してください。
例: 図面を使用してオブジェクトを描画する
次の例は、3 つの楕円の描画でオブジェクトを描画する方法を示しています。 省略記号を説明するために、GeometryDrawing が使用されます。
<Button Content="A Button">
  <Button.Background>
    <DrawingBrush>
      <DrawingBrush.Drawing>
        <GeometryDrawing Brush="LightBlue">
          <GeometryDrawing.Geometry>
            <GeometryGroup>
              <EllipseGeometry RadiusX="12.5" RadiusY="25" Center="25,50" />
              <EllipseGeometry RadiusX="12.5" RadiusY="25" Center="50,50" />
              <EllipseGeometry RadiusX="12.5" RadiusY="25" Center="75,50" />
            </GeometryGroup>
          </GeometryDrawing.Geometry>
          <GeometryDrawing.Pen>
            <Pen Thickness="1" Brush="Gray" />
          </GeometryDrawing.Pen>
        </GeometryDrawing>
      </DrawingBrush.Drawing>
    </DrawingBrush>
  </Button.Background>
</Button>
// Create a DrawingBrush.
DrawingBrush myDrawingBrush = new DrawingBrush();

// Create a drawing.
GeometryDrawing myGeometryDrawing = new GeometryDrawing();
myGeometryDrawing.Brush = Brushes.LightBlue;
myGeometryDrawing.Pen = new Pen(Brushes.Gray, 1);
GeometryGroup ellipses = new GeometryGroup();
ellipses.Children.Add(new EllipseGeometry(new Point(25,50), 12.5, 25));
ellipses.Children.Add(new EllipseGeometry(new Point(50,50), 12.5, 25));
ellipses.Children.Add(new EllipseGeometry(new Point(75,50), 12.5, 25));

myGeometryDrawing.Geometry = ellipses;
myDrawingBrush.Drawing = myGeometryDrawing;

Button myButton = new Button();
myButton.Content = "A Button";

// Use the DrawingBrush to paint the button's background.
myButton.Background = myDrawingBrush;
' Create a DrawingBrush.
Dim myDrawingBrush As New DrawingBrush()

' Create a drawing.
Dim myGeometryDrawing As New GeometryDrawing()
myGeometryDrawing.Brush = Brushes.LightBlue
myGeometryDrawing.Pen = New Pen(Brushes.Gray, 1)
Dim ellipses As New GeometryGroup()
ellipses.Children.Add(New EllipseGeometry(New Point(25,50), 12.5, 25))
ellipses.Children.Add(New EllipseGeometry(New Point(50,50), 12.5, 25))
ellipses.Children.Add(New EllipseGeometry(New Point(75,50), 12.5, 25))

myGeometryDrawing.Geometry = ellipses
myDrawingBrush.Drawing = myGeometryDrawing

Dim myButton As New Button()
myButton.Content = "A Button"

' Use the DrawingBrush to paint the button's background.
myButton.Background = myDrawingBrush
ビジュアルを使って領域を着色する
すべてのブラシの中で最も多目的で強力なVisualBrushは、Visualを使って区域を塗る。 Visualは、多くの便利なグラフィカル コンポーネントの先祖として機能する低レベルのグラフィカル型です。 たとえば、 Window、 FrameworkElement、および Control クラスはすべて、 Visual オブジェクトの型です。 VisualBrushを使用すると、ほぼすべての Windows Presentation Foundation (WPF) グラフィカル オブジェクトで領域を描画できます。
注
VisualBrushはFreezableオブジェクトの一種ですが、Visual プロパティがnull以外の値に設定されている場合、固定 (読み取り専用) することはできません。
VisualのVisualBrushコンテンツを指定するには、2 つの方法があります。
新しいVisualを作成し、それを使用してVisualのVisualBrush プロパティを設定します。 例については、次の「例: Visual を使用してオブジェクトを描画する」セクションを参照してください。
既存の Visualを使用して、ターゲット Visualの重複するイメージを作成します。 その後、 VisualBrush を使用して、反射や倍率などの興味深い効果を作成できます。 例については、「 例: リフレクションの作成」セクションを 参照してください。
Visualの新しいVisualBrushを定義し、そのVisualがUIElement (パネルやコントロールなど) である場合、UIElement プロパティがAutoLayoutContentに設定されている場合、レイアウト システムはtrueとその子要素で実行されます。 ただし、ルート UIElement は基本的にシステムの残りの部分 (スタイル) から分離されており、外部レイアウトはこの境界に浸透できません。 したがって、ルート UIElementのサイズを明示的に指定する必要があります。その唯一の親は VisualBrush であるため、塗りつぶされている領域に自動的にサイズを設定することはできません。 Windows Presentation Foundation (WPF) のレイアウトの詳細については、「 レイアウト」を参照してください。
ImageBrushやDrawingBrushと同様に、VisualBrushはその内容を拡大して出力領域を埋めます。 この動作をオーバーライドするには、 Stretch プロパティを既定の設定の Fill から変更します。 詳細については、 Stretch プロパティを参照してください。
例: ビジュアルを使用してオブジェクトを描画する
次の例では、いくつかのコントロールとパネルを使用して四角形を描画します。
<Rectangle Width="150" Height="150" Stroke="Black" Margin="5,0,5,0">
  <Rectangle.Fill>
    <VisualBrush>
      <VisualBrush.Visual>
        <StackPanel Background="White">
          <Rectangle Width="25" Height="25" Fill="Red" Margin="2" />
          <TextBlock FontSize="10pt" Margin="2">Hello, World!</TextBlock>
          <Button Margin="2">A Button</Button>
        </StackPanel>
      </VisualBrush.Visual>
    </VisualBrush>
  </Rectangle.Fill>
</Rectangle>
VisualBrush myVisualBrush = new VisualBrush();

// Create the visual brush's contents.
StackPanel myStackPanel = new StackPanel();
myStackPanel.Background = Brushes.White;

Rectangle redRectangle = new Rectangle();
redRectangle.Width = 25;
redRectangle.Height =25;
redRectangle.Fill = Brushes.Red;
redRectangle.Margin = new Thickness(2);
myStackPanel.Children.Add(redRectangle);

TextBlock someText = new TextBlock();
FontSizeConverter myFontSizeConverter = new FontSizeConverter();
someText.FontSize = (double)myFontSizeConverter.ConvertFrom("10pt");
someText.Text = "Hello, World!";
someText.Margin = new Thickness(2);
myStackPanel.Children.Add(someText);

Button aButton = new Button();
aButton.Content = "A Button";
aButton.Margin = new Thickness(2);
myStackPanel.Children.Add(aButton);

// Use myStackPanel as myVisualBrush's content.
myVisualBrush.Visual = myStackPanel;

// Create a rectangle to paint.
Rectangle myRectangle = new Rectangle();
myRectangle.Width = 150;
myRectangle.Height = 150;
myRectangle.Stroke = Brushes.Black;
myRectangle.Margin = new Thickness(5,0,5,0);

// Use myVisualBrush to paint myRectangle.
myRectangle.Fill = myVisualBrush;
Dim myVisualBrush As New VisualBrush()

' Create the visual brush's contents.
Dim myStackPanel As New StackPanel()
myStackPanel.Background = Brushes.White

Dim redRectangle As New Rectangle()
With redRectangle
    .Width = 25
    .Height = 25
    .Fill = Brushes.Red
    .Margin = New Thickness(2)
End With
myStackPanel.Children.Add(redRectangle)

Dim someText As New TextBlock()
Dim myFontSizeConverter As New FontSizeConverter()
someText.FontSize = CDbl(myFontSizeConverter.ConvertFrom("10pt"))
someText.Text = "Hello, World!"
someText.Margin = New Thickness(2)
myStackPanel.Children.Add(someText)

Dim aButton As New Button()
aButton.Content = "A Button"
aButton.Margin = New Thickness(2)
myStackPanel.Children.Add(aButton)

' Use myStackPanel as myVisualBrush's content.
myVisualBrush.Visual = myStackPanel

' Create a rectangle to paint.
Dim myRectangle As New Rectangle()
With myRectangle
    .Width = 150
    .Height = 150
    .Stroke = Brushes.Black
    .Margin = New Thickness(5, 0, 5, 0)
End With

' Use myVisualBrush to paint myRectangle.
myRectangle.Fill = myVisualBrush
例: リフレクションを作成する
前の例では、背景として使用する新しい Visual を作成する方法を示しました。 VisualBrushを使用して既存のビジュアルを表示することもできます。この機能を使用すると、反射や倍率などの興味深い視覚効果を生成できます。 次の例では、 VisualBrush を使用して、複数の要素を含む Border のリフレクションを作成します。 次の図は、この例で生成される出力を示しています。

反映された Visual オブジェクト
using System;
using System.Windows;
using System.Windows.Data;
using System.Windows.Controls;
using System.Windows.Media;
using System.Windows.Media.Effects;
using System.Windows.Media.Imaging;
using System.IO;
using System.Collections.ObjectModel;
using System.Windows.Shapes;
namespace SDKSample
{
    public partial class ReflectionExample : Page
    {
        public ReflectionExample()
        {
            // Create a name scope for the page.
            NameScope.SetNameScope(this, new NameScope());

            this.Background = Brushes.Black;
            StackPanel myStackPanel = new StackPanel();
            myStackPanel.Margin = new Thickness(50);

            Border myReflectedBorder = new Border();
            this.RegisterName("ReflectedVisual", myReflectedBorder);

            // Create a gradient background for the border.
            GradientStop firstStop = new GradientStop();
            firstStop.Offset = 0.0;
            Color firstStopColor = new Color();
            firstStopColor.R = 204;
            firstStopColor.G = 204;
            firstStopColor.B = 255;
            firstStopColor.A = 255;
            firstStop.Color = firstStopColor;
            GradientStop secondStop = new GradientStop();
            secondStop.Offset = 1.0;
            secondStop.Color = Colors.White;

            GradientStopCollection myGradientStopCollection = new GradientStopCollection();
            myGradientStopCollection.Add(firstStop);
            myGradientStopCollection.Add(secondStop);

            LinearGradientBrush myLinearGradientBrush = new LinearGradientBrush();
            myLinearGradientBrush.StartPoint = new Point(0, 0.5);
            myLinearGradientBrush.EndPoint = new Point(1, 0.5);
            myLinearGradientBrush.GradientStops = myGradientStopCollection;

            myReflectedBorder.Background = myLinearGradientBrush;

            // Add contents to the border.
            StackPanel borderStackPanel = new StackPanel();
            borderStackPanel.Orientation = Orientation.Horizontal;
            borderStackPanel.Margin = new Thickness(10);

            TextBlock myTextBlock = new TextBlock();
            myTextBlock.TextWrapping = TextWrapping.Wrap;
            myTextBlock.Width = 200;
            myTextBlock.Text = "Lorem ipsum dolor sit amet, consectetuer adipiscing elit." +
                               " Suspendisse vel ante. Donec luctus tortor sit amet est." +
                               " Nullam pulvinar odio et wisi." +
                               " Pellentesque quis magna. Sed pellentesque." +
                               " Nulla euismod." +
                               "Pellentesque habitant morbi tristique senectus et netus et malesuada fames ac turpis egestas.";

            borderStackPanel.Children.Add(myTextBlock);

            StackPanel ellipseStackPanel = new StackPanel();

            Ellipse ellipse1 = new Ellipse();
            ellipse1.Margin = new Thickness(10);
            ellipse1.Height = 50;
            ellipse1.Width = 50;
            ellipse1.Fill = Brushes.Black;
            ellipseStackPanel.Children.Add(ellipse1);
            Ellipse ellipse2 = new Ellipse();
            ellipse2.Margin = new Thickness(10);
            ellipse2.Height = 50;
            ellipse2.Width = 50;
            ellipse2.Fill = Brushes.Black;
            ellipseStackPanel.Children.Add(ellipse2);
            Ellipse ellipse3 = new Ellipse();
            ellipse3.Margin = new Thickness(10);
            ellipse3.Height = 50;
            ellipse3.Width = 50;
            ellipse3.Fill = Brushes.Black;
            ellipseStackPanel.Children.Add(ellipse3);
            borderStackPanel.Children.Add(ellipseStackPanel);

            myReflectedBorder.Child = borderStackPanel;

            // Create divider rectangle
            Rectangle dividerRectangle = new Rectangle();
            dividerRectangle.Height = 1;
            dividerRectangle.Fill = Brushes.Gray;
            dividerRectangle.HorizontalAlignment = HorizontalAlignment.Stretch;

            // Create the object to contain the reflection.
            Rectangle reflectionRectangle = new Rectangle();

            // Bind the height of the rectangle to the border height.
            Binding heightBinding = new Binding();
            heightBinding.ElementName = "ReflectedVisual";
            heightBinding.Path = new PropertyPath(Rectangle.HeightProperty);
            BindingOperations.SetBinding(reflectionRectangle, Rectangle.HeightProperty, heightBinding);

            // Bind the width of the rectangle to the border width.
            Binding widthBinding = new Binding();
            widthBinding.ElementName = "ReflectedVisual";
            widthBinding.Path = new PropertyPath(Rectangle.WidthProperty);
            BindingOperations.SetBinding(reflectionRectangle, Rectangle.WidthProperty, widthBinding);

            // Creates the reflection.
            VisualBrush myVisualBrush = new VisualBrush();
            myVisualBrush.Opacity = 0.75;
            myVisualBrush.Stretch = Stretch.None;
            Binding reflectionBinding = new Binding();
            reflectionBinding.ElementName = "ReflectedVisual";
            BindingOperations.SetBinding(myVisualBrush, VisualBrush.VisualProperty, reflectionBinding);

            ScaleTransform myScaleTransform = new ScaleTransform();
            myScaleTransform.ScaleX = 1;
            myScaleTransform.ScaleY = -1;
            TranslateTransform myTranslateTransform = new TranslateTransform();
            myTranslateTransform.Y = 1;

            TransformGroup myTransformGroup = new TransformGroup();
            myTransformGroup.Children.Add(myScaleTransform);
            myTransformGroup.Children.Add(myTranslateTransform);

            myVisualBrush.RelativeTransform = myTransformGroup;

            reflectionRectangle.Fill = myVisualBrush;

            // Create a gradient background for the border.
            GradientStop firstStop2 = new GradientStop();
            firstStop2.Offset = 0.0;
            Color c1 = new Color();
            c1.R = 0;
            c1.G = 0;
            c1.B = 0;
            c1.A = 255;
            firstStop2.Color = c1;
            GradientStop secondStop2 = new GradientStop();
            secondStop2.Offset = 0.5;
            Color c2 = new Color();
            c2.R = 0;
            c2.G = 0;
            c2.B = 0;
            c2.A = 51;
            firstStop2.Color = c2;
            GradientStop thirdStop = new GradientStop();
            thirdStop.Offset = 0.75;
            Color c3 = new Color();
            c3.R = 0;
            c3.G = 0;
            c3.B = 0;
            c3.A = 0;
            thirdStop.Color = c3;

            GradientStopCollection myGradientStopCollection2 = new GradientStopCollection();
            myGradientStopCollection2.Add(firstStop2);
            myGradientStopCollection2.Add(secondStop2);
            myGradientStopCollection2.Add(thirdStop);

            LinearGradientBrush myLinearGradientBrush2 = new LinearGradientBrush();
            myLinearGradientBrush2.StartPoint = new Point(0.5, 0);
            myLinearGradientBrush2.EndPoint = new Point(0.5, 1);
            myLinearGradientBrush2.GradientStops = myGradientStopCollection2;

            reflectionRectangle.OpacityMask = myLinearGradientBrush2;

            BlurBitmapEffect myBlurBitmapEffect = new BlurBitmapEffect();
            myBlurBitmapEffect.Radius = 1.5;

            reflectionRectangle.BitmapEffect = myBlurBitmapEffect;

            myStackPanel.Children.Add(myReflectedBorder);
            myStackPanel.Children.Add(dividerRectangle);
            myStackPanel.Children.Add(reflectionRectangle);
            this.Content = myStackPanel;
        }
        /*
    <Rectangle
      Height="{Binding Path=ActualHeight, ElementName=ReflectedVisual}"
      Width="{Binding Path=ActualWidth, ElementName=ReflectedVisual}">

      <Rectangle.OpacityMask>
        <LinearGradientBrush StartPoint="0.5,0" EndPoint="0.5,1">
          <GradientStop Color="#FF000000" Offset="0.0" />
          <GradientStop Color="#33000000" Offset="0.5" />
          <GradientStop Color="#00000000" Offset="0.75" />
        </LinearGradientBrush>
      </Rectangle.OpacityMask>

      <Rectangle.BitmapEffect>
        <BlurBitmapEffect Radius="1.5" />
      </Rectangle.BitmapEffect>

    </Rectangle>
  </StackPanel>
</Page>

*/
    }
}
Imports System.Windows
Imports System.Windows.Data
Imports System.Windows.Controls
Imports System.Windows.Media
Imports System.Windows.Media.Effects
Imports System.Windows.Media.Imaging
Imports System.IO
Imports System.Collections.ObjectModel
Imports System.Windows.Shapes
Namespace SDKSample
    Partial Public Class ReflectionExample
        Inherits Page
        Public Sub New()
            ' Create a name scope for the page.
            NameScope.SetNameScope(Me, New NameScope())

            Me.Background = Brushes.Black
            Dim myStackPanel As New StackPanel()
            myStackPanel.Margin = New Thickness(50)

            Dim myReflectedBorder As New Border()
            Me.RegisterName("ReflectedVisual", myReflectedBorder)

            ' Create a gradient background for the border.
            Dim firstStop As New GradientStop()
            firstStop.Offset = 0.0
            Dim firstStopColor As New Color()
            firstStopColor.R = 204
            firstStopColor.G = 204
            firstStopColor.B = 255
            firstStopColor.A = 255
            firstStop.Color = firstStopColor
            Dim secondStop As New GradientStop()
            secondStop.Offset = 1.0
            secondStop.Color = Colors.White

            Dim myGradientStopCollection As New GradientStopCollection()
            myGradientStopCollection.Add(firstStop)
            myGradientStopCollection.Add(secondStop)

            Dim myLinearGradientBrush As New LinearGradientBrush()
            myLinearGradientBrush.StartPoint = New Point(0, 0.5)
            myLinearGradientBrush.EndPoint = New Point(1, 0.5)
            myLinearGradientBrush.GradientStops = myGradientStopCollection

            myReflectedBorder.Background = myLinearGradientBrush

            ' Add contents to the border.
            Dim borderStackPanel As New StackPanel()
            borderStackPanel.Orientation = Orientation.Horizontal
            borderStackPanel.Margin = New Thickness(10)

            Dim myTextBlock As New TextBlock()
            myTextBlock.TextWrapping = TextWrapping.Wrap
            myTextBlock.Width = 200
            myTextBlock.Text = "Lorem ipsum dolor sit amet, consectetuer adipiscing elit." & " Suspendisse vel ante. Donec luctus tortor sit amet est." & " Nullam pulvinar odio et wisi." & " Pellentesque quis magna. Sed pellentesque." & " Nulla euismod." & "Pellentesque habitant morbi tristique senectus et netus et malesuada fames ac turpis egestas."

            borderStackPanel.Children.Add(myTextBlock)

            Dim ellipseStackPanel As New StackPanel()

            Dim ellipse1 As New Ellipse()
            ellipse1.Margin = New Thickness(10)
            ellipse1.Height = 50
            ellipse1.Width = 50
            ellipse1.Fill = Brushes.Black
            ellipseStackPanel.Children.Add(ellipse1)
            Dim ellipse2 As New Ellipse()
            ellipse2.Margin = New Thickness(10)
            ellipse2.Height = 50
            ellipse2.Width = 50
            ellipse2.Fill = Brushes.Black
            ellipseStackPanel.Children.Add(ellipse2)
            Dim ellipse3 As New Ellipse()
            ellipse3.Margin = New Thickness(10)
            ellipse3.Height = 50
            ellipse3.Width = 50
            ellipse3.Fill = Brushes.Black
            ellipseStackPanel.Children.Add(ellipse3)
            borderStackPanel.Children.Add(ellipseStackPanel)

            myReflectedBorder.Child = borderStackPanel

            ' Create divider rectangle
            Dim dividerRectangle As New Rectangle()
            dividerRectangle.Height = 1
            dividerRectangle.Fill = Brushes.Gray
            dividerRectangle.HorizontalAlignment = HorizontalAlignment.Stretch

            ' Create the object to contain the reflection.
            Dim reflectionRectangle As New Rectangle()

            ' Bind the height of the rectangle to the border height.
            Dim heightBinding As New Binding()
            heightBinding.ElementName = "ReflectedVisual"
            heightBinding.Path = New PropertyPath(Rectangle.HeightProperty)
            BindingOperations.SetBinding(reflectionRectangle, Rectangle.HeightProperty, heightBinding)

            ' Bind the width of the rectangle to the border width.
            Dim widthBinding As New Binding()
            widthBinding.ElementName = "ReflectedVisual"
            widthBinding.Path = New PropertyPath(Rectangle.WidthProperty)
            BindingOperations.SetBinding(reflectionRectangle, Rectangle.WidthProperty, widthBinding)

            ' Creates the reflection.
            Dim myVisualBrush As New VisualBrush()
            myVisualBrush.Opacity = 0.75
            myVisualBrush.Stretch = Stretch.None
            Dim reflectionBinding As New Binding()
            reflectionBinding.ElementName = "ReflectedVisual"
            BindingOperations.SetBinding(myVisualBrush, VisualBrush.VisualProperty, reflectionBinding)

            Dim myScaleTransform As New ScaleTransform()
            myScaleTransform.ScaleX = 1
            myScaleTransform.ScaleY = -1
            Dim myTranslateTransform As New TranslateTransform()
            myTranslateTransform.Y = 1

            Dim myTransformGroup As New TransformGroup()
            myTransformGroup.Children.Add(myScaleTransform)
            myTransformGroup.Children.Add(myTranslateTransform)

            myVisualBrush.RelativeTransform = myTransformGroup

            reflectionRectangle.Fill = myVisualBrush

            ' Create a gradient background for the border.
            Dim firstStop2 As New GradientStop()
            firstStop2.Offset = 0.0
            Dim c1 As New Color()
            c1.R = 0
            c1.G = 0
            c1.B = 0
            c1.A = 255
            firstStop2.Color = c1
            Dim secondStop2 As New GradientStop()
            secondStop2.Offset = 0.5
            Dim c2 As New Color()
            c2.R = 0
            c2.G = 0
            c2.B = 0
            c2.A = 51
            firstStop2.Color = c2
            Dim thirdStop As New GradientStop()
            thirdStop.Offset = 0.75
            Dim c3 As New Color()
            c3.R = 0
            c3.G = 0
            c3.B = 0
            c3.A = 0
            thirdStop.Color = c3

            Dim myGradientStopCollection2 As New GradientStopCollection()
            myGradientStopCollection2.Add(firstStop2)
            myGradientStopCollection2.Add(secondStop2)
            myGradientStopCollection2.Add(thirdStop)

            Dim myLinearGradientBrush2 As New LinearGradientBrush()
            myLinearGradientBrush2.StartPoint = New Point(0.5, 0)
            myLinearGradientBrush2.EndPoint = New Point(0.5, 1)
            myLinearGradientBrush2.GradientStops = myGradientStopCollection2

            reflectionRectangle.OpacityMask = myLinearGradientBrush2

            Dim myBlurBitmapEffect As New BlurBitmapEffect()
            myBlurBitmapEffect.Radius = 1.5

            reflectionRectangle.BitmapEffect = myBlurBitmapEffect

            myStackPanel.Children.Add(myReflectedBorder)
            myStackPanel.Children.Add(dividerRectangle)
            myStackPanel.Children.Add(reflectionRectangle)
            Me.Content = myStackPanel

        End Sub
    End Class
End Namespace
<Page
  xmlns="http://schemas.microsoft.com/winfx/2006/xaml/presentation"
  xmlns:x="http://schemas.microsoft.com/winfx/2006/xaml"
  Background="Black">


  <StackPanel Margin="50">

    <!-- The object to reflect. -->
    <Border Name="ReflectedVisual" Width="400">
      <Border.Background>
        <LinearGradientBrush StartPoint="0,0.5" EndPoint="1,0.5">
          <GradientStop Offset="0.0" Color="#CCCCFF" />
          <GradientStop Offset="1.0" Color="White" />
        </LinearGradientBrush>
      </Border.Background>
      <StackPanel Orientation="Horizontal" Margin="10">
        <TextBlock TextWrapping="Wrap" Width="200" Margin="10">
          Lorem ipsum dolor sit amet, consectetuer adipiscing elit.
          Suspendisse vel ante. Donec luctus tortor sit amet est.
          Nullam pulvinar odio et wisi.
          Pellentesque quis magna. Sed pellentesque.
          Nulla euismod.
          Pellentesque habitant morbi tristique senectus et netus et malesuada fames ac turpis egestas.
        </TextBlock>
        <StackPanel>
          <Ellipse Margin="10" Height="50" Width="50" Fill="Black" />
          <Ellipse Margin="10" Height="50" Width="50" Fill="Black" />
          <Ellipse Margin="10" Height="50" Width="50" Fill="Black" />
        </StackPanel>
      </StackPanel>
    </Border>

    <Rectangle Height="1" Fill="Gray" HorizontalAlignment="Stretch" />

    <!-- The object to contain the reflection.-->
    <Rectangle
      Height="{Binding Path=ActualHeight, ElementName=ReflectedVisual}"
      Width="{Binding Path=ActualWidth, ElementName=ReflectedVisual}">
      <Rectangle.Fill>

        <!-- Creates the reflection. -->
        <VisualBrush
          Opacity="0.75" Stretch="None"
          Visual="{Binding ElementName=ReflectedVisual}">
          <VisualBrush.RelativeTransform>

            <!-- Flip the reflection. -->
            <TransformGroup>
              <ScaleTransform ScaleX="1" ScaleY="-1" />
              <TranslateTransform  Y="1" />
            </TransformGroup>
          </VisualBrush.RelativeTransform>
        </VisualBrush>
      </Rectangle.Fill>

      <Rectangle.OpacityMask>
        <LinearGradientBrush StartPoint="0.5,0" EndPoint="0.5,1">
          <GradientStop Color="#FF000000" Offset="0.0" />
          <GradientStop Color="#33000000" Offset="0.5" />
          <GradientStop Color="#00000000" Offset="0.75" />
        </LinearGradientBrush>
      </Rectangle.OpacityMask>

      <Rectangle.BitmapEffect>
        <BlurBitmapEffect Radius="1.5" />
      </Rectangle.BitmapEffect>

    </Rectangle>
  </StackPanel>
</Page>
画面の一部を拡大する方法とリフレクションを作成する方法を示すその他の例については、 VisualBrush サンプルを参照してください。
TileBrush の機能
ImageBrush、 DrawingBrush、および VisualBrush は、 TileBrush オブジェクトの型です。 TileBrush オブジェクトを使用すると、領域をイメージ、描画、またはビジュアルで描画する方法を大幅に制御できます。 たとえば、1 つのストレッチ イメージで領域を塗りつぶすのではなく、パターンを作成する一連のイメージ タイルで領域を塗りつぶすことができます。
TileBrushには、コンテンツ、タイル、出力領域の 3 つの主要なコンポーネントがあります。

1 つのタイルを持つ TileBrush のコンポーネント
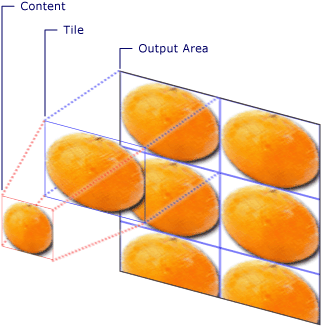
複数のタイルを持つ TileBrush のコンポーネント
TileBrush オブジェクトのタイリング機能の詳細については、「TileBrush の概要」を参照してください。
こちらも参照ください
GitHub で Microsoft と共同作業する
このコンテンツのソースは GitHub にあります。そこで、issue や pull request を作成および確認することもできます。 詳細については、共同作成者ガイドを参照してください。
.NET Desktop feedback