Patient service center: Support patients with patient insights
Engage with your patients in the way they want, by using chat and voice calls over Microsoft Teams, and monitor automatic conversations through the Microsoft Azure Health Bot service. Service agents can help your patients with information and setting up appointments.
Key capabilities for Patient service center include:
Monitor patient conversations: An ongoing conversations dashboard provides information on the conversations handled by the agents and integrated bots.
Agent scripts: Leverage provider-specific agent scripts to address patient issues.
Monitor effectiveness: Conversation intelligence provides insights to service center managers on agent performance.
Follow up: Send follow-up surveys on patient satisfaction, reminders on appointments, and more.
Appointment scheduling: Schedule or reschedule appointments during conversations with patients.
Teams Calling: Direct Conversation with the Patient to discuss availability or get details etc.
Patient service center builds on Dynamics 365 Customer Service and its Digital Messaging Add-in to add healthcare-specific capabilities to Microsoft Cloud for Healthcare. Learn more about how to use Dynamics 365 Customer Service and how to deploy and configure Patient service center.
Connect Patient service center to Patient access to create a direct channel for your patients and configure Microsoft Azure Health Bot to automate conversations.
To access Patient service center, select Patient service center from your Microsoft Dynamics 365 home page after deployment.
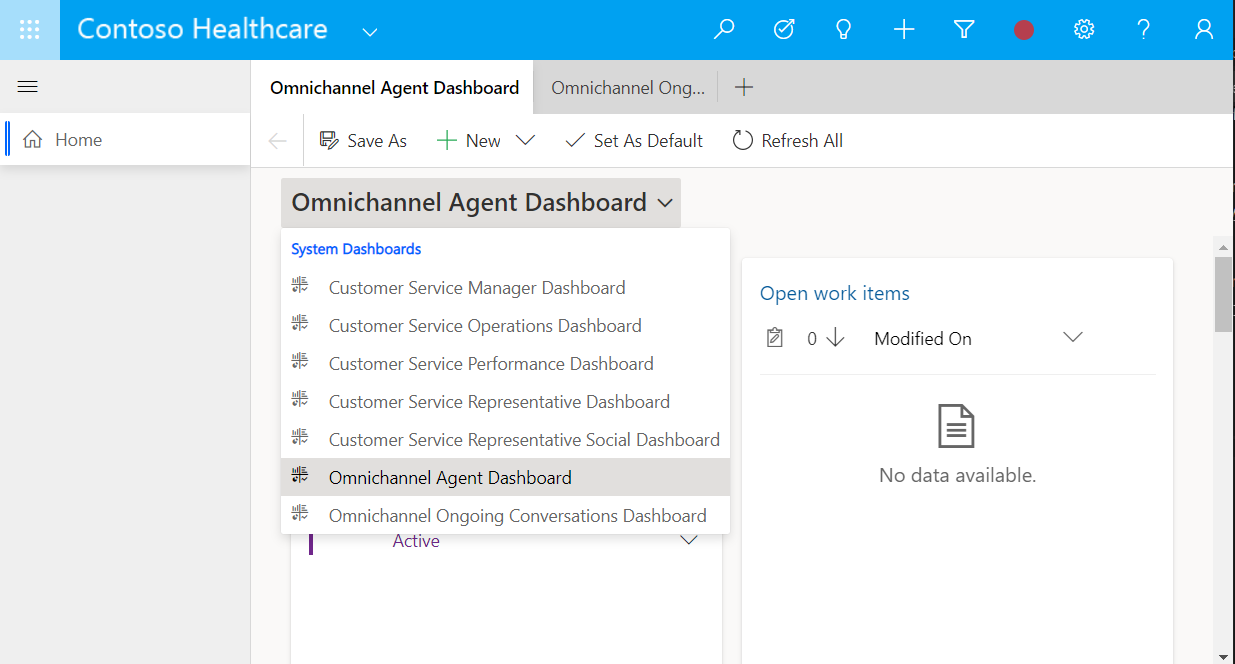
Select a dashboard
To select a dashboard to view, select the arrow next to Dashboard Selector.
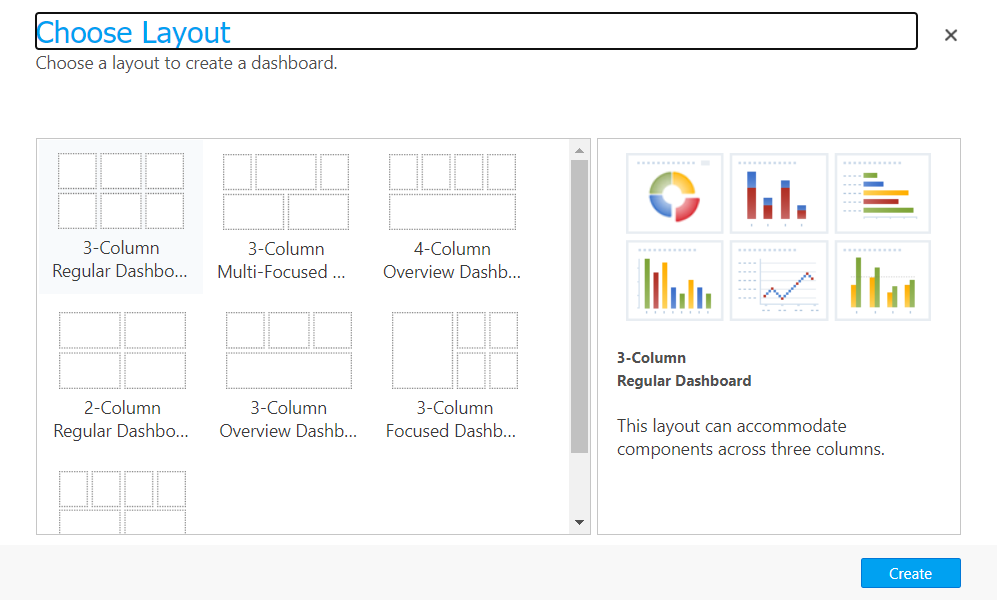
To create a new dashboard, select New and select Dynamics 365 Dashboard. To learn how to create a dashboard, go to Create model-driven app dashboards.
Add an item or dashboard to a tab
To add an item or dashboard to a new tab in Patient service center, select Open sitemap item to a new tab, the plus symbol (+), and select an item.

Escalation from Microsoft Azure Health Bot in Patient service center
To configure escalation from the Microsoft Azure Health Bot service into Patient service center, go to Enable a bot to escalate and end conversation.
Upon receiving the escalation from the Azure Health Bot service, Patient service center receives a notification of an incoming chat request within the solution. Upon selecting Accept, you can view the full patient view for the transferred patient or consumer. The configurable Patient view provides a full view of the following in the context of a patient:
Patient Demographic Data
Patient Clinical Timeline
Patient Care Plan Development Tool
Patient Care Team Collaboration Tool
To learn how to use each Patient view component, go to Use Care management.

Agent scripts
In Microsoft Cloud for Healthcare solutions powered by Dynamics 365, Patient service center is often the patient's frontline of direct communication with an organization. The agents and caregivers need to deal with continuous updates both to products and processes, making it difficult to ensure appropriate steps are being followed during patient service. Even after agents have been rigorously trained, recurrent human errors and delays in service delivery occur due to a lack of guidance in real-time customer scenarios. These issues lead to lower productivity and thus negatively affect patient and consumer satisfaction levels. To avoid errors and ensure that processes are adhered to, agents and caregivers need guidance.
Agent scripts provide guidance to agents and caregivers about what to do when they get a patient or consumer issue. The scripts ensure that only accurate, organization-endorsed information is being shared, while also safeguarding the organization regarding issues of legal compliance. Agent scripts help organizations to be unified and effective while also handling patients and customers faster and more efficiently.
Agent scripts reduce the human errors involved in the process, because agents know which actions they need to perform next while they interact with a patient or customer, which enables them to adhere to business process. This guidance, in turn, leads agents to provide quick resolutions for the issue (low average handling time) and improve satisfaction.
For more information about administering and configuring agent guidance, go to Guide agents with scripts. The scheduling wizard is triggered by a macro and can be launched from an agent script.
Knowledge management
In healthcare, it's imperative to provide patients and consumers with information that helps them make informed health decisions. Through knowledge management in Patient service center, agents and caregivers can proactively send patients and consumers knowledge and wellness content within the context of addressing a patient issue in Patient service center.
You can add a knowledge article to a new tab in Patient service center. Select Open sitemap item to a new tab, the plus symbol (+), and select Knowledge Articles.
For more information about the administration and configuration of knowledge base articles that can be sent in Patient service center, go to Share knowledge articles in Omnichannel for Customer Service.

Scheduling
Schedule or reschedule appointments during conversations with patients. The scheduling wizard filters available slots to help you book appointments.
Schedule an appointment
On the patient form, select Schedule Appointment on the command bar.

The patient scheduling wizard guides you through the following required steps:
Select a specialty or a provider from the patient's care team.

Select the appointment type.

Select the appointment location. You can search by ZIP Code. The location is needed for both clinic and virtual appointments.

Select the slot for the appointment. Select a date to bring up slots on that date and on future dates. The wizard only shows appointment slots with a Status of Free.

Add a reason (required) and more details (optional). The reason field updates the Subject field of the appointment, and the additional details field updates the Comment field of the appointment.

Review the appointment details and select Schedule appointment. After appointment booking, the selected slot's Status is changed to Busy. An appointment record is also be created. A scheduled clinic appointment has a Status of Booked. A scheduled virtual appointment will have a Status of Pending until a meeting link is generated, after which it will also have a Status of Booked. Go to Generate virtual visit link automatically for details on configuring how a meeting link is generated.

Select whether the email confirmation should be sent to the patient's primary email address. Go to Configure appointment confirmation emails for details on configuring the confirmation emails.

Select Done to send the email confirmation.

Reschedule an appointment
If an appointment needs to be rescheduled, open the appointment and select Reschedule Appointment on the command bar.
Note
An appointment cannot be rescheduled if it is missing any of the following fields: location, practitioner, or appointment channel (clinic or virtual).

The patient rescheduling wizard guides you through the following required steps to update the appointment time, after prefiltering the slots based on the current practitioner, location, and appointment channel. The details of each step are the same as in the scheduling wizard, unless otherwise noted.
Select the slot for the appointment.

Update the reason (optional) or update the additional details (optional). Changing the reason field updates the Subject field of the appointment, and changing the additional details field updates the Comment field of the appointment.

Review the appointment details and select Reschedule appointment.

Select whether an email confirmation should be sent to the patient's primary email address.

Select Done to send the email confirmation.

Voice calling with the patient (preview)
Important
- This is a preview feature.
- Preview features aren't meant for production use and may have restricted functionality. These features are available before an official release so that customers can get early access and provide feedback.
At times, the caregiver or healthcare personas like the care manager or the nurse may want to directly get on a quick call with the patient to get more information such as:
- Information pertaining to patient availability.
- Getting relevant medical information regarding the patient's care history.
- Checking up on the patient.
For these scenarios, they don't need the sophistication of a video call with the patient, but would rather have a quick sync over a voice call. We provide patients with a simple way to do so, by embedding native Microsoft Teams calling within the caregiver's Patient access portal.
The following section describes how to configure the voice calling capabilities in Patient service center via the Dynamics 365 Sales Hub app.
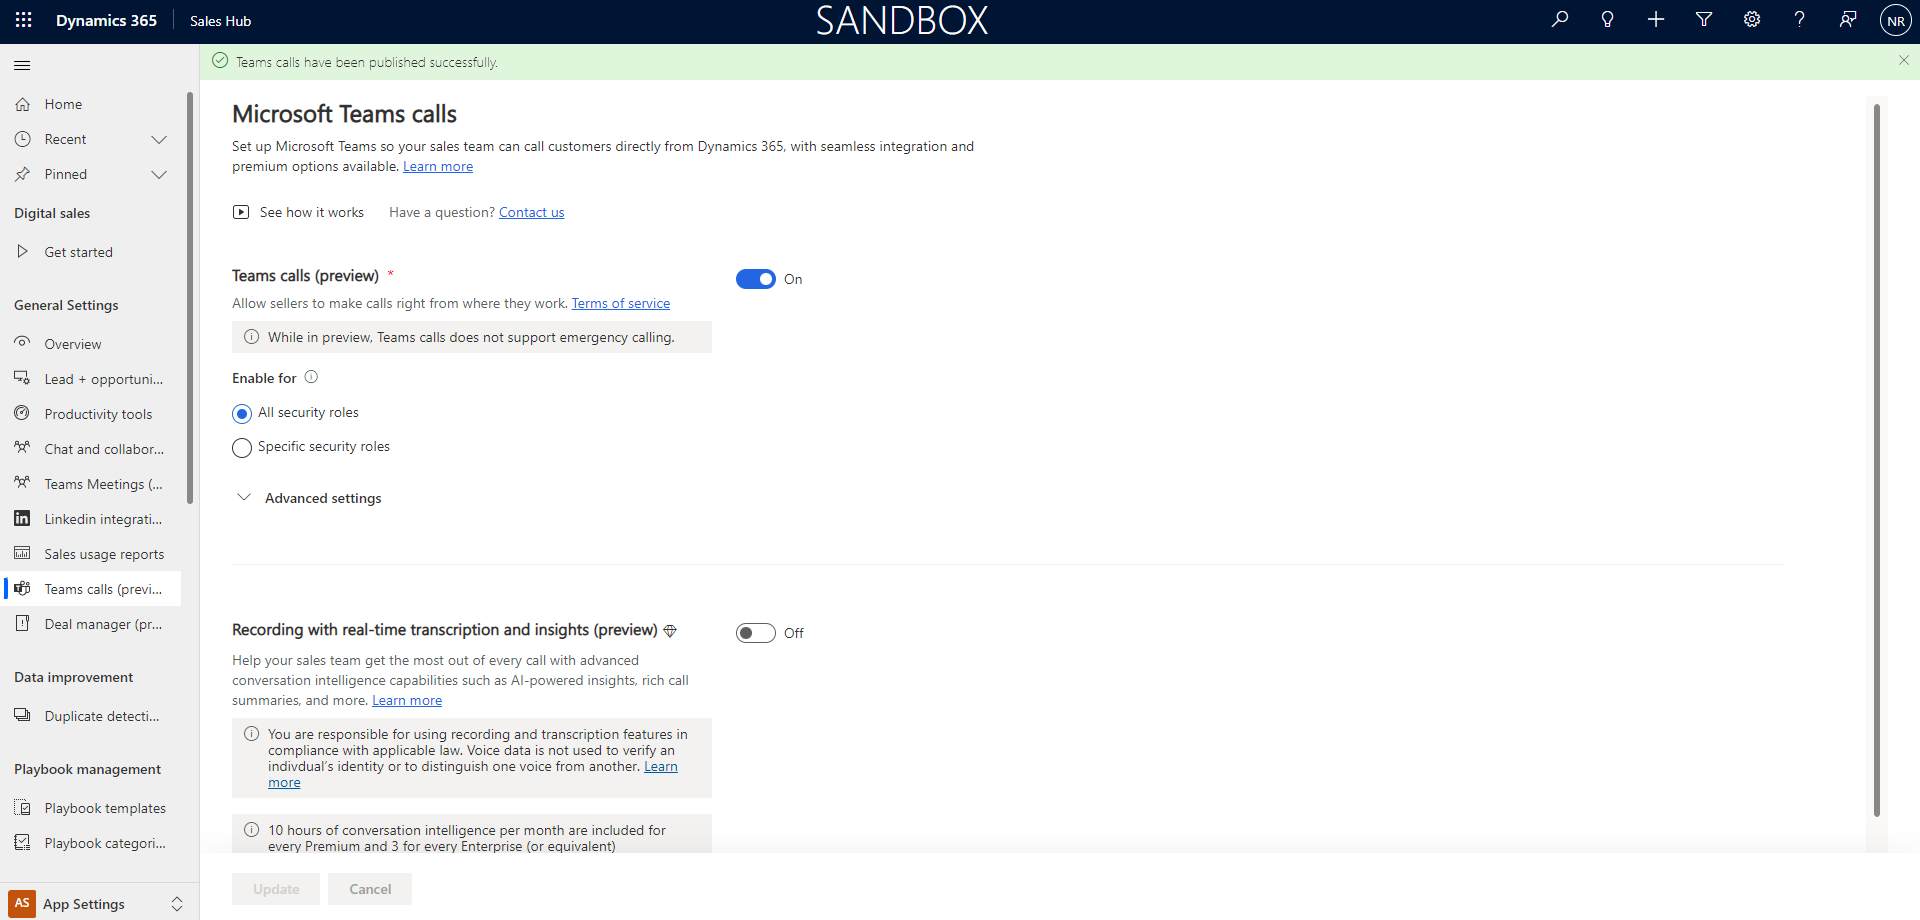
Set up Teams embedded calling
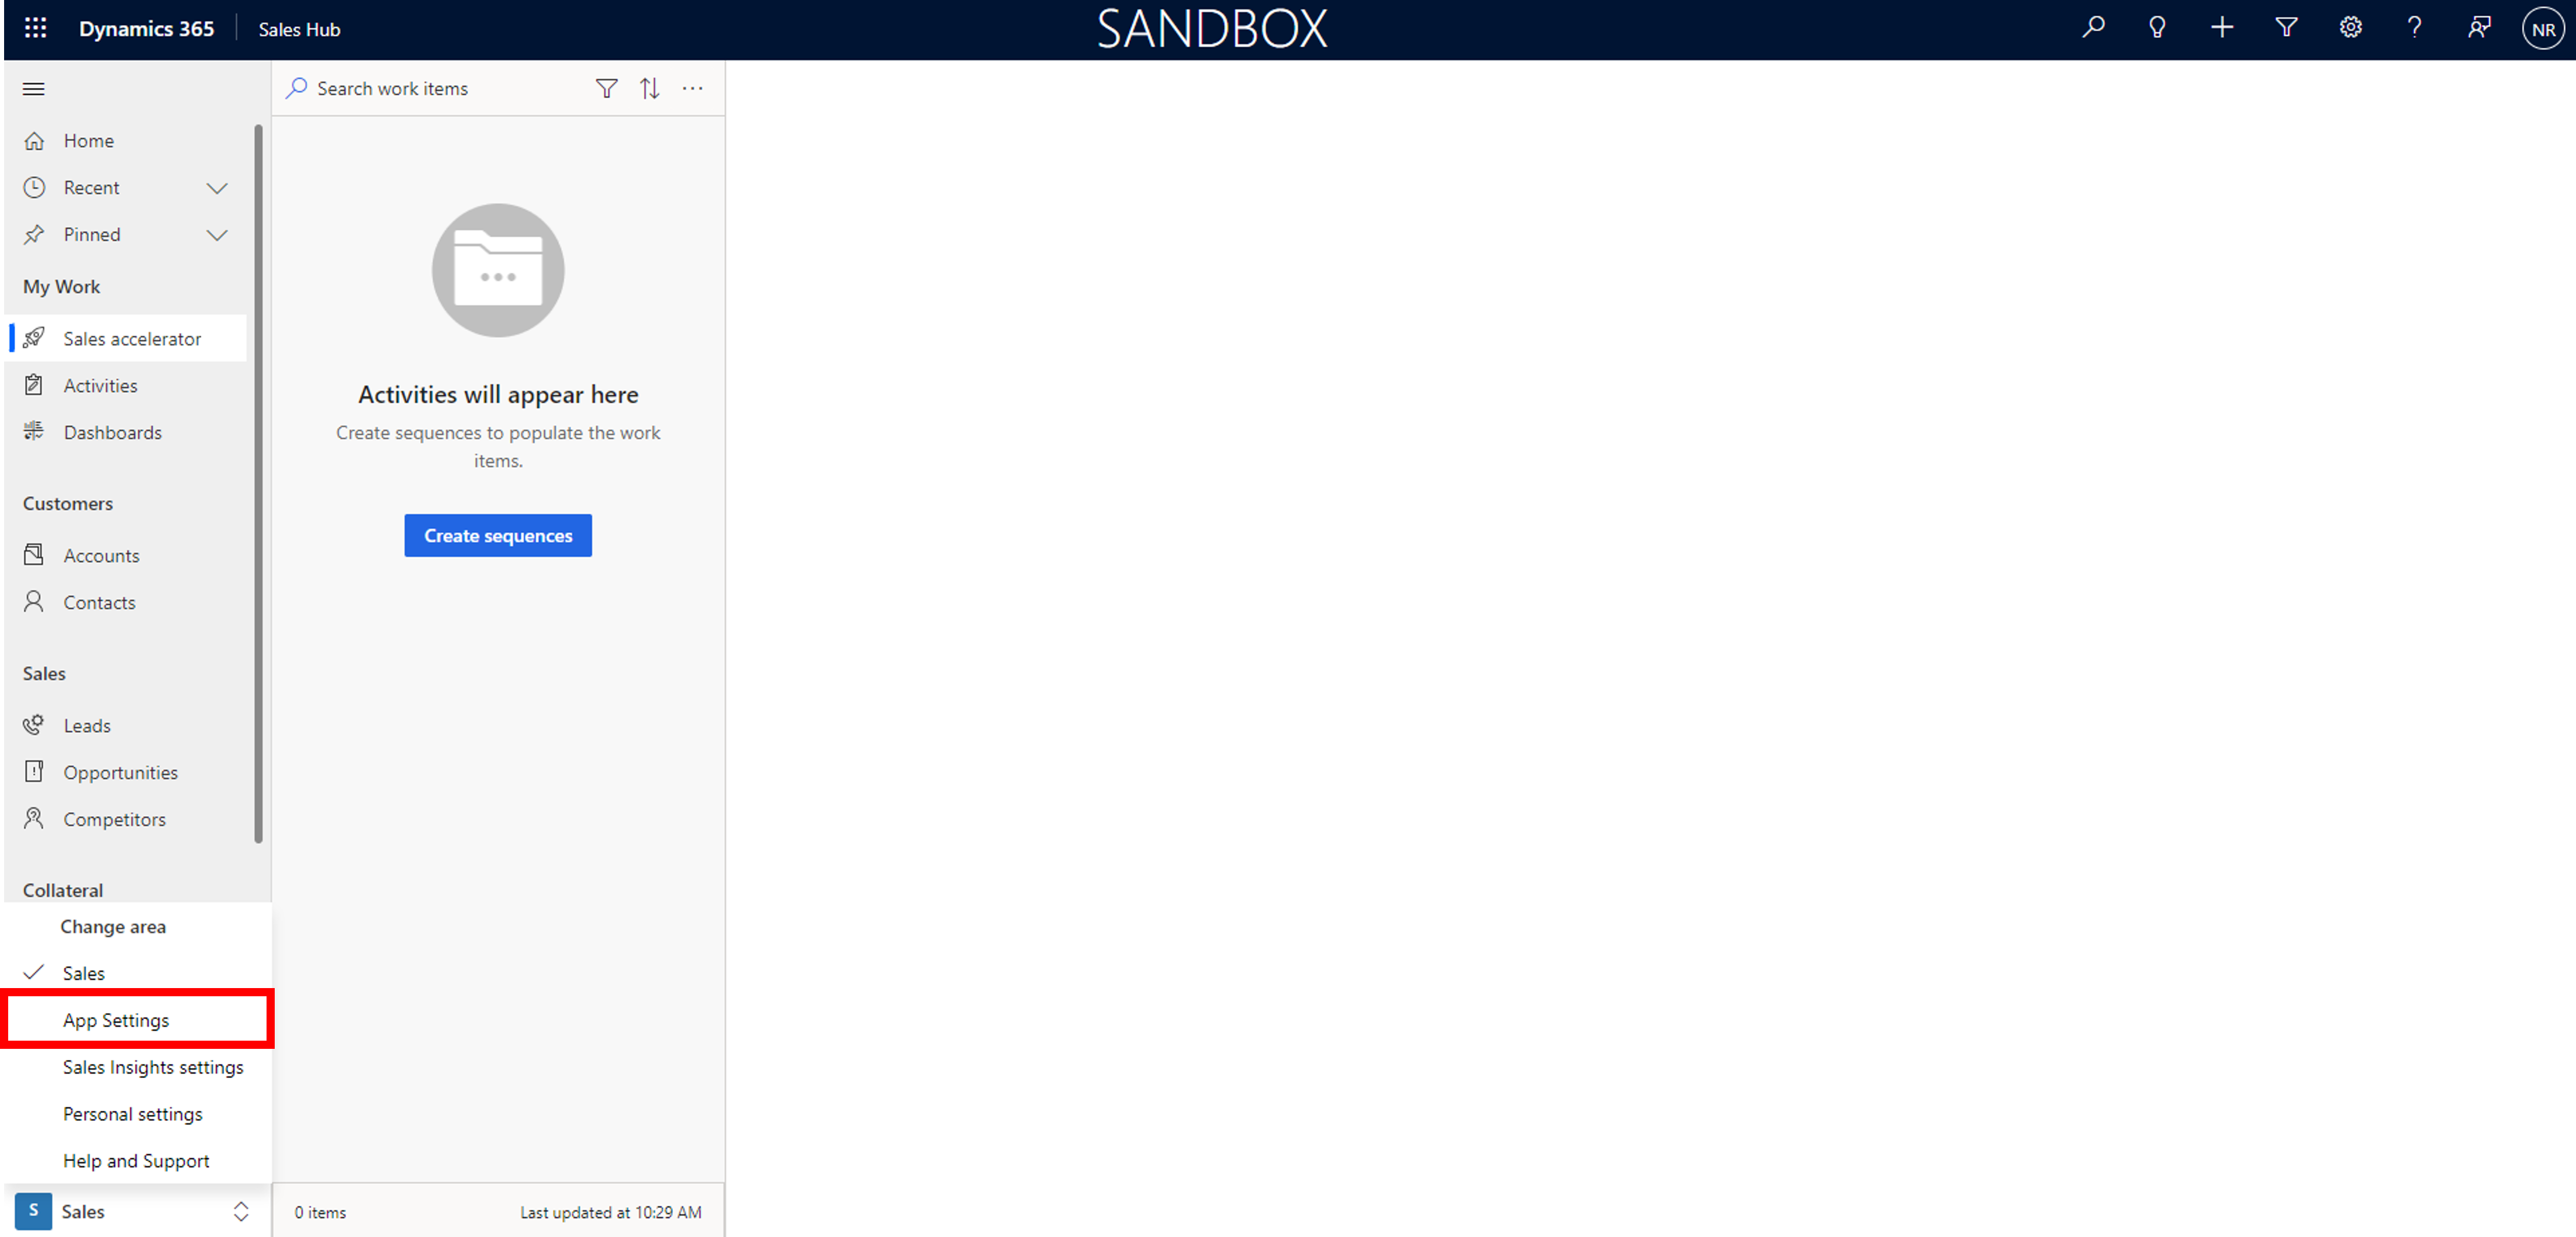
Navigate to the Dynamics 365 Sales Hub app.
On the Sales Hub home page, navigate to the Change area option in the lower-left section of the page and select App Settings.
Under the General Settings panel, select Teams calls (preview).
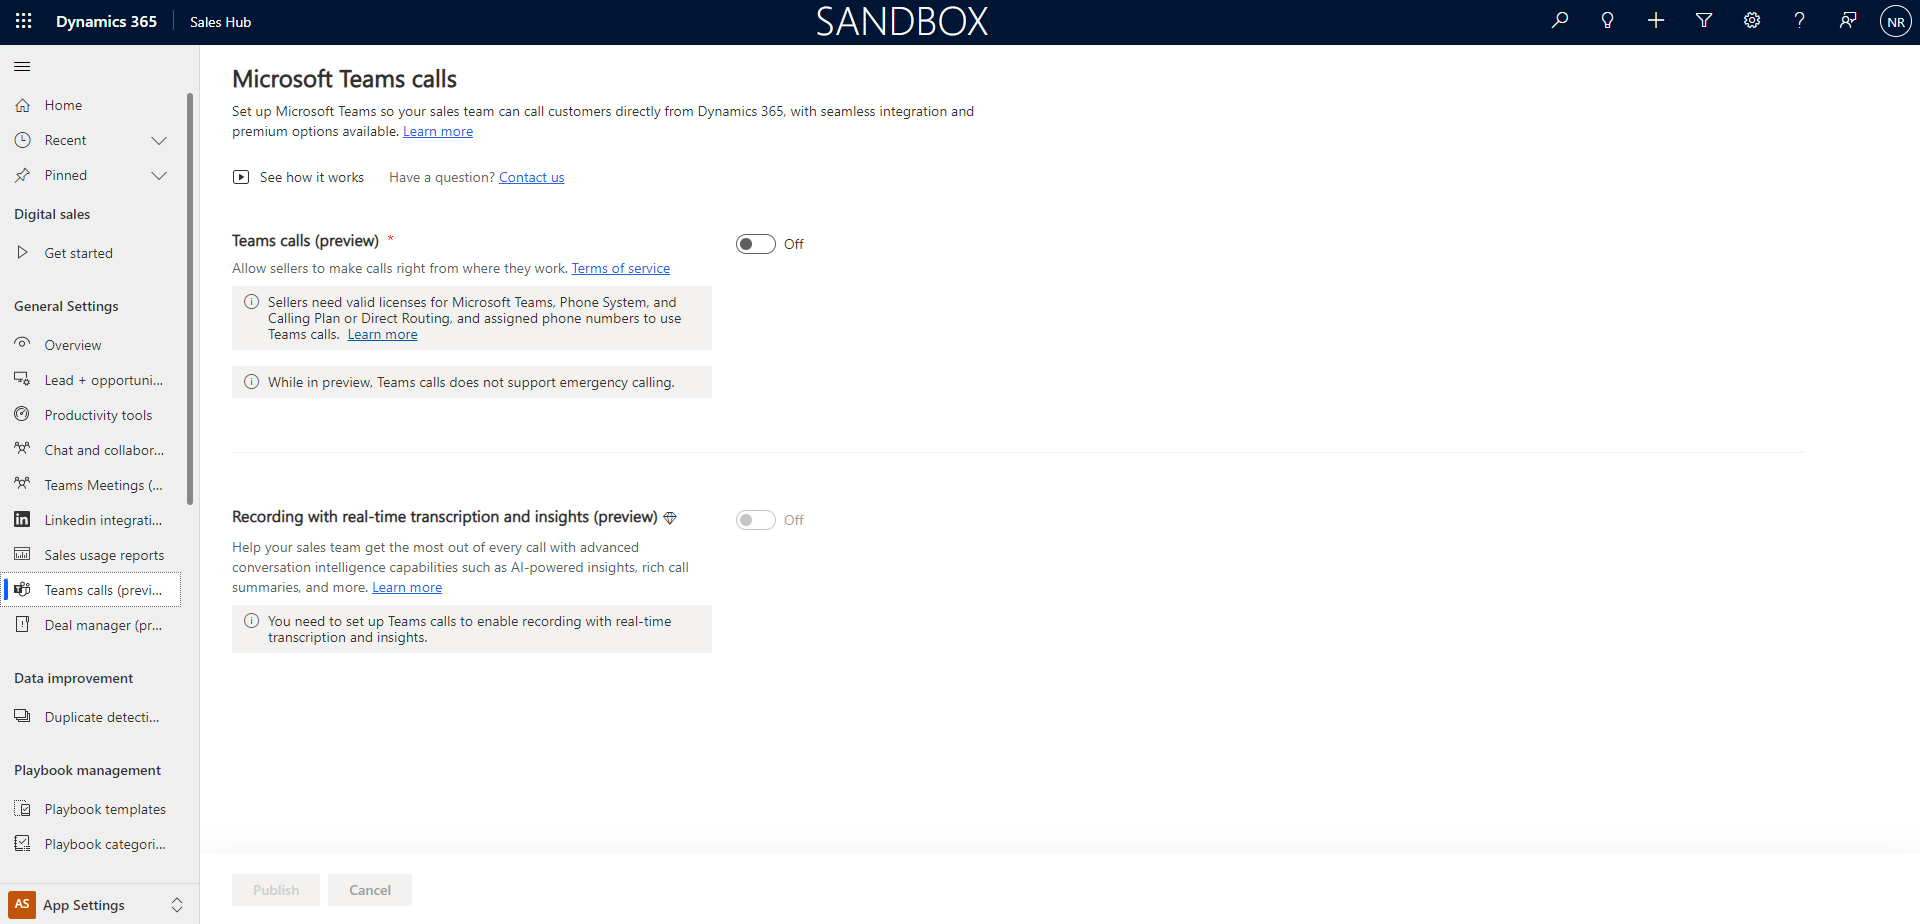
You can enable or disable the call feature, and also choose to configure the following options:
- Enable or disable embedded calling using the Teams calls (preview) button.
- Configure the security roles for which the Teams calling option is applicable.
- In the Advanced settings section, choose the Dynamics 365 Unified Interface apps for which Microsoft Teams calls would be enabled.
- Enable or disable call recording as per the requirement. Specify the security roles that can have access to the recording.
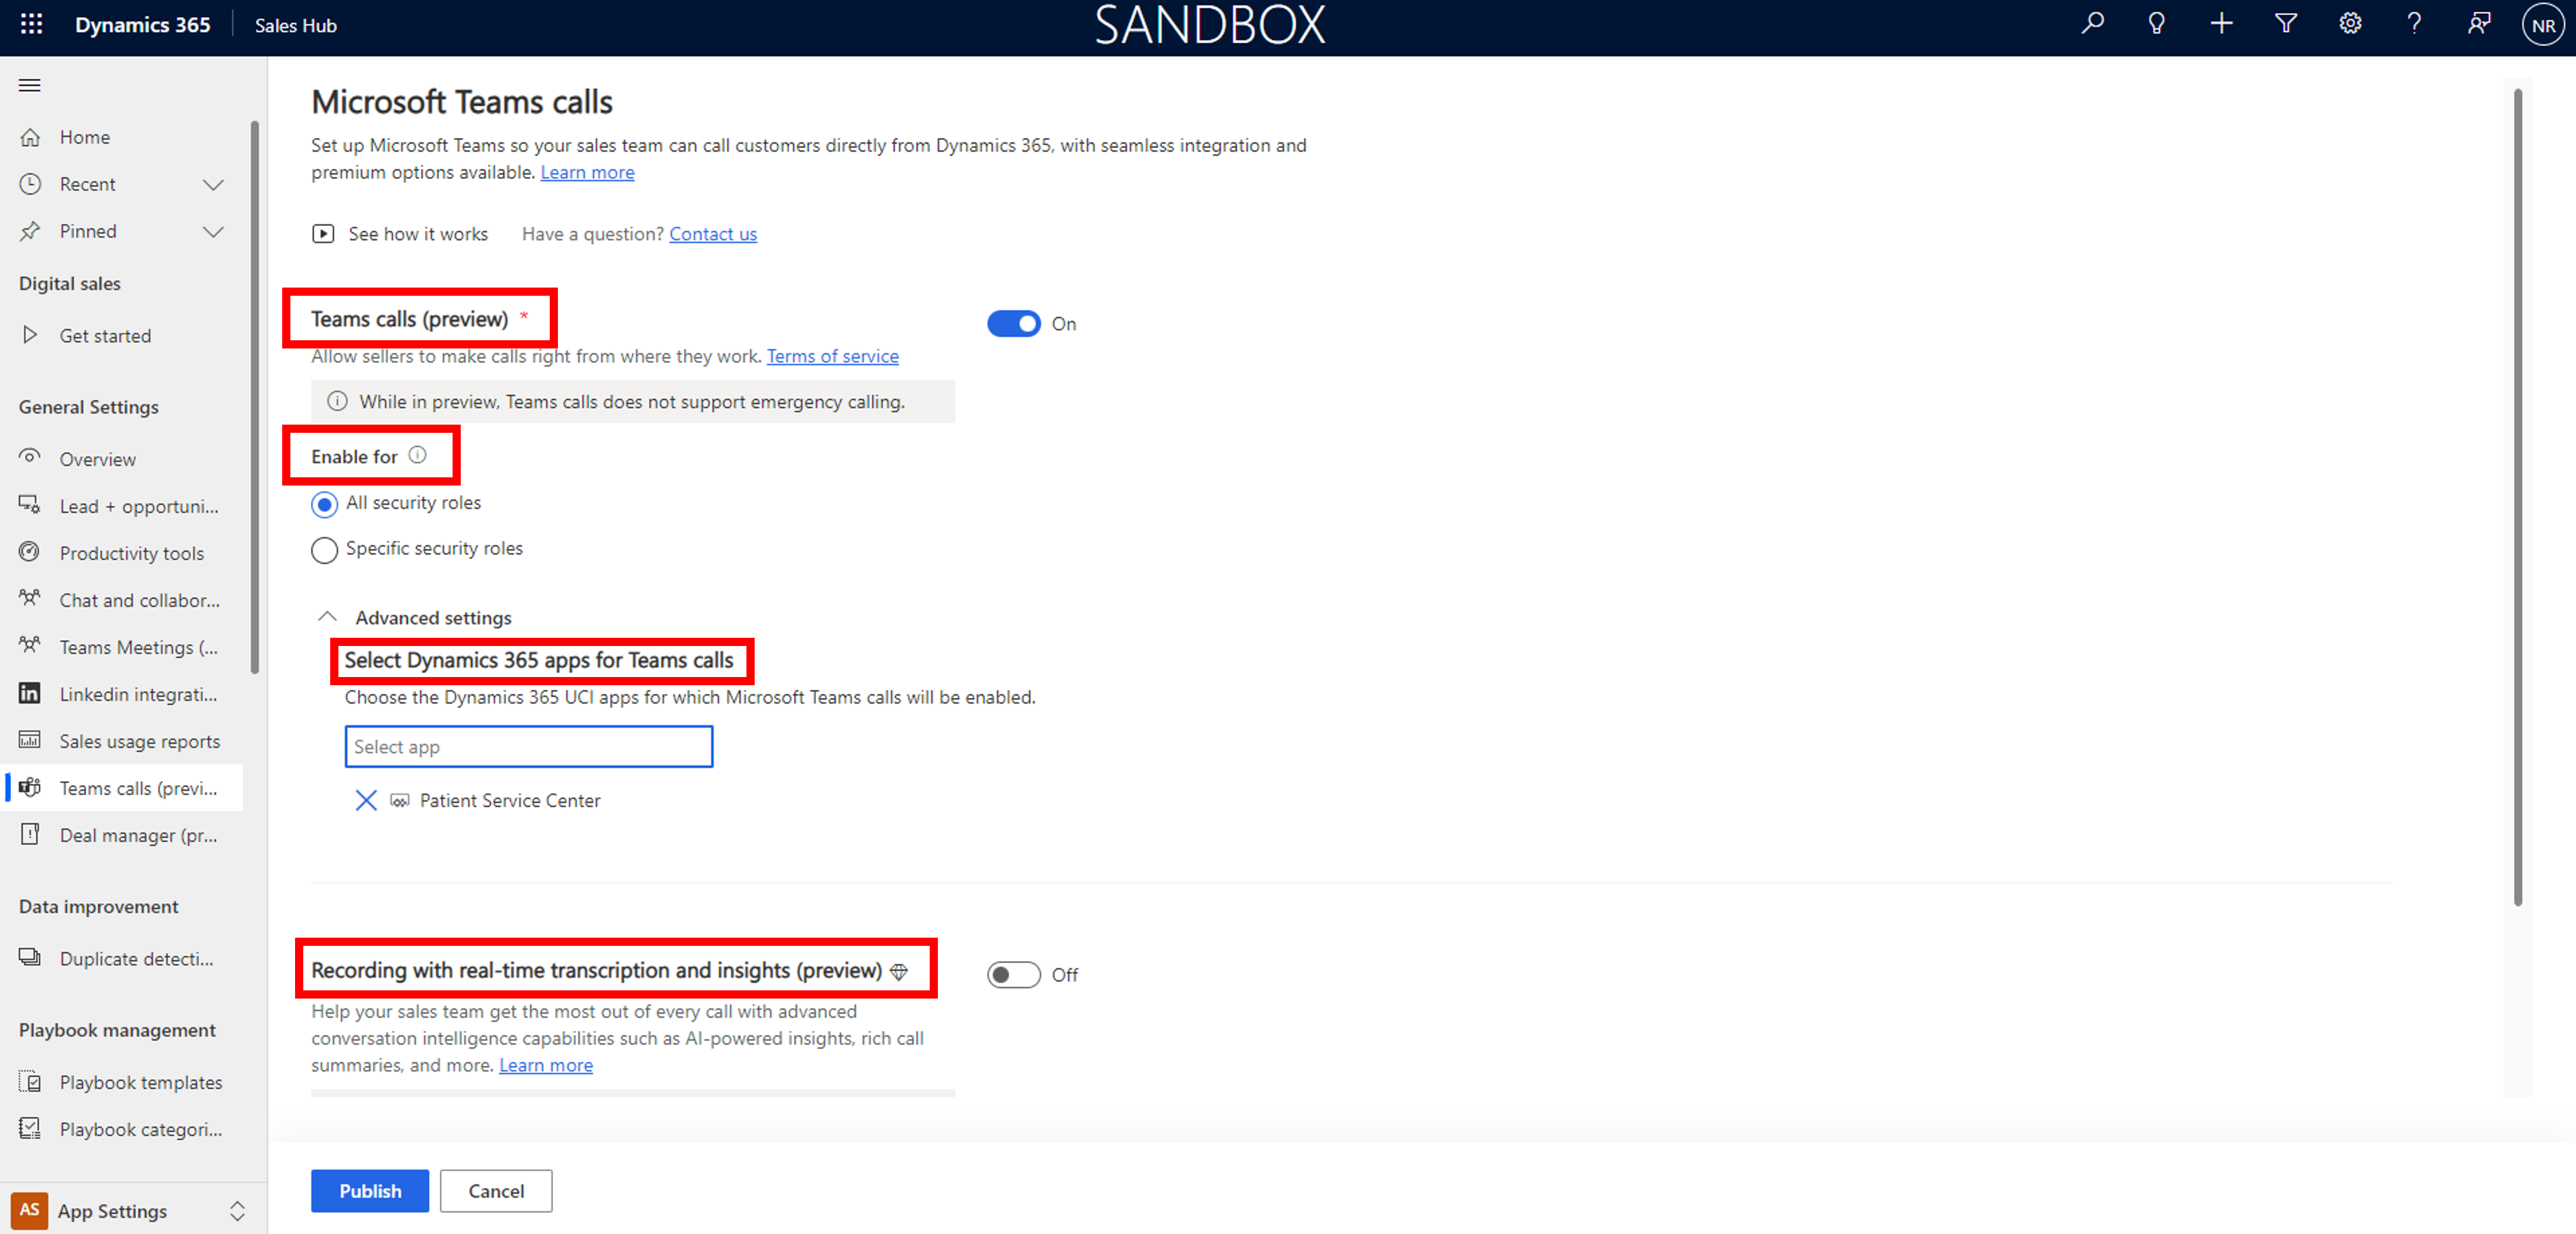
Select Update to save the changes.
See also
What is Microsoft Cloud for Healthcare?
Basic navigation in a model-driven app
Introduction to Omnichannel for Customer Service
Agents using Omnichannel for Customer Service app
Deploy healthcare solutions
Configure healthcare solutions