JSON (JavaScript オブジェクト表記) は、データを格納および転送するための形式です。 各 JSON オブジェクトは、作成時に定義できる名前と値のペアのコレクションです。 JSON は、Excel で範囲、テーブル、その他のデータ パターンの任意の複雑さを処理できるため、Office スクリプトで便利です。 JSON を使用すると、 Web サービス からの受信データを解析し、 Power Automate フローを介して複雑なオブジェクトを渡すことができます。
この記事では、Office スクリプトでの JSON の使用に焦点を当てます。 最初に、W3 Schools の JSON の概要 などの記事から、形式の詳細を確認することをお勧めします。
JSON データを範囲またはテーブルに解析する
JSON オブジェクトの配列は、アプリケーションと Web サービスの間でテーブル データの行を渡す一貫した方法を提供します。 このような場合、各 JSON オブジェクトは行を表し、プロパティは列を表します。 Office スクリプトは、JSON 配列をループして 2D 配列として再アセンブルできます。 その後、この配列は範囲の値として設定され、ブックに格納されます。 プロパティ名は、テーブルを作成するためのヘッダーとして追加することもできます。
次のスクリプトは、テーブルに変換される JSON データを示しています。 データは外部ソースから取得されないことに注意してください。 これについては、この記事の後半で説明します。
/**
 * Sample JSON data. This would be replaced by external calls or
 * parameters getting data from Power Automate in a production script.
 */
const jsonData = [
  { "Action": "Edit", /* Action property with value of "Edit". */
    "N": 3370, /* N property with value of 3370. */
    "Percent": 17.85 /* Percent property with value of 17.85. */
  },
  // The rest of the object entries follow the same pattern.
  { "Action": "Paste", "N": 1171, "Percent": 6.2 },
  { "Action": "Clear", "N": 599, "Percent": 3.17 },
  { "Action": "Insert", "N": 352, "Percent": 1.86 },
  { "Action": "Delete", "N": 350, "Percent": 1.85 },
  { "Action": "Refresh", "N": 314, "Percent": 1.66 },
  { "Action": "Fill", "N": 286, "Percent": 1.51 },
];

/**
 * This script converts JSON data to an Excel table.
 */
function main(workbook: ExcelScript.Workbook) {
  // Create a new worksheet to store the imported data.
  const newSheet = workbook.addWorksheet();
  newSheet.activate();

  // Determine the data's shape by getting the properties in one object.
  // This assumes all the JSON objects have the same properties.
  const columnNames = getPropertiesFromJson(jsonData[0]);

  // Create the table headers using the property names.
  const headerRange = newSheet.getRangeByIndexes(0, 0, 1, columnNames.length);
  headerRange.setValues([columnNames]);

  // Create a new table with the headers.
  const newTable = newSheet.addTable(headerRange, true);

  // Add each object in the array of JSON objects to the table.
  const tableValues = jsonData.map(row => convertJsonToRow(row));
  newTable.addRows(-1, tableValues);
}

/**
 * This function turns a JSON object into an array to be used as a table row.
 */
function convertJsonToRow(obj: object) {
  const array: (string | number)[] = [];

  // Loop over each property and get the value. Their order will be the same as the column headers.
  for (let value in obj) {
    array.push(obj[value]);
  }
  return array;
}

/**
 * This function gets the property names from a single JSON object.
 */
function getPropertiesFromJson(obj: object) {
  const propertyArray: string[] = [];

  // Loop over each property in the object and store the property name in an array.
  for (let property in obj) {
    propertyArray.push(property);
  }

  return propertyArray;
}
ヒント
JSON の構造がわかっている場合は、独自のインターフェイスを作成して、特定のプロパティを簡単に取得できます。 JSON から配列への変換手順は、型セーフな参照に置き換えることができます。 次のコード スニペットは、新しい ActionRow インターフェイスを使用する呼び出しに置き換えられた手順 (コメントアウト) を示しています。 これにより、 convertJsonToRow 関数は不要になります。
  // const tableValues = jsonData.map(row => convertJsonToRow(row));
  // newTable.addRows(-1, tableValues);
  // }

     const actionRows: ActionRow[] = jsonData as ActionRow[];
     // Add each object in the array of JSON objects to the table.
     const tableValues = actionRows.map(row => [row.Action, row.N, row.Percent]);
     newTable.addRows(-1, tableValues);
   }

   interface ActionRow {
     Action: string;
     N: number;
     Percent: number;
   }
外部ソースから JSON データを取得する
Office スクリプトを使用して JSON データをブックにインポートするには、2 つの方法があります。
- Power Automate フローを使用する パラメーター として。
-
外部 Web サービスへの
fetch呼び出しを使用します。
Power Automate で動作するようにサンプルを変更する
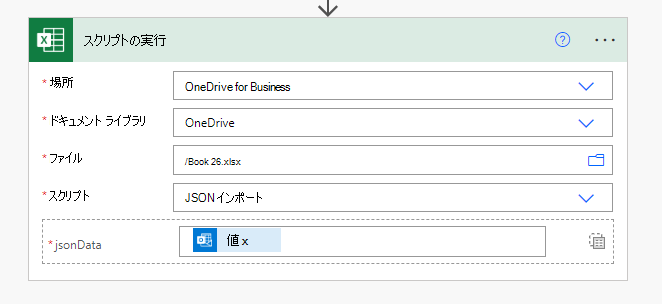
Power Automate の JSON データは、汎用オブジェクト配列として渡すことができます。 スクリプトに object[] プロパティを追加して、そのデータを受け入れます。
// For Power Automate, replace the main signature in the previous sample with this one
// and remove the sample data.
function main(workbook: ExcelScript.Workbook, jsonData: object[]) {
その後、Power Automate コネクタにオプションが表示され、[スクリプトの実行] アクションにjsonDataが追加されます。

fetch呼び出しを使用するようにサンプルを変更する
Web サービスは、JSON データを使用して fetch 呼び出しに応答できます。 これにより、Excel を維持しながら必要なデータがスクリプトに提供されます。
fetchと外部呼び出しの詳細については、「Office スクリプトでの外部 API 呼び出しのサポート」を参照してください。
// For external services, replace the main signature in the previous sample with this one,
// add the fetch call, and remove the sample data.
async function main(workbook: ExcelScript.Workbook) {
  // Replace WEB_SERVICE_URL with the URL of whatever service you need to call.
  const response = await fetch('WEB_SERVICE_URL');
  const jsonData: object[] = await response.json();
範囲から JSON を作成する
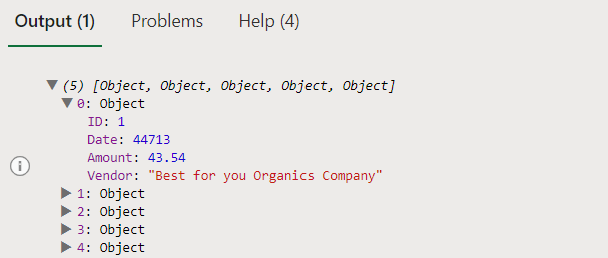
ワークシートの行と列は、多くの場合、データ値間のリレーションシップを意味します。 テーブルの行は概念的にプログラミング オブジェクトにマップされ、各列はそのオブジェクトのプロパティです。 次のデータの表を考えてみましょう。 各行は、スプレッドシートに記録されたトランザクションを表します。
| ID | Date | Amount | ベンダー |
|---|---|---|---|
| 1 | 6/1/2022 | $43.54 | ベスト・for・エ・オーガニックズ・カンパニー |
| 2 | 6/3/2022 | $67.23 | 自由のパン屋とカフェ |
| 3 | 6/3/2022 | $37.12 | ベスト・for・エ・オーガニックズ・カンパニー |
| 4 | 6/6/2022 | $86.95 | Coho Vineyard |
| 5 | 6/7/2022 | $13.64 | 自由のパン屋とカフェ |
各トランザクション (各行) には、"ID"、"Date"、"Amount"、"Vendor" の一連のプロパティが関連付けられています。 これは、Office スクリプトでオブジェクトとしてモデル化できます。
// An interface that wraps transaction details as JSON.
interface Transaction {
  "ID": string;
  "Date": number;
  "Amount": number;
  "Vendor": string;
}
サンプル テーブルの行はインターフェイスのプロパティに対応しているため、スクリプトは各行を Transaction オブジェクトに簡単に変換できます。 これは、Power Automate のデータを出力するときに便利です。 次のスクリプトは、テーブル内の各行を反復処理し、 Transaction[]に追加します。
function main(workbook: ExcelScript.Workbook) {
  // Get the table on the current worksheet.
  const table = workbook.getActiveWorksheet().getTables()[0];

  // Create an array of Transactions and add each row to it.
  let transactions: Transaction[] = [];
  const dataValues = table.getRangeBetweenHeaderAndTotal().getValues();
  for (let i = 0; i < dataValues.length; i++) {
    let row = dataValues[i];
    let currentTransaction: Transaction = {
      ID: row[table.getColumnByName("ID").getIndex()] as string,
      Date: row[table.getColumnByName("Date").getIndex()] as number,
      Amount: row[table.getColumnByName("Amount").getIndex()] as number,
      Vendor: row[table.getColumnByName("Vendor").getIndex()] as string
    };
    transactions.push(currentTransaction);
  }

  // Do something with the Transaction objects, such as return them to a Power Automate flow.
  console.log(transactions);
}

// An interface that wraps transaction details as JSON.
interface Transaction {
  "ID": string;
  "Date": number;
  "Amount": number;
  "Vendor": string;
}

を使用して JSON をエクスポートする fetch
fetchを使用してデータをインポートするのと同様に、同様のコマンドを使用してブックからデータを送信できます。
POST コマンドは、文字列化された JSON データを受け取り、指定したエンドポイントに送信します。
この動作を確認するには、前のサンプルの console.log(transactions); 行を次のコードに置き換えます。 これにより、テスト サーバーに POST コマンドが発行され、データが読み戻されます。
  const response = await fetch('https://jsonplaceholder.typicode.com/posts', {
    method: 'POST',
    body: JSON.stringify(transactions),
    headers: {
      'Content-type': 'application/json; charset=UTF-8',
    },
  });
  const jsonData: object[] = await response.json();
  console.log(jsonData);
ジェネリック オブジェクトを使用する
前のサンプルでは、テーブル ヘッダーの値が一貫性があると想定しています。 テーブルに変数列がある場合は、汎用 JSON オブジェクトを作成する必要があります。 次のスクリプトは、任意のテーブルを JSON としてログに記録するスクリプトを示しています。
function main(workbook: ExcelScript.Workbook) {
  // Get the table on the current worksheet.
  const table = workbook.getActiveWorksheet().getTables()[0];

  // Use the table header names as JSON properties.
  const tableHeaders = table.getHeaderRowRange().getValues()[0] as string[];

  // Get each data row in the table.
  const dataValues = table.getRangeBetweenHeaderAndTotal().getValues();
  let jsonArray: object[] = [];

  // For each row, create a JSON object and assign each property to it based on the table headers.
  for (let i = 0; i < dataValues.length; i++) {
    // Create a blank generic JSON object.
    let jsonObject: { [key: string]: string } = {};
    for (let j = 0; j < dataValues[i].length; j++) {
      jsonObject[tableHeaders[j]] = dataValues[i][j] as string;
    }

    jsonArray.push(jsonObject);
  }

  // Do something with the objects, such as return them to a Power Automate flow.
  console.log(jsonArray);
}
関連項目
Office Scripts