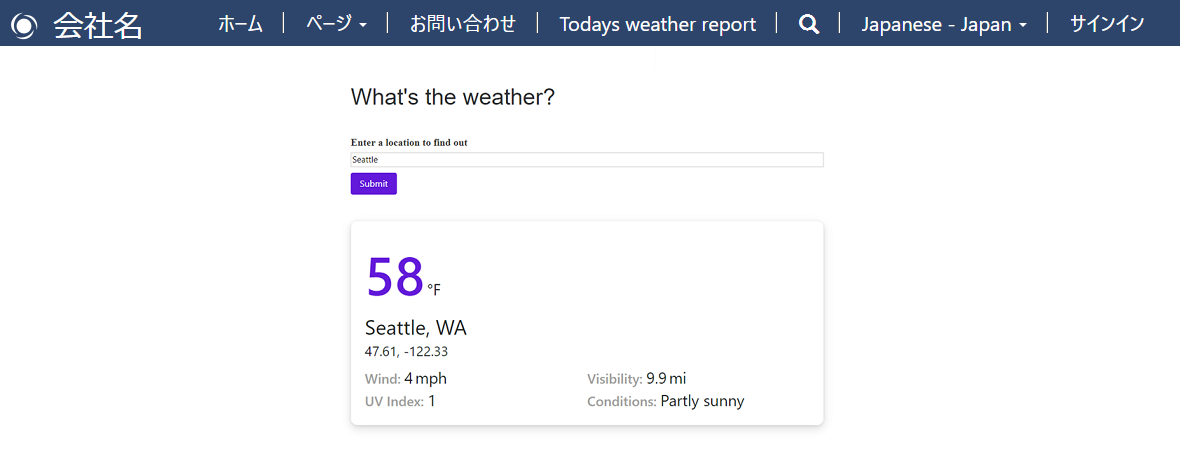
この記事では、Power Pages を作成し、Power Automate クラウド フローを使用して MSN 天気アプリを呼び出し、現在の天気の詳細をページに表示する方法について説明します。
前提条件
これらの手順を完了するには、Power Automate と Power Pages 環境が必要です。 ライセンスがない場合は、Power Pages および Power Automate の試用版にサインアップすることができます。
ステップ 1: クラウド フローを作成する
Power Pages トリガーを使用してフローを作成し、MSN 天気予報 アクションを使用して気象データを取得します。
Power Pages にサインインします。
サイト + + 編集 を選択します
ワークスペースの設定 に移動し、アプリの統合で クラウド フロー を選択します。
選択 + 新しいフローを作成する
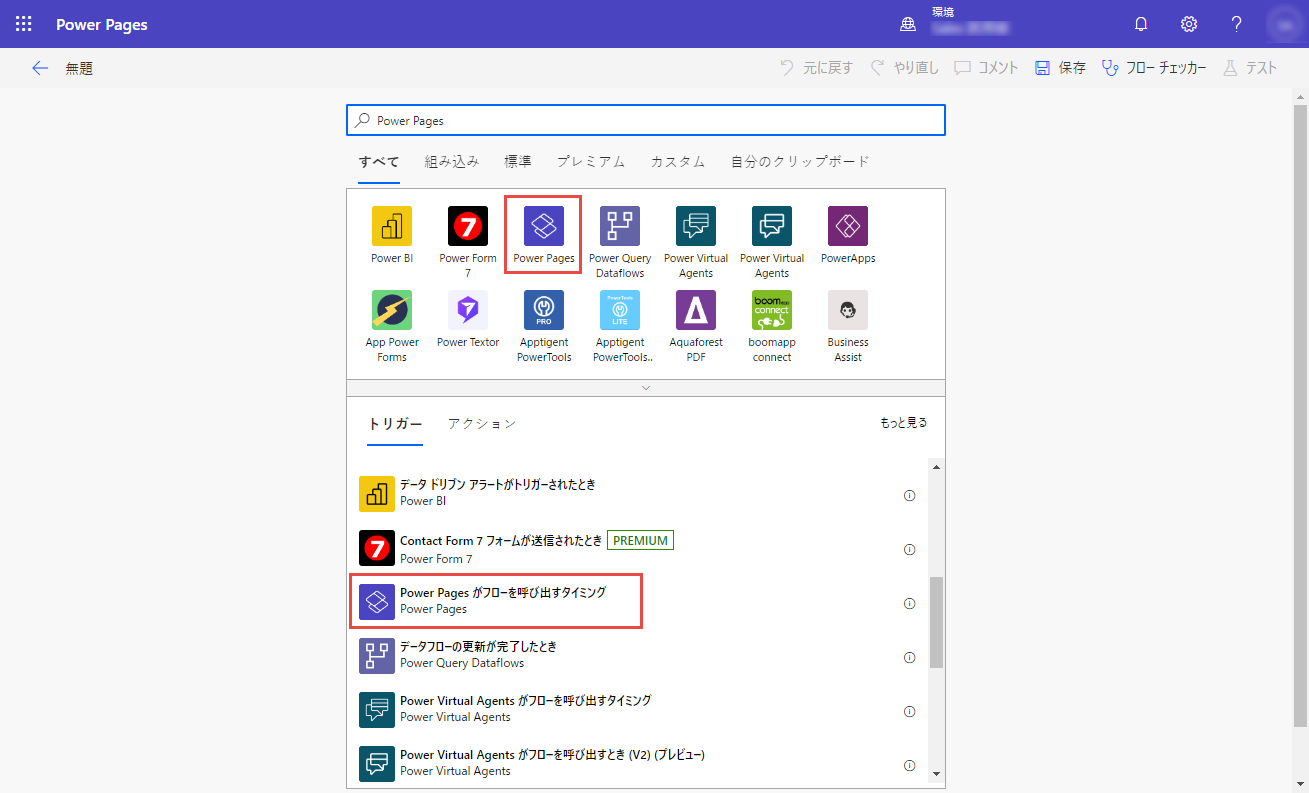
Power Pagesを検索します。
- Power Pages がフローを呼び出すとき トリガーを選択します。
+ 入力の追加を選択します。
テキスト を選択します。
場所 として名前を追加します。
+ 新しいステップ を選択します。
MSN 天気 を検索します。
現在の天気を取得する アクションを選択します。
カーソルを 場所 入力テキストに合わせます。動的コンテンツから Power Pages がフローを呼び出すとき の下にある 場所 パラメーターを選択します。
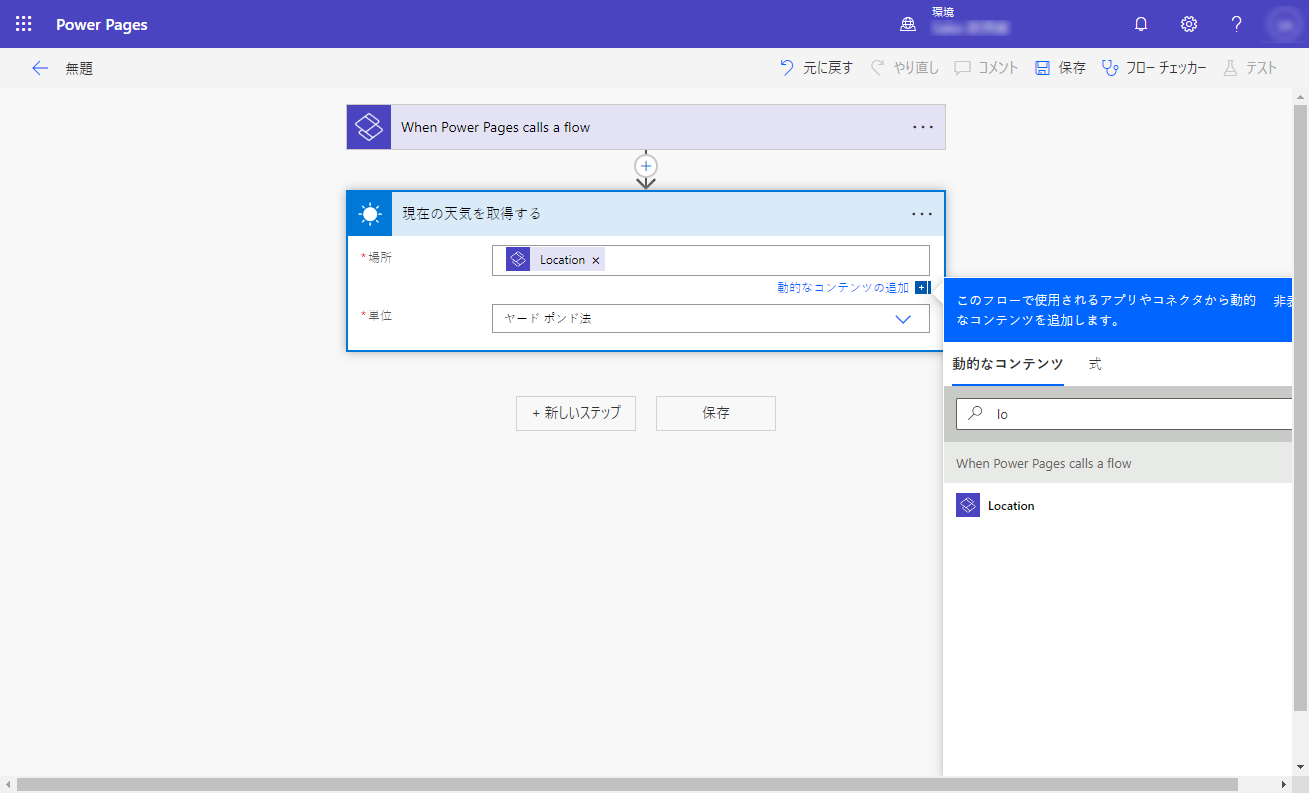
注意
ヤード ポンド法のままでも、メートル法に変更することもできます。
+ 新しいステップ を選択します。
Power Pagesを検索します。
Power Pages に値を返す アクションを選択します。
+ 追加および出力 を選択します。
Textを選択します。
タイトルとして 気圧 と入力します。
現在の天気を取得する で、動的コンテンツ 気圧 を選択します。
繰り返して、テキスト タイプを使用して次の出力ステップを作成します:
- 湿度
- 温度
- UV 指数
- 風速
- 場所
- 視認距離
- 経度
- 緯度
- 温度単位
- 気圧単位
- 速度単位
- 距離の単位
- 条件
保存を選択します
フローに 現在の天気を取得する と名前を付けます。
ステップ 2: フローをステップに追加する
フローを保存した後、サイトに追加し、適切な Web ロールを割り当てる必要があります。
Power Pages にサインインします。
スターター レイアウト のいずれかを使用してサイトを作成します。
そのサイトを選択し、編集 を選択します。
設定 ワークスペースに移動します。
アプリの統合 で クラウド フロー を選択します。
クラウド フローの追加 + を選択します。
現在の天気を取得するフロー を検索します。
ロールで + ロールの追加 を選択します。
匿名ユーザー ロールを選択します。
追加を選択します。
URL をコピーします。

注意
これは、関連するクラウド フローに接続するために使用される固有の URL です。 後でこの URL を使用して、現在の天気フローを呼び出します。
ステップ 3: MSN 天気データを表示するページを作成する
フローを作成して Power Pages サイトに接続すると、JavaScript を使用してコントロール イベントから呼び出すことができます。
ページ ワークスペースを選択します。
+ ページ を選択します。
ページに "今日の天気予報" という名前を付けます。
コードの編集 を選択して、Visual Studio Code を開きます。
このコードを貼り付けます:
    <style>
        div.weatherdetail {
            border: 1px solid #F3F2F1;
            border-radius: 12px;
            box-shadow: 0px 1.2px 3.6px rgba(0, 0, 0, 0.1), 0px 6.4px 14.4px rgba(0, 0, 0, 0.13);
            padding: 24px;
        }
        .weather label {
            font-family: 'Nunito';
            font-style: normal;
            font-weight: 600;
            font-size: 18px;
            color: #323130;
        }
        .weather button {
            font-family: 'Segoe UI';
            padding: 8px 16px;
            font-size: 16px;
            background-color: #6219D9;
            color: white;
            border: none;
            border-radius: 4px;
            cursor: pointer;
            outline: none;
        }
        div.weather {
            display: flex;
            flex-direction: column;
            align-items: flex-start;
            padding: 100px;
            gap: 36px;
            width: 840px;
        }
        span.temperature {
            font-family: Segoe UI;
            font-size: 96px;
            font-style: normal;
            font-weight: 600;
            color: #6219d9;
        }
        span.weatherinfov1 {
            font-family: Segoe UI;
            font-size: 28px;
            font-style: normal;
            font-weight: 400;
            color: #201f1e;
        }
        span.weatherinfov2 {
            font-family: Segoe UI;
            font-size: 24px;
            font-style: normal;
            font-weight: 600;
            color: #a19f9d;
        }
    </style>

    <div class="row sectionBlockLayout text-left" style="display: flex; flex-wrap: wrap; margin: 0px; min-height: auto; padding: 8px;">
        <div class="container" style="display: flex; flex-wrap: wrap;">
            <div class="col-md-12 columnBlockLayout weather" style="flex-grow: 1; display: flex; flex-direction: column; min-width: 310px; word-break: break-word; padding: 0 180px; margin: 60px 0px;">
                <h1>What's the weather?</h1>
                <form id="cityForm">
                    <label for="locationInput">Enter a location to find out</label>
                    <br>
                    <input type="text" style="width: 840px; border: 1px solid #D2D0CE;" id="locationInput" required />
                    <p>
                    <p>
                        <button type="submit">Submit</button>
                    </p>
                </form>
                <div id="weatherdetail" class="weatherdetail" style="display: none;width: 840px">
                    <div>
                        <div>
                            <span class="temperature" id="temperature"> </span>
                            <span class="weatherinfov1" id="temperature_units"></span>
                        </div>
                        <div>
                            <span class="weatherinfov1" style="font-size: 36px;" id="location"> </span>
                            <br>
                            <span class="weatherinfov1" style="font-size: 24px;" id="cordinates"></span>
                            <p>
                        </div>
                    </div>
                    <div style="display: flex;">
                        <div style="flex: 1;">
                            <span class="weatherinfov2">Wind: </span>
                            <span class="weatherinfov1" id="windspeed"></span>
                            <span class="weatherinfov1" id="speed_units"> </span>
                        </div>
                        <div style="flex: 1;">
                            <span class="weatherinfov2">Visibility: </span>
                            <span class="weatherinfov1" id="visibility"></span>
                            <span class="weatherinfov1" id="distance_units"></span>
                        </div>
                    </div>
                    <div style="display: flex;">
                        <div style="flex: 1;">
                            <span class="weatherinfov2">UV Index: </span>
                            <span class="weatherinfov1" id="uv"></span>
                        </div>
                        <div style="flex: 1;">
                            <span class="weatherinfov2">Conditions: </span>
                            <span class="weatherinfov1" id="condition"></span>
                        </div>
                    </div>
                </div>
            </div>
        </div>
    </div>

    <script>
        document.getElementById("cityForm").addEventListener("submit", function (event) {
            event.preventDefault(); // Prevent form submission
            var weatherDiv = document.getElementById("weatherdetail");
            weatherDiv.style.display = "none";

            var location = document.getElementById("locationInput").value;

            var _url = "<Cloud flow URL>";

          var data = {};
          data["Location"] = location;

            var payload = {};
            payload.eventData = JSON.stringify(data);
            shell
                .ajaxSafePost({
                    type: "POST",
                    url: _url,
                    data: payload
                })
                .done(function (response) {
                    const result = JSON.parse(response);
                    document.getElementById("temperature").innerHTML = result["temperature"];
                    document.getElementById("windspeed").innerHTML = result["wind_speed"];
                    document.getElementById("visibility").innerHTML = result["visibility_distance"];
                    document.getElementById("uv").innerHTML = result["uv_index"];
                    document.getElementById("location").innerHTML = result["location"];
                    document.getElementById("condition").innerHTML = result["conditions"];
                    document.getElementById("temperature_units").innerHTML = result["temperature_units"];
                    document.getElementById("speed_units").innerHTML = result["speed_units"];
                    document.getElementById("distance_units").innerHTML = result["distance_units"];
                    document.getElementById("cordinates").innerHTML = parseFloat(result["latitude"]).toFixed(2) + ', ' + parseFloat(result["longitude"]).toFixed(2);
                    weatherDiv.style.display = "block";
                })
                .fail(function () {
                    alert("failed");
                });
        });
    </script>
前の手順でコピーした URL に置き換えます。
CTRL + S を選択してコードを保存します。
デザイン スタジオで 同期 を選択します。
ステップ 4: フロー統合をテストする
フロー統合機能をテストするには:
プレビュー を選択してサイトを開きます。
場所 テキスト ボックスに郵便番号または市区町村を入力します。
送信 ボタンを選択します。