- Windows で C を する
- Linux 上の C
- Raspberry Pi で Cを使用する
- Node.js (汎用)
- Raspberry Pi のNode.js
このチュートリアルでは、リモート監視 ソリューション アクセラレータに次のテレメトリを送信する Chiller デバイスを実装します。
- 温度
- 圧力
- 湿度
わかりやすくするために、Chillerのサンプル テレメトリ値が生成されます。 実際のセンサーをデバイスに接続し、実際のテレメトリを送信することで、サンプルを拡張できます。
サンプル デバイスも次のとおりです。
- メタデータをソリューションに送信して、その機能を説明します。
- ソリューションの デバイス ページからトリガーされたアクションに応答します。
- ソリューションの デバイス ページから送信される構成変更に応答します。
このチュートリアルを完了するには、アクティブな Azure アカウントが必要です。 アカウントがない場合は、無料試用アカウントを数分で作成することができます。 詳細については、「Azure の無料試用版サイト」を参照してください。
開始する前に
デバイスのコードを記述する前に、リモート監視ソリューション アクセラレータをデプロイし、ソリューションに新しい実デバイスを追加します。
リモート監視ソリューション アクセラレータをデプロイする
このチュートリアルで作成した Chiller デバイスは、リモート監視 ソリューション アクセラレータのインスタンスにデータを送信します。 Azure アカウントにリモート監視ソリューション アクセラレータをまだプロビジョニングしていない場合は、「リモート監視ソリューション アクセラレータをデプロイする」 を参照してください。
リモート監視ソリューションのデプロイ プロセスが完了したら、の起動 クリックして、ブラウザーでソリューション ダッシュボードを開きます。
リモート監視ソリューションにデバイスを追加する
注
ソリューションにデバイスを既に追加している場合は、この手順をスキップできます。 ただし、次の手順では、デバイスの接続文字列が必要です。 デバイスの接続文字列は、Azure portal から取得することも、az iot CLI ツールを使用して取得することもできます。
デバイスがソリューション アクセラレータに接続するには、有効な資格情報を使用して IoT Hub に自身を識別する必要があります。 ソリューションにデバイスを追加するときに、これらの資格情報を含むデバイス接続文字列を保存できます。 このチュートリアルの後半で、クライアント アプリケーションにデバイス接続文字列を含めます。
リモート監視ソリューションにデバイスを追加するには、ソリューションの Device Explorer ページで次の手順を実行します。
[新しいデバイス] を選択し、次に [Real] を [デバイスの種類] として選択します。
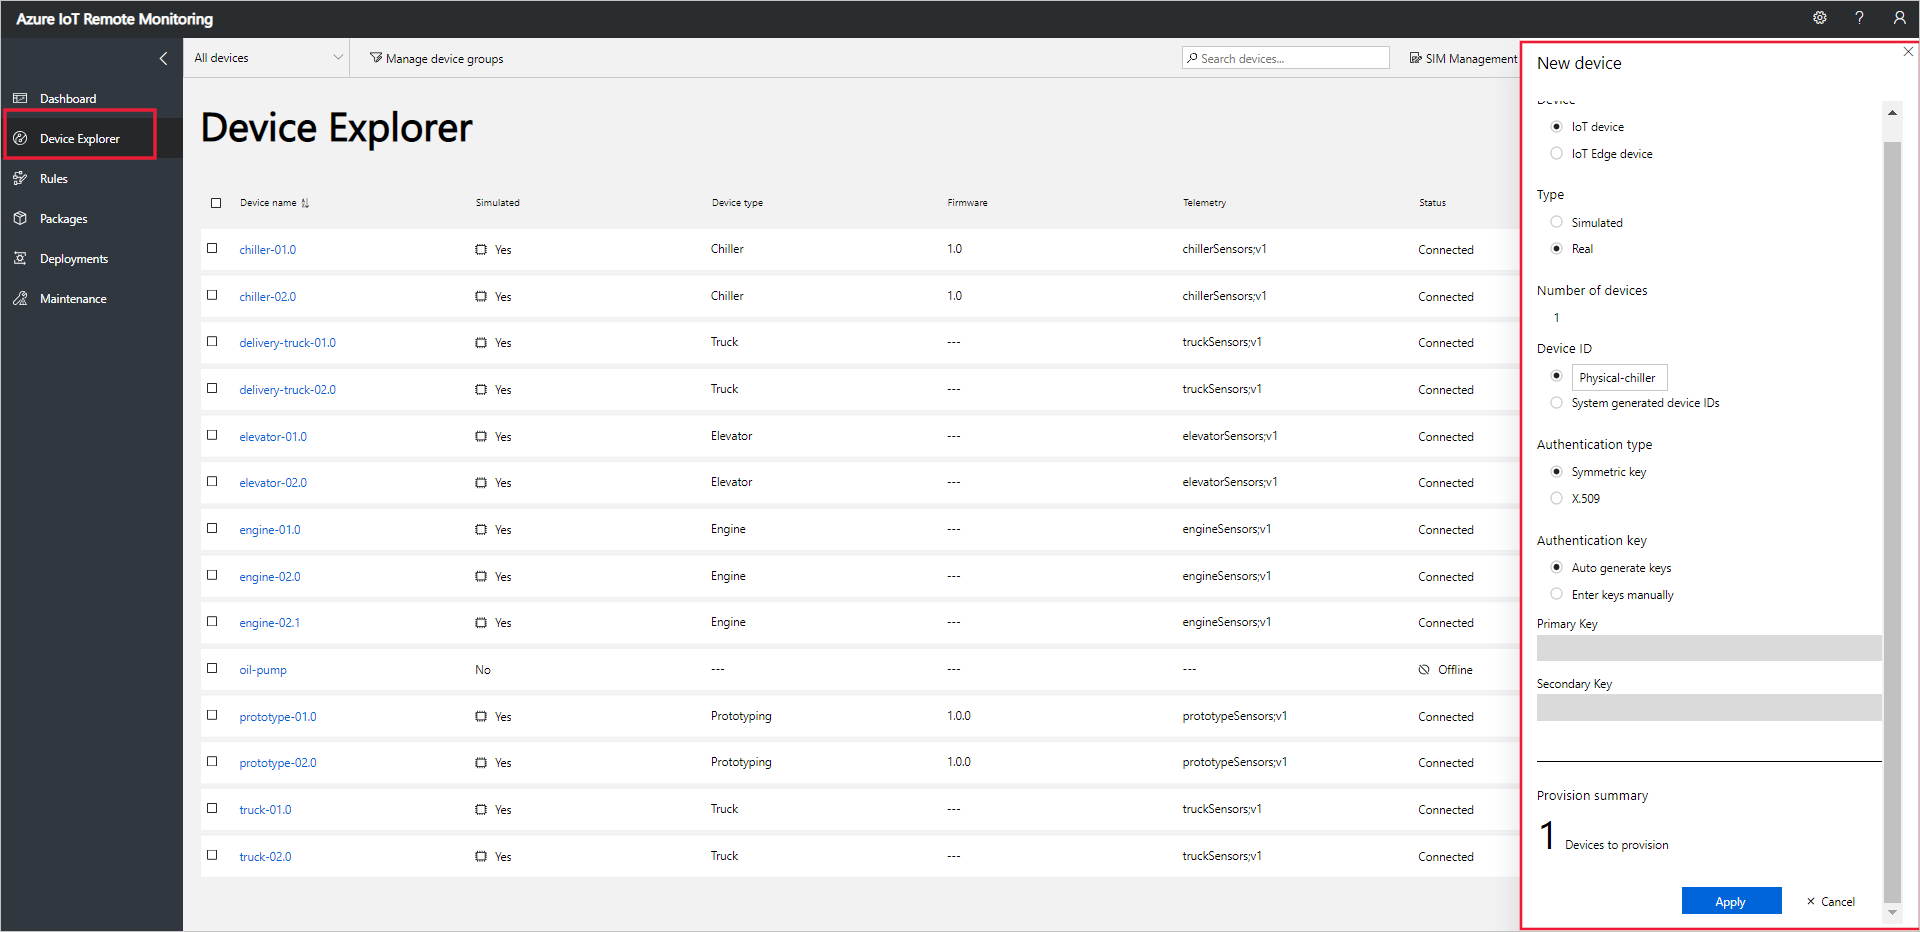 を追加する
を追加するデバイス ID として 物理冷却装置 を入力します。 [対称キー ] および [キーの自動生成 ] オプションを選択します。
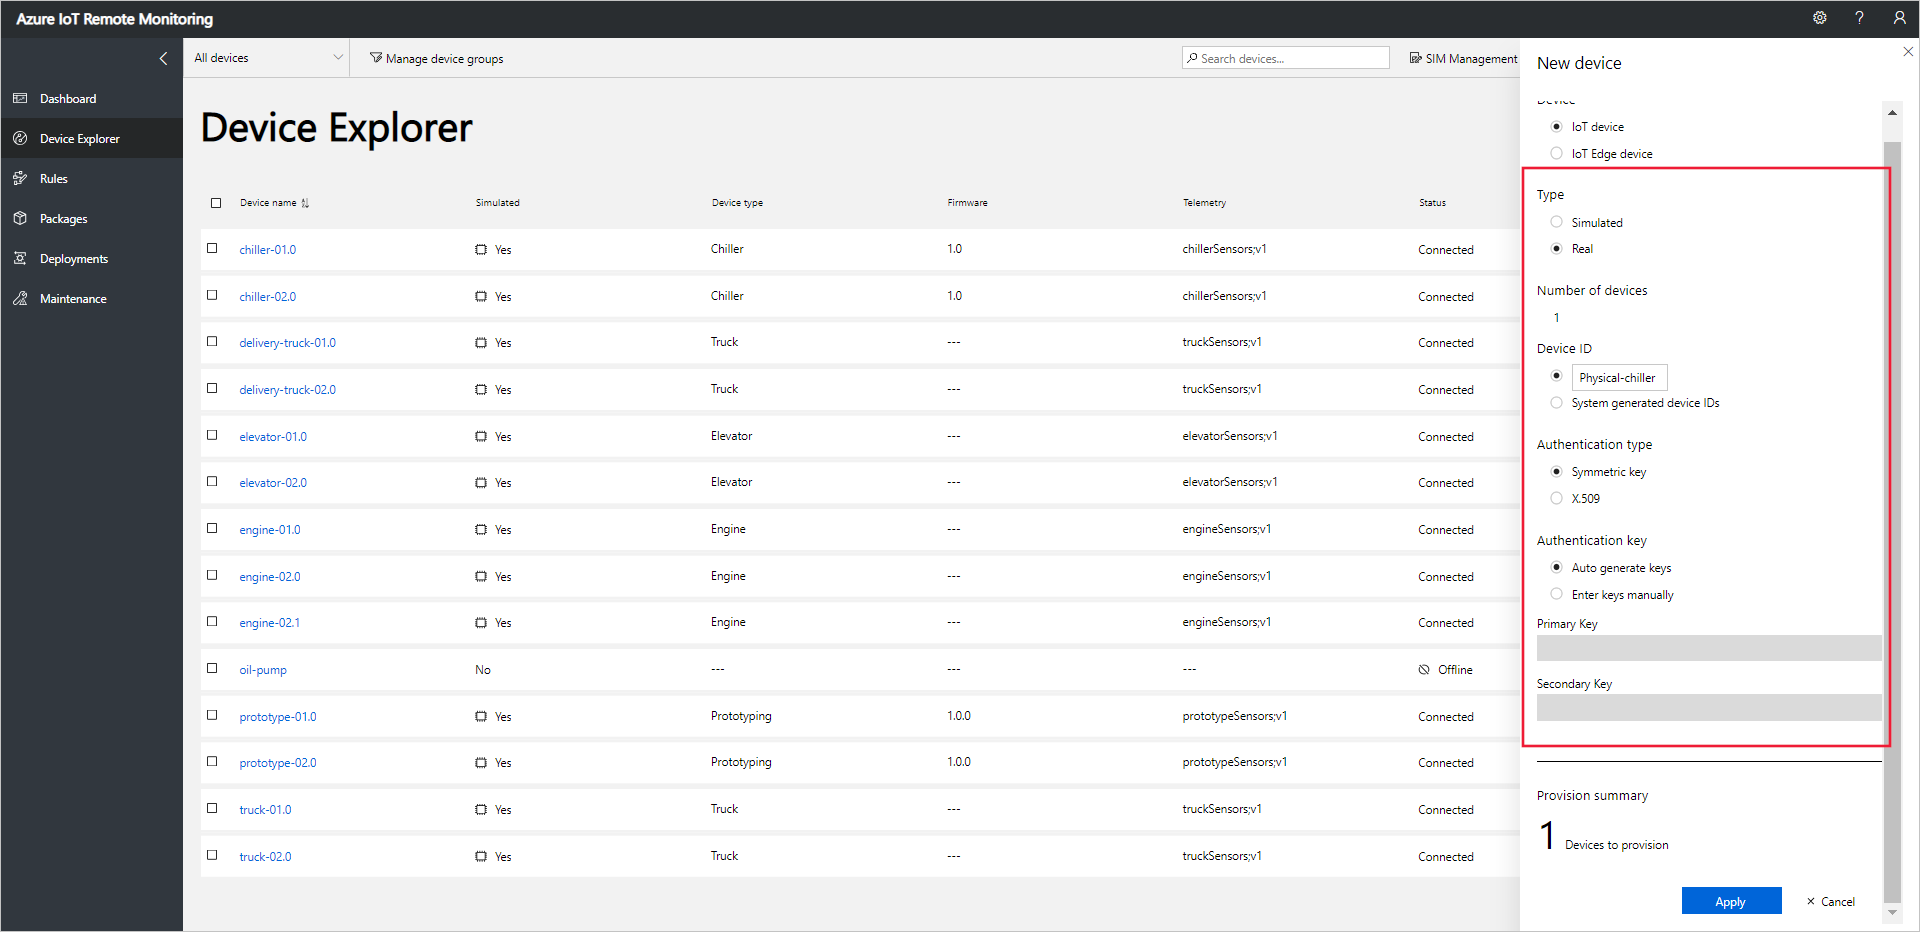
[ 適用] を選択します。 次に、デバイス ID、主キー、および接続文字列の主キー の値 を書き留めてください。
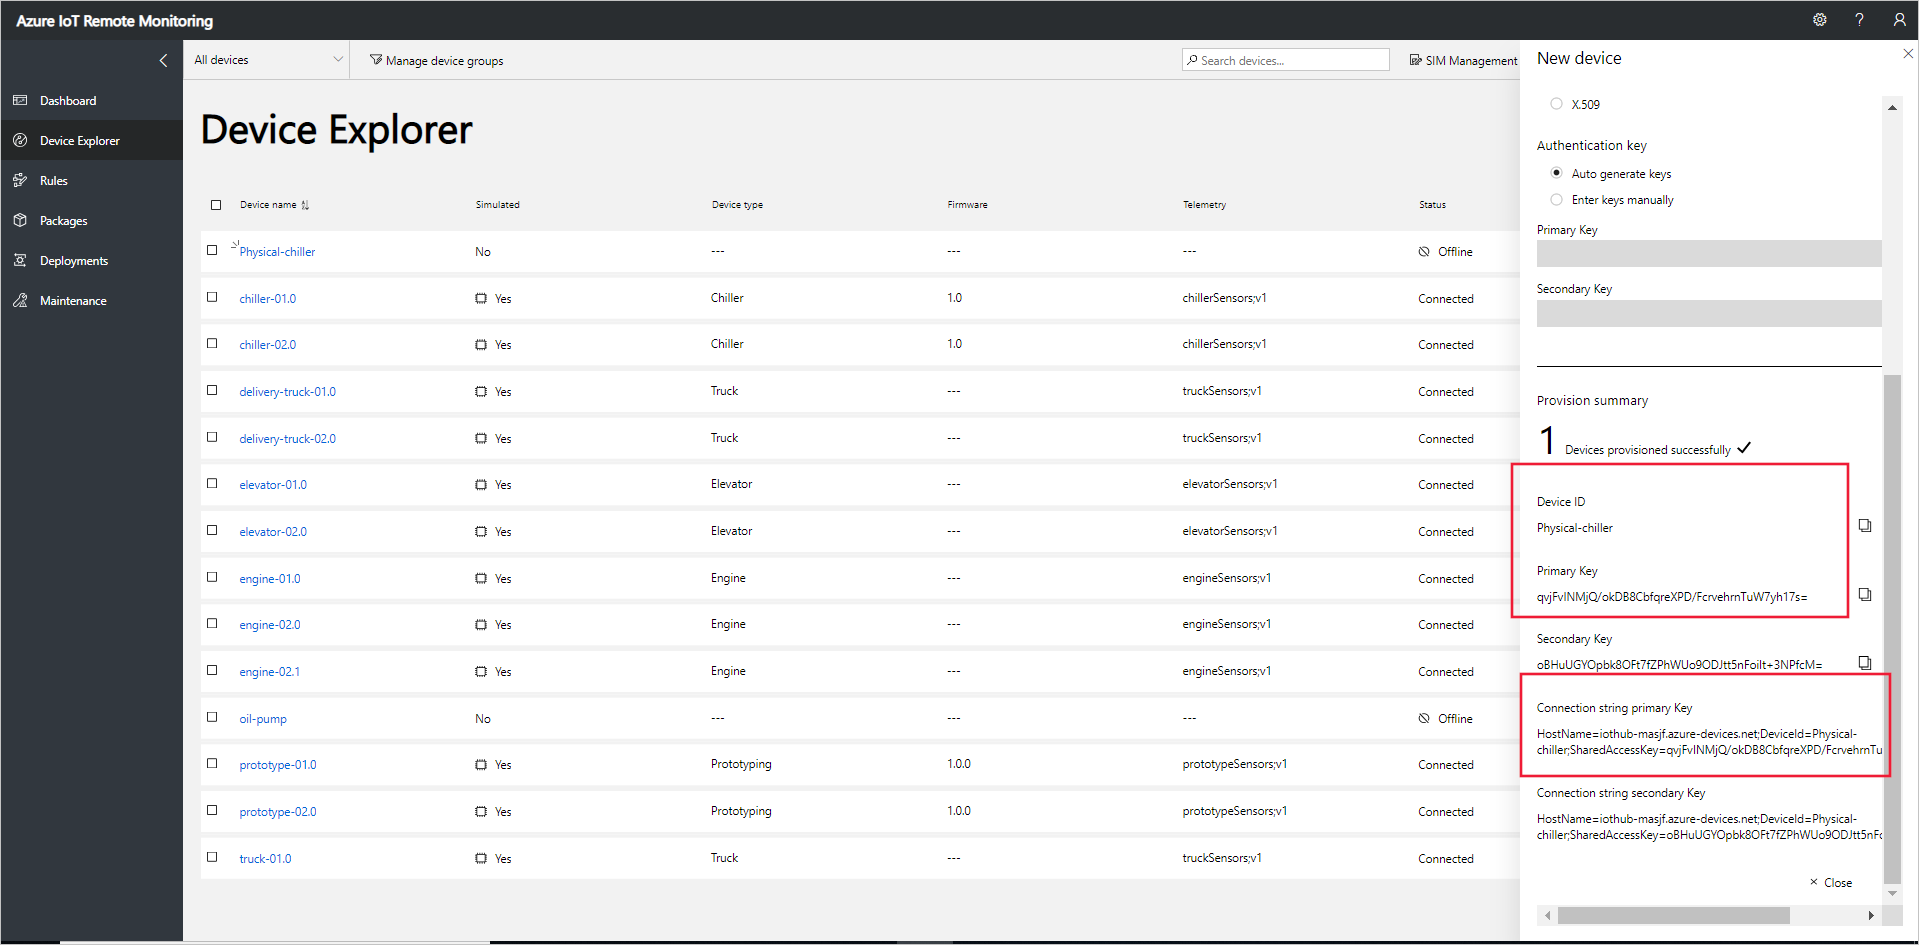
リモート監視ソリューション アクセラレータに実際のデバイスを追加し、そのデバイス接続文字列を確認しました。 以降のセクションでは、デバイス接続文字列を使用してソリューションに接続するクライアント アプリケーションを実装します。
クライアント アプリケーションは、組み込みの Chiller デバイス モデルを実装します。 ソリューション アクセラレータ デバイス モデルでは、デバイスに関する次の項目を指定します。
- デバイスがソリューションに報告するプロパティ。 たとえば、Chiller デバイスは、そのファームウェアと場所に関する情報を報告します。
- デバイスがソリューションに送信するテレメトリの種類。 たとえば、Chiller デバイスは、温度、湿度、圧力の値を送信します。
- デバイスで実行するようにソリューションからスケジュールできるメソッド。 たとえば、Chiller デバイスは、Reboot、FirmwareUpdate、EmergencyValveRelease、および IncreasePressure メソッド 実装する必要があります。
このチュートリアルでは、実際のデバイスをリモート監視ソリューション アクセラレータに接続する方法について説明します。 このチュートリアルでは、Node.jsを使用します。これは、リソースの制約が最小限の環境に適したオプションです。
デバイスをシミュレートする場合は、「新しいシミュレートされたデバイスを作成してテストする」を参照してください。
必要なハードウェア
Raspberry Pi のコマンド ラインにリモートで接続できるデスクトップ コンピューター。
Microsoft IoT Starter Kit for Raspberry Pi 3 または同等のコンポーネント。 このチュートリアルでは、キットの次の項目を使用します。
- Raspberry Pi 3
- MicroSD カード (NOOBS 付き)
- USB ミニ ケーブル
- イーサネット ケーブル
必要なデスクトップ ソフトウェア
Raspberry Pi のコマンド ラインにリモートでアクセスできるようにするには、デスクトップ コンピューター上の SSH クライアントが必要です。
- Windows には SSH クライアントは含まれません。 PuTTY 使用することをお勧めします。
- ほとんどの Linux ディストリビューションと Mac OS には、コマンド ライン SSH ユーティリティが含まれています。 詳細については、「Linux または Mac OS を使用した SSH の」を参照してください。
必要な Raspberry Pi ソフトウェア
まだインストールしていない場合は、バージョン 4.0.0 以降 Node.js Raspberry Pi にインストールします。 次の手順では、Raspberry Pi Node.js v6 をインストールする方法を示します。
sshを使用して Raspberry Pi に接続します。 詳細については、Raspberry Pi Web サイトの SSH (Secure Shell) を参照してください。Raspberry Pi を更新するには、次のコマンドを使用します。
sudo apt-get update次のコマンドを使用して、Raspberry Pi から Node.js の既存のインストールを削除します。
sudo apt-get remove nodered -y
sudo apt-get remove nodejs nodejs-legacy -y
sudo apt-get remove npm  -y
次のコマンドを使用して、Raspberry Pi Node.js v6 をダウンロードしてインストールします。
curl -sL https://deb.nodesource.com/setup_6.x | sudo bash -
sudo apt-get install nodejs npm
次のコマンドを使用して、v6.11.4 Node.js 正常にインストールされていることを確認します。
node --version
Node.js ソリューションを作成する
Raspberry Pi への ssh 接続を使用して、次の手順を完了します。
Raspberry Pi のホーム フォルダーに
remotemonitoringという名前のフォルダーを作成します。 コマンド ラインで次のフォルダーに移動します。cd ~ mkdir remotemonitoring cd remotemonitoringサンプル アプリを完了する必要があるパッケージをダウンロードしてインストールするには、次のコマンドを実行します。
npm install async azure-iot-device azure-iot-device-mqttremotemonitoringフォルダーに、remote_monitoring.jsという名前のファイルを作成します。 このファイルをテキスト エディターで開きます。 Raspberry Pi では、nanoまたはviテキスト エディターを使用できます。remote_monitoring.js ファイルに、次の
requireステートメントを追加します。var Protocol = require('azure-iot-device-mqtt').Mqtt; var Client = require('azure-iot-device').Client; var Message = require('azure-iot-device').Message; var async = require('async');requireステートメントの後に、次の変数宣言を追加します。 プレースホルダーの値{device connection string}を、リモート監視ソリューションでプロビジョニングしたデバイス用に指定した値に置き換えます。var connectionString = '{device connection string}';いくつかの基本テレメトリ データを定義するには、次の変数を追加します。
var temperature = 50;
var temperatureUnit = 'F';
var humidity = 50;
var humidityUnit = '%';
var pressure = 55;
var pressureUnit = 'psig';
いくつかのプロパティ値を定義するには、次の変数を追加します。
var schema = "real-chiller;v1";
var deviceType = "RealChiller";
var deviceFirmware = "1.0.0";
var deviceFirmwareUpdateStatus = "";
var deviceLocation = "Building 44";
var deviceLatitude = 47.638928;
var deviceLongitude = -122.13476;
var deviceOnline = true;
次の変数を追加して、ソリューションに送信する報告されるプロパティを定義します。 これらのプロパティには、Web UI に表示するメタデータが含まれます。
var reportedProperties = {
  "SupportedMethods": "Reboot,FirmwareUpdate,EmergencyValveRelease,IncreasePressure",
  "Telemetry": {
    [schema]: ""
  },
  "Type": deviceType,
  "Firmware": deviceFirmware,
  "FirmwareUpdateStatus": deviceFirmwareUpdateStatus,
  "Location": deviceLocation,
  "Latitude": deviceLatitude,
  "Longitude": deviceLongitude,
  "Online": deviceOnline
}
操作の結果を出力するには、次のヘルパー関数を追加します。
function printErrorFor(op) {
    return function printError(err) {
        if (err) console.log(op + ' error: ' + err.toString());
    };
}
テレメトリ値をランダム化するために使用する次のヘルパー関数を追加します。
function generateRandomIncrement() {
    return ((Math.random() * 2) - 1);
}
ソリューションからのダイレクト メソッド呼び出しを処理する次のジェネリック関数を追加します。 この関数は、呼び出されたダイレクト メソッドに関する情報を表示しますが、このサンプルではデバイスを変更しません。 このソリューションでは、ダイレクト メソッドを使用してデバイスで動作します。
function onDirectMethod(request, response) {
  // Implement logic asynchronously here.
  console.log('Simulated ' + request.methodName);

  // Complete the response
  response.send(200, request.methodName + ' was called on the device', function (err) {
    if (err) console.error('Error sending method response :\n' + err.toString());
    else console.log('200 Response to method \'' + request.methodName + '\' sent successfully.');
  });
}
次の関数を追加して、ソリューションからの直接メソッド呼び出し FirmwareUpdate を処理します。 この関数は、ダイレクト メソッド ペイロードで渡されたパラメーターを検証し、ファームウェア更新シミュレーションを非同期的に実行します。
function onFirmwareUpdate(request, response) {
  // Get the requested firmware version from the JSON request body
  var firmwareVersion = request.payload.Firmware;
  var firmwareUri = request.payload.FirmwareUri;

  // Ensure we got a firmware values
  if (!firmwareVersion || !firmwareUri) {
    response.send(400, 'Missing firmware value', function(err) {
      if (err) console.error('Error sending method response :\n' + err.toString());
      else console.log('400 Response to method \'' + request.methodName + '\' sent successfully.');
    });
  } else {
    // Respond the cloud app for the device method
    response.send(200, 'Firmware update started.', function(err) {
      if (err) console.error('Error sending method response :\n' + err.toString());
      else {
        console.log('200 Response to method \'' + request.methodName + '\' sent successfully.');

        // Run the simulated firmware update flow
        runFirmwareUpdateFlow(firmwareVersion, firmwareUri);
      }
    });
  }
}
次の関数を追加して、進行状況をソリューションに報告する実行時間の長いファームウェア更新フローをシミュレートします。
// Simulated firmwareUpdate flow
function runFirmwareUpdateFlow(firmwareVersion, firmwareUri) {
  console.log('Simulating firmware update flow...');
  console.log('> Firmware version passed: ' + firmwareVersion);
  console.log('> Firmware URI passed: ' + firmwareUri);
  async.waterfall([
    function (callback) {
      console.log("Image downloading from " + firmwareUri);
      var patch = {
        FirmwareUpdateStatus: 'Downloading image..'
      };
      reportUpdateThroughTwin(patch, callback);
      sleep(10000, callback);
    },
    function (callback) {
      console.log("Downloaded, applying firmware " + firmwareVersion);
      deviceOnline = false;
      var patch = {
        FirmwareUpdateStatus: 'Applying firmware..',
        Online: false
      };
      reportUpdateThroughTwin(patch, callback);
      sleep(8000, callback);
    },
    function (callback) {
      console.log("Rebooting");
      var patch = {
        FirmwareUpdateStatus: 'Rebooting..'
      };
      reportUpdateThroughTwin(patch, callback);
      sleep(10000, callback);
    },
    function (callback) {
      console.log("Firmware updated to " + firmwareVersion);
      deviceOnline = true;
      var patch = {
        FirmwareUpdateStatus: 'Firmware updated',
        Online: true,
        Firmware: firmwareVersion
      };
      reportUpdateThroughTwin(patch, callback);
      callback(null);
    }
  ], function(err) {
    if (err) {
      console.error('Error in simulated firmware update flow: ' + err.message);
    } else {
      console.log("Completed simulated firmware update flow");
    }
  });

  // Helper function to update the twin reported properties.
  function reportUpdateThroughTwin(patch, callback) {
    console.log("Sending...");
    console.log(JSON.stringify(patch, null, 2));
    client.getTwin(function(err, twin) {
      if (!err) {
        twin.properties.reported.update(patch, function(err) {
          if (err) callback(err);
        });
      } else {
        if (err) callback(err);
      }
    });
  }

  function sleep(milliseconds, callback) {
    console.log("Simulate a delay (milleseconds): " + milliseconds);
    setTimeout(function () {
      callback(null);
    }, milliseconds);
  }
}
次のコードを追加して、テレメトリ データをソリューションに送信します。 クライアント アプリは、メッセージ スキーマを識別するためにメッセージにプロパティを追加します。
function sendTelemetry(data, schema) {
  if (deviceOnline) {
    var d = new Date();
    var payload = JSON.stringify(data);
    var message = new Message(payload);
    message.properties.add('iothub-creation-time-utc', d.toISOString());
    message.properties.add('iothub-message-schema', schema);

    console.log('Sending device message data:\n' + payload);
    client.sendEvent(message, printErrorFor('send event'));
  } else {
    console.log('Offline, not sending telemetry');
  }
}
次のコードを追加して、クライアント インスタンスを作成します。
var client = Client.fromConnectionString(connectionString, Protocol);次のコードを次のように追加します。
接続を開きます。
必要なプロパティのハンドラーを設定します。
報告されたプロパティを送信します。
ダイレクト メソッドのハンドラーを登録します。 このサンプルでは、ファームウェア更新ダイレクト メソッドに別のハンドラーを使用します。
テレメトリの送信を開始します。
client.open(function (err) {
if (err) {
  printErrorFor('open')(err);
} else {
  // Create device Twin
  client.getTwin(function (err, twin) {
    if (err) {
      console.error('Could not get device twin');
    } else {
      console.log('Device twin created');

      twin.on('properties.desired', function (delta) {
        // Handle desired properties set by solution
        console.log('Received new desired properties:');
        console.log(JSON.stringify(delta));
      });

      // Send reported properties
      twin.properties.reported.update(reportedProperties, function (err) {
        if (err) throw err;
        console.log('Twin state reported');
      });

      // Register handlers for all the method names we are interested in.
      // Consider separate handlers for each method.
      client.onDeviceMethod('Reboot', onDirectMethod);
      client.onDeviceMethod('FirmwareUpdate', onFirmwareUpdate);
      client.onDeviceMethod('EmergencyValveRelease', onDirectMethod);
      client.onDeviceMethod('IncreasePressure', onDirectMethod);
    }
  });

  // Start sending telemetry
  var sendDeviceTelemetry = setInterval(function () {
    temperature += generateRandomIncrement();
    pressure += generateRandomIncrement();
    humidity += generateRandomIncrement();
    var data = {
      'temperature': temperature,
      'temperature_unit': temperatureUnit,
      'humidity': humidity,
      'humidity_unit': humidityUnit,
      'pressure': pressure,
      'pressure_unit': pressureUnit
    };
    sendTelemetry(data, schema)
  }, 5000);

  client.on('error', function (err) {
    printErrorFor('client')(err);
    if (sendTemperatureInterval) clearInterval(sendTemperatureInterval);
    if (sendHumidityInterval) clearInterval(sendHumidityInterval);
    if (sendPressureInterval) clearInterval(sendPressureInterval);
    client.close(printErrorFor('client.close'));
  });
}
});
変更を remote_monitoring.js ファイルに保存します。
サンプル アプリケーションを起動するには、Raspberry Pi のコマンド プロンプトで次のコマンドを実行します。
node remote_monitoring.js
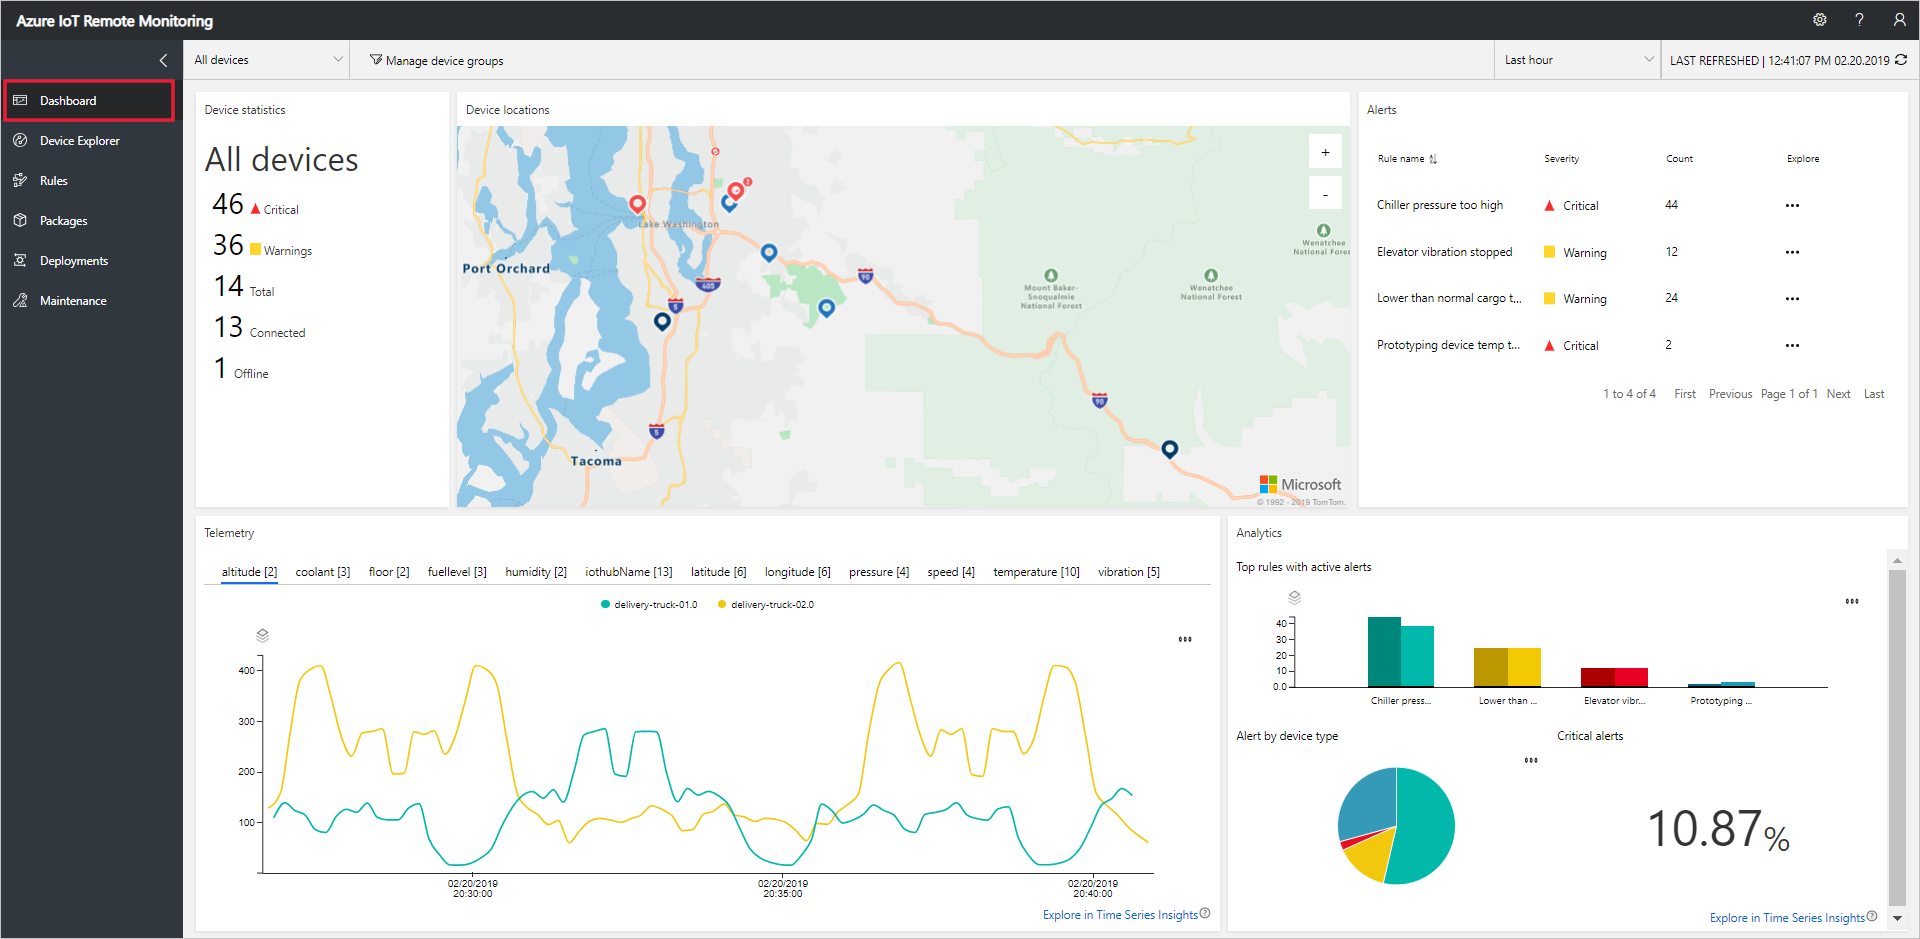
デバイス テレメトリを表示する
デバイスから送信されたテレメトリは、ソリューションの Device Explorer ページで確認できます。
Device Explorer の [] ページで、プロビジョニングしたデバイスをデバイスの一覧から選択します。 デバイス テレメトリのプロットを含むデバイスに関する情報がパネルに表示されます。
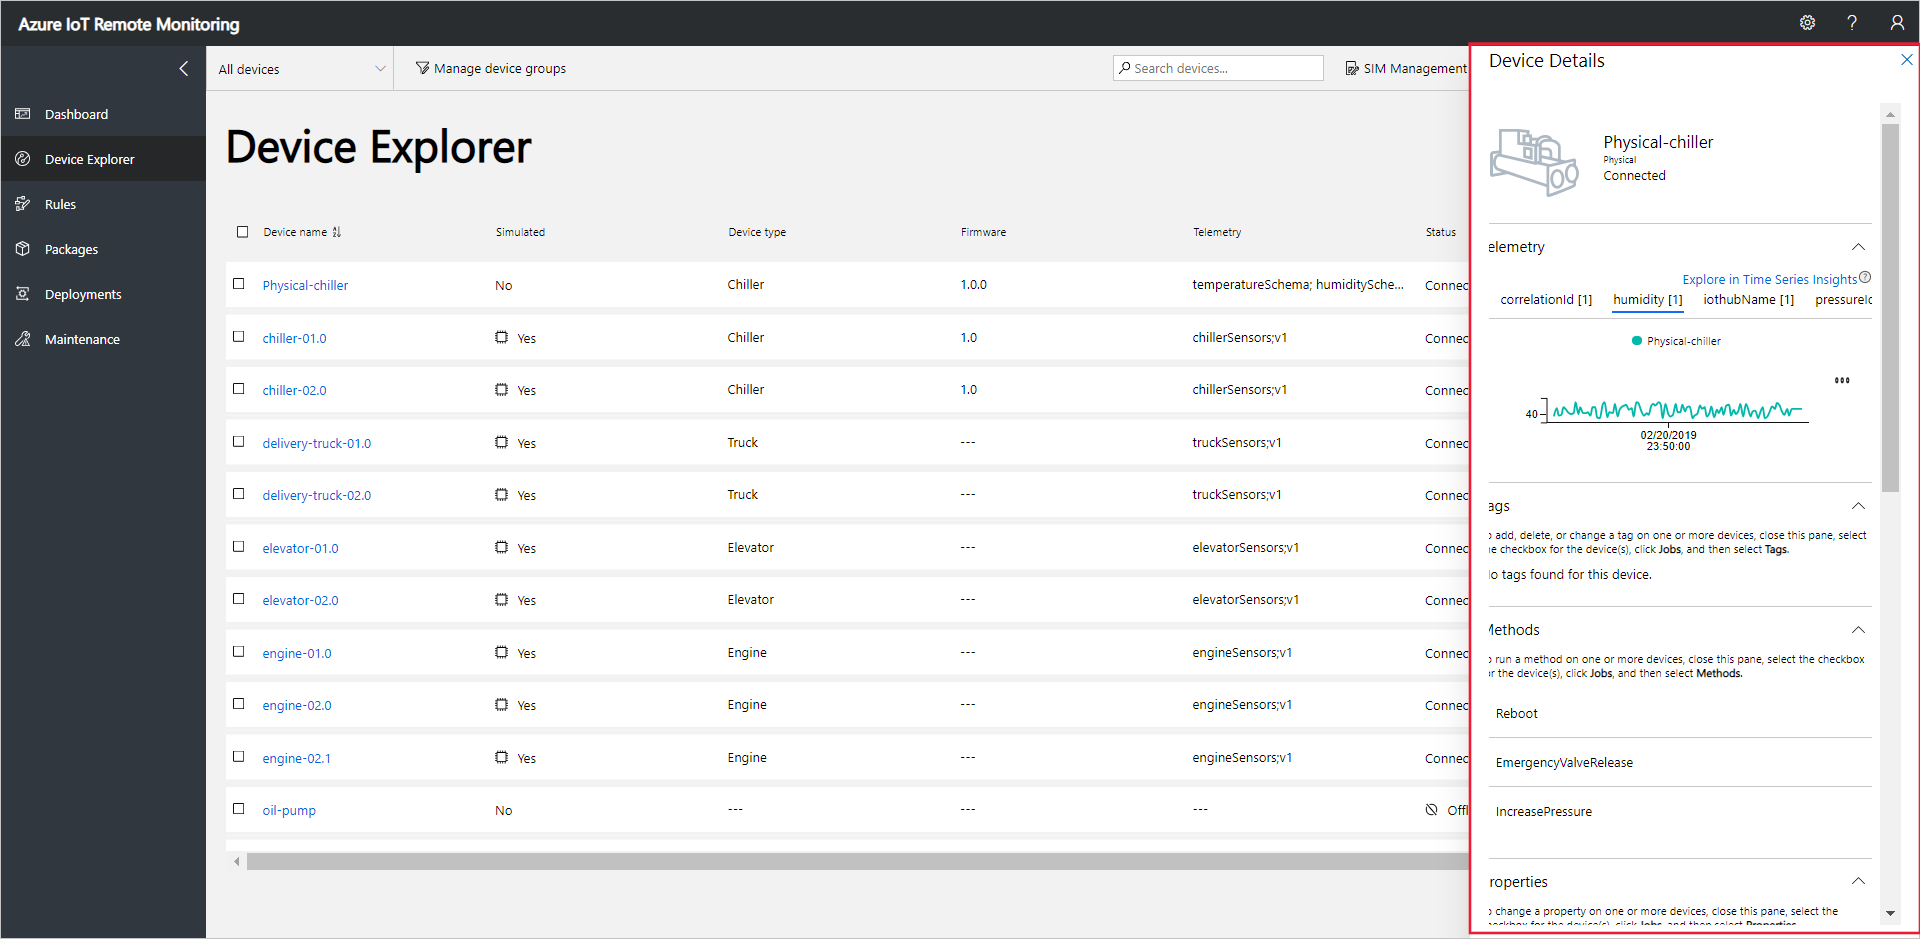 を表示する
を表示する圧力 を選択して、テレメトリの表示を変更します。
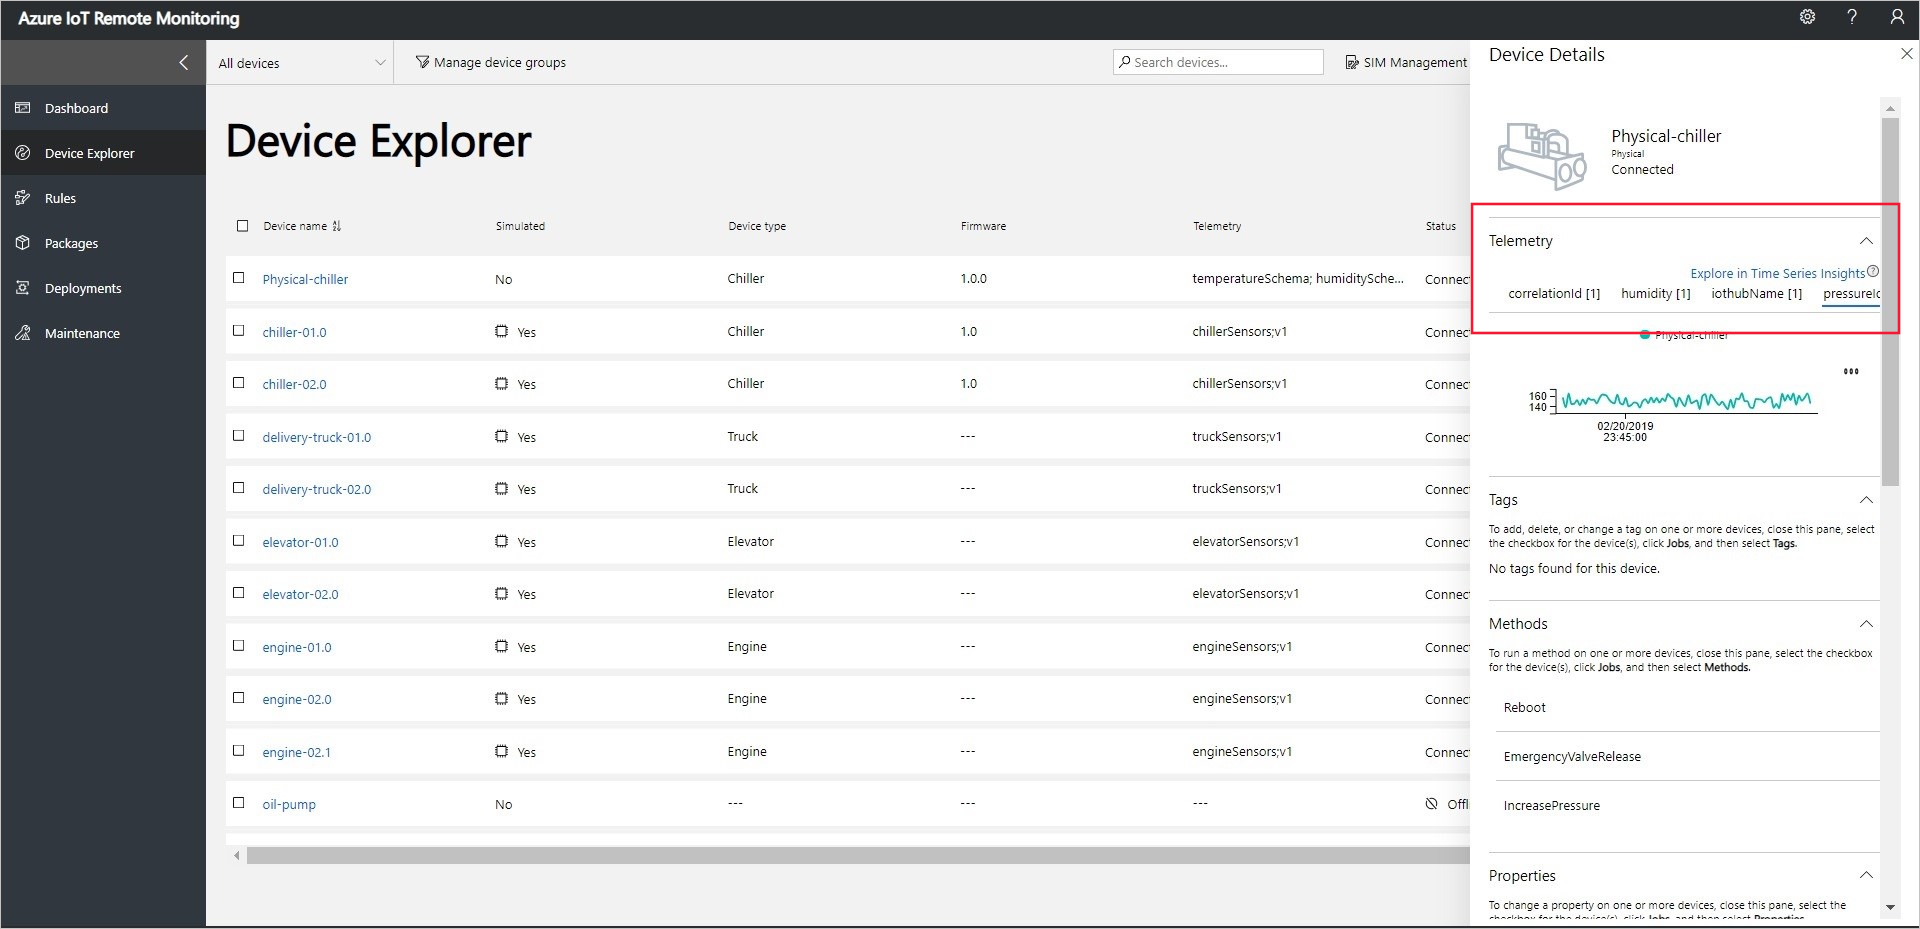 を表示する
を表示するデバイスに関する診断情報を表示するには、下にスクロールして「診断」に移動します。
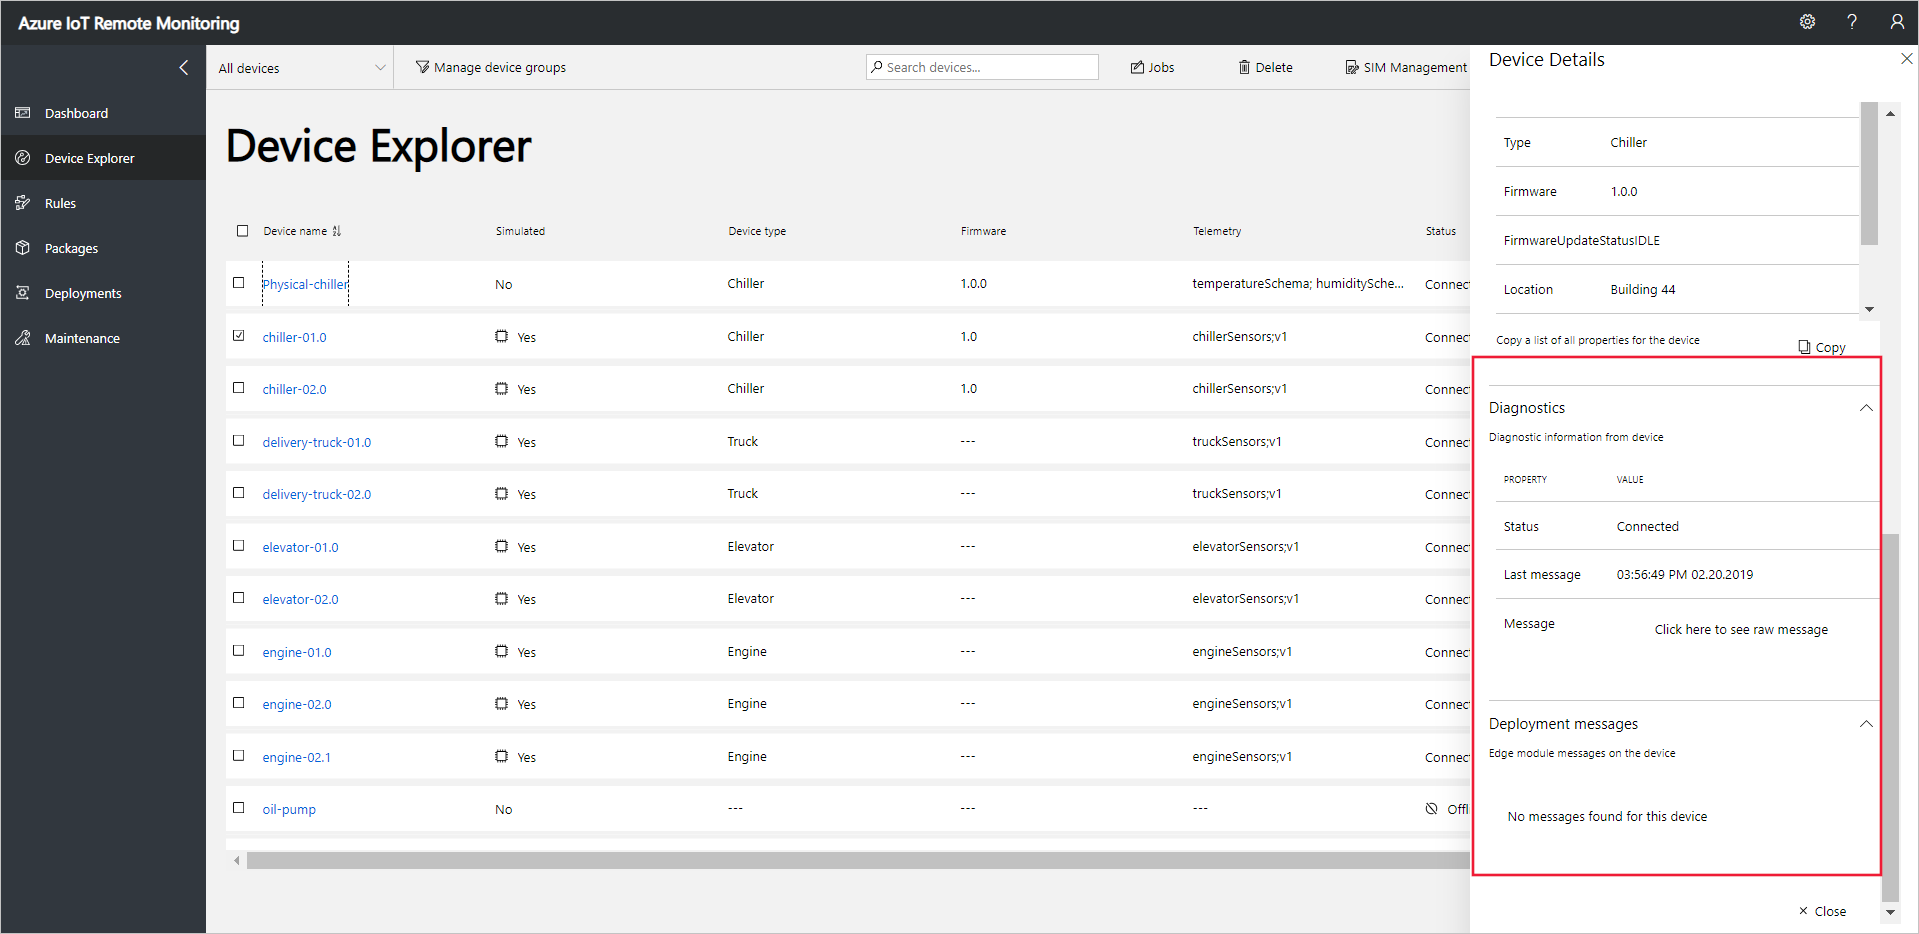 を表示する
を表示する
デバイスで操作する
デバイスでメソッドを呼び出すには、リモート監視ソリューションの Device Explorer ページを使用します。 たとえば、リモート監視ソリューション において、Chiller デバイスは Reboot メソッドを実装します。
デバイス を選択して、ソリューションの Device Explorer ページに移動します。
Device Explorer ページのデバイスの一覧でプロビジョニングしたデバイスを選択します。
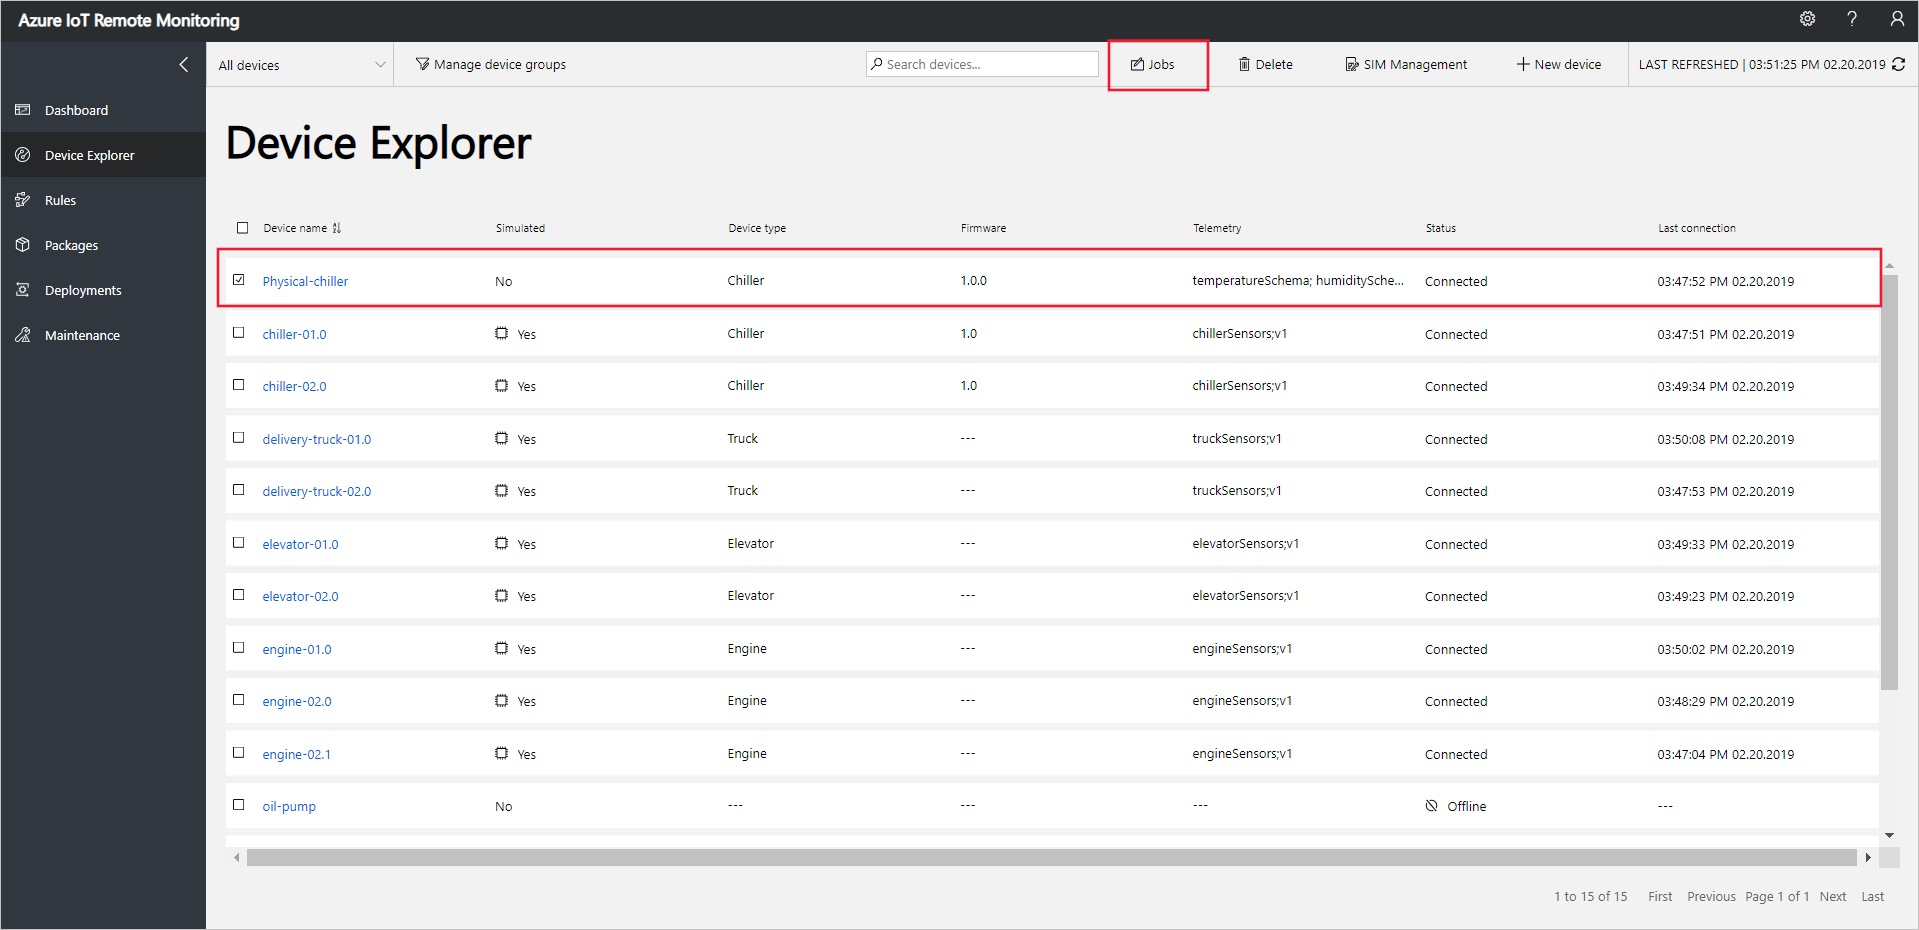 を選択する
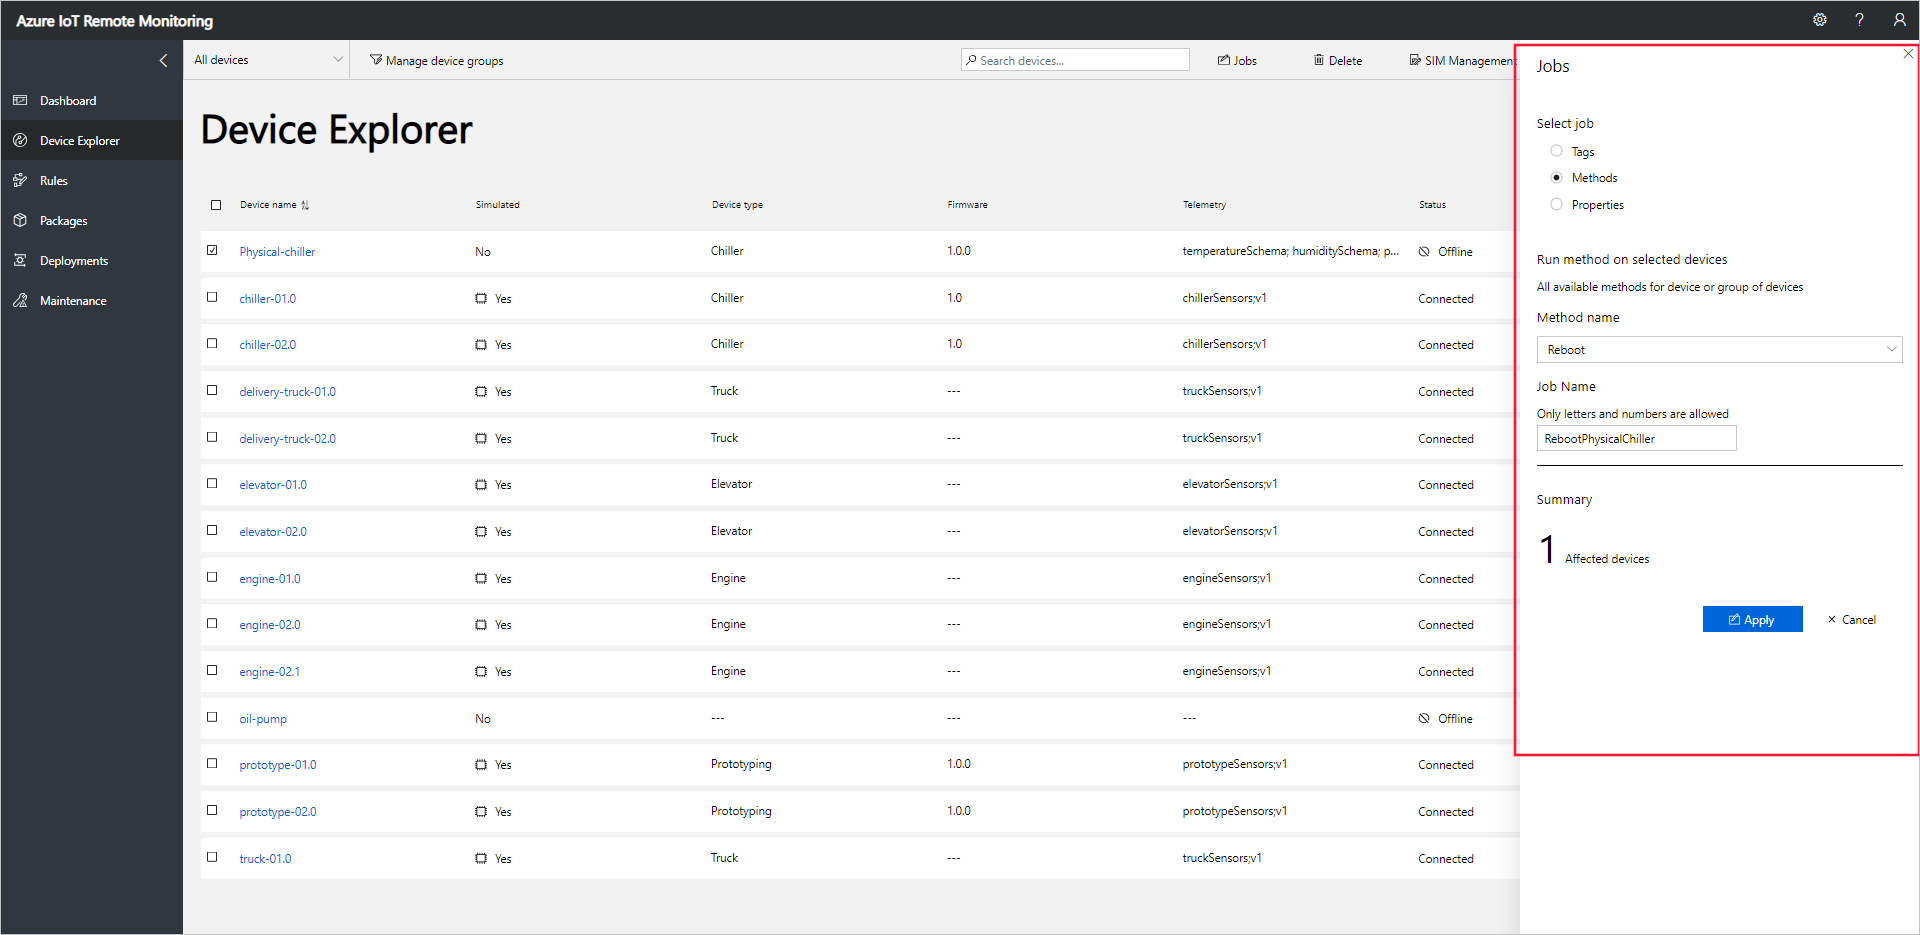
を選択するデバイスで呼び出すことができるメソッドの一覧を表示するには、[ジョブ] 選択し、[メソッド] をします。 ジョブを複数のデバイスで実行するようにスケジュールするには、一覧から複数のデバイスを選択します。 ジョブ パネルには、選択したすべてのデバイスに共通する手法のタイプが表示されます。
[再起動 選択し、ジョブ名を RebootPhysicalChiller 設定し、[apply 選択します。
 をスケジュールする
シミュレートされたデバイスがメソッドを処理している間、デバイス コードを実行しているコンソールに一連のメッセージが表示されます。
注
ソリューション内のジョブの状態を追跡するには、[ジョブの状態の表示] 選択します。
次のステップ
「リモート監視ソリューション アクセラレータのカスタマイズ 記事では、ソリューション アクセラレータをカスタマイズするいくつかの方法について説明します。