
RelativeLayout は、レイアウトまたは兄弟要素のプロパティを基準にして子を配置およびサイズ設定するために使用されます。 これにより、デバイス サイズに比例してスケーリングする UI を作成できます。 さらに、他のレイアウト クラスとは異なり、RelativeLayout では、重なるように子を配置することができます。
RelativeLayout クラスには、次のプロパティが定義されています。
Constraint型のXConstraint。子の X 位置に関する制約を表す添付プロパティです。Constraint型のYConstraint。子の Y 位置に関する制約を表す添付プロパティです。Constraint型のWidthConstraint。子の幅に関する制約を表す添付プロパティです。Constraint型のHeightConstraint。子の高さに関する制約を表す添付プロパティです。BoundsConstraint型のBoundsConstraint。子の位置とサイズに関する制約を表す添付プロパティです。 XAML からこのプロパティを簡単に使用することはできません。
これらのプロパティは、BindableProperty オブジェクトがサポートしています。つまり、プロパティをデータ バインディングの対象にして、スタイル設定することができます。 添付プロパティについて詳しくは、「Xamarin.Forms添付プロパティ」をご覧ください。
Note
RelativeLayout 内の子の幅と高さは、WidthConstraint と HeightConstraint 添付プロパティではなく、子の WidthRequest と HeightRequest プロパティを使用して指定することもできます。
RelativeLayout クラスは、IList<T> 型の Children プロパティを定義する Layout<T> クラスから派生します。 Children プロパティは Layout<T> クラスの ContentProperty であるため、XAML から明示的に設定する必要はありません。
ヒント
可能であれば、RelativeLayout は使用しないでください。 CPU で相当な量の作業を実行しなければならなくなります。
制約
RelativeLayout 内では、子の位置とサイズは、絶対値または相対値を使用して制約として指定されます。 制約が指定されていない場合、子はレイアウトの左上隅に配置されます。
次の表は、XAML と C# で制約を指定する方法を示しています。
| XAML | C# | |
|---|---|---|
| 絶対値 | 絶対制約は、RelativeLayout 添付プロパティを double 値に設定することによって指定されます。 |
絶対制約は、Constraint.Constant メソッドで、または Func<Rectangle> 引数を必要とする Children.Add オーバーロードを使用して指定されます。 |
| 相対値 | 相対制約は、RelativeLayout 添付プロパティを、ConstraintExpression マークアップ拡張によって返される Constraint オブジェクトに設定することによって指定されます。 |
相対制約は、Constraint クラスのメソッドによって返される Constraint オブジェクトで指定されます。 |
絶対値を使用した制約の指定の詳細については、「絶対位置決めとサイズ設定」を参照してください。 相対値を使用した制約の指定の詳細については、「相対位置とサイズ設定」を参照してください。
C# では、子を 3 つの Add オーバーロードによって RelativeLayout に追加できます。 最初のオーバーロードでは、子の位置とサイズを指定するための Expression<Func<Rectangle>> が必要です。 2 番目のオーバーロードでは、x、y、width、height 引数の省略可能な Expression<Func<double>> オブジェクトが必要です。 3 番目のオーバーロードでは、x、y、width、height 引数の省略可能な Constraint オブジェクトが必要です。
SetXConstraint、SetYConstraint、SetWidthConstraint、SetHeightConstraint メソッドを使用して、RelativeLayout 内の子の位置とサイズを変更できます。 これらの各メソッドの最初の引数は子であり、2 番目は Constraint オブジェクトです。 さらに、SetBoundsConstraint メソッドを使用して、子の位置とサイズを変更することもできます。 このメソッドの最初の引数は子で、2 つ目は BoundsConstraint オブジェクトです。
絶対配置とサイズ変更
RelativeLayout では、デバイスに依存しない単位で指定された絶対値を使用して子を配置およびサイズ設定できます。この単位では、子をレイアウトに配置する場所を明示的に定義します。 これは、子を RelativeLayout の Children コレクションに追加し、各子の XConstraint、YConstraint、WidthConstraint、HeightConstraint 添付プロパティを絶対位置やサイズ値に設定することによって実現されます。
警告
デバイスによって画面サイズと解像度が異なるため、子の配置とサイズ設定に絶対値を使用すると問題が発生する可能性があります。 したがって、1 つのデバイス上の画面の中心の座標は、他のデバイス上でオフセットされる可能性があります。
次の XAML は、子が絶対値を使用して配置される RelativeLayout を示しています。
<ContentPage xmlns="http://xamarin.com/schemas/2014/forms"
             xmlns:x="http://schemas.microsoft.com/winfx/2009/xaml"
             x:Class="RelativeLayoutDemos.Views.StylishHeaderDemoPage"
             Title="Stylish header demo">
    <RelativeLayout Margin="20">
        <BoxView Color="Silver"
                 RelativeLayout.XConstraint="0"
                 RelativeLayout.YConstraint="10"
                 RelativeLayout.WidthConstraint="200"
                 RelativeLayout.HeightConstraint="5" />
        <BoxView Color="Silver"
                 RelativeLayout.XConstraint="0"
                 RelativeLayout.YConstraint="20"
                 RelativeLayout.WidthConstraint="200"
                 RelativeLayout.HeightConstraint="5" />
        <BoxView Color="Silver"
                 RelativeLayout.XConstraint="10"
                 RelativeLayout.YConstraint="0"
                 RelativeLayout.WidthConstraint="5"
                 RelativeLayout.HeightConstraint="65" />
        <BoxView Color="Silver"
                 RelativeLayout.XConstraint="20"
                 RelativeLayout.YConstraint="0"
                 RelativeLayout.WidthConstraint="5"
                 RelativeLayout.HeightConstraint="65" />
        <Label Text="Stylish header"
               FontSize="24"
               RelativeLayout.XConstraint="30"
               RelativeLayout.YConstraint="25" />
    </RelativeLayout>
</ContentPage>
この例では、各 BoxView オブジェクトの位置は、XConstraint および YConstraint 添付プロパティで指定された値を使用して定義されます。 各 BoxView のサイズは、WidthConstraint および HeightConstraint 添付プロパティで指定された値を使用して定義されます。 また、Label オブジェクトの位置は、XConstraint および YConstraint 添付プロパティで指定された値を使用して定義されます。 しかし、サイズ値は Label に指定されていないため、制約されず、それ自体でサイズ設定できます。 いずれの場合も、絶対値はデバイスに依存しない単位を表します。
次のスクリーンショットは、結果のレイアウトです。

これに相当する C# コードを次に示します。
public class StylishHeaderDemoPageCS : ContentPage
{
    public StylishHeaderDemoPageCS()
    {
        RelativeLayout relativeLayout = new RelativeLayout
        {
            Margin = new Thickness(20)
        };

        relativeLayout.Children.Add(new BoxView
        {
            Color = Color.Silver
        }, () => new Rectangle(0, 10, 200, 5));

        relativeLayout.Children.Add(new BoxView
        {
            Color = Color.Silver
        }, () => new Rectangle(0, 20, 200, 5));

        relativeLayout.Children.Add(new BoxView
        {
            Color = Color.Silver
        }, () => new Rectangle(10, 0, 5, 65));

        relativeLayout.Children.Add(new BoxView
        {
            Color = Color.Silver
        }, () => new Rectangle(20, 0, 5, 65));

        relativeLayout.Children.Add(new Label
        {
            Text = "Stylish Header",
            FontSize = 24
        }, Constraint.Constant(30), Constraint.Constant(25));

        Title = "Stylish header demo";
        Content = relativeLayout;
    }
}
この例では、BoxView オブジェクトは、各子の位置とサイズを指定するために Expression<Func<Rectangle>> を必要とする Add オーバーロードを使用して、RelativeLayout に追加されます。 Label の位置は、(この場合は Constraint.Constant メソッドによって作成される) 省略可能な Constraint オブジェクトを必要とする Add オーバーロードを使用して定義されます。
Note
絶対値を使用する RelativeLayout では、レイアウトの境界内に収まらないように子を配置およびサイズ設定できます。
相対位置とサイズ設定
RelativeLayout では、レイアウトまたは兄弟要素のプロパティを基準にした値を使用して、子を配置およびサイズ設定できます。 これは、子を RelativeLayout の Children コレクションに追加し、各子の XConstraint、YConstraint、WidthConstraint、HeightConstraint 添付プロパティを、Constraint オブジェクトを使用して相対値に設定することによって実現されます。
制約は、定数にすることも、親または兄弟に相対的になるようにすることもできます。 制約の型は、次のメンバーを定義する ConstraintType 列挙体によって表されます。
RelativeToParent。親に相対的な制約を示します。RelativeToView。ビュー (または兄弟) に相対的な制約を示します。Constant。定数制約を示します。
制約マークアップ拡張
XAML では、ConstraintExpression マークアップ拡張で Constraint オブジェクトを作成できます。 通常、このマークアップ拡張は、RelativeLayout 内の子の位置とサイズを、その親または兄弟に関連付けるために使用されます。
ConstraintExpression クラスには、次のプロパティが定義されています。
double型のConstant。制約定数値を表します。string型のElementName。制約を計算するソース要素の名前を表します。double型のFactor。ソース要素を基準にした、制約を受けるディメンションをスケーリングする要素を表します。 このプロパティの既定値は 1 です。string型のProperty。制約計算で使用するソース要素のプロパティの名前を表します。ConstraintType型のType。制約の型を表します。
Xamarin.Forms マークアップ拡張機能の詳細については、「XAML マークアップ拡張機能」を参照してください。
次の XAML は、ConstraintExpression マークアップ拡張によって子が制約されている RelativeLayout を示しています。
<ContentPage xmlns="http://xamarin.com/schemas/2014/forms"
             xmlns:x="http://schemas.microsoft.com/winfx/2009/xaml"
             x:Class="RelativeLayoutDemos.Views.RelativePositioningAndSizingDemoPage"
             Title="RelativeLayout demo">
    <RelativeLayout>
        <BoxView Color="Red"
                 RelativeLayout.XConstraint="{ConstraintExpression Type=Constant, Constant=0}"
                 RelativeLayout.YConstraint="{ConstraintExpression Type=Constant, Constant=0}" />
        <BoxView Color="Green"
                 RelativeLayout.XConstraint="{ConstraintExpression Type=RelativeToParent, Property=Width, Constant=-40}"
                 RelativeLayout.YConstraint="{ConstraintExpression Type=Constant, Constant=0}" />
        <BoxView Color="Blue"
                 RelativeLayout.XConstraint="{ConstraintExpression Type=Constant, Constant=0}"
                 RelativeLayout.YConstraint="{ConstraintExpression Type=RelativeToParent, Property=Height, Constant=-40}" />
        <BoxView Color="Yellow"
                 RelativeLayout.XConstraint="{ConstraintExpression Type=RelativeToParent, Property=Width, Constant=-40}"
                 RelativeLayout.YConstraint="{ConstraintExpression Type=RelativeToParent, Property=Height, Constant=-40}" />

        <!-- Centered and 1/3 width and height of parent -->
        <BoxView x:Name="oneThird"
                 Color="Silver"
                 RelativeLayout.XConstraint="{ConstraintExpression Type=RelativeToParent, Property=Width, Factor=0.33}"
                 RelativeLayout.YConstraint="{ConstraintExpression Type=RelativeToParent, Property=Height, Factor=0.33}"
                 RelativeLayout.WidthConstraint="{ConstraintExpression Type=RelativeToParent, Property=Width, Factor=0.33}"
                 RelativeLayout.HeightConstraint="{ConstraintExpression Type=RelativeToParent, Property=Height, Factor=0.33}" />

        <!-- 1/3 width and height of previous -->
        <BoxView Color="Black"
                 RelativeLayout.XConstraint="{ConstraintExpression Type=RelativeToView, ElementName=oneThird, Property=X}"
                 RelativeLayout.YConstraint="{ConstraintExpression Type=RelativeToView, ElementName=oneThird, Property=Y}"
                 RelativeLayout.WidthConstraint="{ConstraintExpression Type=RelativeToView, ElementName=oneThird, Property=Width, Factor=0.33}"
                 RelativeLayout.HeightConstraint="{ConstraintExpression Type=RelativeToView, ElementName=oneThird, Property=Height, Factor=0.33}" />
    </RelativeLayout>
</ContentPage>
この例では、各 BoxView オブジェクトの位置は、XConstraint と YConstraint 添付プロパティを設定することによって定義されます。 最初の BoxView では、XConstraint と YConstraint 添付プロパティが定数 (絶対値) に設定されています。 残りの BoxView オブジェクトではすべて、少なくとも 1 つの相対値を使用して位置が設定されます。 たとえば、黄色の BoxView オブジェクトでは、XConstraint 添付プロパティが親 (RelativeLayout) の幅から 40 を引いた値に設定されます。 同様に、この BoxView では、YConstraint 添付プロパティが親の高さから 40 を引いた値に設定されます。 これにより、黄色の BoxView は確実に画面の右下隅に示されます。
Note
サイズを指定しない BoxView オブジェクトのサイズは、Xamarin.Forms によって自動的に 40 x 40 に設定されます。
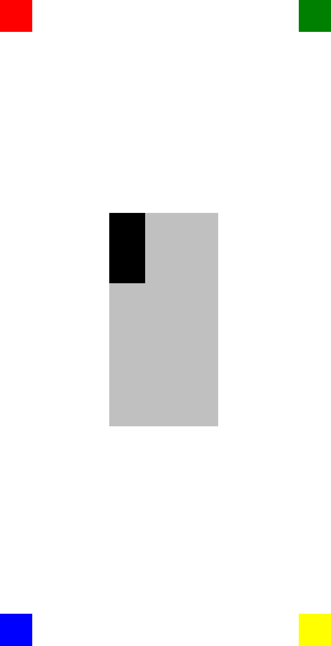
oneThird という名前のシルバーの BoxView は、親を基準にして中央に配置されます。 また、その親を基準にサイズ設定され、その幅と高さの 3 分の 1 になります。 これは、XConstraint と WidthConstraint 添付プロパティを親 (RelativeLayout) の幅に設定し、0.33 を乗算することによって実現されます。 同様に、YConstraint と HeightConstraint 添付プロパティは親の高さに設定され、0.33 が乗算されます。
黒い BoxView は、 oneThird BoxViewを基準にして配置され、サイズが変更されます。 これは、兄弟要素の X と Y の値に、その XConstraint と YConstraint 添付プロパティをそれぞれ設定することによって実現されます。 同様に、そのサイズは、その兄弟要素の幅と高さの 3 分の 1 に設定されます。 これは、兄弟要素の Width と Height の値にそれぞれ WidthConstraint と HeightConstraint 添付プロパティを設定し、0.33 を乗算することによって実現されます。
次のスクリーンショットは、結果のレイアウトを示しています。
制約オブジェクト
Constraint クラスでは、Constraint オブジェクトを返す次のパブリック静的メソッドが定義されます。
Constant。doubleで指定されたサイズに子を制約します。FromExpression。ラムダ式を使用して子を制約します。RelativeToParent。親のサイズを基準にして子を制約します。RelativeToView。ビューのサイズを基準にして子を制約します。
さらに、BoundsConstraint クラスでは、子の位置とサイズを Expression<Func<Rectangle>> で制約する BoundsConstraint を返す単一のメソッドである FromExpression が定義されます。 このメソッドを使用して、BoundsConstraint 添付プロパティを設定できます。
次の C# コードは、子が Constraint オブジェクトによって制約されている RelativeLayout を示しています。
public class RelativePositioningAndSizingDemoPageCS : ContentPage
{
    public RelativePositioningAndSizingDemoPageCS()
    {
        RelativeLayout relativeLayout = new RelativeLayout();

        // Four BoxView's
        relativeLayout.Children.Add(
            new BoxView { Color = Color.Red },
            Constraint.Constant(0),
            Constraint.Constant(0));

        relativeLayout.Children.Add(
            new BoxView { Color = Color.Green },
            Constraint.RelativeToParent((parent) =>
            {
                return parent.Width - 40;
            }), Constraint.Constant(0));

        relativeLayout.Children.Add(
            new BoxView { Color = Color.Blue },
            Constraint.Constant(0),
            Constraint.RelativeToParent((parent) =>
            {
                return parent.Height - 40;
            }));

        relativeLayout.Children.Add(
            new BoxView { Color = Color.Yellow },
            Constraint.RelativeToParent((parent) =>
            {
                return parent.Width - 40;
            }),
            Constraint.RelativeToParent((parent) =>
            {
                return parent.Height - 40;
            }));

        // Centered and 1/3 width and height of parent
        BoxView silverBoxView = new BoxView { Color = Color.Silver };
        relativeLayout.Children.Add(
            silverBoxView,
            Constraint.RelativeToParent((parent) =>
            {
                return parent.Width * 0.33;
            }),
            Constraint.RelativeToParent((parent) =>
            {
                return parent.Height * 0.33;
            }),
            Constraint.RelativeToParent((parent) =>
            {
                return parent.Width * 0.33;
            }),
            Constraint.RelativeToParent((parent) =>
            {
                return parent.Height * 0.33;
            }));

        // 1/3 width and height of previous
        relativeLayout.Children.Add(
            new BoxView { Color = Color.Black },
            Constraint.RelativeToView(silverBoxView, (parent, sibling) =>
            {
                return sibling.X;
            }),
            Constraint.RelativeToView(silverBoxView, (parent, sibling) =>
            {
                return sibling.Y;
            }),
            Constraint.RelativeToView(silverBoxView, (parent, sibling) =>
            {
                return sibling.Width * 0.33;
            }),
            Constraint.RelativeToView(silverBoxView, (parent, sibling) =>
            {
                return sibling.Height * 0.33;
            }));

        Title = "RelativeLayout demo";
        Content = relativeLayout;
    }
}
この例では、x、y、width、height 引数に省略可能な Constraint オブジェクトを必要とする Add オーバーロードを使用して、子が RelativeLayout に追加されます。
Note
相対値を使用する RelativeLayout では、レイアウトの境界内に収まらないように、子の位置とサイズを設定できます。