これは、従来のユーザー名とパスワード認証システムの代わりにWindows Helloを使用するパッケージ化されたWindows appを作成する方法に関する完全なチュートリアルの最初の部分です。 この場合、アプリは WinUI 3 アプリですが、WPFアプリやWindows Forms アプリなど、パッケージ化された任意のWindows appでも同じアプローチを使用できます。 アプリはサインインにユーザー名を使用し、アカウントごとに Hello キーを作成します。 これらのアカウントは、Windows Helloの構成に関する Windows 設定で設定されている PIN によって保護されます。
このチュートリアルは、アプリのビルドとバックエンド サービスの接続という 2 つの部分に分かれています。 この記事が完了したら、パート 2: Windows Hello ログイン サービスに進みます。
開始する前に、Windows Helloの概要を読んで、Windows Helloのしくみを一般的に理解しておく必要があります。
概要
このprojectを構築するには、C# と XAML のエクスペリエンスが必要です。 また、Windows 10 または Windows 11 コンピューターで Visual Studio 2026 を使用する必要があります。 開発環境のセットアップの詳細な手順については、「 Windows アプリの開発を開始 する」を参照してください。
- Visual Studioで、File>New>Project を選択します。
- New Project ダイアログのドロップダウン フィルターで、それぞれ C#/C++、Windows、および WinUI を選択します。
- WinUI 空のアプリ (パッケージ化) を選択し、アプリケーションに "WindowsHelloLogin" という名前を付けます。
- 新しいアプリケーションをビルドして実行すると (F5)、画面に空白のウィンドウが表示されます。 アプリケーションを閉じます。

演習 1: Windows Helloを使用してログインする
この演習では、コンピューターにWindows Helloが設定されているかどうかを確認する方法と、Windows Helloを使用してアカウントにサインインする方法について説明します。
新しいprojectソリューションに "Views" という名前の新しいフォルダーを作成します。 このフォルダーには、このサンプルで移動するページが含まれます。 Solution Explorer のprojectを右クリックし、Add>New Folder を選択し、フォルダーの名前を Views に変更します。

MainWindow.xaml を開き、
Windowの内容を空のStackPanelまたはGridコントロールに置き換えます。 MainWindow が読み込まれるときにページ ナビゲーションを実装し、新しいページに移動するため、MainWindow のコンテンツは必要ありません。XAML の
Titleに プロパティを追加します。 属性は次のようになります:Title="Windows Hello Login"。コンパイル エラーを回避するために、MainWindow.xaml.csから myButton_Click イベント ハンドラーを削除します。 このサンプルでは、このイベント ハンドラーは必要ありません。
新しい ビュー フォルダーを右クリックし、[ 追加>新しいアイテム] を選択し、 空白のページ テンプレートを選択します。 このページに "MainPage.xaml" という名前を付けます。

App.xaml.cs ファイルを開き、 OnLaunched ハンドラーを更新して、アプリのページ ナビゲーションを実装します。 また、ページの読み込み中に発生するエラーに対処するために、 RootFrame_NavigationFailed ハンドラー メソッドを追加する必要もあります。
protected override void OnLaunched(Microsoft.UI.Xaml.LaunchActivatedEventArgs args)
{
    m_window = new MainWindow();
    var rootFrame = new Frame();
    rootFrame.NavigationFailed += RootFrame_NavigationFailed;
    rootFrame.Navigate(typeof(MainPage), args);
    m_window.Content = rootFrame;
    m_window.Activate();
}

private void RootFrame_NavigationFailed(object sender, NavigationFailedEventArgs e)
{
    throw new Exception($"Error loading page {e.SourcePageType.FullName}");
}
また、コードのコンパイル エラーを解決するには、App.xaml.cs ファイルの先頭に 4 つの using ステートメントを追加する必要があります。
using Microsoft.UI.Xaml.Controls;
using Microsoft.UI.Xaml.Navigation;
using System;
using WindowsHelloLogin.Views;
新しい ビュー フォルダーを右クリックし、[ 追加>新しいアイテム] を選択し、 空白のページ テンプレートを選択します。 このページに "Login.xaml" という名前を付けます。
新しいログイン ページのユーザー インターフェイスを定義するには、次の XAML を追加します。 この XAML は、次の子を配置する
StackPanelを定義します。タイトルを含む
TextBlockです。エラーメッセージ用の
TextBlockユーザー名を入力する際の
TextBox。レジスタ ページに移動する
Button。Windows Helloの状態を格納するための
TextBlock。バックエンドまたは構成済みのユーザーがまだないため、[ログイン] ページについて説明する
TextBlock。<Grid> <StackPanel> <TextBlock Text="Login" FontSize="36" Margin="4" TextAlignment="Center"/> <TextBlock x:Name="ErrorMessage" Text="" FontSize="20" Margin="4" Foreground="Red" TextAlignment="Center"/> <TextBlock Text="Enter your username below" Margin="0,0,0,20" TextWrapping="Wrap" Width="300" TextAlignment="Center" VerticalAlignment="Center" FontSize="16"/> <TextBox x:Name="UsernameTextBox" Margin="4" Width="250"/> <Button x:Name="LoginButton" Content="Login" Background="DodgerBlue" Foreground="White" Click="LoginButton_Click" Width="80" HorizontalAlignment="Center" Margin="0,20"/> <TextBlock Text="Don't have an account?" TextAlignment="Center" VerticalAlignment="Center" FontSize="16"/> <TextBlock x:Name="RegisterButtonTextBlock" Text="Register now" PointerPressed="RegisterButtonTextBlock_OnPointerPressed" Foreground="DodgerBlue" TextAlignment="Center" VerticalAlignment="Center" FontSize="16"/> <Border x:Name="WindowsHelloStatus" Background="#22B14C" Margin="0,20" Height="100" > <TextBlock x:Name="WindowsHelloStatusText" Text="Windows Hello is ready to use!" Margin="4" TextAlignment="Center" VerticalAlignment="Center" FontSize="20"/> </Border> <TextBlock x:Name="LoginExplanation" FontSize="24" TextAlignment="Center" TextWrapping="Wrap" Text="Please Note: To demonstrate a login, validation will only occur using the default username 'sampleUsername'"/> </StackPanel> </Grid>
ソリューションを構築するには、コードビハインドファイルにいくつかのメソッドを追加する必要があります。 F7 キーを押すか、Solution Explorer を使用してLogin.xaml.cs ファイルを編集します。 Login イベントと Register イベントを処理する次の 2 つのイベント メソッドを追加します。 現時点では、これらのメソッドは
ErrorMessage.Textを空の文字列に設定します。 次の using ステートメントを必ず含めます。 これらは、次の手順で必要になります。using Microsoft.UI.Xaml; using Microsoft.UI.Xaml.Controls; using Microsoft.UI.Xaml.Input; using Microsoft.UI.Xaml.Media; using Microsoft.UI.Xaml.Navigation; using System; namespace WindowsHelloLogin.Views { public sealed partial class Login : Page { public Login() { this.InitializeComponent(); } private void LoginButton_Click(object sender, RoutedEventArgs e) { ErrorMessage.Text = ""; } private void RegisterButtonTextBlock_OnPointerPressed(object sender, PointerRoutedEventArgs e) { ErrorMessage.Text = ""; } } }ログイン ページをレンダリングするには、MainPage が読み込まれたときにログイン ページに移動するように MainPage コードを編集します。 MainPage.xaml.cs ファイルを開きます。 Solution Explorerで、MainPage.xaml.csをダブルクリックします。 見つからない場合は、MainPage.xaml の横にある小さな矢印をクリックしてコードビハインドファイルを表示します。 Login ページに移動する Loaded イベント ハンドラー メソッドを作成します。
namespace WindowsHelloLogin.Views
{
    public sealed partial class MainPage : Page
    {
        public MainPage()
        {
            this.InitializeComponent();
            Loaded += MainPage_Loaded;
        }

        private void MainPage_Loaded(object sender, RoutedEventArgs e)
        {
            Frame.Navigate(typeof(Login));
        }
    }
}
Login ページで、
OnNavigatedToイベントを処理して、Windows Helloが現在のコンピューターで使用可能かどうかを検証する必要があります。 Login.xaml.csで、次のコードを実装します。 WindowsHelloHelper オブジェクトがエラーがあることを示していることがわかります。 これは、このヘルパー クラスをまだ作成していないためです。public sealed partial class Login : Page { public Login() { this.InitializeComponent(); } protected override async void OnNavigatedTo(NavigationEventArgs e) { // Check if Windows Hello is set up and available on this machine if (await WindowsHelloHelper.WindowsHelloAvailableCheckAsync()) { } else { // Windows Hello isn't set up, so inform the user WindowsHelloStatus.Background = new SolidColorBrush(Windows.UI.Color.FromArgb(255, 50, 170, 207)); WindowsHelloStatusText.Text = $"Windows Hello is not set up!{Environment.NewLine}Please go to Windows Settings and set up a PIN to use it."; LoginButton.IsEnabled = false; } } }WindowsHelloHelper クラスを作成するには、WindowsHelloLogin project を右クリックし、Add>New Folder をクリックします。 このフォルダーに Utils という名前を付けます。
Utils フォルダーを右クリックし、[追加>Class] を選択します。 この新しいクラスに "WindowsHelloHelper.cs" という名前を付けます。
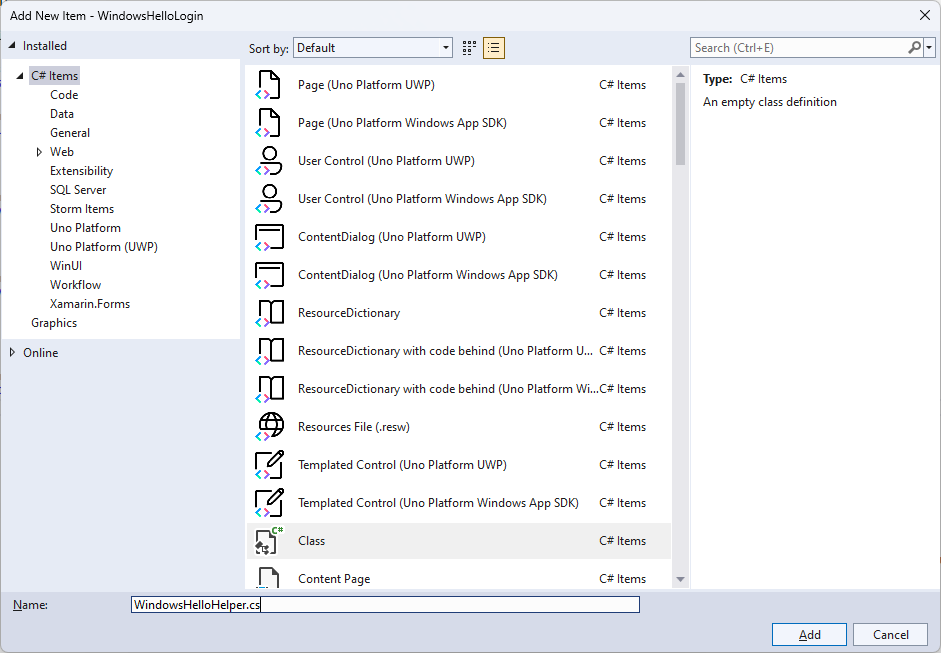
WindowsHelloHelper クラスのスコープを
public staticに変更し、使用する準備ができているかどうかをユーザーに通知する次のメソッドWindows Hello追加します。 必要な名前空間を追加する必要があります。using System; using System.Diagnostics; using System.Threading.Tasks; using Windows.Security.Credentials; namespace WindowsHelloLogin.Utils { public static class WindowsHelloHelper { /// <summary> /// Checks to see if Windows Hello is ready to be used. /// /// Windows Hello has dependencies on: /// 1. Having a connected Microsoft Account /// 2. Having a Windows PIN set up for that account on the local machine /// </summary> public static async Task<bool> WindowsHelloAvailableCheckAsync() { bool keyCredentialAvailable = await KeyCredentialManager.IsSupportedAsync(); if (keyCredentialAvailable == false) { // Key credential is not enabled yet as user // needs to connect to a Microsoft Account and select a PIN in the connecting flow. Debug.WriteLine("Windows Hello is not set up!\nPlease go to Windows Settings and set up a PIN to use it."); return false; } return true; } } }Login.xaml.csで、
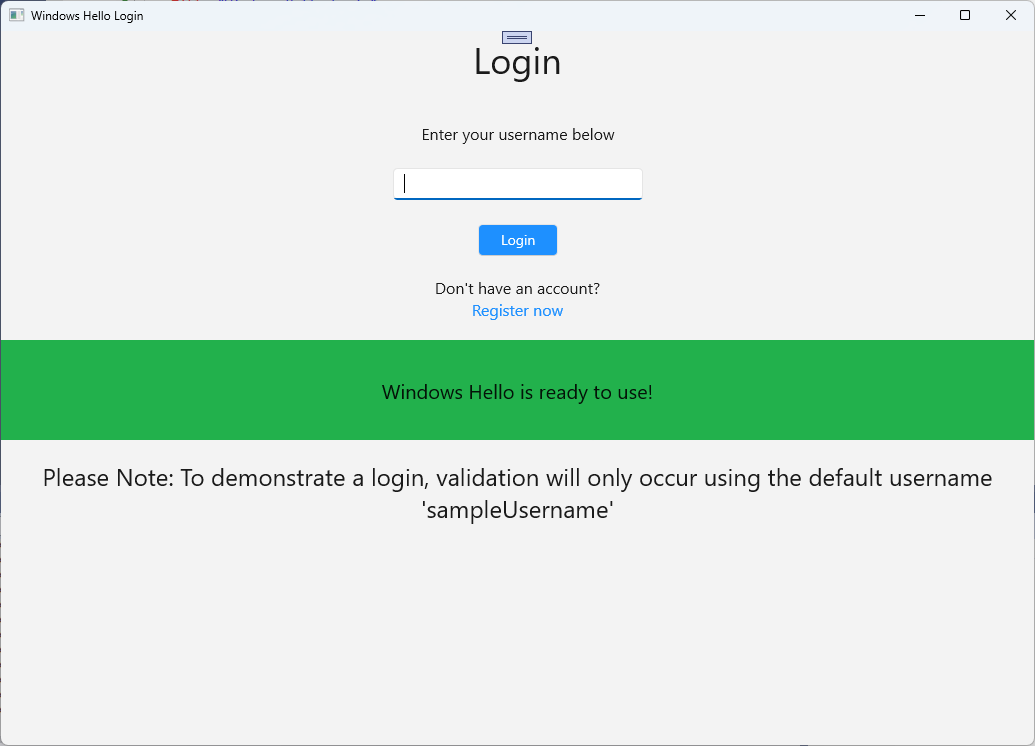
WindowsHelloLogin.Utils名前空間への参照を追加します。 これにより、OnNavigatedToメソッドのエラーが解決されます。using WindowsHelloLogin.Utils;アプリケーションをビルドして実行します。 ログイン ページに移動し、Windows Helloを使用する準備ができている場合は、Windows Helloバナーが表示されます。 マシンのWindows Hello状態を示す緑色または青のバナーが表示されます。
次に必要なことは、サインインのロジックを構築することです。 "Models" という名前のprojectに新しいフォルダーを作成します。
Models フォルダーに、"Account.cs" という名前の新しいクラスを作成します。 このクラスは、アカウント モデルとして機能します。 これはサンプル projectであるため、ユーザー名のみが含まれます。 クラススコープを
publicに変更し、Usernameプロパティを追加します。namespace WindowsHelloLogin.Models { public class Account { public string Username { get; set; } } }アプリには、アカウントを処理する方法が必要です。 このハンズオン ラボでは、サーバーやデータベースがないため、ユーザーの一覧が保存され、ローカルに読み込まれます。 Utils フォルダーを右クリックし、"AccountHelper.cs" という名前の新しいクラスを追加します。 クラス スコープを
public staticに変更します。 AccountHelper は、アカウントの一覧をローカルに保存して読み込むのに必要なすべてのメソッドを含む静的クラスです。 保存と読み込みは 、XmlSerializer を使用して機能します。 また、保存されたファイルと保存した場所も覚えておく必要があります。using System; using System.Collections.Generic; using System.IO; using System.Text; using System.Threading.Tasks; using System.Xml.Serialization; using Windows.Storage; using WindowsHelloLogin.Models; namespace WindowsHelloLogin.Utils { public static class AccountHelper { // In the real world this would not be needed as there would be a server implemented that would host a user account database. // For this tutorial we will just be storing accounts locally. private const string USER_ACCOUNT_LIST_FILE_NAME = "accountlist.txt"; private static string _accountListPath = Path.Combine(ApplicationData.Current.LocalFolder.Path, USER_ACCOUNT_LIST_FILE_NAME); public static List<Account> AccountList = []; /// <summary> /// Create and save a useraccount list file. (Updating the old one) /// </summary> private static async void SaveAccountListAsync() { string accountsXml = SerializeAccountListToXml(); if (File.Exists(_accountListPath)) { StorageFile accountsFile = await StorageFile.GetFileFromPathAsync(_accountListPath); await FileIO.WriteTextAsync(accountsFile, accountsXml); } else { StorageFile accountsFile = await ApplicationData.Current.LocalFolder.CreateFileAsync(USER_ACCOUNT_LIST_FILE_NAME); await FileIO.WriteTextAsync(accountsFile, accountsXml); } } /// <summary> /// Gets the useraccount list file and deserializes it from XML to a list of useraccount objects. /// </summary> /// <returns>List of useraccount objects</returns> public static async Task<List<Account>> LoadAccountListAsync() { if (File.Exists(_accountListPath)) { StorageFile accountsFile = await StorageFile.GetFileFromPathAsync(_accountListPath); string accountsXml = await FileIO.ReadTextAsync(accountsFile); DeserializeXmlToAccountList(accountsXml); } return AccountList; } /// <summary> /// Uses the local list of accounts and returns an XML formatted string representing the list /// </summary> /// <returns>XML formatted list of accounts</returns> public static string SerializeAccountListToXml() { var xmlizer = new XmlSerializer(typeof(List<Account>)); var writer = new StringWriter(); xmlizer.Serialize(writer, AccountList); return writer.ToString(); } /// <summary> /// Takes an XML formatted string representing a list of accounts and returns a list object of accounts /// </summary> /// <param name="listAsXml">XML formatted list of accounts</param> /// <returns>List object of accounts</returns> public static List<Account> DeserializeXmlToAccountList(string listAsXml) { var xmlizer = new XmlSerializer(typeof(List<Account>)); TextReader textreader = new StreamReader(new MemoryStream(Encoding.UTF8.GetBytes(listAsXml))); return AccountList = (xmlizer.Deserialize(textreader)) as List<Account>; } } }次に、アカウントのローカル リストからアカウントを追加および削除する方法を実装します。 これらのアクションによって、それぞれ一覧が保存されます。 このハンズオン ラボに必要な最後の方法は、検証方法です。 承認サーバーまたはユーザーのデータベースがないため、ハードコーディングされた 1 人のユーザーに対して検証されます。 これらのメソッドは AccountHelper クラスに追加する必要があります。
public static Account AddAccount(string username)
{
    // Create a new account with the username
    var account = new Account() { Username = username };
    // Add it to the local list of accounts
    AccountList.Add(account);
    // SaveAccountList and return the account
    SaveAccountListAsync();
    return account;
}

public static void RemoveAccount(Account account)
{
    // Remove the account from the accounts list
    AccountList.Remove(account);
    // Re save the updated list
    SaveAccountListAsync();
}

public static bool ValidateAccountCredentials(string username)
{
    // In the real world, this method would call the server to authenticate that the account exists and is valid.
    // However, for this tutorial, we'll just have an existing sample user that's named "sampleUsername".
    // If the username is null or does not match "sampleUsername" validation will fail.
    // In this case, the user should register a new Windows Hello user.

    if (string.IsNullOrEmpty(username))
    {
        return false;
    }

    if (!string.Equals(username, "sampleUsername"))
    {
        return false;
    }

    return true;
}
次に必要なのは、ユーザーからのログインリクエストを処理することです。 Login.xaml.csで、現在のアカウントのログインを保持する新しいプライベート変数を作成します。 次に、 SignInWindowsHelloAsync という名前の新しいメソッドを追加します。 これにより、 AccountHelper.ValidateAccountCredentials メソッドを使用してアカウント資格情報が検証されます。 入力したユーザー名が、前の手順で構成したハードコーディングされた文字列値と同じ場合、このメソッドは ブール 値を返します。 このサンプルのハードコーディングされた値は "sampleUsername" です。
using WindowsHelloLogin.Models;
using WindowsHelloLogin.Utils;
using System.Diagnostics;
using System.Threading.Tasks;

namespace WindowsHelloLogin.Views
{
    public sealed partial class Login : Page
    {
        private Account _account;

        public Login()
        {
            this.InitializeComponent();
        }

        protected override async void OnNavigatedTo(NavigationEventArgs e)
        {
            // Check if Windows Hello is set up and available on this machine
            if (await WindowsHelloHelper.WindowsHelloAvailableCheckAsync())
            {
            }
            else
            {
                // Windows Hello is not set up, so inform the user
                WindowsHelloStatus.Background = new SolidColorBrush(Windows.UI.Color.FromArgb(255, 50, 170, 207));
                WindowsHelloStatusText.Text = "Windows Hello is not set up!\nPlease go to Windows Settings and set up a PIN to use it.";
                LoginButton.IsEnabled = false;
            }
        }

        private async void LoginButton_Click(object sender, RoutedEventArgs e)
        {
            ErrorMessage.Text = "";
            await SignInWindowsHelloAsync();
        }

        private void RegisterButtonTextBlock_OnPointerPressed(object sender, PointerRoutedEventArgs e)
        {
            ErrorMessage.Text = "";
        }

        private async Task SignInWindowsHelloAsync()
        {
            if (AccountHelper.ValidateAccountCredentials(UsernameTextBox.Text))
            {
                // Create and add a new local account
                _account = AccountHelper.AddAccount(UsernameTextBox.Text);
                Debug.WriteLine("Successfully signed in with traditional credentials and created local account instance!");

                //if (await WindowsHelloHelper.CreateWindowsHelloKeyAsync(UsernameTextBox.Text))
                //{
                //    Debug.WriteLine("Successfully signed in with Windows Hello!");
                //}
            }
            else
            {
                ErrorMessage.Text = "Invalid Credentials";
            }
        }
    }
}
WindowsHelloHelper でメソッドを参照していたコメントされたコードに気付いたかもしれません。 WindowsHelloHelper.csで、 CreateWindowsHelloKeyAsync という名前の新しいメソッドを追加します。 このメソッドは、KeyCredentialManager のWindows Hello API を使用します。 RequestCreateAsync を呼び出すと、accountId およびローカル コンピューターに固有のWindows Hello キーが作成されます。 実際のシナリオでこれを実装する場合は、switch ステートメントのコメントに注意してください。
/// <summary>
/// Creates a Windows Hello key on the machine using the account ID provided.
/// </summary>
/// <param name="accountId">The account ID associated with the account that we are enrolling into Windows Hello</param>
/// <returns>Boolean indicating if creating the Windows Hello key succeeded</returns>
public static async Task<bool> CreateWindowsHelloKeyAsync(string accountId)
{
    KeyCredentialRetrievalResult keyCreationResult = await KeyCredentialManager.RequestCreateAsync(accountId, KeyCredentialCreationOption.ReplaceExisting);

    switch (keyCreationResult.Status)
    {
        case KeyCredentialStatus.Success:
            Debug.WriteLine("Successfully created key");

            // In the real world, authentication would take place on a server.
            // So, every time a user migrates or creates a new Windows Hello
            // account, details should be pushed to the server.
            // The details that would be pushed to the server include:
            // The public key, keyAttestation (if available),
            // certificate chain for attestation endorsement key (if available),
            // status code of key attestation result: keyAttestationIncluded or
            // keyAttestationCanBeRetrievedLater and keyAttestationRetryType.
            // As this sample has no concept of a server, it will be skipped for now.
            // For information on how to do this, refer to the second sample.

            // For this sample, just return true
            return true;
        case KeyCredentialStatus.UserCanceled:
            Debug.WriteLine("User cancelled sign-in process.");
            break;
        case KeyCredentialStatus.NotFound:
            // User needs to set up Windows Hello
            Debug.WriteLine("Windows Hello is not set up!\nPlease go to Windows Settings and set up a PIN to use it.");
            break;
        default:
            break;
    }

    return false;
}
CreateWindowsHelloKeyAsync メソッドを作成したら、Login.xaml.cs ファイルに戻り、SignInWindowsHelloAsync メソッド内のコードのコメントを解除します。
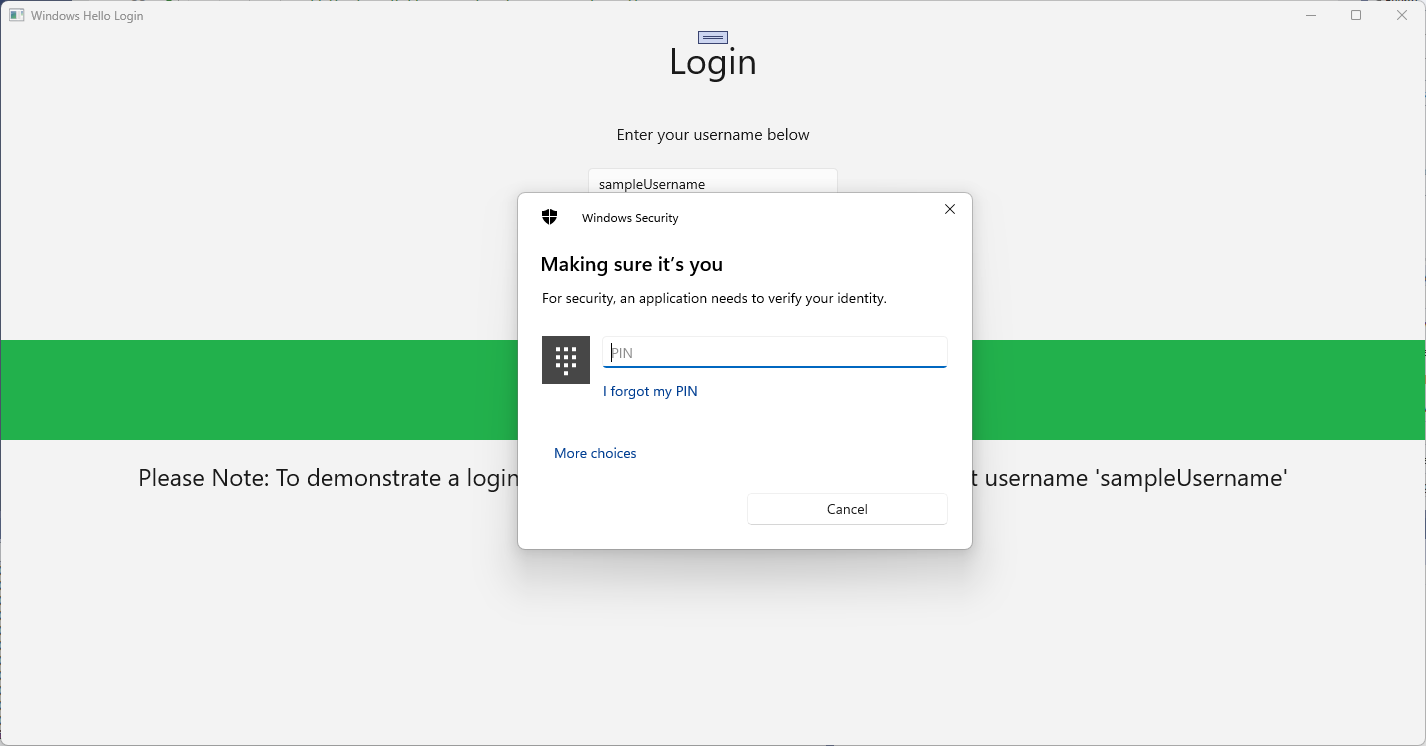
private async Task SignInWindowsHelloAsync()
{
    if (AccountHelper.ValidateAccountCredentials(UsernameTextBox.Text))
    {
        //Create and add a new local account
        _account = AccountHelper.AddAccount(UsernameTextBox.Text);
        Debug.WriteLine("Successfully signed in with traditional credentials and created local account instance!");

        if (await WindowsHelloHelper.CreateWindowsHelloKeyAsync(UsernameTextBox.Text))
        {
            Debug.WriteLine("Successfully signed in with Windows Hello!");
        }
    }
    else
    {
        ErrorMessage.Text = "Invalid Credentials";
    }
}
アプリケーションをビルドして実行します。 ログイン ページに移動します。 "sampleUsername" としてユーザー名を入力し、[ログイン] をクリックします。 PIN の入力を求めるWindows Helloプロンプトが表示されます。 PIN を正しく入力すると、CreateWindowsHelloKeyAsync メソッドでWindows Hello キーを作成できるようになります。 出力ウィンドウを監視して、成功を示すメッセージが表示されているかどうかを確認します。
演習 2: ウェルカム ページとユーザー選択ページ
この演習では、前の演習から続行します。 ユーザーが正常にログインすると、ユーザーはウェルカム ページに移動し、そこでサインアウトしたり、アカウントを削除したりできます。 Windows Helloすべてのコンピューターのキーを作成すると、ユーザー選択画面を作成できます。この画面には、そのコンピューターにサインインしているすべてのユーザーが表示されます。 その後、ユーザーはこれらのアカウントのいずれかを選択し、すでにコンピューターへのアクセスを認証されているため、パスワードを再入力せずにウェルカム画面に直接移動できます。
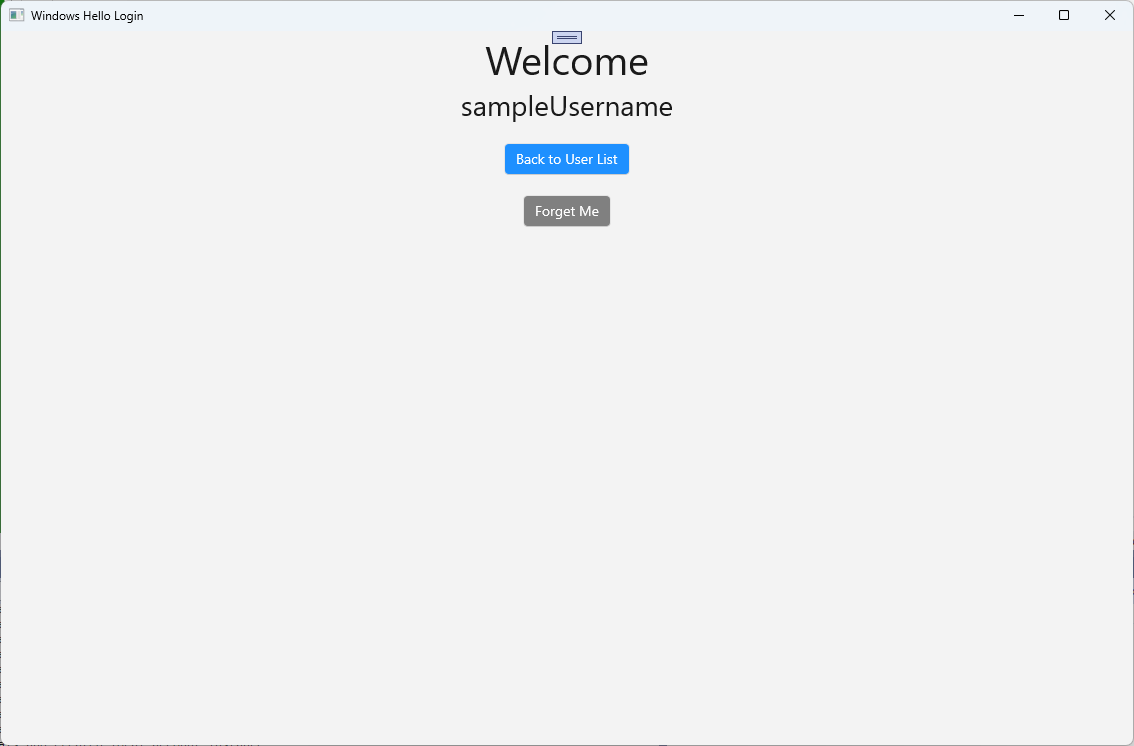
Views フォルダーに、"Welcome.xaml" という名前の新しい空白ページを追加します。 次の XAML を追加して、ページのユーザー インターフェイスを完成させます。 これにより、タイトル、ログインしたユーザー名、および 2 つのボタンが表示されます。 いずれかのボタンがユーザー リストに戻り (後で作成します)、もう 1 つのボタンでこのユーザーの忘れ処理が行われます。
<Grid>
  <StackPanel>
    <TextBlock x:Name="Title" Text="Welcome" FontSize="40" TextAlignment="Center"/>
    <TextBlock x:Name="UserNameText" FontSize="28" TextAlignment="Center"/>

    <Button x:Name="BackToUserListButton" Content="Back to User List" Click="Button_Restart_Click"
            HorizontalAlignment="Center" Margin="0,20" Foreground="White" Background="DodgerBlue"/>

    <Button x:Name="ForgetButton" Content="Forget Me" Click="Button_Forget_User_Click"
            Foreground="White"
            Background="Gray"
            HorizontalAlignment="Center"/>
  </StackPanel>
</Grid>
Welcome.xaml.cs分離コード ファイルに、ログインしているアカウントを保持する新しいプライベート変数を追加します。
OnNavigateToイベントをオーバーライドするメソッドを実装する必要があります。これにより、ウェルカム ページに渡されたアカウントが格納されます。 また、XAML で定義されている 2 つのボタンのClickイベントを実装する必要があります。WindowsHelloLogin.ModelsおよびWindowsHelloLogin.Utils名前空間に using ステートメントを追加する必要があります。using WindowsHelloLogin.Models; using WindowsHelloLogin.Utils; using System.Diagnostics; namespace WindowsHelloLogin.Views { public sealed partial class Welcome : Page { private Account _activeAccount; public Welcome() { InitializeComponent(); } protected override void OnNavigatedTo(NavigationEventArgs e) { _activeAccount = (Account)e.Parameter; if (_activeAccount != null) { UserNameText.Text = _activeAccount.Username; } } private void Button_Restart_Click(object sender, RoutedEventArgs e) { } private void Button_Forget_User_Click(object sender, RoutedEventArgs e) { // Remove the account from Windows Hello // WindowsHelloHelper.RemoveWindowsHelloAccountAsync(_activeAccount); // Remove it from the local accounts list and re-save the updated list AccountHelper.RemoveAccount(_activeAccount); Debug.WriteLine($"User {_activeAccount.Username} deleted."); } } }Button_Forget_User_Clickイベント ハンドラーでコメント アウトされた行に気付いた可能性があります。 アカウントはローカル リストから削除されていますが、現在、Windows Helloから削除する方法はありません。 Windows Hello ユーザーの削除を処理する新しいメソッドをWindowsHelloHelper.csに実装する必要があります。 このメソッドでは、他のWindows Hello API を使用してアカウントを開いて削除します。 実際には、アカウントを削除すると、ユーザー データベースが有効なままになるようにサーバーまたはデータベースに通知する必要があります。WindowsHelloLogin.Models名前空間を参照する using ステートメントが必要です。using WindowsHelloLogin.Models; /// <summary> /// Function to be called when user requests deleting their account. /// Checks the KeyCredentialManager to see if there is a Windows Hello /// account for the current user. /// It then deletes the local key associated with the account. /// </summary> public static async void RemoveWindowsHelloAccountAsync(Account account) { // Open the account with Windows Hello KeyCredentialRetrievalResult keyOpenResult = await KeyCredentialManager.OpenAsync(account.Username); if (keyOpenResult.Status == KeyCredentialStatus.Success) { // In the real world you would send key information to server to unregister //for example, RemoveWindowsHelloAccountOnServer(account); } // Then delete the account from the machine's list of Windows Hello accounts await KeyCredentialManager.DeleteAsync(account.Username); }Welcome.xaml.csに戻り、 RemoveWindowsHelloAccountAsync を呼び出す行のコメントを解除します。
private void Button_Forget_User_Click(object sender, RoutedEventArgs e)
{
    // Remove it from Windows Hello
    WindowsHelloHelper.RemoveWindowsHelloAccountAsync(_activeAccount);

    // Remove it from the local accounts list and re-save the updated list
    AccountHelper.RemoveAccount(_activeAccount);

    Debug.WriteLine($"User {_activeAccount.Username} deleted.");
}
SignInWindowsHelloAsync メソッド (Login.xaml.cs) で、CreateWindowsHelloKeyAsync が成功したら、[ようこそ] ページに移動し、アカウントを渡す必要があります。
private async Task SignInWindowsHelloAsync()
{
    if (AccountHelper.ValidateAccountCredentials(UsernameTextBox.Text))
    {
        // Create and add a new local account
        _account = AccountHelper.AddAccount(UsernameTextBox.Text);
        Debug.WriteLine("Successfully signed in with traditional credentials and created local account instance!");

        if (await WindowsHelloHelper.CreateWindowsHelloKeyAsync(UsernameTextBox.Text))
        {
            Debug.WriteLine("Successfully signed in with Windows Hello!");
            Frame.Navigate(typeof(Welcome), _account);
        }
    }
    else
    {
        ErrorMessage.Text = "Invalid Credentials";
    }
}
アプリケーションをビルドして実行します。 "sampleUsername" でログインし、[ ログイン] をクリックします。 PIN を入力します。成功した場合は、[ ようこそ ] 画面に移動します。 Forget User をクリックして、Visual Studioの Output ウィンドウを監視して、ユーザーが削除されたかどうかを確認します。 ユーザーが削除されると、[ ようこそ ] ページに残ります。 アプリが移動できるユーザー選択ページを作成する必要があります。
Views フォルダーで、"UserSelection.xaml" という名前の新しい空白ページを作成し、次の XAML を追加してユーザー インターフェイスを定義します。 このページには、ローカル アカウントリスト内のすべてのユーザーを表示する ListView と、
Buttonページに移動してユーザーが別のアカウントを追加できるようにするが含まれます。<Grid> <StackPanel> <TextBlock x:Name="Title" Text="Select a User" FontSize="36" Margin="4" TextAlignment="Center" HorizontalAlignment="Center"/> <ListView x:Name="UserListView" Margin="4" MaxHeight="200" MinWidth="250" Width="250" HorizontalAlignment="Center"> <ListView.ItemTemplate> <DataTemplate> <Grid Background="DodgerBlue" Height="50" Width="250" HorizontalAlignment="Stretch" VerticalAlignment="Stretch"> <TextBlock Text="{Binding Username}" HorizontalAlignment="Center" TextAlignment="Center" VerticalAlignment="Center" Foreground="White"/> </Grid> </DataTemplate> </ListView.ItemTemplate> </ListView> <Button x:Name="AddUserButton" Content="+" FontSize="36" Width="60" Click="AddUserButton_Click" HorizontalAlignment="Center"/> </StackPanel> </Grid>UserSelection.xaml.csで、ローカル リストにアカウントがない場合に
Loadedページに移動する メソッドを実装します。 また、SelectionChangedのListViewイベントと、ClickのButtonイベントも実装します。using System.Diagnostics; using WindowsHelloLogin.Models; using WindowsHelloLogin.Utils; namespace WindowsHelloLogin.Views { public sealed partial class UserSelection : Page { public UserSelection() { InitializeComponent(); Loaded += UserSelection_Loaded; } private void UserSelection_Loaded(object sender, RoutedEventArgs e) { if (AccountHelper.AccountList.Count == 0) { // If there are no accounts, navigate to the Login page Frame.Navigate(typeof(Login)); } UserListView.ItemsSource = AccountHelper.AccountList; UserListView.SelectionChanged += UserSelectionChanged; } /// <summary> /// Function called when an account is selected in the list of accounts /// Navigates to the Login page and passes the chosen account /// </summary> private void UserSelectionChanged(object sender, RoutedEventArgs e) { if (((ListView)sender).SelectedValue != null) { Account account = (Account)((ListView)sender).SelectedValue; if (account != null) { Debug.WriteLine($"Account {account.Username} selected!"); } Frame.Navigate(typeof(Login), account); } } /// <summary> /// Function called when the "+" button is clicked to add a new user. /// Navigates to the Login page with nothing filled out /// </summary> private void AddUserButton_Click(object sender, RoutedEventArgs e) { Frame.Navigate(typeof(Login)); } } }アプリには、 UserSelection ページに移動する場所がいくつかあります。 MainPage.xaml.csでは、ログイン ページではなく UserSelection ページに移動する必要があります。 MainPage で読み込まれたイベントが発生している間は、UserSelection ページでアカウントがあるかどうかを確認できるように、アカウントの一覧を読み込む必要があります。 これには、
Loadedメソッドを非同期に変更し、WindowsHelloLogin.Utils名前空間の using ステートメントを追加する必要があります。using WindowsHelloLogin.Utils; private async void MainPage_Loaded(object sender, RoutedEventArgs e) { // Load the local account list before navigating to the UserSelection page await AccountHelper.LoadAccountListAsync(); Frame.Navigate(typeof(UserSelection)); }次に、アプリはウェルカム ページから UserSelection ページに移動する必要があります。 どちらの
Clickイベントでも、 UserSelection ページに戻る必要があります。private void Button_Restart_Click(object sender, RoutedEventArgs e) { Frame.Navigate(typeof(UserSelection)); } private void Button_Forget_User_Click(object sender, RoutedEventArgs e) { // Remove it from Windows Hello WindowsHelloHelper.RemoveWindowsHelloAccountAsync(_activeAccount); // Remove it from the local accounts list and re-save the updated list AccountHelper.RemoveAccount(_activeAccount); Debug.WriteLine($"User {_activeAccount.Username} deleted."); // Navigate back to UserSelection page. Frame.Navigate(typeof(UserSelection)); }[ ログイン ] ページで、[ UserSelection ] ページの一覧から選択したアカウントにログインするコードが必要です。
OnNavigatedToイベントで、ナビゲーション中に渡されたアカウントを格納します。 まず、アカウントが既存のアカウントであるかどうかを識別する新しいプライベート変数を追加します。 次に、OnNavigatedToイベントを処理します。namespace WindowsHelloLogin.Views { public sealed partial class Login : Page { private Account _account; private bool _isExistingAccount; public Login() { InitializeComponent(); } /// <summary> /// Function called when this frame is navigated to. /// Checks to see if Windows Hello is available and if an account was passed in. /// If an account was passed in set the "_isExistingAccount" flag to true and set the _account. /// </summary> protected override async void OnNavigatedTo(NavigationEventArgs e) { // Check Windows Hello is set up and available on this machine if (await WindowsHelloHelper.WindowsHelloAvailableCheckAsync()) { if (e.Parameter != null) { _isExistingAccount = true; // Set the account to the existing account being passed in _account = (Account)e.Parameter; UsernameTextBox.Text = _account.Username; await SignInWindowsHelloAsync(); } } else { // Windows Hello is not set up, so inform the user WindowsHelloStatus.Background = new SolidColorBrush(Windows.UI.Color.FromArgb(255, 50, 170, 207)); WindowsHelloStatusText.Text = $"Windows Hello is not set up!{Environment.NewLine}Please go to Windows Settings and set up a PIN to use it."; LoginButton.IsEnabled = false; } } } }選択したアカウントにサインインするには、 SignInWindowsHelloAsync メソッドを更新する必要があります。 WindowsHelloHelper には、アカウントにアカウント キーが既に作成されているため、Windows Helloでアカウントを開く別の方法が必要です。 Windows Helloを使用して既存のユーザーにサインインするには、WindowsHelloHelper.csに新しいメソッドを実装します。 コードの各部分の詳細については、コード のコメントを参照してください。
/// <summary>
/// Attempts to sign a message using the account key on the system for the accountId passed.
/// </summary>
/// <returns>Boolean representing if creating the Windows Hello authentication message succeeded</returns>
public static async Task<bool> GetWindowsHelloAuthenticationMessageAsync(Account account)
{
    KeyCredentialRetrievalResult openKeyResult = await KeyCredentialManager.OpenAsync(account.Username);
    // Calling OpenAsync will allow the user access to what is available in the app and will not require user credentials again.
    // If you wanted to force the user to sign in again you can use the following:
    // var consentResult = await Windows.Security.Credentials.UI.UserConsentVerifier.RequestVerificationAsync(account.Username);
    // This will ask for the either the password of the currently signed in Microsoft Account or the PIN used for Windows Hello.

    if (openKeyResult.Status == KeyCredentialStatus.Success)
    {
        // If OpenAsync has succeeded, the next thing to think about is whether the client application requires access to backend services.
        // If it does here you would request a challenge from the server. The client would sign this challenge and the server
        // would check the signed challenge. If it is correct, it would allow the user access to the backend.
        // You would likely make a new method called RequestSignAsync to handle all this.
        // For example, RequestSignAsync(openKeyResult);
        // Refer to the second Windows Hello sample for information on how to do this.

        // For this sample, there is not concept of a server implemented so just return true.
        return true;
    }
    else if (openKeyResult.Status == KeyCredentialStatus.NotFound)
    {
        // If the account is not found at this stage. It could be one of two errors.
        // 1. Windows Hello has been disabled
        // 2. Windows Hello has been disabled and re-enabled cause the Windows Hello Key to change.
        // Calling CreateWindowsHelloKeyAsync and passing through the account will attempt to replace the existing Windows Hello Key for that account.
        // If the error really is that Windows Hello is disabled then the CreateWindowsHelloKeyAsync method will output that error.
        if (await CreateWindowsHelloKeyAsync(account.Username))
        {
            // If the Hello Key was again successfully created, Windows Hello has just been reset.
            // Now that the Hello Key has been reset for the account retry sign in.
            return await GetWindowsHelloAuthenticationMessageAsync(account);
        }
    }

    // Can't use Windows Hello right now, try again later
    return false;
}
Login.xaml.cs の SignInWindowsHelloAsync メソッドを更新して、既存のアカウントを処理します。 これにより、WindowsHelloHelper.csの新しいメソッドが使用されます。 成功した場合、アカウントはサインインし、ユーザーは ウェルカム ページに移動します。
private async Task SignInWindowsHelloAsync()
{
    if (_isExistingAccount)
    {
        if (await WindowsHelloHelper.GetWindowsHelloAuthenticationMessageAsync(_account))
        {
            Frame.Navigate(typeof(Welcome), _account);
        }
    }
    else if (AccountHelper.ValidateAccountCredentials(UsernameTextBox.Text))
    {
        //Create and add a new local account
        _account = AccountHelper.AddAccount(UsernameTextBox.Text);
        Debug.WriteLine("Successfully signed in with traditional credentials and created local account instance!");

        if (await WindowsHelloHelper.CreateWindowsHelloKeyAsync(UsernameTextBox.Text))
        {
            Debug.WriteLine("Successfully signed in with Windows Hello!");
            Frame.Navigate(typeof(Welcome), _account);
        }
    }
    else
    {
        ErrorMessage.Text = "Invalid Credentials";
    }
}
アプリケーションをビルドして実行します。 "sampleUsername" でログインします。 PIN を入力すると、成功した場合は [ようこそ ] ページに移動します。 [戻る] をクリックしてユーザー一覧に戻ります。 これで、一覧にユーザーが表示されます。 これをクリックすると、WindowsHello を使用すると、パスワードなどを再入力しなくてもサインインし直します。

演習 3: 新しいWindows Hello ユーザーを登録する
この演習では、Windows Helloを使用して新しいアカウントを作成できる新しいページを作成します。 これは 、ログイン ページの動作と同様に機能します。 Login ページは、Windows Helloを使用するように移行している既存のユーザーに対して実装されます。 WindowsHelloRegister ページでは、新しいユーザーのWindows Hello登録が作成されます。
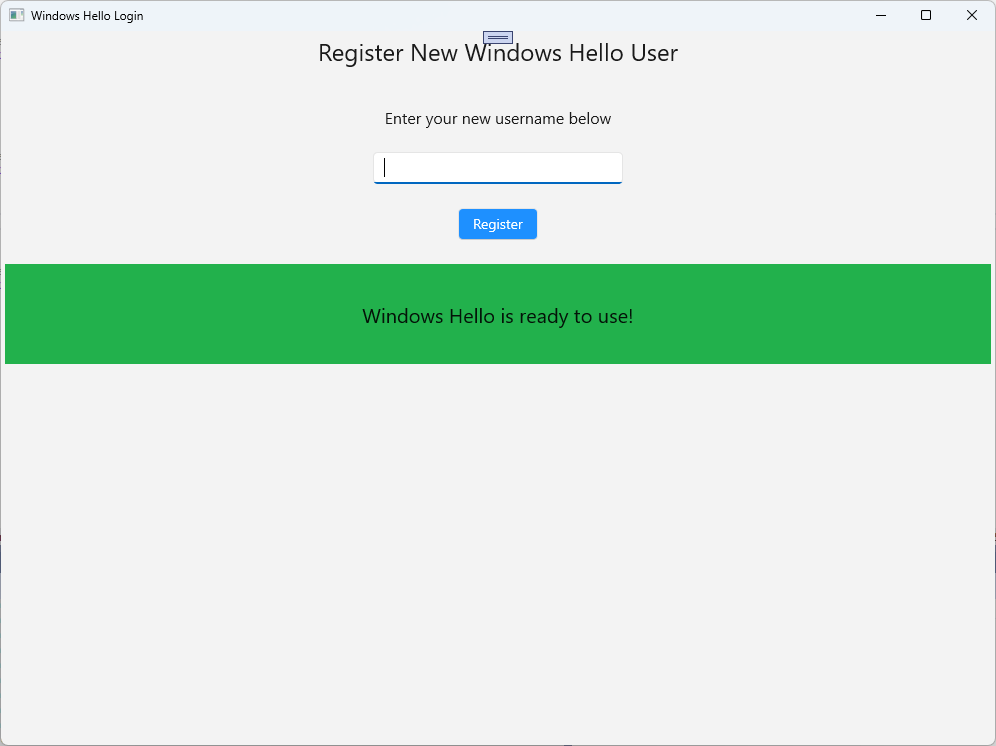
Views フォルダーに、"WindowsHelloRegister.xaml" という名前の新しい空白ページを作成します。 XAML で次のコードを追加して、ユーザー インターフェイスを設定します。 このページのインターフェイスは 、ログイン ページに似ています。
<Grid>
  <StackPanel>
    <TextBlock x:Name="Title" Text="Register New Windows Hello User" FontSize="24" Margin="4" TextAlignment="Center"/>

    <TextBlock x:Name="ErrorMessage" Text="" FontSize="20" Margin="4" Foreground="Red" TextAlignment="Center"/>

    <TextBlock Text="Enter your new username below" Margin="0,0,0,20"
               TextWrapping="Wrap" Width="300"
               TextAlignment="Center" VerticalAlignment="Center" FontSize="16"/>

    <TextBox x:Name="UsernameTextBox" Margin="4" Width="250"/>

    <Button x:Name="RegisterButton" Content="Register" Background="DodgerBlue" Foreground="White"
            Click="RegisterButton_Click_Async" Width="80" HorizontalAlignment="Center" Margin="0,20"/>

    <Border x:Name="WindowsHelloStatus" Background="#22B14C" Margin="4" Height="100">
      <TextBlock x:Name="WindowsHelloStatusText" Text="Windows Hello is ready to use!" FontSize="20"
                 Margin="4" TextAlignment="Center" VerticalAlignment="Center"/>
    </Border>
  </StackPanel>
</Grid>
WindowsHelloRegister.xaml.cs分離コード ファイルで、レジスタ ボタンのプライベート
Account変数とClickイベントを実装します。 これにより、新しいローカル アカウントが追加され、Windows Hello キーが作成されます。using Microsoft.UI.Xaml.Controls; using Microsoft.UI.Xaml; using WindowsHelloLogin.Models; using WindowsHelloLogin.Utils; namespace WindowsHelloLogin.Views { public sealed partial class WindowsHelloRegister : Page { private Account _account; public WindowsHelloRegister() { InitializeComponent(); } private async void RegisterButton_Click_Async(object sender, RoutedEventArgs e) { ErrorMessage.Text = ""; // In the real world, you would validate the entered credentials and information before // allowing a user to register a new account. // For this sample, we'll skip that step and just register an account if the username is not null. if (!string.IsNullOrEmpty(UsernameTextBox.Text)) { // Register a new account _account = AccountHelper.AddAccount(UsernameTextBox.Text); // Register new account with Windows Hello await WindowsHelloHelper.CreateWindowsHelloKeyAsync(_account.Username); // Navigate to the Welcome page. Frame.Navigate(typeof(Welcome), _account); } else { ErrorMessage.Text = "Please enter a username"; } } } }登録がクリックされたときに ログイン ページからこのページに移動する必要があります。
private void RegisterButtonTextBlock_OnPointerPressed(object sender, PointerRoutedEventArgs e)
{
    ErrorMessage.Text = "";
    Frame.Navigate(typeof(WindowsHelloRegister));
}
アプリケーションをビルドして実行します。 新しいユーザーの登録を試みます。 次に、ユーザーリストに戻り、そのユーザーとログインを選択できることを確認します。
このラボでは、新しいWindows Hello API を使用して既存のユーザーを認証し、新しいユーザーのアカウントを作成するために必要な重要なスキルについて学習しました。 この新しい知識により、ユーザーがアプリケーションのパスワードを覚える必要がなくなりますが、アプリケーションはユーザー認証によって保護されたままであることを確信できます。 Windows では、Windows Helloの新しい認証テクノロジを使用して、生体認証ログイン オプションをサポートしています。
関連トピック
GitHub で Microsoft と共同作業する
このコンテンツのソースは GitHub にあります。そこで、issue や pull request を作成および確認することもできます。 詳細については、共同作成者ガイドを参照してください。

Windows developer