![タスク バーの上にアプリ通知が表示されている画面キャプチャ。通知は、あるイベントのリマインダーです。アプリ名、イベント名、イベントの場所が示されています。選択項目の入力には、現在選択されている値 [Going] (参加する) が表示されています。[RSVP] (出欠確認) と [Dismiss] (閉じる) というラベルの付いた 2 つのボタンがあります。](../../../design/images/shell-1x.png)
このクイックスタートでは、Windows アプリ SDK を使って、ローカル アプリ通知 (トースト通知とも呼ばれます) を送受信するデスクトップ Windows アプリケーションを作成します。
重要
昇格された (管理者特権の) アプリの通知は、現在サポートされていません。
前提条件
サンプル アプリ
このクイックスタートでは、GitHub にある通知サンプル アプリのコードについて説明します。
API リファレンス
アプリ通知の API リファレンス ドキュメントについては、「Microsoft.Windows.AppNotifications 名前空間」を参照してください。
ステップ 1: 名前空間の宣言を追加する
Windows アプリ SDK アプリ通知 Microsoft.Windows.AppNotifications の名前空間を追加します。
using Microsoft.Windows.AppNotifications;
手順 2: アプリのマニフェストを更新する
アプリがパッケージ化されていない場合 (つまり、実行時にパッケージ ID がない場合) は、「手順 3: アプリ通知を処理できるように登録する」に進みます。
アプリがパッケージ化されている場合 (外部の場所でパッケージ化された場合を含む):
- Package.appxmanifest を開きます。
-
xmlns:com="http://schemas.microsoft.com/appx/manifest/com/windows10"およびxmlns:desktop="http://schemas.microsoft.com/appx/manifest/desktop/windows10"名前空間を<Package>に追加します -
<desktop:Extension>にwindows.toastNotificationActivationを追加して、COM アクティベーター CLSID を宣言します。 CLSID を取得するには、Visual Studio の [ツール] の [GUID の作成] に移動します。 - 同じ CLSID を使って COM アクティベーターの
<com:Extension>を追加します。-
Executable属性に .exe ファイルを指定します。 .exe ファイルは、通知用にアプリを登録するときにRegister()を呼び出すプロセスと同じである必要があります。詳細については、手順 3 で説明します。 次の例では、Executable="SampleApp\SampleApp.exe"を使います。 - Windows アプリ SDK が通知のペイロードを AppNotification の種類として確実に処理できるように、
Arguments="----AppNotificationActivated:"を指定します。 -
DisplayNameを指定します。
-
重要
警告: appx マニフェストで を使って <uap:Protocol> アプリ拡張機能の種類を定義した場合、アプリが既に実行されている場合でも、通知をクリックすると、同じアプリの新しいプロセスが起動します。
<!--Packaged apps only-->
<!--package.appxmanifest-->

<Package
  xmlns:com="http://schemas.microsoft.com/appx/manifest/com/windows10"
  xmlns:desktop="http://schemas.microsoft.com/appx/manifest/desktop/windows10"
  ...
  <Applications>
    <Application>
      ...
      <Extensions>

        <!--Specify which CLSID to activate when notification is clicked-->
        <desktop:Extension Category="windows.toastNotificationActivation">
          <desktop:ToastNotificationActivation ToastActivatorCLSID="replaced-with-your-guid-C173E6ADF0C3" />
        </desktop:Extension>

        <!--Register COM CLSID-->
        <com:Extension Category="windows.comServer">
          <com:ComServer>
            <com:ExeServer Executable="SampleApp\SampleApp.exe" DisplayName="SampleApp" Arguments="----AppNotificationActivated:">
              <com:Class Id="replaced-with-your-guid-C173E6ADF0C3" />
            </com:ExeServer>
          </com:ComServer>
        </com:Extension>

      </Extensions>
    </Application>
  </Applications>
 </Package>
手順 3: アプリ通知を処理できるように登録する
通知を処理できるようにアプリを登録し、アプリが終了したら登録を解除します。
App.xaml ファイルで、AppNotificationManager::Default().NotificationInvoked を登録してから、AppNotificationManager::Default().Register を呼び出します。 これらの呼び出し順が重要です。
重要
AppInstance.GetCurrent.GetActivatedEventArgs を呼び出す前に、AppNotificationManager::Default().Register を呼び出す必要があります。
アプリが終了したら、AppNotificationManager::Default().Unregister() を呼び出して COM サーバーを解放し、後続の呼び出しで新しいプロセスを起動できるようにします。
// App.xaml.cs
namespace CsUnpackagedAppNotifications
{

    public partial class App : Application
    {
        private Window mainWindow;
        private NotificationManager notificationManager;

        public App()
        {
            this.InitializeComponent();
            notificationManager = new NotificationManager();
            AppDomain.CurrentDomain.ProcessExit += new EventHandler(OnProcessExit);
        }

        protected override void OnLaunched(LaunchActivatedEventArgs args)
        {
            mainWindow = new MainWindow();

            notificationManager.Init();

            // Complete in Step 5

            mainWindow.Activate();
        }

        void OnProcessExit(object sender, EventArgs e)
        {
            notificationManager.Unregister();
        }
    }
}


// NotificationManager.cs
namespace CsUnpackagedAppNotifications
{
    internal class NotificationManager
    {
        private bool m_isRegistered;

        private Dictionary<int, Action<AppNotificationActivatedEventArgs>> c_map;

        public NotificationManager()
        {
            m_isRegistered = false;

            // When adding new a scenario, be sure to add its notification handler here.
            c_map = new Dictionary<int, Action<AppNotificationActivatedEventArgs>>();
            c_map.Add(ToastWithAvatar.ScenarioId, ToastWithAvatar.NotificationReceived);
            c_map.Add(ToastWithTextBox.ScenarioId, ToastWithTextBox.NotificationReceived);
        }

        ~NotificationManager()
        {
            Unregister();
        }

        public void Init()
        {
            // To ensure all Notification handling happens in this process instance, register for
            // NotificationInvoked before calling Register(). Without this a new process will
            // be launched to handle the notification.
            AppNotificationManager notificationManager = AppNotificationManager.Default;

            notificationManager.NotificationInvoked += OnNotificationInvoked;

            notificationManager.Register();
            m_isRegistered = true;
        }

        public void Unregister()
        {
            if (m_isRegistered)
            {
                AppNotificationManager.Default.Unregister();
                m_isRegistered = false;
            }
        }

        public void ProcessLaunchActivationArgs(AppNotificationActivatedEventArgs notificationActivatedEventArgs)
        {
            // Complete in Step 5
        }

    }
}
手順 4: アプリ通知を表示する
次に進む前に、「手順 3: アプリ通知を処理できるように登録する」を完了する必要があります。
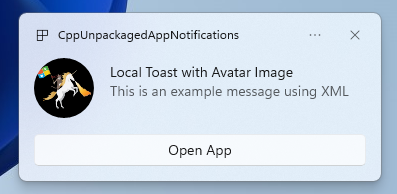
これで、appLogoOverride の画像とボタンを含む単純なアプリ通知が表示されます。
AppNotificationBuilder クラスを使ってアプリ通知を構築し、Show を呼び出します。 XML を使ってアプリ通知を構築する方法の詳細については、トーストのコンテンツと通知の XML スキーマのページの例を参照してください。
注
アプリがパッケージ化されている場合 (外部の場所でパッケージ化された場合を含む)、通知の左上隅にあるアプリ アイコンは package.manifest から取得されます。 アプリがパッケージ化されていない場合、最初にショートカットを調べ、次にアプリ プロセス内のリソース ファイルを調べてアイコンが取得されます。 すべての試行が失敗した場合は、Windows の既定のアプリ アイコンが使われます。 サポートされているアイコン ファイルの種類は、.jpg、.png、.bmp、.ico です。
// ToastWithAvatar.cs
class ToastWithAvatar
{
    public const int ScenarioId = 1;
    public const string ScenarioName = "Local Toast with Avatar Image";

    public static bool SendToast()
    {
        var appNotification = new AppNotificationBuilder()
            .AddArgument("action", "ToastClick")
            .AddArgument(Common.scenarioTag, ScenarioId.ToString())
            .SetAppLogoOverride(new System.Uri("file://" + App.GetFullPathToAsset("Square150x150Logo.png")), AppNotificationImageCrop.Circle)
            .AddText(ScenarioName)
            .AddText("This is an example message using XML")
            .AddButton(new AppNotificationButton("Open App")
                .AddArgument("action", "OpenApp")
                .AddArgument(Common.scenarioTag, ScenarioId.ToString()))
            .BuildNotification();

        AppNotificationManager.Default.Show(appNotification);

        return appNotification.Id != 0; // return true (indicating success) if the toast was sent (if it has an Id)
    }

    public static void NotificationReceived(AppNotificationActivatedEventArgs notificationActivatedEventArgs)
    {
        // Complete in Step 5
    }
}

// Call SendToast() to send a notification.
手順 5: 通知を選ぶユーザーを処理する
ユーザーは通知の本文またはボタンを選択できます。 ユーザーによる通知の操作に応じて、アプリは呼び出しを処理する必要があります。
これを処理するには 2 つの一般的な方法があります。
- アプリを特定の UI コンテキストで起動することを選ぶか、
- UI をレンダリングせずに、アクション固有の動作 (通知本文のボタンを押すなど) をアプリで評価することを選びます。 バックグラウンド アクションとも呼ばれます。
次のコード例 (サンプル アプリのものではありません) は、ユーザー生成アクションを処理する両方の方法を示しています。
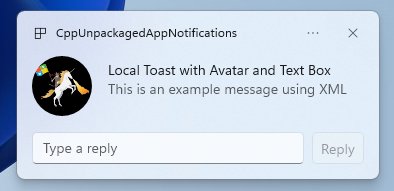
launch 値 (ユーザーによる通知本文のクリックに対応します)、input 要素 (クイック返信テキスト ボックス)、arguments 値のボタン (ユーザーによるボタンのクリックに対応します) を通知の XML ペイロードに追加します。
ProcessLaunchActivationArgs では、各引数の大文字と小文字が区別されます。
重要
デスクトップ アプリの場合、通知 XML ペイロード内の activationType="background" の設定は無視されます。 この手順で説明したように、代わりにアクティブ化引数を処理し、ウィンドウを表示するかどうかを決定する必要があります。
// Example of how to process a user either selecting the notification body or inputting a quick reply in the text box.
// Notification XML payload
//<toast launch="action=openThread&threadId=92187">
// <visual>
// <binding template="ToastGeneric">
// <image placement="appLogoOverride" hint-crop="circle" src="C:\<fullpath>\Logo.png"/>
// <text>Local Toast with Avatar and Text box</text>
// <text>This is an example message using</text>
// </binding>
// </visual>
// <actions>
// <input id="replyBox" type="text" placeHolderContent="Reply" />
// <action
// content="Send"
// hint-inputId="replyBox"
// arguments="action=reply&threadId=92187" />
// </actions>
//</toast>
void ProcessLaunchActivationArgs(const winrt::AppNotificationActivatedEventArgs& notificationActivatedEventArgs)
{
// If the user clicks on the notification body, your app needs to launch the chat thread window
if (std::wstring(notificationActivatedEventArgs.Argument().c_str()).find(L"openThread") != std::wstring::npos)
{
GenerateChatThreadWindow();
}
else // If the user responds to a message by clicking a button in the notification, your app needs to reply back to the other user with no window launched
if (std::wstring(notificationActivatedEventArgs.Argument().c_str()).find(L"reply") != std::wstring::npos)
{
auto input = notificationActivatedEventArgs.UserInput();
auto replyBoxText = input.Lookup(L"replyBox");
// Process the reply text
SendReplyToUser(replyBoxText);
}
}
以下のガイドラインに従ってください。
- ユーザーが通知を選び、アプリが実行されていない場合、アプリが起動し、通知のコンテキストでフォアグラウンド ウィンドウがユーザーに表示されることが想定されます。
- ユーザーが通知を選び、アプリが最小化されている場合、アプリはフォアグラウンドに移動され、通知のコンテキストで新しいウィンドウがレンダリングされることが想定されます。
- 通知のバックグラウンド アクションがユーザーによって呼び出された場合 (たとえば、ユーザーが通知テキスト ボックスに入力し、返信を押して通知に応答した場合)、アプリはフォアグラウンド ウィンドウをレンダリングせずにペイロードを処理します。
より詳細な例については、GitHub にあるサンプル アプリ コードを参照してください。
手順 6: 通知を削除する
ユーザーにとって不要になった通知を削除します。
この例では、ユーザーはアプリ内のグループ チャットからのメッセージをすべて閲覧したため、グループ チャットからの通知をすべてクリアします。 次に、ユーザーは友達をミュートしたので、その友達からの通知をすべてクリアします。 まず [グループ] と [タグ] のプロパティを通知に追加しておいてから表示すると、特定できるようになります。
void SendNotification(winrt::hstring const& payload, winrt::hstring const& friendId, winrt::hstring const& groupChatId)
{
    winrt::AppNotification notification(payload);

    // Setting Group Id here allows clearing notifications from a specific chat group later
    notification.Group(groupChatId);

    // Setting Tag Id here allows clearing notifications from a specific friend later
    notification.Tag(friendId);

    winrt::AppNotificationManager::Default().Show(notification);
}

winrt::Windows::Foundation::IAsyncAction RemoveAllNotificationsFromGroupChat(const std::wstring groupChatId)
{
    winrt::AppNotificationManager manager = winrt::AppNotificationManager::Default();
    co_await manager.RemoveByGroupAsync(groupChatId);
}

winrt::Windows::Foundation::IAsyncAction RemoveAllNotificationsFromFriend(const std::wstring friendId)
{
    winrt::AppNotificationManager manager = winrt::AppNotificationManager::Default();
    co_await manager.RemoveByTagAsync(friendId);
}
追加機能
クラウドソースのアプリ通知を送信する
クラウドからアプリ通知を送信するには、「クイックスタート: Windows App SDK のプッシュ通知」の「クラウドソースのアプリ通知を送信する」に従ってください。
有効時間の設定
通知内のメッセージが一定期間のみ関連する場合は、Expiration プロパティを使ってアプリ通知の有効期限を設定します。 たとえば、カレンダー イベントのリマインダーを送信する場合は、有効期限をカレンダー イベントの終了時に設定します。
注
既定値であり、最大の有効期限は 3 日です。
class ToastWithAvatar
{
    public static bool SendToast()
    {

        var appNotification = new AppNotificationBuilder()
            .SetAppLogoOverride(new System.Uri("ms-appx:///images/logo.png"), AppNotificationImageCrop.Circle)
            .AddText("Example expiring notification")
            .AddText("This is an example message")
            .BuildNotification();


        appNotification.Expiration = DateTime.Now.AddDays(1);
        AppNotificationManager.Default.Show(appNotification);

        return appNotification.Id != 0; // return true (indicating success) if the toast was sent (if it has an Id)
    }
}
再起動時に通知が期限切れになるようにする
再起動時に通知を削除する場合は、ExpiresOnReboot プロパティを True に設定します。
class ToastWithAvatar
{
    public static bool SendToast()
    {

        var appNotification = new AppNotificationBuilder()
            .SetAppLogoOverride(new System.Uri("ms-appx:///images/logo.png"), AppNotificationImageCrop.Circle)
            .AddText("Example ExpiresOnReboot notification")
            .AddText("This is an example message")
            .BuildNotification();


            appNotification.ExpiresOnReboot = true;
            AppNotificationManager.Default.Show(appNotification);

            return appNotification.Id != 0; // return true (indicating success) if the toast was sent (if it has an Id)
    }
}
進行状況バー通知の送信と更新
進行状況バーに関連する更新を通知に表示できます。
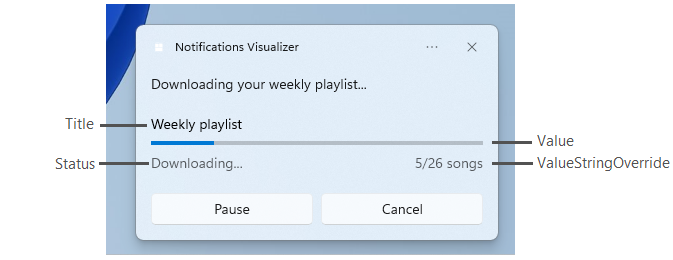
AppNotificationProgressData コンストラクトを使って、進行状況バーの通知を更新します。
const winrt::hstring c_tag = L"weekly-playlist";
const winrt::hstring c_group = L"downloads";

// Send first Notification Progress Update
void SendUpdatableNotificationWithProgress()
{
    auto notification{ winrt::AppNotificationBuilder()
            .AddText(L"Downloading this week's new music...")
            .AddProgressBar(winrt::AppNotificationProgressBar()
                .BindTitle()
                .BindValue()
                .BindValueStringOverride()
                .BindStatus())
            .BuildNotification() }

    notification.Tag(c_tag);
    notification.Group(c_group);

    // Assign initial values for first notification progress UI
    winrt::AppNotificationProgressData data(1); // Sequence number
    data.Title(L"Weekly playlist"); // Binds to {progressTitle} in xml payload
    data.Value(0.6); // Binds to {progressValue} in xml payload
    data.ValueStringOverride(L"15/26 songs"); // Binds to {progressValueString} in xml payload
    data.Status(L"Downloading..."); // Binds to {progressStatus} in xml payload

    notification.Progress(data);
    winrt::AppNotificationManager::Default().Show(notification);
}

// Send subsequent progress updates
winrt::Windows::Foundation::IAsyncAction UpdateProgressAsync()
{
    // Assign new values
    winrt::AppNotificationProgressData data(2 /* Sequence number */ );
    data.Title(L"Weekly playlist"); // Binds to {progressTitle} in xml payload
    data.Value(0.7); // Binds to {progressValue} in xml payload
    data.ValueStringOverride(L"18/26 songs"); // Binds to {progressValueString} in xml payload
    data.Status(L"Downloading..."); // Binds to {progressStatus} in xml payload

    auto result = co_await winrt::AppNotificationManager::Default().UpdateAsync(data, c_tag, c_group);
    if (result == winrt::AppNotificationProgressResult::AppNotificationNotFound)
    {
        // Progress Update failed since the previous notification update was dismissed by the user! So account for this in your logic by stopping updates or starting a new Progress Update flow.
    }
}
リソース
GitHub で Microsoft と共同作業する
このコンテンツのソースは GitHub にあります。そこで、issue や pull request を作成および確認することもできます。 詳細については、共同作成者ガイドを参照してください。

Windows developer