Note
Lives タイルは、新しいバージョンの Windows ではサポートされていない Windows 10 の機能です。 新しいアプリの場合は、 App アイコンの現在のガイダンスに従うことをお勧めします。
アダプティブ タイル テンプレートは Windows 10 の新機能であり、さまざまな画面密度に適応するシンプルで柔軟なマークアップ言語を使用して、独自のタイル通知コンテンツを設計できます。 この記事では、Windows アプリのアダプティブ ライブ タイルを作成する方法について説明します。 アダプティブ要素と属性の完全な一覧については、 Adaptive タイル スキーマを参照してください。
(必要に応じて、 のプリセット テンプレートを引き続き使用できますWindows 8 タイル テンプレート カタログ Windows 10 の通知を設計する場合)。
作業の開始
Notifications ライブラリをインストールします。 XML の代わりに C# を使用して通知を生成する場合は、 Microsoft.Toolkit.Uwp.Notifications という名前の NuGet パッケージをインストールします ("notifications uwp" を検索します)。 この記事で提供される C# サンプルでは、NuGet パッケージのバージョン 1.0.0 を使用します。
Notifications Visualizer をインストールします。 この無料の Windows アプリは、Visual Studio の XAML エディターまたはデザイン ビューと同様、タイルの編集時に視覚的なプレビューが即座に表示されるため、アダプティブ ライブ タイルのデザインに便利です。 詳細については、「通知ビジュアライザー」を参照するか、ストアから Notifications Visualizer をダウンロードしてください。
タイル通知を送信する方法
ローカル タイル通知の送信に関する 確認を参照してください。 次のドキュメントでは、アダプティブ タイルに関するすべてのビジュアル UI の可能性について説明します。
使い方のガイダンス
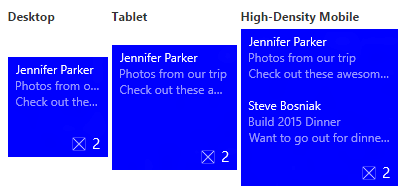
アダプティブ テンプレートは、さまざまなフォーム ファクターと通知の種類で機能するように設計されています。 グループやサブグループなどの要素はコンテンツをリンクし、特定の視覚的な動作を意味しません。 通知の最終的な外観は、電話、タブレット、デスクトップ、または別のデバイスのどちらであるかに関係なく、表示される特定のデバイスに基づく必要があります。
ヒントは、特定の視覚的な動作を実現するために要素に追加できる省略可能な属性です。 ヒントは、デバイス固有でも通知固有でもかまいません。
基本的な例
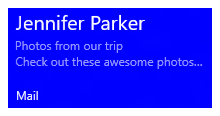
この例では、アダプティブ タイル テンプレートで生成できる内容を示します。
<tile>
  <visual>

    <binding template="TileMedium">
      ...
    </binding>

    <binding template="TileWide">
      <text hint-style="subtitle">Jennifer Parker</text>
      <text hint-style="captionSubtle">Photos from our trip</text>
      <text hint-style="captionSubtle">Check out these awesome photos I took while in New Zealand!</text>
    </binding>

    <binding template="TileLarge">
      ...
    </binding>

  </visual>
</tile>
TileContent content = new TileContent()
{
    Visual = new TileVisual()
    {
        TileMedium = ...

        TileWide = new TileBinding()
        {
            Content = new TileBindingContentAdaptive()
            {
                Children =
                {
                    new AdaptiveText()
                    {
                        Text = "Jennifer Parker",
                        HintStyle = AdaptiveTextStyle.Subtitle
                    },

                    new AdaptiveText()
                    {
                        Text = "Photos from our trip",
                        HintStyle = AdaptiveTextStyle.CaptionSubtle
                    },

                    new AdaptiveText()
                    {
                        Text = "Check out these awesome photos I took while in New Zealand!",
                        HintStyle = AdaptiveTextStyle.CaptionSubtle
                    }
                }
            }
        },

        TileLarge = ...
    }
};
結果:
タイルのサイズ
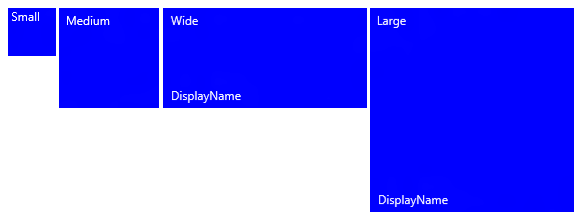
各タイル サイズのコンテンツは、XML ペイロード内の個別の TileBinding 要素で個別に指定されます。 テンプレート属性を次のいずれかの値に設定して、ターゲット サイズを選択します。
TileSmallTileMediumTileWideTileLarge
1 つのタイル通知 XML ペイロードの場合は、次の例に示すように、サポートするタイル サイズごとに <binding> 要素を指定します。
<tile>
  <visual>

    <binding template="TileSmall">
      <text>Small</text>
    </binding>

    <binding template="TileMedium">
      <text>Medium</text>
    </binding>

    <binding template="TileWide">
      <text>Wide</text>
    </binding>

    <binding template="TileLarge">
      <text>Large</text>
    </binding>

  </visual>
</tile>
TileContent content = new TileContent()
{
    Visual = new TileVisual()
    {
        TileSmall = new TileBinding()
        {
            Content = new TileBindingContentAdaptive()
            {
                Children =
                {
                    new AdaptiveText() { Text = "Small" }
                }
            }
        },

        TileMedium = new TileBinding()
        {
            Content = new TileBindingContentAdaptive()
            {
                Children =
                {
                    new AdaptiveText() { Text = "Medium" }
                }
            }
        },

        TileWide = new TileBinding()
        {
            Content = new TileBindingContentAdaptive()
            {
                Children =
                {
                    new AdaptiveText() { Text = "Wide" }
                }
            }
        },

        TileLarge = new TileBinding()
        {
            Content = new TileBindingContentAdaptive()
            {
                Children =
                {
                    new AdaptiveText() { Text = "Large" }
                }
            }
        }
    }
};
結果:
ブランド化
通知ペイロードのブランド化属性を使用して、ライブ タイルの下部 (表示名とコーナー ロゴ) のブランド化を制御できます。 none、nameのみ、logoのみ、または両方をnameAndLogoと共に表示することを選択できます。
<visual branding="logo">
  ...
</visual>
new TileVisual()
{
    Branding = TileBranding.Logo,
    ...
}
結果:

特定のタイル サイズに対してブランド化を適用するには、次の 2 つの方法のいずれかを使用します。
- TileBinding 要素に属性を適用します。
- 通知ペイロード全体に影響する TileVisual 要素に属性を適用します。
バインディングのブランド化を指定しない場合は、ビジュアル要素で提供されるブランド化が使用されます。
<tile>
  <visual branding="nameAndLogo">

    <binding template="TileMedium" branding="logo">
      ...
    </binding>

    <!--Inherits branding from visual-->
    <binding template="TileWide">
      ...
    </binding>

  </visual>
</tile>
TileContent content = new TileContent()
{
    Visual = new TileVisual()
    {
        Branding = TileBranding.NameAndLogo,

        TileMedium = new TileBinding()
        {
            Branding = TileBranding.Logo,
            ...
        },

        // Inherits branding from Visual
        TileWide = new TileBinding()
        {
            ...
        }
    }
};
既定のブランド化の結果:
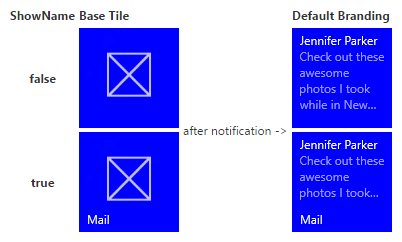
通知ペイロードでブランドを指定しない場合、基本タイルのプロパティによってブランドが決定されます。 基本タイルに表示名が表示されている場合、ブランドは既定で nameされます。 それ以外の場合、表示名が表示されない場合、ブランドは既定で none されます。
注 これは、既定のブランディングが "logo" であった Windows 8.x からの変更点です。
## 表示名
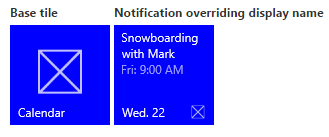
displayName属性を使用して任意のテキスト文字列を入力することで、通知の表示名をオーバーライドできます。 ブランド化と同様に、通知ペイロード全体に影響する TileVisual 要素、または個々のタイルにのみ影響する TileBinding 要素でこれを指定できます。
<tile>
  <visual branding="nameAndLogo" displayName="Wednesday 22">

    <binding template="TileMedium" displayName="Wed. 22">
      ...
    </binding>

    <!--Inherits displayName from visual-->
    <binding template="TileWide">
      ...
    </binding>

  </visual>
</tile>
TileContent content = new TileContent()
{
    Visual = new TileVisual()
    {
        Branding = TileBranding.NameAndLogo,
        DisplayName = "Wednesday 22",

        TileMedium = new TileBinding()
        {
            DisplayName = "Wed. 22",
            ...
        },

        // Inherits DisplayName from Visual
        TileWide = new TileBinding()
        {
            ...
        }
    }
};
結果:
Text
AdaptiveText要素は、テキストを表示するために使用されます。 ヒントを使用して、テキストの表示方法を変更できます。
<text>This is a line of text</text>
new AdaptiveText()
{
    Text = "This is a line of text"
};
結果:
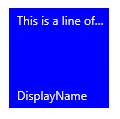
テキストの折り返し
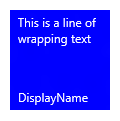
既定では、テキストは折り返されないため、タイルの端から引き続き表示されます。 hint-wrap属性を使用して、テキスト要素にテキストの折り返しを設定します。 hint-minLinesとhint-maxLinesを使用して行の最小数と最大数を制御することもできます。どちらも正の整数を受け入れます。
<text hint-wrap="true">This is a line of wrapping text</text>
new AdaptiveText()
{
    Text = "This is a line of wrapping text",
    HintWrap = true
};
結果:
テキスト スタイル
スタイルは、テキスト要素のフォント サイズ、色、および太さを制御します。 不透明度を 60% に設定する各スタイルの "微妙な" バリエーションなど、さまざまなスタイルがあり、通常はテキストの色が淡い灰色になります。
<text hint-style="base">Header content</text>
<text hint-style="captionSubtle">Subheader content</text>
new AdaptiveText()
{
    Text = "Header content",
    HintStyle = AdaptiveTextStyle.Base
},

new AdaptiveText()
{
    Text = "Subheader content",
    HintStyle = AdaptiveTextStyle.CaptionSubtle
}
結果:
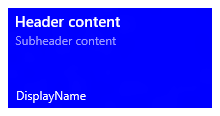
注 hint-style を指定しない場合、スタイルは既定で caption に設定されます。
基本的なテキスト スタイル
| <text hint-style="*" /> | フォントの高さ | フォントの太さ |
|---|---|---|
| caption | 12 有効ピクセル (epx) | Regular |
| body | 15 epx | Regular |
| base | 15 epx | 中太字 |
| 字幕 | 20 epx | Regular |
| タイトル | 24 epx | Semilight |
| サブヘッダー | 34 epx | "ライト" |
| ヘッダー | 46 epx | "ライト" |
数字のテキスト スタイルのバリエーション
これらのバリエーションにより、行の高さが減り、上下のコンテンツがテキストに大幅に近づくようになります。
- titleNumeral
- subheaderNumeral
- headerNumeral
テキスト スタイルの微妙なバリエーション
各スタイルには、テキストに 60% の不透明度を与える微妙なバリエーションがあり、通常はテキストの色が淡い灰色の網掛けになります。
- captionSubtle
- bodySubtle
- baseSubtle
- subtitleSubtle
- titleSubtle
- titleNumeralSubtle
- subheaderSubtle
- subheaderNumeralSubtle
- headerSubtle
- headerNumeralSubtle
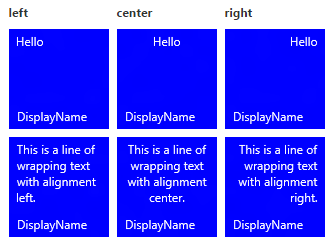
テキスト配置
テキストは、左、中央、または右に水平方向に配置できます。 英語などの左から右の言語では、テキストは既定で左揃えになります。 アラビア語などの右から左の言語では、テキストは既定で右揃えになります。 要素の hint-align 属性を使用して、手動で配置を設定できます。
<text hint-align="center">Hello</text>
new AdaptiveText()
{
    Text = "Hello",
    HintAlign = AdaptiveTextAlign.Center
};
結果:
グループとサブグループ
グループを使用すると、グループ内のコンテンツが関連しており、コンテンツ全体を表示して意味を理解できるようにする必要があることを意味的に宣言できます。 たとえば、ヘッダーと小見出しの 2 つのテキスト要素があり、ヘッダーのみを表示しても意味がありません。 サブグループ内でこれらの要素をグループ化することで、要素はすべて表示されるか (収まる可能性がある場合)、またはまったく表示されません (適合できないため)。
デバイスと画面全体で最適なエクスペリエンスを提供するには、複数のグループを提供します。 複数のグループを使用すると、タイルを大きな画面に適応できます。
注 グループの有効な子は、サブグループのみです。
<binding template="TileWide" branding="nameAndLogo">
  <group>
    <subgroup>
      <text hint-style="subtitle">Jennifer Parker</text>
      <text hint-style="captionSubtle">Photos from our trip</text>
      <text hint-style="captionSubtle">Check out these awesome photos I took while in New Zealand!</text>
    </subgroup>
  </group>

  <text />

  <group>
    <subgroup>
      <text hint-style="subtitle">Steve Bosniak</text>
      <text hint-style="captionSubtle">Build 2015 Dinner</text>
      <text hint-style="captionSubtle">Want to go out for dinner after Build tonight?</text>
    </subgroup>
  </group>
</binding>
TileWide = new TileBinding()
{
    Branding = TileBranding.NameAndLogo,
    Content = new TileBindingContentAdaptive()
    {
        Children =
        {
            CreateGroup(
                from: "Jennifer Parker",
                subject: "Photos from our trip",
                body: "Check out these awesome photos I took while in New Zealand!"),

            // For spacing
            new AdaptiveText(),

            CreateGroup(
                from: "Steve Bosniak",
                subject: "Build 2015 Dinner",
                body: "Want to go out for dinner after Build tonight?")
        }
    }
}

...

private static AdaptiveGroup CreateGroup(string from, string subject, string body)
{
    return new AdaptiveGroup()
    {
        Children =
        {
            new AdaptiveSubgroup()
            {
                Children =
                {
                    new AdaptiveText()
                    {
                        Text = from,
                        HintStyle = AdaptiveTextStyle.Subtitle
                    },
                    new AdaptiveText()
                    {
                        Text = subject,
                        HintStyle = AdaptiveTextStyle.CaptionSubtle
                    },
                    new AdaptiveText()
                    {
                        Text = body,
                        HintStyle = AdaptiveTextStyle.CaptionSubtle
                    }
                }
            }
        }
    };
}
結果:
サブグループ (列)
サブグループを使用すると、データをグループ内のセマンティック セクションに分割することもできます。 ライブ タイルの場合、これは視覚的に列に変換されます。
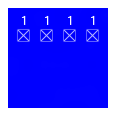
hint-weight属性を使用すると、列の幅を制御できます。 hint-weightの値は、使用可能なスペースの加重比率として表されます。これは、GridUnitType.Starの動作と同じです。 等幅列の場合は、各重みを 1 に割り当てます。
| hint-weight | 幅の割合 |
| 1 | 25% |
| 1 | 25% |
| 1 | 25% |
| 1 | 25% |
| 合計重量: 4 |
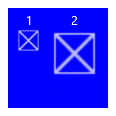
1 つの列を別の列の 2 倍の大きさにするには、小さい列に 1 の重みを割り当て、大きい列に重み 2 を割り当てます。
| hint-weight | 幅の割合 |
| 1 | 33.3% |
| 2 | 66.7% |
| 合計重量: 3 |
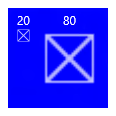
最初の列が全幅の 20% を占め、2 番目の列が全幅の 80% を占める場合は、最初の重みを 20 に、2 番目の重みを 80 に割り当てます。 合計の重みが 100 の場合は、パーセンテージとして機能します。
| hint-weight | 幅の割合 |
| 20 | 20% |
| 80 | 80% |
| 総重量: 100 |
注 8 ピクセルの余白が列の間に自動的に追加されます。
サブグループが 2 つ以上ある場合は、正の整数のみを受け入れる hint-weightを指定する必要があります。 最初のサブグループに hint-weight を指定しない場合は、重み 50 が割り当てられます。 指定した hint-weight を持たない次のサブグループには、100 から前の重みの合計を引いた重みが割り当てられます。結果が 0 の場合は 1 に割り当てられます。 ヒントの重みを指定していない残りのサブグループには、重み 1 が割り当てられます。
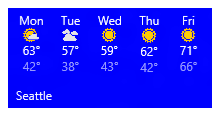
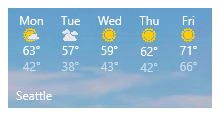
次に示すのは、同じ幅の 5 列のタイルを実現する方法を示す天気タイルのサンプル コードです。
<binding template="TileWide" displayName="Seattle" branding="name">
  <group>
    <subgroup hint-weight="1">
      <text hint-align="center">Mon</text>
      <image src="Assets\Weather\Mostly Cloudy.png" hint-removeMargin="true"/>
      <text hint-align="center">63°</text>
      <text hint-align="center" hint-style="captionsubtle">42°</text>
    </subgroup>
    <subgroup hint-weight="1">
      <text hint-align="center">Tue</text>
      <image src="Assets\Weather\Cloudy.png" hint-removeMargin="true"/>
      <text hint-align="center">57°</text>
      <text hint-align="center" hint-style="captionsubtle">38°</text>
    </subgroup>
    <subgroup hint-weight="1">
      <text hint-align="center">Wed</text>
      <image src="Assets\Weather\Sunny.png" hint-removeMargin="true"/>
      <text hint-align="center">59°</text>
      <text hint-align="center" hint-style="captionsubtle">43°</text>
    </subgroup>
    <subgroup hint-weight="1">
      <text hint-align="center">Thu</text>
      <image src="Assets\Weather\Sunny.png" hint-removeMargin="true"/>
      <text hint-align="center">62°</text>
      <text hint-align="center" hint-style="captionsubtle">42°</text>
    </subgroup>
    <subgroup hint-weight="1">
      <text hint-align="center">Fri</text>
      <image src="Assets\Weather\Sunny.png" hint-removeMargin="true"/>
      <text hint-align="center">71°</text>
      <text hint-align="center" hint-style="captionsubtle">66°</text>
    </subgroup>
  </group>
</binding>
TileWide = new TileBinding()
{
    DisplayName = "Seattle",
    Branding = TileBranding.Name,
    Content = new TileBindingContentAdaptive()
    {
        Children =
        {
            new AdaptiveGroup()
            {
                Children =
                {
                    CreateSubgroup("Mon", "Mostly Cloudy.png", "63°", "42°"),
                    CreateSubgroup("Tue", "Cloudy.png", "57°", "38°"),
                    CreateSubgroup("Wed", "Sunny.png", "59°", "43°"),
                    CreateSubgroup("Thu", "Sunny.png", "62°", "42°"),
                    CreateSubgroup("Fri", "Sunny.png", "71°", "66°")
                }
            }
        }
    }
}

...

private static AdaptiveSubgroup CreateSubgroup(string day, string image, string highTemp, string lowTemp)
{
    return new AdaptiveSubgroup()
    {
        HintWeight = 1,
        Children =
        {
            new AdaptiveText()
            {
                Text = day,
                HintAlign = AdaptiveTextAlign.Center
            },
            new AdaptiveImage()
            {
                Source = "Assets/Weather/" + image,
                HintRemoveMargin = true
            },
            new AdaptiveText()
            {
                Text = highTemp,
                HintAlign = AdaptiveTextAlign.Center
            },
            new AdaptiveText()
            {
                Text = lowTemp,
                HintAlign = AdaptiveTextAlign.Center,
                HintStyle = AdaptiveTextStyle.CaptionSubtle
            }
        }
    };
}
結果:
画像
<image>要素は、タイル通知に画像を表示するために使用されます。 画像は、タイル コンテンツ (既定) 内にインラインで配置することも、コンテンツの背後にある背景画像として、または通知の上部からアニメーション化するピーク 画像として配置することもできます。
Note
イメージは、アプリのパッケージ、アプリのローカル ストレージ、または Web から使用できます。 Fall Creators Update の時点で、Web 画像の上限は通常の接続で 3 MB、従量制課金接続で 1 MB です。 まだ Fall Creators Update を実行していないデバイスでは、Web イメージは 200 KB を上限とします。
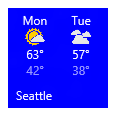
追加の動作を指定しない場合、イメージは一様に縮小または展開され、使用可能な幅に合わせて表示されます。 この例では、2 つの列とインライン 画像を使用するタイルを示します。 インライン イメージは、列の幅に合わせて拡大されます。
<binding template="TileMedium" displayName="Seattle" branding="name">
  <group>
    <subgroup>
      <text hint-align="center">Mon</text>
      <image src="Assets\Apps\Weather\Mostly Cloudy.png" hint-removeMargin="true"/>
      <text hint-align="center">63°</text>
      <text hint-style="captionsubtle" hint-align="center">42°</text>
    </subgroup>
    <subgroup>
      <text hint-align="center">Tue</text>
      <image src="Assets\Apps\Weather\Cloudy.png" hint-removeMargin="true"/>
      <text hint-align="center">57°</text>
      <text hint-style="captionSubtle" hint-align="center">38°</text>
    </subgroup>
  </group>
</binding>
TileMedium = new TileBinding()
{
    DisplayName = "Seattle",
    Branding = TileBranding.Name,
    Content = new TileBindingContentAdaptive()
    {
        Children =
        {
            new AdaptiveGroup()
            {
                Children =
                {
                    CreateSubgroup("Mon", "Mostly Cloudy.png", "63°", "42°"),
                    CreateSubgroup("Tue", "Cloudy.png", "57°", "38°")
                }
            }
        }
    }
}
...
private static AdaptiveSubgroup CreateSubgroup(string day, string image, string highTemp, string lowTemp)
{
    return new AdaptiveSubgroup()
    {
        Children =
        {
            new AdaptiveText()
            {
                Text = day,
                HintAlign = AdaptiveTextAlign.Center
            },
            new AdaptiveImage()
            {
                Source = "Assets/Weather/" + image,
                HintRemoveMargin = true
            },
            new AdaptiveText()
            {
                Text = highTemp,
                HintAlign = AdaptiveTextAlign.Center
            },
            new AdaptiveText()
            {
                Text = lowTemp,
                HintAlign = AdaptiveTextAlign.Center,
                HintStyle = AdaptiveTextStyle.CaptionSubtle
            }
        }
    };
}
結果:
<バインド>ルート、または最初のグループに配置された画像も、使用可能な高さに合わせて拡大されます。
画像の配置
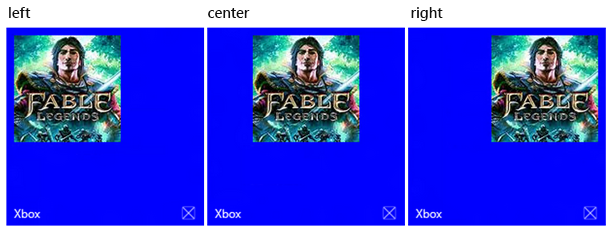
イメージは、 hint-align 属性を使用して、左揃え、中央揃え、または右揃えに設定できます。 また、これにより、幅を埋めるためにストレッチするのではなく、ネイティブ解像度で画像が表示されます。
<binding template="TileLarge">
  <image src="Assets/fable.jpg" hint-align="center"/>
</binding>
TileLarge = new TileBinding()
{
    Content = new TileBindingContentAdaptive()
    {
        Children =
        {
            new AdaptiveImage()
            {
                Source = "Assets/fable.jpg",
                HintAlign = AdaptiveImageAlign.Center
            }
        }
    }
}
結果:
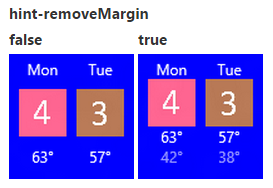
画像の余白
既定では、インライン画像は、画像の上または下のコンテンツの間に 8 ピクセルの余白を持っています。 この余白は、イメージの hint-removeMargin 属性を使用して削除できます。 ただし、画像は常にタイルの端から 8 ピクセルの余白を保持し、サブグループ (列) は常に列間の 8 ピクセルのパディングを保持します。
<binding template="TileMedium" branding="none">
  <group>
    <subgroup>
      <text hint-align="center">Mon</text>
      <image src="Assets\Numbers\4.jpg" hint-removeMargin="true"/>
      <text hint-align="center">63°</text>
      <text hint-style="captionsubtle" hint-align="center">42°</text>
    </subgroup>
    <subgroup>
      <text hint-align="center">Tue</text>
      <image src="Assets\Numbers\3.jpg" hint-removeMargin="true"/>
      <text hint-align="center">57°</text>
      <text hint-style="captionsubtle" hint-align="center">38°</text>
    </subgroup>
  </group>
</binding>
TileMedium = new TileBinding()
{
    Branding = TileBranding.None,
    Content = new TileBindingContentAdaptive()
    {
        Children =
        {
            new AdaptiveGroup()
            {
                Children =
                {
                    CreateSubgroup("Mon", "4.jpg", "63°", "42°"),
                    CreateSubgroup("Tue", "3.jpg", "57°", "38°")
                }
            }
        }
    }
}

...

private static AdaptiveSubgroup CreateSubgroup(string day, string image, string highTemp, string lowTemp)
{
    return new AdaptiveSubgroup()
    {
        HintWeight = 1,
        Children =
        {
            new AdaptiveText()
            {
                Text = day,
                HintAlign = AdaptiveTextAlign.Center
            },
            new AdaptiveImage()
            {
                Source = "Assets/Numbers/" + image,
                HintRemoveMargin = true
            },
            new AdaptiveText()
            {
                Text = highTemp,
                HintAlign = AdaptiveTextAlign.Center
            },
            new AdaptiveText()
            {
                Text = lowTemp,
                HintAlign = AdaptiveTextAlign.Center,
                HintStyle = AdaptiveTextStyle.CaptionSubtle
            }
        }
    };
}
画像のトリミング
画像は、 hint-crop 属性を使用して円にトリミングできます。現在、値 "none" (既定値) または "circle" のみがサポートされています。
<binding template="TileLarge" hint-textStacking="center">
  <group>
    <subgroup hint-weight="1"/>
    <subgroup hint-weight="2">
      <image src="Assets/Apps/Hipstame/hipster.jpg" hint-crop="circle"/>
    </subgroup>
    <subgroup hint-weight="1"/>
  </group>

  <text hint-style="title" hint-align="center">Hi,</text>
  <text hint-style="subtitleSubtle" hint-align="center">MasterHip</text>
</binding>
TileLarge = new TileBinding()
{
    Content = new TileBindingContentAdaptive()
    {
        TextStacking = TileTextStacking.Center,
        Children =
        {
            new AdaptiveGroup()
            {
                Children =
                {
                    new AdaptiveSubgroup() { HintWeight = 1 },
                    new AdaptiveSubgroup()
                    {
                        HintWeight = 2,
                        Children =
                        {
                            new AdaptiveImage()
                            {
                                Source = "Assets/Apps/Hipstame/hipster.jpg",
                                HintCrop = AdaptiveImageCrop.Circle
                            }
                        }
                    },
                    new AdaptiveSubgroup() { HintWeight = 1 }
                }
            },
            new AdaptiveText()
            {
                Text = "Hi,",
                HintStyle = AdaptiveTextStyle.Title,
                HintAlign = AdaptiveTextAlign.Center
            },
            new AdaptiveText()
            {
                Text = "MasterHip",
                HintStyle = AdaptiveTextStyle.SubtitleSubtle,
                HintAlign = AdaptiveTextAlign.Center
            }
        }
    }
}
結果:

背景の画像
背景画像を設定するには、 <バインドのルートにイメージ要素を配置し> 配置属性を "background" に設定します。
<binding template="TileWide">
  <image src="Assets\Mostly Cloudy-Background.jpg" placement="background"/>
  <group>
    <subgroup hint-weight="1">
      <text hint-align="center">Mon</text>
      <image src="Assets\Weather\Mostly Cloudy.png" hint-removeMargin="true"/>
      <text hint-align="center">63°</text>
      <text hint-align="center" hint-style="captionsubtle">42°</text>
    </subgroup>
    ...
  </group>
</binding>
TileWide = new TileBinding()
{
    Content = new TileBindingContentAdaptive()
    {
        BackgroundImage = new TileBackgroundImage()
        {
            Source = "Assets/Mostly Cloudy-Background.jpg"
        },

        Children =
        {
            new AdaptiveGroup()
            {
                Children =
                {
                    CreateSubgroup("Mon", "Mostly Cloudy.png", "63°", "42°")
                    ...
                }
            }
        }
    }
}

...

private static AdaptiveSubgroup CreateSubgroup(string day, string image, string highTemp, string lowTemp)
{
    return new AdaptiveSubgroup()
    {
        HintWeight = 1,
        Children =
        {
            new AdaptiveText()
            {
                Text = day,
                HintAlign = AdaptiveTextAlign.Center
            },
            new AdaptiveImage()
            {
                Source = "Assets/Weather/" + image,
                HintRemoveMargin = true
            },
            new AdaptiveText()
            {
                Text = highTemp,
                HintAlign = AdaptiveTextAlign.Center
            },
            new AdaptiveText()
            {
                Text = lowTemp,
                HintAlign = AdaptiveTextAlign.Center,
                HintStyle = AdaptiveTextStyle.CaptionSubtle
            }
        }
    };
}
結果:
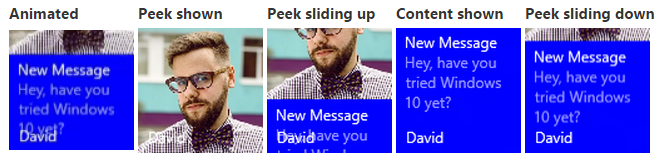
イメージをピークする
タイルの上部から "ピーク" する画像を指定できます。 ピーク画像では、アニメーションを使用して、タイルの上部から下または上にスライドし、ビューをピークした後、後でスライドして戻ってタイルのメイン コンテンツを表示します。 ピーク画像を設定するには、 <binding>のルートにイメージ要素を配置し、placement 属性を "peek" に設定します。
<binding template="TileMedium" branding="name">
  <image placement="peek" src="Assets/Apps/Hipstame/hipster.jpg"/>
  <text>New Message</text>
  <text hint-style="captionsubtle" hint-wrap="true">Hey, have you tried Windows 10 yet?</text>
</binding>
TileWide = new TileBinding()
{
    Branding = TileBranding.Name,
    Content = new TileBindingContentAdaptive()
    {
        PeekImage = new TilePeekImage()
        {
            Source = "Assets/Apps/Hipstame/hipster.jpg"
        },
        Children =
        {
            new AdaptiveText()
            {
                Text = "New Message"
            },
            new AdaptiveText()
            {
                Text = "Hey, have you tried Windows 10 yet?",
                HintStyle = AdaptiveTextStyle.CaptionSubtle,
                HintWrap = true
            }
        }
    }
}
ピーク画像と背景画像の円のトリミング
円のトリミングを行うには、ピークイメージと背景画像でヒントトリミング属性を使用します。
<image placement="peek" hint-crop="circle" src="Assets/Apps/Hipstame/hipster.jpg"/>
new TilePeekImage()
{
    HintCrop = TilePeekImageCrop.Circle,
    Source = "Assets/Apps/Hipstame/hipster.jpg"
}
結果は次のようになります。

ピークと背景画像の両方を使用する
タイル通知でピークと背景画像の両方を使用するには、通知ペイロードでピーク画像と背景画像の両方を指定します。
結果は次のようになります。

プレビューと背景画像のオーバーレイ
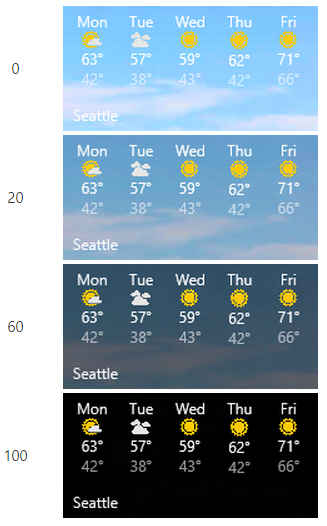
背景に黒いオーバーレイを設定し、 hint-overlay を使用してイメージをプレビューできます。これは、0 から 100 の整数を受け取り、0 はオーバーレイなし、100 は完全な黒のオーバーレイです。 オーバーレイを使用すると、タイル上のテキストを読みやすくすることができます。
背景画像でヒント オーバーレイを使用する
ペイロードにテキスト要素がある限り、背景画像は既定で 20% オーバーレイになります (それ以外の場合は、既定で 0% オーバーレイになります)。
<binding template="TileWide">
  <image placement="background" hint-overlay="60" src="Assets\Mostly Cloudy-Background.jpg"/>
  ...
</binding>
TileWide = new TileBinding()
{
    Content = new TileBindingContentAdaptive()
    {
        BackgroundImage = new TileBackgroundImage()
        {
            Source = "Assets/Mostly Cloudy-Background.jpg",
            HintOverlay = 60
        },

        ...
    }
}
hint-overlay 結果:
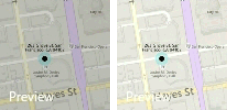
プレビュー画像でヒント オーバーレイを使用する
Windows 10 バージョン 1511 以降では、背景画像と同様に、プレビュー画像のオーバーレイもサポートされています。 ピーク画像要素のヒント オーバーレイを 0 から 100 の整数として指定します。 ピーク 画像の既定のオーバーレイは 0 (オーバーレイなし) です。
<binding template="TileMedium">
  <image hint-overlay="20" src="Assets\Map.jpg" placement="peek"/>
  ...
</binding>
TileMedium = new TileBinding()
{
    Content = new TileBindingContentAdaptive()
    {
        PeekImage = new TilePeekImage()
        {
            Source = "Assets/Map.jpg",
            HintOverlay = 20
        },
        ...
    }
}
次の例は、20% の不透明度 (左) と 0% の不透明度 (右) のピーク画像を示しています。
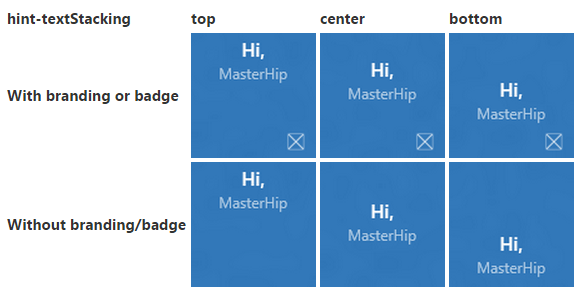
垂直方向の配置 (テキストの積み重ね)
タイルのコンテンツの垂直方向の配置を制御するには、TileBinding 要素と AdaptiveSubgroup 要素の両方でhint-textStacking属性を使用します。 既定では、すべてが上下に整列されますが、コンテンツを下部または中央に配置することもできます。
バインド要素でのテキストのスタック
TileBinding レベルで適用すると、テキストの積み重ねによって通知コンテンツ全体の垂直方向の配置が設定され、ブランド/バッジ領域の上の使用可能な垂直方向のスペースに配置されます。
<binding template="TileMedium" hint-textStacking="center" branding="logo">
  <text hint-style="base" hint-align="center">Hi,</text>
  <text hint-style="captionSubtle" hint-align="center">MasterHip</text>
</binding>
TileMedium = new TileBinding()
{
    Branding = TileBranding.Logo,
    Content = new TileBindingContentAdaptive()
    {
        TextStacking = TileTextStacking.Center,
        Children =
        {
            new AdaptiveText()
            {
                Text = "Hi,",
                HintStyle = AdaptiveTextStyle.Base,
                HintAlign = AdaptiveTextAlign.Center
            },

            new AdaptiveText()
            {
                Text = "MasterHip",
                HintStyle = AdaptiveTextStyle.CaptionSubtle,
                HintAlign = AdaptiveTextAlign.Center
            }
        }
    }
}
サブグループ要素でのテキストの積み重ね
AdaptiveSubgroup レベルで適用すると、テキストの積み重ねによってサブグループ (列) コンテンツの垂直方向の配置が設定され、グループ全体で使用可能な垂直空間に配置されます。
<binding template="TileWide" branding="nameAndLogo">
  <group>
    <subgroup hint-weight="33">
      <image src="Assets/Apps/Hipstame/hipster.jpg" hint-crop="circle"/>
    </subgroup>
    <subgroup hint-textStacking="center">
      <text hint-style="subtitle">Hi,</text>
      <text hint-style="bodySubtle">MasterHip</text>
    </subgroup>
  </group>
</binding>
TileWide = new TileBinding()
{
    Branding = TileBranding.NameAndLogo,
    Content = new TileBindingContentAdaptive()
    {
        Children =
        {
            new AdaptiveGroup()
            {
                Children =
                {
                    // Image column
                    new AdaptiveSubgroup()
                    {
                        HintWeight = 33,
                        Children =
                        {
                            new AdaptiveImage()
                            {
                                Source = "Assets/Apps/Hipstame/hipster.jpg",
                                HintCrop = AdaptiveImageCrop.Circle
                            }
                        }
                    },

                    // Text column
                    new AdaptiveSubgroup()
                    {
                        // Vertical align its contents
                        TextStacking = TileTextStacking.Center,
                        Children =
                        {
                            new AdaptiveText()
                            {
                                Text = "Hi,",
                                HintStyle = AdaptiveTextStyle.Subtitle
                            },

                            new AdaptiveText()
                            {
                                Text = "MasterHip",
                                HintStyle = AdaptiveTextStyle.BodySubtle
                            }
                        }
                    }
                }
            }
        }
    }
}