შენიშვნა
ამ გვერდზე წვდომა მოითხოვს ავტორიზაციას. შეგიძლიათ სცადოთ შესვლა ან შეცვალოთ დირექტორიები.
ამ გვერდზე წვდომა მოითხოვს ავტორიზაციას. შეგიძლიათ სცადოთ დირექტორიების შეცვლა.
This article shows you the most common deployment and runtime configuration for Java apps in Azure App Service. If it's your first time using Azure App Service, you should first read through the Java quickstart. You can find the answers to general questions about using App Service that aren't specific to Java development in the App Service FAQ.
Azure App Service runs Java web applications on a fully managed service in three variants:
- Java Standard Edition (SE): Can run an app deployed as a Java Archive (JAR) package that contains an embedded server (such as Spring Boot, Quarkus, Dropwizard, or an app with an embedded Tomcat or Jetty server).
- Tomcat: The built-in Tomcat server can run an app deployed as a web application archive (WAR) package.
- JBoss Enterprise Application Platform (EAP): The built-in JBoss EAP server can run an app deployed as a WAR or enterprise archive (EAR) package. Supported for Linux apps in a set of pricing tiers which includes Free, Premium v3, and Isolated v2.gti
Note
JBoss EAP on App Service now supports "Bring Your Own License" (BYOL) billing, this allows customers with existing Red Hat subscriptions to apply those licenses directly to their JBoss EAP deployments on Azure App Service. Learn more.
Show the Java version
To show the current Java version, run the following command in Azure Cloud Shell:
az webapp config show --resource-group <resource-group-name> --name <app-name> --query linuxFxVersion
To show all supported Java versions, run the following command in Cloud Shell:
az webapp list-runtimes --os linux | grep "JAVA\|TOMCAT\|JBOSSEAP"
Get the Java version in the Linux container
For more detailed version information in the Linux container, open an SSH session with the container. Here are a few examples of what you can run.
To view the Java version in the SSH session:
java -version
To view the Tomcat server version in the SSH session:
sh /usr/local/tomcat/bin/version.sh
Or, if your Tomcat server is in a custom location, find version.sh with:
find / -name "version.sh"
To view the JBoss EAP server version in the SSH session:
$JBOSS_HOME/bin/jboss-cli.sh --connect --commands=:product-info
For more information on version support, see App Service language runtime support policy.
What happens to outdated runtimes in App Service?
Outdated runtimes are deprecated by the maintaining organization or have significant vulnerabilities. Accordingly, they're removed from the create and configure pages in the portal. When an outdated runtime is hidden from the portal, any app that's still using that runtime continues to run.
If you want to create an app with an outdated runtime version that's no longer shown on the portal, use the Azure CLI, an ARM template, or Bicep. These deployment alternatives let you create deprecated runtimes that are removed from the portal but are still being supported.
If a runtime is fully removed from the App Service platform, your Azure subscription owner receives an email notice before the removal.
Deploying your app
Build tools
Maven
By using the Maven Plugin for Azure Web Apps, you can easily prepare your project with one command in your project root:
mvn com.microsoft.azure:azure-webapp-maven-plugin:2.13.0:config
This command adds an azure-webapp-maven-plugin plugin and the related configuration by prompting you to select an existing Azure Web App or to create a new one. During configuration, it attempts to detect whether your application should be deployed to Java SE, Tomcat, or (Linux only) JBoss EAP. Then you can deploy your Java app to Azure by using the following command:
mvn package azure-webapp:deploy
Here's a sample configuration in pom.xml:
<plugin>
  <groupId>com.microsoft.azure</groupId>
  <artifactId>azure-webapp-maven-plugin</artifactId>
  <version>2.11.0</version>
  <configuration>
    <subscriptionId>111111-11111-11111-1111111</subscriptionId>
    <resourceGroup>spring-boot-xxxxxxxxxx-rg</resourceGroup>
    <appName>spring-boot-xxxxxxxxxx</appName>
    <pricingTier>B2</pricingTier>
    <region>westus</region>
    <runtime>
      <os>Linux</os>
      <webContainer>Java SE</webContainer>
      <javaVersion>Java 17</javaVersion>
    </runtime>
    <deployment>
      <resources>
        <resource>
          <type>jar</type>
          <directory>${project.basedir}/target</directory>
          <includes>
            <include>*.jar</include>
          </includes>
        </resource>
      </resources>
    </deployment>
  </configuration>
</plugin>
Gradle
Set up the Gradle Plugin for Azure Web Apps by adding the plugin to
build.gradle:plugins { id "com.microsoft.azure.azurewebapp" version "1.10.0" }Configure your web app details. The corresponding Azure resources are created if they don't exist. Here's a sample configuration. For details, refer to this document.
azurewebapp {
    subscription = '<your subscription id>'
    resourceGroup = '<your resource group>'
    appName = '<your app name>'
    pricingTier = '<price tier like 'P1v2'>'
    region = '<region like 'westus'>'
    runtime {
      os = 'Linux'
      webContainer = 'Tomcat 10.0' // or 'Java SE' if you want to run an executable jar
      javaVersion = 'Java 17'
    }
    appSettings {
        <key> = <value>
    }
    auth {
        type = 'azure_cli' // support azure_cli, oauth2, device_code and service_principal
    }
}
Deploy with one command.
gradle azureWebAppDeploy
IDEs
Azure provides seamless Java App Service development experience in popular Java Integrated Development Environments (IDEs), including:
- VS Code: Java Web Apps with Visual Studio Code.
- IntelliJ IDEA: Create a Hello World web app for Azure App Service by using IntelliJ.
- Eclipse IDE: Create a Hello World web app for Azure App Service by using Eclipse.
Kudu and OneDeploy APIs
Deployment clients such as the Maven plugin, GitHub Actions using azure/webapps-deploy@v3 and newer, or the az webapp deploy command use OneDeploy, which is invoked by calling the /api/publish endpoint of the Kudu site under the hood. For more information on this API, see this documentation.
When these deployment methods are used, they will automatically rename the provided JAR file to app.jar during the deployment process. This will be placed under /home/site/wwwwroot. To deploy JAR files to Java SE see this documentation.
Note
If you use alternative methods like FTP or older ZipDeploy APIs, this method of renaming the provided JAR file will not be invoked. Take note of this if using the Startup File text box in the Configuration section of the portal to explicitly call your JAR file.
You can deploy WAR files to your Tomcat application by following this documentation. When these deployment methods above are used, they will automatically rename the provided War file to app.war during the deployment process. This will be placed under /home/site/wwwwroot and by default only supports deploying one WAR file under wwwroot. This will not be placed under the /home/site/wwwroot/webapps directory like seen when using deployment APIs such as WarDeploy. To avoid any issues with file structure clashes, it is advised to only use one or the other deployment type.
To deploy WAR files to JBoss EAP, see this documentation. When OneDeploy is used, this will automatically rename the WAR file to app.war and be placed under /home/site/wwwroot.
To deploy EAR files, use FTP. Your EAR application is deployed to the context root defined in your application's configuration. If you want your web app to be served in the root path, ensure that your app sets the context root to the root path: <context-root>/</context-root>. For more information, see Setting the context root of a web application.
Don't deploy your WAR or JAR by using FTP. The FTP tool is designed to upload startup scripts, dependencies, or other runtime files. It's not the optimal choice for deploying web apps.
Rewrite or redirect a URL
To rewrite or redirect a URL, use one of the available URL rewriters, such as UrlRewriteFilter.
Tomcat also provides a rewrite valve.
JBoss EAP also provides a rewrite valve.
Logging and debugging apps
Performance reports, traffic visualizations, and health checkups are available for each app through the Azure portal. For more information, see Azure App Service diagnostics overview.
Stream diagnostic logs
You can access the console logs that are generated from inside the container.
To turn on container logging, run the following command:
az webapp log config --name <app-name> --resource-group <resource-group-name> --docker-container-logging filesystem
Replace the <app-name> and <resource-group-name> values with names that are appropriate for your web app.
After you turn on container logging, run the following command to see the log stream:
az webapp log tail --name <app-name> --resource-group <resource-group-name>
If console logs don't appear immediately, check again in 30 seconds.
To stop log streaming at any time, use the keyboard shortcut Ctrl+C.
For more information, see Stream logs in Cloud Shell.
SSH console access in Linux
If you want to open a direct SSH session with your container, your app should be running.
Use the az webapp ssh command.
If you're not authenticated, you need to authenticate with your Azure subscription to connect. When you're authenticated, you see an in-browser shell where you can run commands inside your container.
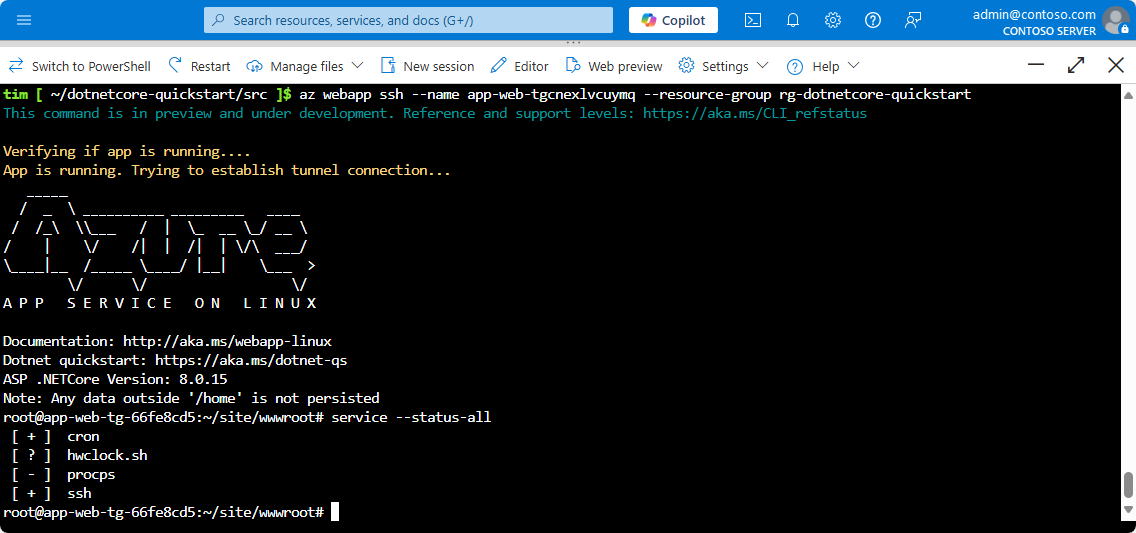
Note
Any changes that you make outside the /home directory are stored in the container itself and don't persist beyond an app restart.
To open a remote SSH session from your local machine, see Open SSH session from remote shell.
Linux troubleshooting tools
The built-in Java images are based on the Alpine Linux operating system. Use the apk package manager to install any troubleshooting tools or commands.
Java profiler
All Java runtimes on Azure App Service come with the Java Development Kit (JDK) Flight Recorder for profiling Java workloads. You can use it to record Java Virtual Machine (JVM), system, and application events, and to troubleshoot problems in your applications.
To learn more about the Java profiler, visit the Azure Application Insights documentation.
Java Flight Recorder
All Java runtimes on App Service come with the Java Flight Recorder. You can use it to record JVM, system, and application events and to troubleshoot problems in your Java applications.
SSH into App Service and run the jcmd command to see a list of all the Java processes running. In addition to jcmd itself, you should see your Java application running with a process ID (PID) number.
078990bbcd11:/home# jcmd
Picked up JAVA_TOOL_OPTIONS: -Djava.net.preferIPv4Stack=true
147 sun.tools.jcmd.JCmd
116 /home/site/wwwroot/app.jar
Execute the following command to start a 30-second recording of the JVM. It profiles the JVM and creates a Java Flight Recorder (JFR) file named jfr_example.jfr in the home directory. Replace 116 with the PID of your Java app.
jcmd 116 JFR.start name=MyRecording settings=profile duration=30s filename="/home/jfr_example.jfr"
During the 30-second interval, you can validate the recording is taking place by running jcmd 116 JFR.check. The command shows all recordings for the given Java process.
Continuous recording
You can use Java Flight Recorder to continuously profile your Java application with minimal impact on runtime performance. To do so, run the following Azure CLI command to create an app setting named JAVA_OPTS with the necessary configuration. The contents of the JAVA_OPTS app setting are passed to the java command when your app starts.
az webapp config appsettings set -g <your_resource_group> -n <your_app_name> --settings JAVA_OPTS=-XX:StartFlightRecording=disk=true,name=continuous_recording,dumponexit=true,maxsize=1024m,maxage=1d
After the recording starts, you can dump the current recording data at any time by using the JFR.dump command.
jcmd <pid> JFR.dump name=continuous_recording filename="/home/recording1.jfr"
Analyze JFR files
Use FTPS to download your JFR file to your local machine. To analyze the JFR file, download and install Java Mission Control (JMC). For instructions on how to use Java Mission Control, see the JMC documentation and the installation instructions.
App logging
To configure App Service to write your application's standard console output and standard console error streams to the local file system or Azure Blob Storage, do the following. Enable application logging through the Azure portal or in the Azure CLI. If you need longer retention, configure the application to write output to a Blob Storage container.
Your Java and Tomcat app logs can be found in the /home/LogFiles/Application/ directory.
Azure Blob Storage logging for Linux-based apps can be configured only by using Azure Monitor.
If your application uses Logback or Log4j for tracing, you can forward these traces for review into Azure Application Insights. Use the logging framework configuration instructions in Explore Java trace logs in Application Insights.
Note
Due to known vulnerability CVE-2021-44228, be sure to use Log4j version 2.16 or later.
Customization and tuning
Azure App Service supports out-of-the-box tuning and customization through the Azure portal and the Azure CLI. Review the following articles for non-Java-specific web app configuration:
- Configure app settings
- Set up a custom domain
- Configure TLS/SSL bindings
- Add a CDN
- Configure the Kudu site
Copy app content locally
Set the app setting JAVA_COPY_ALL to true to copy your app contents to the local worker from the shared file system. This setting helps address file-locking issues. JAVA_COPY_ALL is not compatible with the legacy convention of deploying to /home/site/wwwroot/webapps.
Set Java runtime options
To set allocated memory or other JVM runtime options, create an app setting named JAVA_OPTS with the options. App Service passes this setting as an environment variable to the Java runtime when it starts.
In the Azure portal, under Application Settings for the web app, create a new app setting named JAVA_OPTS that includes other settings, such as -Xms512m -Xmx1204m.
In the Azure portal, under Application Settings for the web app, create a new app setting named CATALINA_OPTS that includes other settings, such as -Xms512m -Xmx1204m.
To configure the app setting from the Maven plugin, add setting/value tags in the Azure plugin section. The following example sets a specific minimum and maximum Java heap size:
<appSettings>
    <property>
        <name>JAVA_OPTS</name>
        <value>-Xms1024m -Xmx1024m</value>
    </property>
</appSettings>
Note
You don't need to create a web.config file when using Tomcat on Windows App Service.
By default, App Service sets the JVM Max Heap size to 70% of the total memory available for the App Service Plan. To disable the default setting, you can use app setting WEBSITE_DISABLE_JAVA_HEAP_CONFIGURATION=”true".
Enhancing your application's performance on the platform may involve adjusting the heap size to better suit your specific needs. When tuning application heap settings, please review your App Service plan details and consider the requirements of multiple applications and deployment slots to find the optimal memory allocation.
Turn on web sockets
Turn on support for web sockets in the Azure portal in the Application settings for the application. You need to restart the application for the setting to take effect.
Turn on web socket support by using the Azure CLI with the following command:
az webapp config set --name <app-name> --resource-group <resource-group-name> --web-sockets-enabled true
Then restart your application:
az webapp stop --name <app-name> --resource-group <resource-group-name>
az webapp start --name <app-name> --resource-group <resource-group-name>
Set default character encoding
In the Azure portal, under Application Settings for the web app, create a new app setting named JAVA_OPTS with value -Dfile.encoding=UTF-8.
Alternatively, you can configure the app setting by using the App Service Maven plugin. Add the setting name and value tags in the plugin configuration:
<appSettings>
    <property>
        <name>JAVA_OPTS</name>
        <value>-Dfile.encoding=UTF-8</value>
    </property>
</appSettings>
Precompile JSP files
To improve performance of Tomcat applications, you can compile your JSP files before deploying to App Service. You can use the Maven plugin provided by Apache Sling, or use this Ant build file.
Ignore the robots933456 message in logs
You might see the following message in the container logs:
2019-04-08T14:07:56.641002476Z "-" - - [08/Apr/2019:14:07:56 +0000] "GET /robots933456.txt HTTP/1.1" 404 415 "-" "-"
You can safely ignore this message. /robots933456.txt is a dummy URL path. App Service uses it to check if the container is capable of serving requests. A "404" error response indicates that the path doesn't exist, and it signals to App Service that the container is healthy and ready to respond to requests.
Choose a Java runtime version
App Service allows users to choose the major version of the JVM, such as Java 8 or Java 11, and the patch version, like 1.8.0_232 or 11.0.5. You can also choose to have the patch version update automatically as new minor versions become available. In most cases, production apps should use pinned patch JVM versions, which prevent unanticipated outages during a patch version autoupdate. All Java web apps use 64-bit JVMs, and it's not configurable.
If you're using Tomcat, you can choose to pin the patch version of Tomcat. On Windows, you can pin the patch versions of the JVM and Tomcat independently. On Linux, you can pin the patch version of Tomcat. The patch version of the JVM is also pinned but isn't separately configurable.
If you choose to pin the minor version, you need to periodically update the JVM minor version on the app. To ensure that your application runs on the newer minor version, create a staging slot and increment the minor version on the staging slot. After you confirm that the application runs correctly on the new minor version, you can swap the staging and production slots.
Run the JBoss CLI
In your JBoss EAP app's SSH session, you can run the JBoss CLI with the following command:
$JBOSS_HOME/bin/jboss-cli.sh --connect
Depending on where JBoss EAP is in the server lifecycle, you might not be able to connect. Wait a few minutes and try again. This approach is useful for quick checks of your current server state (for example, to see if a data source is properly configured).
Also, changes you make to the server with the JBoss CLI in the SSH session don't persist after the app restarts. Each time the app starts, the JBoss EAP server begins with a clean installation. During the startup lifecycle, App Service makes the necessary server configurations and deploys the app. To make any persistent changes in the JBoss EAP server, use a custom startup script or a startup command. For an end-to-end example, see Configure data sources for a Java SE, Tomcat, or JBoss EAP app in Azure App Service.
Alternatively, you can manually configure App Service to run any file on startup. For example:
az webapp config set --resource-group <group-name> --name <app-name> --startup-file /home/site/scripts/foo.sh
For more information about the CLI commands that you can run, see:
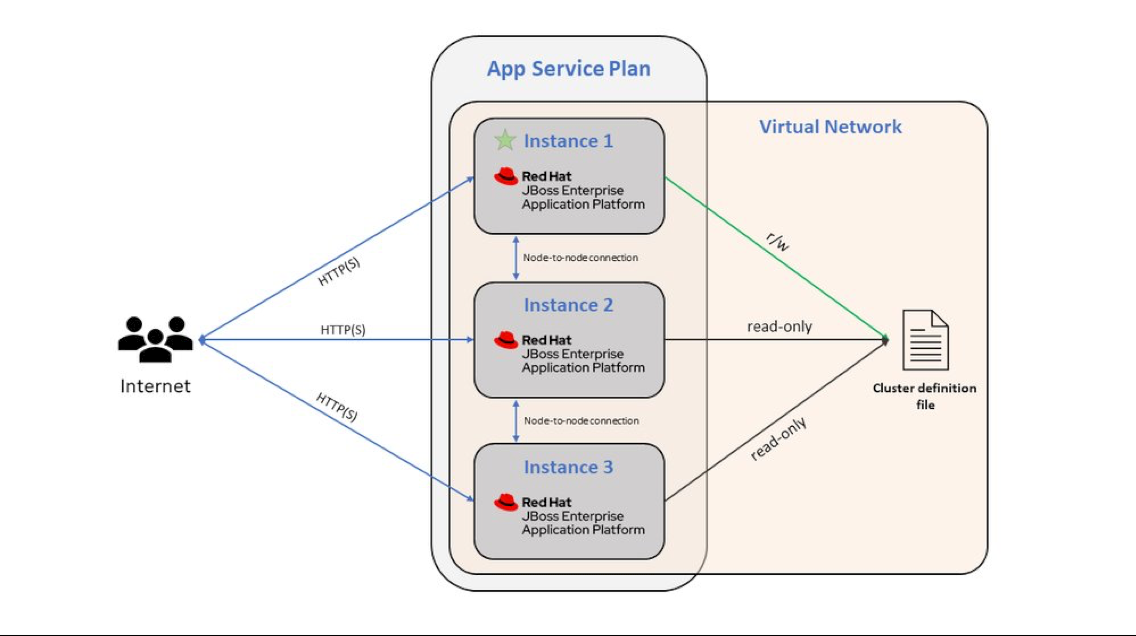
Clustering
App Service supports clustering for JBoss EAP versions 7.4.1 and greater. To enable clustering, your web app must be integrated with a virtual network. When the web app is integrated with a virtual network, it restarts, and the JBoss EAP installation automatically starts up with a clustered configuration. When you run multiple instances with autoscaling, the JBoss EAP instances communicate with each other over the subnet specified in the virtual network integration. You can disable clustering by creating an app setting named WEBSITE_DISABLE_CLUSTERING with any value.
Note
If you're enabling your virtual network integration with an ARM template, you need to manually set the property vnetPrivatePorts to a value of 2. If you enable virtual network integration from the CLI or portal, this property is set for you automatically.
When clustering is enabled, the JBoss EAP instances use the FILE_PING JGroups discovery protocol to discover new instances and persist cluster information (for example: the cluster members, their identifiers, and their IP addresses). On App Service, these files are under /home/clusterinfo/. The first EAP instance to start obtains read/write permissions on the cluster membership file. Other instances read the file, find the primary node, and coordinate with that node to be included in the cluster and added to the file.
Note
You can avoid JBoss EAP clustering timeouts by cleaning up obsolete discovery files during your app startup.
The Premium V3, Premium V4, and Isolated V2 App Service Plan types can optionally be distributed across Availability Zones to improve resiliency and reliability for your business-critical workloads. This architecture is also known as zone redundancy. The JBoss EAP clustering feature is compatible with the zone redundancy feature.
Autoscale rules
When you're configuring autoscale rules for horizontal scaling, it's important to remove instances incrementally (one at a time) to ensure that each removed instance can transfer its activity (such as handling a database transaction) to another member of the cluster. When you're configuring your autoscale rules in the portal to scale down, use the following options:
- Operation: "Decrease count by"
- Cool down: "5 minutes" or greater
- Instance count: 1
You don't need to incrementally add instances (scaling out). You can add multiple instances to the cluster at a time.
App Service plans
JBoss EAP is available in the following pricing tiers: F1, P0v3, P1mv3, P2mv3, P3mv3, P4mv3, P5mv3, P0v4, P1mv4, P2mv4, P3mv4, P4mv4, and P5mv4.
JBoss EAP server lifecycle
A JBoss EAP app in App Service goes through five distinct phases before launching the server:
- Environment setup phase
- Server launch phase
- Server configuration phase
- App deployment phase
- Server reload phase
See the following sections for details and opportunities to customize (such as through app settings).
1. Environment setup phase
- The SSH service is started to enable secure SSH sessions with the container.
- The Java runtime keystore is updated with any public and private certificates that are defined in the Azure portal.
- Public certificates are provided by the platform in the
/var/ssl/certsdirectory, and they're loaded to$JRE_HOME/lib/security/cacerts. - Private certificates are provided by the platform in the
/var/ssl/privatedirectory, and they're loaded to$JRE_HOME/lib/security/client.jks.
- Public certificates are provided by the platform in the
- If any certificates are loaded in the Java keystore in this step, the properties
javax.net.ssl.keyStore,javax.net.ssl.keyStorePassword, andjavax.net.ssl.keyStoreTypeare added to theJAVA_OPTSenvironment variable. - Some initial JVM configuration is determined, like logging directories and Java memory heap parameters:
- If you provide the
–Xmsor–Xmxflags for memory in the app settingJAVA_OPTS, these values override the ones provided by the platform. - If you configure the app setting
WEBSITES_CONTAINER_STOP_TIME_LIMIT, the value is passed to the runtime propertyorg.wildfly.sigterm.suspend.timeout, which controls the maximum shutdown wait time (in seconds) when JBoss EAP is being stopped.
- If you provide the
- If the app is integrated with a virtual network, the App Service runtime passes a list of ports to be used for inter-server communication in the environment variable
WEBSITE_PRIVATE_PORTSand launches JBoss EAP by using theclusteringconfiguration. Otherwise, thestandaloneconfiguration is used.- For the
clusteringconfiguration, the server configuration filestandalone-azure-full-ha.xmlis used. - For the
standaloneconfiguration, the server configuration filestandalone-full.xmlis used.
- For the
2. Server launch phase
- If JBoss EAP is launched in the
clusteringconfiguration:- Each JBoss EAP instance receives an internal identifier between 0 and the number of instances that the app is scaled out to.
- If some files are found in the transaction store path for this server instance (by using its internal identifier), it means this server instance is taking the place of an identical service instance. The other service instance previously crashed and left uncommitted transactions behind. The server is configured to resume the work on these transactions.
- Regardless of whether JBoss EAP starts in the
clusteringorstandaloneconfiguration, if the server version is 7.4 or later and the runtime uses Java 17, then the configuration is updated to enable the Elytron subsystem for security. - If you configure the app setting
WEBSITE_JBOSS_OPTS, the value is passed to the JBoss launcher script. This setting can be used to provide paths to property files and more flags that influence the startup of JBoss EAP.
3. Server configuration phase
At the start of this phase, App Service first waits for both the JBoss EAP server and the admin interface to be ready to receive requests before continuing. This process can take a few more seconds if Application Insights is enabled.
When both JBoss EAP Server and the admin interface are ready, App Service takes the following actions:
- Adds the JBoss EAP module
azure.appservice, which provides utility classes for logging and integration with App Service. - Updates the console logger to use a colorless mode so that log files aren't full of color-escaping sequences.
- Sets up the integration with Azure Monitor logs.
- Updates the binding IP addresses of the Web Services Description Language (WSDL) and management interfaces.
- Adds the JBoss EAP module
azure.appservice.easyauthfor integration with App Service authentication and Microsoft Entra ID. - Updates the logging configuration of access logs and the name and rotation of the main server log file.
- Adds the JBoss EAP module
Unless the app setting
WEBSITE_SKIP_AUTOCONFIGURE_DATABASEis defined, App Service autodetects Java Database Connectivity (JDBC) URLs in the App Service app settings. If valid JDBC URLs exist for PostgreSQL, MySQL, MariaDB, Oracle, SQL Server, or Azure SQL Database, it adds the corresponding drivers to the server, adds a data source for each of the JDBC URLs, and sets the Java Naming and Directory Interface (JNDI) name for each data source tojava:jboss/env/jdbc/<app-setting-name>_DS, where<app-setting-name>is the name of the app setting.If the
clusteringconfiguration is enabled, the console logger to be configured is checked.If there are JAR files deployed to the
/home/site/libsdirectory, a new global module is created with all of these JAR files.At the end of the phase, App Service runs the custom startup script, if one exists. The search logic for the custom startup script is defined as follows:
- If you configured a startup command (for example, through the Azure portal or the Azure CLI), run it; otherwise,
- If the path
/home/site/scripts/startup.shexists, use it; otherwise, - If the path
/home/startup.shexists, use it.
The custom startup command or script runs as the root user (no need for sudo), so they can install Linux packages or launch the JBoss CLI to perform more JBoss EAP install/customization commands like creating data sources and installing resource adapters. For information on Ubuntu package management commands, see the Ubuntu Server documentation. For JBoss CLI commands, see the JBoss Management CLI Guide.
4. App deployment phase
The startup script deploys apps to JBoss EAP by looking in the following locations, in order of precedence:
- If you configured the app setting
WEBSITE_JAVA_WAR_FILE_NAME, deploy the file designated by it. - If
/home/site/wwwroot/app.warexists, deploy it. - If any other EAR and WAR files exist in
/home/site/wwwroot, deploy them. - If
/home/site/wwwroot/webappsexists, deploy the files and directories in it. WAR files are deployed as applications themselves, and directories are deployed as "exploded" (uncompressed) web apps. - If any standalone JSP pages exist in
/home/site/wwwroot, copy them to the web server root and deploy them as one web app. - If no deployable files are found, deploy the default welcome page (parking page) in the root context.
5. Server reload phase
- After the deployment steps are complete, the JBoss EAP server is reloaded to apply any changes that require a server reload.
- After the server reloads, the applications deployed to the JBoss EAP server should be ready to respond to requests.
- The server runs until the App Service app is stopped or restarted. You can manually stop or restart the App Service app, or you trigger a restart when you deploy files or make configuration changes to the App Service app.
- If the JBoss EAP server exits abnormally in the
clusteringconfiguration, a final function calledemit_alert_tx_store_not_emptyis executed. The function checks if the JBoss EAP process left a nonempty transaction store file in disk. If so, an error is logged in the console:Error: finishing server with non-empty store for node XXXX. When a new server instance is started, it looks for these nonempty transaction store files to resume the work (see 2. Server launch phase).
Tomcat baseline configuration
Note
This section applies to Linux only.
Java developers can customize the server settings, troubleshoot issues, and deploy applications to Tomcat with confidence if they know about the server.xml file and configuration details of Tomcat. Possible customizations include:
- Customizing Tomcat configuration: When you understand the server.xml file and Tomcat's configuration details, you can fine-tune the server settings to match the needs of their applications.
- Debugging: When an application is deployed on a Tomcat server, developers need to know the server configuration to debug any issues that might arise. This process includes checking the server logs, examining the configuration files, and identifying any errors that might be occurring.
- Troubleshooting Tomcat issues: Inevitably, Java developers encounter issues with their Tomcat server, such as performance problems or configuration errors. When you understand the server.xml file and Tomcat's configuration details, developers can quickly diagnose and troubleshoot these issues, which can save time and effort.
- Deploying applications to Tomcat: To deploy a Java web application to Tomcat, developers need to know how to configure the server.xml file and other Tomcat settings. You need to understand these details to deploy applications successfully and ensure that they run smoothly on the server.
When you create an app with built-in Tomcat to host your Java workload (a WAR file or a JAR file), there are certain settings that you get out of the box for Tomcat configuration. You can refer to the official Apache Tomcat documentation for detailed information, including the default configuration for Tomcat Web Server.
Additionally, there are certain transformations that are applied on top of the server.xml for Tomcat distribution upon start. These transformations include changes to the Connector, Host, and Valve settings.
The latest versions of Tomcat have server.xml (8.5.58 and 9.0.38 onward). Older versions of Tomcat don't use transforms and might have different behavior as a result.
Connector
<Connector port="${port.http}" address="127.0.0.1" maxHttpHeaderSize="16384" compression="on" URIEncoding="UTF-8" connectionTimeout="${site.connectionTimeout}" maxThreads="${catalina.maxThreads}" maxConnections="${catalina.maxConnections}" protocol="HTTP/1.1" redirectPort="8443"/>
maxHttpHeaderSizeis set to16384.URIEncodingis set toUTF-8.connectionTimeoutis set toWEBSITE_TOMCAT_CONNECTION_TIMEOUT, which defaults to240000.maxThreadsis set toWEBSITE_CATALINA_MAXTHREADS, which defaults to200.maxConnectionsis set toWEBSITE_CATALINA_MAXCONNECTIONS, which defaults to10000.
Note
The connectionTimeout, maxThreads, and maxConnections settings can be tuned with app settings.
Following are example CLI commands that you might use to alter the values of connectionTimeout, maxThreads, or maxConnections:
az webapp config appsettings set --resource-group myResourceGroup --name myApp --settings WEBSITE_TOMCAT_CONNECTION_TIMEOUT=120000
az webapp config appsettings set --resource-group myResourceGroup --name myApp --settings WEBSITE_CATALINA_MAXTHREADS=100
az webapp config appsettings set --resource-group myResourceGroup --name myApp --settings WEBSITE_CATALINA_MAXCONNECTIONS=5000
Connector uses the address of the container instead of 127.0.0.1.
Host
<Host appBase="${site.appbase}" xmlBase="${site.xmlbase}" unpackWARs="${site.unpackwars}" workDir="${site.tempdir}" errorReportValveClass="com.microsoft.azure.appservice.AppServiceErrorReportValve" name="localhost" autoDeploy="true">
appBaseis set toAZURE_SITE_APP_BASE, which defaults to localWebappsLocalPath.xmlBaseis set toAZURE_SITE_HOME, which defaults to/site/wwwroot.unpackWARsis set toAZURE_UNPACK_WARS, which defaults totrue.workDiris set toJAVA_TMP_DIR, which defaultsTMP.errorReportValveClassuses our custom error report valve.
Valve
<Valve prefix="site_access_log.${catalina.instance.name}" pattern="%h %l %u %t "%r" %s %b %D %{x-arr-log-id}i" directory="${site.logdir}/http/RawLogs" maxDays="${site.logRetentionDays}" className="org.apache.catalina.valves.AccessLogValve" suffix=".txt"/>
directoryis set toAZURE_LOGGING_DIR, which defaults tohome\logFiles.maxDaysis set toWEBSITE_HTTPLOGGING_RETENTION_DAYS, which defaults to7. This value aligns with the application-logging platform default.
On Linux, it has all of the same customization, and it adds some error and reporting pages to the valve:
<xsl:attribute name="appServiceErrorPage">
    <xsl:value-of select="'${appService.valves.appServiceErrorPage}'"/>
</xsl:attribute>

<xsl:attribute name="showReport">
    <xsl:value-of select="'${catalina.valves.showReport}'"/>
</xsl:attribute>

<xsl:attribute name="showServerInfo">
    <xsl:value-of select="'${catalina.valves.showServerInfo}'"/>
</xsl:attribute>
Related content
Visit the Azure for Java Developers center to find Azure quickstarts, tutorials, and Java reference documentation.