.NET에서 Relay 하이브리드 연결 HTTP 요청 시작
이 빠른 시작에서는 HTTP 프로토콜을 사용하여 메시지를 보내고 받는 .NET 받는 사람 및 보낸 사람 애플리케이션을 만듭니다. 애플리케이션은 Azure Relay 하이브리드 연결 기능을 사용합니다. Azure Relay에 대한 일반적인 내용은 Azure Relay를 참조하세요.
이 빠른 시작에서 수행하는 단계는 다음과 같습니다.
- Azure Portal을 사용하여 Relay 네임스페이스를 만듭니다.
- Azure Portal을 사용하여 해당 네임스페이스에 하이브리드 연결을 만듭니다.
- 메시지를 수신하는 서버(수신기) 콘솔 애플리케이션을 작성합니다.
- 메시지를 보내는 클라이언트(발신자) 콘솔 애플리케이션을 작성합니다.
- 애플리케이션을 실행합니다.
필수 조건
이 자습서를 완료하려면 다음 필수 구성 요소가 필요합니다.
- Visual Studio 2019 이상 이 자습서의 예제에서는 Visual Studio 2022를 사용합니다.
- Azure 구독 구독이 없으면 시작하기 전에 계정을 만드세요.
네임스페이스 만들기
Azure Portal에 로그인합니다.
왼쪽 메뉴에서 모든 서비스를 선택합니다. 통합을 선택하고 릴레이를 검색한 다음, 릴레이 위로 마우스 커서를 이동하여 만들기를 선택합니다.

네임스페이스 만들기 페이지에서 다음 단계를 수행합니다.
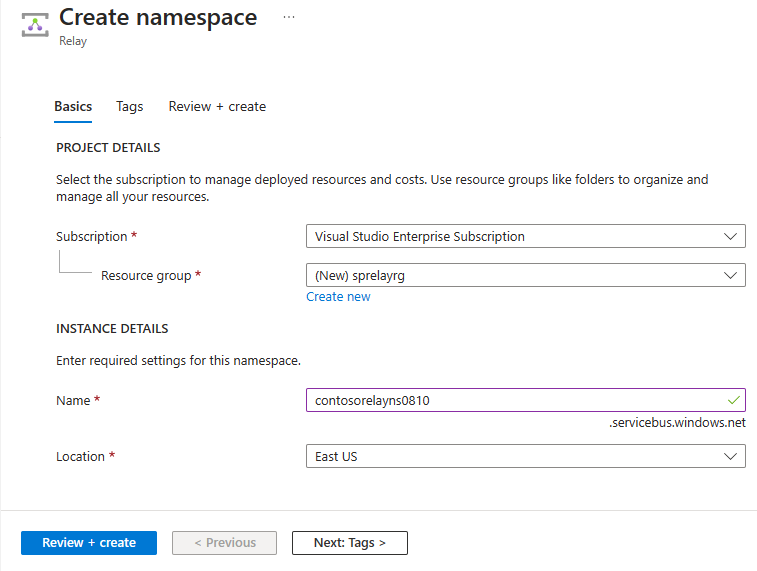
네임스페이스를 만들 Azure 구독을 선택합니다.
리소스 그룹의 경우 네임스페이스를 배치할 기존 리소스 그룹을 선택하거나 새 리소스 그룹을 만듭니다.
릴레이 네임스페이스의 이름을 입력합니다.
네임스페이스를 호스팅해야 하는 지역을 선택합니다.
페이지 아래쪽에서 검토 + 만들기를 선택합니다.
리뷰 + 생성 페이지에서 생성를 선택합니다.
몇 분 후에 네임스페이스에 대한 릴레이 페이지가 표시됩니다.

관리 자격 증명 가져오기
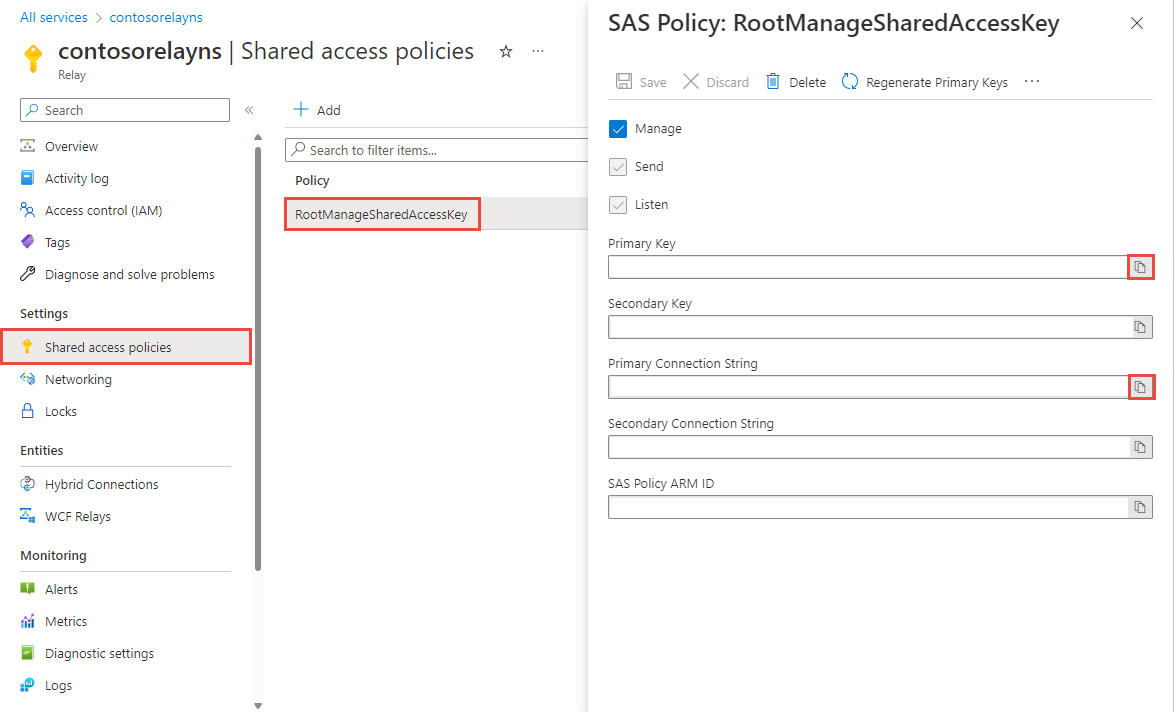
릴레이 페이지의 왼쪽 메뉴에서 공유 액세스 정책을 선택합니다. `
공유 액세스 정책 페이지에서 RootManageSharedAccessKey를 선택합니다.
정책: RootManageSharedAccessKey 아래에서 기본 연결 문자열 옆에 있는 복사 단추를 선택합니다. 이 작업은 나중에 사용할 연결 문자열을 클립보드에 복사합니다. 메모장이나 기타 다른 위치에 임시로 이 값을 붙여 넣습니다.
앞의 단계를 반복하여 나중에 사용할 기본 키의 값을 복사하여 임시 위치에 붙여넣습니다.
하이브리드 연결 만들기
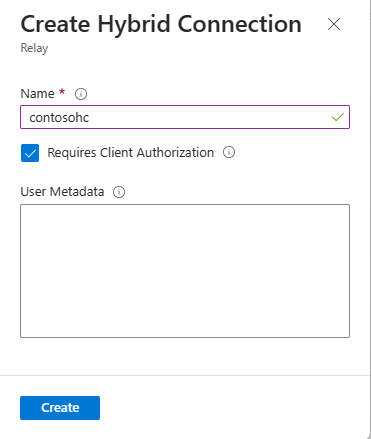
네임스페이스의 릴레이 페이지에서 다음 단계에 따라 하이브리드 연결을 만듭니다.
왼쪽 메뉴의 엔터티에서 하이브리드 연결을 선택한 다음, + 하이브리드 연결을 선택합니다.
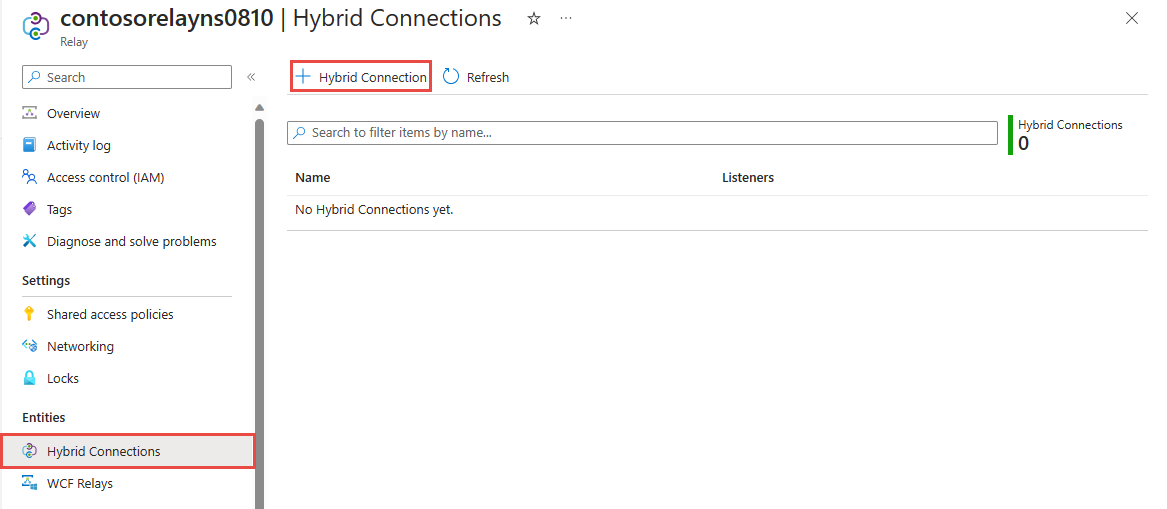
하이브리드 연결 만들기 페이지에서 하이브리드 연결 이름을 입력하고 만들기를 선택합니다.
서버 애플리케이션(수신기) 만들기
Visual Studio에서 메시지를 릴레이로부터 수신 대기하고 받을 C# 콘솔 애플리케이션을 작성합니다.
콘솔 애플리케이션 만들기
Visual Studio에서 새 콘솔 앱(.NET Framework) 프로젝트를 만듭니다.
릴레이 NuGet 패키지 추가
- 마우스 오른쪽 단추로 새로 만든 프로젝트를 클릭한 다음 NuGet 패키지 관리를 선택합니다.
- 찾아보기를 선택한 다음 Microsoft.Azure.Relay를 검색합니다. 검색 결과에서 Microsoft Azure Relay를 선택합니다.
- 설치을 선택하여 설치를 완료합니다. 대화 상자를 닫습니다.
메시지를 받는 코드 작성
Program.cs 파일의 맨 위에 있는 기존
using문을 다음using문으로 바꿉니다.using System; using System.IO; using System.Threading; using System.Threading.Tasks; using Microsoft.Azure.Relay; using System.Net;상수를 하이브리드 연결 정보의
Program클래스에 추가합니다. 대괄호에 포함된 자리 표시자를 하이브리드 연결을 만들 때 가져온 값으로 바꿉니다. 정규화된 네임스페이스 이름을 사용해야 합니다.// replace {RelayNamespace} with the name of your namespace private const string RelayNamespace = "{RelayNamespace}.servicebus.windows.net"; // replace {HybridConnectionName} with the name of your hybrid connection private const string ConnectionName = "{HybridConnectionName}"; // replace {SAKKeyName} with the name of your Shared Access Policies key, which is RootManageSharedAccessKey by default private const string KeyName = "{SASKeyName}"; // replace {SASKey} with the primary key of the namespace you saved earlier private const string Key = "{SASKey}";Program클래스에RunAsync메서드를 추가합니다.private static async Task RunAsync() { var cts = new CancellationTokenSource(); var tokenProvider = TokenProvider.CreateSharedAccessSignatureTokenProvider(KeyName, Key); var listener = new HybridConnectionListener(new Uri(string.Format("sb://{0}/{1}", RelayNamespace, ConnectionName)), tokenProvider); // Subscribe to the status events. listener.Connecting += (o, e) => { Console.WriteLine("Connecting"); }; listener.Offline += (o, e) => { Console.WriteLine("Offline"); }; listener.Online += (o, e) => { Console.WriteLine("Online"); }; // Provide an HTTP request handler listener.RequestHandler = (context) => { // Do something with context.Request.Url, HttpMethod, Headers, InputStream... context.Response.StatusCode = HttpStatusCode.OK; context.Response.StatusDescription = "OK, This is pretty neat"; using (var sw = new StreamWriter(context.Response.OutputStream)) { sw.WriteLine("hello!"); } // The context MUST be closed here context.Response.Close(); }; // Opening the listener establishes the control channel to // the Azure Relay service. The control channel is continuously // maintained, and is reestablished when connectivity is disrupted. await listener.OpenAsync(); Console.WriteLine("Server listening"); // Start a new thread that will continuously read the console. await Console.In.ReadLineAsync(); // Close the listener after you exit the processing loop. await listener.CloseAsync(); }Program클래스의Main메서드에 다음 코드 줄을 추가합니다.RunAsync().GetAwaiter().GetResult();완성된 Program.cs 파일은 다음과 같이 표시됩니다.
namespace Server
{
    using System;
    using System.IO;
    using System.Threading;
    using System.Threading.Tasks;
    using Microsoft.Azure.Relay;
    using System.Net;

    public class Program
    {
        private const string RelayNamespace = "{RelayNamespace}.servicebus.windows.net";
        private const string ConnectionName = "{HybridConnectionName}";
        private const string KeyName = "{SASKeyName}";
        private const string Key = "{SASKey}";

        public static void Main(string[] args)
        {
            RunAsync().GetAwaiter().GetResult();
        }

        private static async Task RunAsync()
        {
            var tokenProvider = TokenProvider.CreateSharedAccessSignatureTokenProvider(KeyName, Key);
            var listener = new HybridConnectionListener(new Uri(string.Format("sb://{0}/{1}", RelayNamespace, ConnectionName)), tokenProvider);

            // Subscribe to the status events.
            listener.Connecting += (o, e) => { Console.WriteLine("Connecting"); };
            listener.Offline += (o, e) => { Console.WriteLine("Offline"); };
            listener.Online += (o, e) => { Console.WriteLine("Online"); };

            // Provide an HTTP request handler
            listener.RequestHandler = (context) =>
            {
                // Do something with context.Request.Url, HttpMethod, Headers, InputStream...
                context.Response.StatusCode = HttpStatusCode.OK;
                context.Response.StatusDescription = "OK";
                using (var sw = new StreamWriter(context.Response.OutputStream))
                {
                    sw.WriteLine("hello!");
                }

                // The context MUST be closed here
                context.Response.Close();
            };

            // Opening the listener establishes the control channel to
            // the Azure Relay service. The control channel is continuously
            // maintained, and is reestablished when connectivity is disrupted.
            await listener.OpenAsync();
            Console.WriteLine("Server listening");

            // Start a new thread that will continuously read the console.
            await Console.In.ReadLineAsync();

            // Close the listener after you exit the processing loop.
            await listener.CloseAsync();
        }
    }
}
클라이언트 애플리케이션(보낸 사람) 만들기
Visual Studio에서 메시지를 릴레이로 보낼 C# 콘솔 애플리케이션을 작성합니다.
콘솔 애플리케이션 만들기
릴레이를 만들 때 [클라이언트 인증 필요] 옵션을 사용하지 않도록 설정한 경우 임의 브라우저로 요청을 하이브리드 연결 URL에 보낼 수 있습니다. 보호된 엔드포인트에 액세스하기 위해서는 여기 표시된 ServiceBusAuthorization 헤더에 토큰을 만들고 전달해야 합니다.
Visual Studio에서 새 콘솔 앱(.NET Framework) 프로젝트를 만듭니다.
릴레이 NuGet 패키지 추가
- 마우스 오른쪽 단추로 새로 만든 프로젝트를 클릭한 다음 NuGet 패키지 관리를 선택합니다.
- 시험판 포함 옵션을 선택합니다.
- 찾아보기를 선택한 다음 Microsoft.Azure.Relay를 검색합니다. 검색 결과에서 Microsoft Azure Relay를 선택합니다.
- 설치을 선택하여 설치를 완료합니다. 대화 상자를 닫습니다.
요청을 보내는 코드 작성
Program.cs 파일의 맨 위에 있는 기존
using문을 다음using문으로 바꿉니다.using System; using System.IO; using System.Threading; using System.Threading.Tasks; using System.Net.Http; using Microsoft.Azure.Relay;상수를 하이브리드 연결 정보의
Program클래스에 추가합니다. 대괄호에 포함된 자리 표시자를 하이브리드 연결을 만들 때 가져온 값으로 바꿉니다. 정규화된 네임스페이스 이름을 사용해야 합니다.// replace {RelayNamespace} with the name of your namespace private const string RelayNamespace = "{RelayNamespace}.servicebus.windows.net"; // replace {HybridConnectionName} with the name of your hybrid connection private const string ConnectionName = "{HybridConnectionName}"; // replace {SAKKeyName} with the name of your Shared Access Policies key, which is RootManageSharedAccessKey by default private const string KeyName = "{SASKeyName}"; // replace {SASKey} with the primary key of the namespace you saved earlier private const string Key = "{SASKey}";Program클래스에 다음 메서드를 추가합니다.private static async Task RunAsync() { var tokenProvider = TokenProvider.CreateSharedAccessSignatureTokenProvider( KeyName, Key); var uri = new Uri(string.Format("https://{0}/{1}", RelayNamespace, ConnectionName)); var token = (await tokenProvider.GetTokenAsync(uri.AbsoluteUri, TimeSpan.FromHours(1))).TokenString; var client = new HttpClient(); var request = new HttpRequestMessage() { RequestUri = uri, Method = HttpMethod.Get, }; request.Headers.Add("ServiceBusAuthorization", token); var response = await client.SendAsync(request); Console.WriteLine(await response.Content.ReadAsStringAsync()); Console.ReadLine(); }Program클래스의Main메서드에 다음 코드 줄을 추가합니다.RunAsync().GetAwaiter().GetResult();Program.cs는 다음과 같이 표시됩니다.
using System; using System.IO; using System.Threading; using System.Threading.Tasks; using System.Net.Http; using Microsoft.Azure.Relay; namespace Client { class Program { private const string RelayNamespace = "{RelayNamespace}.servicebus.windows.net"; private const string ConnectionName = "{HybridConnectionName}"; private const string KeyName = "{SASKeyName}"; private const string Key = "{SASKey}"; static void Main(string[] args) { RunAsync().GetAwaiter().GetResult(); } private static async Task RunAsync() { var tokenProvider = TokenProvider.CreateSharedAccessSignatureTokenProvider( KeyName, Key); var uri = new Uri(string.Format("https://{0}/{1}", RelayNamespace, ConnectionName)); var token = (await tokenProvider.GetTokenAsync(uri.AbsoluteUri, TimeSpan.FromHours(1))).TokenString; var client = new HttpClient(); var request = new HttpRequestMessage() { RequestUri = uri, Method = HttpMethod.Get, }; request.Headers.Add("ServiceBusAuthorization", token); var response = await client.SendAsync(request); Console.WriteLine(await response.Content.ReadAsStringAsync()); } } }
애플리케이션 실행
서버 애플리케이션을 실행합니다. 콘솔 창에서 다음과 같은 텍스트가 표시됩니다.
Online
Server listening
클라이언트 애플리케이션을 실행합니다. 클라이언트 창에서
hello!가 표시됩니다. 클라이언트는 HTTP 요청을 서버에 보냈고, 서버는hello!로 응답했습니다.이제 콘솔 창을 닫으려면 콘솔 창에서 ENTER 키를 누릅니다.
축하합니다. 전체 하이브리드 연결 애플리케이션을 만들었습니다.
다음 단계
이 빠른 시작에서는 메시지를 보내고 받는 데 HTTP를 사용한 .NET 클라이언트 및 서버 애플리케이션을 만들었습니다. Azure Relay의 하이브리드 연결 기능은 또한 WebSockets를 사용하여 메시지를 보내고 받을 수 있도록 지원합니다. Azure Relay 하이브리드 연결에 WebSockets를 사용하는 방법에 대한 자세한 내용은 WebSockets 빠른 시작을 참조하세요.
이 빠른 시작에서는 클라이언트 및 서버 애플리케이션을 만드는 데 .NET Framework를 사용했습니다. Node.js를 사용하여 클라이언트 및 서버 애플리케이션을 작성하는 방법은 Node.js WebSockets 빠른 시작 또는 Node.js HTTP 빠른 시작을 참조하세요.