빠른 시작: 전화 번호에 대한 아웃바운드 통화
Communication Services Calling SDK를 사용하여 앱에 PSTN 통화를 추가하여 Azure Communication Services를 시작하세요.
Important
Azure Communication Services는 미국, 푸에르토리코, 캐나다, 덴마크, 영국의 긴급 번호에 대한 긴급 통화를 지원합니다.
Azure Communication Services 음성 통화(PSTN)는 미국, 푸에르토리코 및 캐나다에서 긴급 번호 911로 전화를 걸고, 덴마크에서는 긴급 번호 112로 전화를 걸며, 영국에서는 긴급 번호 999와 112로 전화를 거는 데 사용할 수 있습니다. Azure Communication Services는 현재 해당 국가 또는 지역 외부에서 해당 긴급 번호로 전화를 걸거나 다른 국가 또는 지역의 응급 서비스로 전화를 거는 것을 지원하지 않습니다.
예제 코드
GitHub에서 이 빠른 시작에 대한 최종 코드 칮기
참고 항목
Azure Communication Services UI 라이브러리를 사용하여 전화 번호에 대한 아웃바운드 통화에 액세스할 수 있습니다. UI 라이브러리를 사용하면 개발자가 몇 줄의 코드만 사용하여 PSTN이 사용하도록 설정된 통화 클라이언트를 애플리케이션에 추가할 수 있습니다.
필수 조건
- 활성 구독이 있는 Azure 계정. 체험 계정을 만듭니다.
- 배포된 Communication Services 리소스. Communication Services 리소스 만들기
- Communication Services 리소스에서 전화 번호를 획득하거나 Azure Communication Services 직접 라우팅을 구성 무료 구독이 있는 경우 평가판 전화 번호를 받을 수 있습니다.
- 호출 클라이언트를 사용하도록 설정하는
User Access Token입니다.User Access Token를 가져오는 방법에 대한 자세한 정보
설정
새 Node.js 애플리케이션 만들기
터미널 또는 명령 창을 열어 앱에 대한 새 디렉터리를 만들고 해당 디렉터리로 이동합니다.
mkdir calling-quickstart
cd calling-quickstart
npm init -y를 실행하여 기본 설정으로 package.json 파일을 만듭니다.
npm init -y
패키지 설치
npm install 명령을 사용하여 JavaScript용 Azure Communication Services Calling SDK를 설치합니다.
npm install @azure/communication-common --save
npm install @azure/communication-calling --save
--save 옵션은 라이브러리를 package.json 파일의 종속성으로 나열합니다.
앱 프레임워크 설정
이 빠른 시작에서는 파일 집합을 사용하여 애플리케이션 자산을 번들로 묶습니다. 다음 명령을 실행하여 이러한 파일 집합을 설치하고 package.json에 개발 종속성으로 나열합니다.
npm install parcel --save-dev
프로젝트의 루트 디렉터리에 index.html 파일을 만듭니다. 이 파일을 사용하여 사용자가 호출을 수행할 수 있도록 하는 기본 레이아웃을 구성합니다.
코드는 다음과 같습니다.
<!DOCTYPE html>
<html>
<head>
<title>Communication Client - Calling Sample</title>
</head>
<body>
<h4>Azure Communication Services</h4>
<h1>Calling Quickstart</h1>
<input
id="callee-phone-input"
type="text"
placeholder="Who would you like to call?"
style="margin-bottom:1em; width: 230px;"
/>
<div>
<button id="call-phone-button" type="button">
Start Call
</button>
<button id="hang-up-phone-button" type="button" disabled="true">
Hang Up
</button>
</div>
<script src="./app.js" type="module"></script>
</body>
</html>
이 빠른 시작에 대한 애플리케이션 로직을 포함하기 위해 app.js라는 프로젝트의 루트 디렉터리에 파일을 만듭니다. 다음 코드를 추가하여 통화 클라이언트를 가져오고, 비즈니스 논리를 연결할 수 있도록 DOM 요소에 대한 참조를 가져옵니다.
import { CallClient, CallAgent } from "@azure/communication-calling";
import { AzureCommunicationTokenCredential } from '@azure/communication-common';

let call;
let callAgent;

const calleePhoneInput = document.getElementById("callee-phone-input");
const callPhoneButton = document.getElementById("call-phone-button");
const hangUpPhoneButton = document.getElementById("hang-up-phone-button");

async function init() {
    const callClient = new CallClient();
    const tokenCredential = new AzureCommunicationTokenCredential('<USER ACCESS TOKEN with VoIP scope>');
    callAgent = await callClient.createCallAgent(tokenCredential);
    //callPhoneButton.disabled = false;
}

init();
휴대폰에 전화 걸기 시작
통화를 시작하는 데 사용할 Communication Services 리소스에서 획득한 전화 번호를 지정합니다.
Warning
전화 번호는 E.164 국제 표준 형식으로 제공되어야 합니다. (예: +12223334444)
callPhoneButton을 클릭할 때 제공한 전화 번호로 통화를 시작하는 이벤트 처리기를 추가합니다.
callPhoneButton.addEventListener("click", () => {
  // start a call to phone
  const phoneToCall = calleePhoneInput.value;
  call = callAgent.startCall(
    [{phoneNumber: phoneToCall}], { alternateCallerId: {phoneNumber: 'YOUR AZURE REGISTERED PHONE NUMBER HERE: +12223334444'}
  });
  // toggle button states
  hangUpPhoneButton.disabled = false;
  callPhoneButton.disabled = true;
});
휴대폰에 전화 걸기 종료
hangUpPhoneButton을 클릭하면 현재 호출을 종료하는 이벤트 수신기를 추가합니다.
hangUpPhoneButton.addEventListener("click", () => {
  // end the current call
  call.hangUp({
    forEveryone: true
  });

  // toggle button states
  hangUpPhoneButton.disabled = true;
  callPhoneButton.disabled = false;
});
forEveryone 속성은 모든 호출 참가자에 대한 호출을 종료합니다.
코드 실행
npx parcel index.html 명령을 사용하여 앱을 빌드하고 실행합니다.
브라우저를 열고 http://localhost:1234/로 이동합니다. 다음 웹 애플리케이션이 표시됩니다.
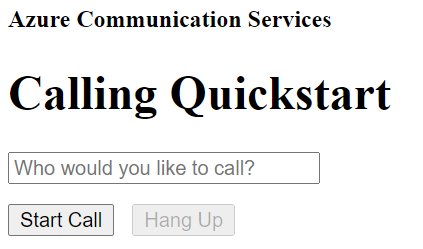
추가된 텍스트 필드에 전화 번호를 제공하고 휴대폰 통화 시작 단추를 클릭하여 실제 전화 번호로 전화를 걸 수 있습니다.
Important
Azure Communication Services는 미국, 푸에르토리코, 캐나다, 덴마크, 영국의 긴급 번호에 대한 긴급 통화를 지원합니다.
Azure Communication Services 음성 통화(PSTN)는 미국, 푸에르토리코 및 캐나다에서 긴급 번호 911로 전화를 걸고, 덴마크에서는 긴급 번호 112로 전화를 걸며, 영국에서는 긴급 번호 999와 112로 전화를 거는 데 사용할 수 있습니다. Azure Communication Services는 현재 해당 국가 또는 지역 외부에서 해당 긴급 번호로 전화를 걸거나 다른 국가 또는 지역의 응급 서비스로 전화를 거는 것을 지원하지 않습니다.
예제 코드
GitHub에서 이 빠른 시작에 대한 최종 코드 칮기
필수 조건
- 활성 구독이 있는 Azure 계정. 체험 계정을 만듭니다.
- 배포된 Communication Services 리소스. Communication Services 리소스 만들기
- Communication Services 리소스에서 전화 번호를 획득하거나 Azure Communication Services 직접 라우팅을 구성 무료 구독이 있는 경우 평가판 전화 번호를 받을 수 있습니다.
- 호출 클라이언트를 사용하도록 설정하는
User Access Token입니다.User Access Token를 가져오는 방법에 대한 자세한 정보 - 애플리케이션에 통화 추가 시작에 대한 빠른 시작을 완료합니다.
필수 구성 요소 확인
- Communication Services 리소스와 연결된 전화 번호를 보려면 Azure Portal에 로그인하고 Communication Services 리소스를 찾아 왼쪽 탐색 창에서 전화 번호 탭을 엽니다.
설정
앱에 PSTN 기능 추가
MainActivity.java를 수정하여 앱에 PhoneNumber 유형을 추가합니다.
import com.azure.android.communication.common.PhoneNumberIdentifier;
휴대폰에 전화 걸기 시작
Communication Services 리소스 내에서 가져온 전화 번호를 지정합니다. 이 번호는 통화를 시작하기 위한 발신자 ID로 사용됩니다.
Warning
전화 번호는 E.164 국제 표준 형식으로 제공되어야 합니다. (예: +12223334444)
MainActivity.java에서 startCall() 이벤트 처리기를 수정하여 전화 통화를 처리합니다.
    private void startCall() {
        EditText calleePhoneView = findViewById(R.id.callee_id);
        String calleePhone = calleePhoneView.getText().toString();
        PhoneNumberIdentifier callerPhone = new PhoneNumberIdentifier("+12223334444");
        StartCallOptions options = new StartCallOptions();
        options.setAlternateCallerId(callerPhone);
        options.setVideoOptions(new VideoOptions(null));
        call = agent.startCall(
                getApplicationContext(),
                new PhoneNumberIdentifier[] {new PhoneNumberIdentifier(calleePhone)},
                options);
    }
앱 시작 및 echo 봇 호출
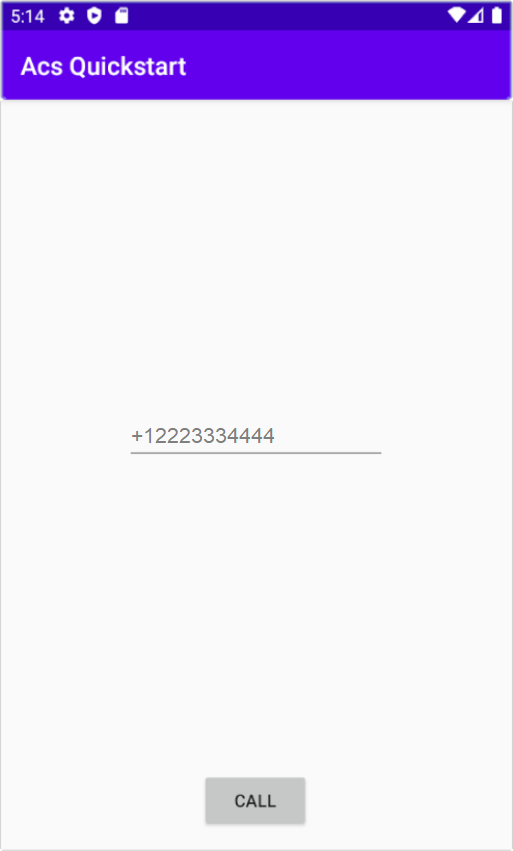
이제 도구 모음의 "앱 실행" 단추(Shift+F10)를 사용하여 앱을 시작할 수 있습니다. 전화를 걸려면 추가된 텍스트 필드에 전화 번호를 입력하고 통화 단추를 선택합니다.
Warning
전화 번호는 E.164 국제 표준 형식으로 제공되어야 합니다. (예: +12223334444)
Important
Azure Communication Services는 미국, 푸에르토리코, 캐나다, 덴마크, 영국의 긴급 번호에 대한 긴급 통화를 지원합니다.
Azure Communication Services 음성 통화(PSTN)는 미국, 푸에르토리코 및 캐나다에서 긴급 번호 911로 전화를 걸고, 덴마크에서는 긴급 번호 112로 전화를 걸며, 영국에서는 긴급 번호 999와 112로 전화를 거는 데 사용할 수 있습니다. Azure Communication Services는 현재 해당 국가 또는 지역 외부에서 해당 긴급 번호로 전화를 걸거나 다른 국가 또는 지역의 응급 서비스로 전화를 거는 것을 지원하지 않습니다.
필수 조건
- 활성 구독이 있는 Azure 계정. 체험 계정을 만듭니다.
- 배포된 Communication Services 리소스. Communication Services 리소스 만들기
- Communication Services 리소스에서 전화 번호를 획득하거나 Azure Communication Services 직접 라우팅을 구성 무료 구독이 있는 경우 평가판 전화 번호를 받을 수 있습니다.
- 호출 클라이언트를 사용하도록 설정하는
User Access Token입니다.User Access Token를 가져오는 방법에 대한 자세한 정보 - 애플리케이션에 통화 추가 시작에 대한 빠른 시작을 완료합니다.
필수 구성 요소 확인
- Communication Services 리소스와 연결된 전화 번호를 보려면 Azure Portal에 로그인하고 Communication Services 리소스를 찾아 왼쪽 탐색 창에서 전화 번호 탭을 엽니다.
- iOS용 Azure Communication Services Calling SDK를 사용하여 앱을 빌드하고 실행할 수 있습니다.
설정
휴대폰에 전화 걸기 시작
통화를 시작하는 데 사용할 Communication Services 리소스에서 획득한 전화 번호를 지정합니다.
Warning
전화 번호는 E.164 국제 표준 형식으로 제공되어야 합니다. (예: +12223334444)
통화 시작 단추를 누를 때 수행되는 startCall 이벤트 처리기를 수정합니다.
func startCall() {
        // Ask permissions
        AVAudioSession.sharedInstance().requestRecordPermission { (granted) in
            if granted {
                let startCallOptions = StartCallOptions()
                startCallOptions.alternateCallerId = PhoneNumberIdentifier(phoneNumber: "<YOUR AZURE REGISTERED PHONE NUMBER>")
                self.callAgent!.startCall(participants: [PhoneNumberIdentifier(phoneNumber: self.callee)], options: startCallOptions) { (call, error) in
                    if (error == nil) {
                        self.call = call
                    } else {
                        print("Failed to get call object")
                    }
                }
            }
        }
    }
코드 실행
제품>실행을 선택하거나 (⌘-R) 바로 가기 키를 사용하여 iOS 시뮬레이터에서 앱을 빌드하고 실행할 수 있습니다.
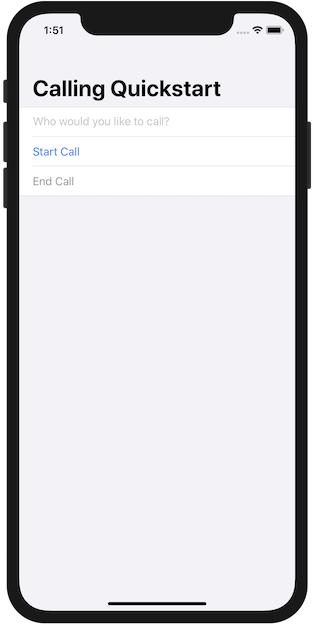
추가된 텍스트 필드에 전화 번호를 제공하고 통화 시작 단추를 클릭하여 휴대폰에 전화를 걸 수 있습니다.
Warning
전화 번호는 E.164 국제 표준 형식으로 제공되어야 합니다. (예: +12223334444)
참고 항목
처음으로 전화를 걸면 마이크에 대한 액세스를 묻는 메시지가 표시됩니다. 프로덕션 애플리케이션에서는 AVAudioSession API를 사용하여 권한 상태를 확인하고 권한이 부여되지 않은 경우 애플리케이션의 동작을 정상적으로 업데이트해야 합니다.
리소스 정리
Communication Services 구독을 정리하고 제거하려면 리소스 또는 리소스 그룹을 삭제하면 됩니다. 리소스 그룹을 삭제하면 해당 리소스 그룹에 연결된 다른 모든 리소스가 함께 삭제됩니다. 리소스 정리에 대해 자세히 알아보세요.
다음 단계
자세한 내용은 다음 문서를 참조하세요.
피드백
출시 예정: 2024년 내내 콘텐츠에 대한 피드백 메커니즘으로 GitHub 문제를 단계적으로 폐지하고 이를 새로운 피드백 시스템으로 바꿀 예정입니다. 자세한 내용은 다음을 참조하세요. https://aka.ms/ContentUserFeedback
다음에 대한 사용자 의견 제출 및 보기