Notiz
Zougrëff op dës Säit erfuerdert Autorisatioun. Dir kënnt probéieren, Iech unzemellen oder Verzeechnesser ze änneren.
Zougrëff op dës Säit erfuerdert Autorisatioun. Dir kënnt probéieren, Verzeechnesser ze änneren.
Microsoft Spark Utilities (MSSparkUtils) is a built-in package that helps you easily perform common tasks. Use MSSparkUtils to work with file systems, get environment variables, chain notebooks together, and work with secrets. The MSSparkUtils package is available in PySpark (Python), Scala, SparkR notebooks, and Fabric pipelines.
Note
- MsSparkUtils is officially renamed to NotebookUtils. The existing code will remain backward compatible and won't cause any breaking changes. We strongly recommend upgrading to notebookutils to ensure continued support and access to new features. The mssparkutils namespace will be retired in the future.
- NotebookUtils is designed to work with Spark 3.4(Runtime v1.2) and above. All new features and updates are exclusively supported with notebookutils namespace going forward.
File system utilities
mssparkutils.fs provides utilities for working with various file systems, including Azure Data Lake Storage Gen2 and Azure Blob Storage. Make sure you configure access to Azure Data Lake Storage Gen2 and Azure Blob Storage appropriately.
Run the following commands for an overview of the available methods:
from notebookutils import mssparkutils
mssparkutils.fs.help()
Output
mssparkutils.fs provides utilities for working with various FileSystems.

Below is overview about the available methods:

cp(from: String, to: String, recurse: Boolean = false): Boolean -> Copies a file or directory, possibly across FileSystems
mv(from: String, to: String, recurse: Boolean = false): Boolean -> Moves a file or directory, possibly across FileSystems
ls(dir: String): Array -> Lists the contents of a directory
mkdirs(dir: String): Boolean -> Creates the given directory if it does not exist, also creating any necessary parent directories
put(file: String, contents: String, overwrite: Boolean = false): Boolean -> Writes the given String out to a file, encoded in UTF-8
head(file: String, maxBytes: int = 1024 * 100): String -> Returns up to the first 'maxBytes' bytes of the given file as a String encoded in UTF-8
append(file: String, content: String, createFileIfNotExists: Boolean): Boolean -> Append the content to a file
rm(dir: String, recurse: Boolean = false): Boolean -> Removes a file or directory
exists(file: String): Boolean -> Check if a file or directory exists
mount(source: String, mountPoint: String, extraConfigs: Map[String, Any]): Boolean -> Mounts the given remote storage directory at the given mount point
unmount(mountPoint: String): Boolean -> Deletes a mount point
mounts(): Array[MountPointInfo] -> Show information about what is mounted
getMountPath(mountPoint: String, scope: String = ""): String -> Gets the local path of the mount point

Use mssparkutils.fs.help("methodName") for more info about a method.
MSSparkUtils works with the file system in the same way as Spark APIs. Take mssparkuitls.fs.mkdirs() and lakehouse usage for example:
| Usage | Relative path from HDFS root | Absolute path for ABFS file system | Absolute path for local file system in driver node |
|---|---|---|---|
| Nondefault lakehouse | Not supported | mssparkutils.fs.mkdirs("abfss://<container_name>@<storage_account_name>.dfs.core.windows.net/<new_dir>") | mssparkutils.fs.mkdirs("file:/<new_dir>") |
| Default lakehouse | Directory under “Files” or “Tables”: mssparkutils.fs.mkdirs("Files/<new_dir>") | mssparkutils.fs.mkdirs("abfss://<container_name>@<storage_account_name>.dfs.core.windows.net/<new_dir>") | mssparkutils.fs.mkdirs("file:/<new_dir>") |
List files
To list the content of a directory, use mssparkutils.fs.ls('Your directory path'). For example:
mssparkutils.fs.ls("Files/tmp") # works with the default lakehouse files using relative path
mssparkutils.fs.ls("abfss://<container_name>@<storage_account_name>.dfs.core.windows.net/<path>")  # based on ABFS file system
mssparkutils.fs.ls("file:/tmp")  # based on local file system of driver node
View file properties
This method returns file properties, including the file name, file path, file size, and whether it's a directory or a file.
files = mssparkutils.fs.ls('Your directory path')
for file in files:
    print(file.name, file.isDir, file.isFile, file.path, file.size)
Create new directory
This method creates the specified directory if it doesn't exist, and creates any necessary parent directories.
mssparkutils.fs.mkdirs('new directory name')
mssparkutils.fs. mkdirs("Files/<new_dir>")  # works with the default lakehouse files using relative path
mssparkutils.fs.ls("abfss://<container_name>@<storage_account_name>.dfs.core.windows.net/<new_dir>")  # based on ABFS file system
mssparkutils.fs.ls("file:/<new_dir>")  # based on local file system of driver node
Copy file
This method copies a file or directory, and supports copy activity across file systems.
mssparkutils.fs.cp('source file or directory', 'destination file or directory', True)# Set the third parameter as True to copy all files and directories recursively
Performant copy file
This method provides a faster way of copying or moving files, especially large volumes of data.
mssparkutils.fs.fastcp('source file or directory', 'destination file or directory', True)# Set the third parameter as True to copy all files and directories recursively
Preview file content
This method returns up to the first maxBytes bytes of the specified file as a string encoded in UTF-8.
# Set the second parameter as an integer for the maxBytes to read
mssparkutils.fs.head('file path', <maxBytes>)
Move file
This method moves a file or directory, and supports moves across file systems.
mssparkutils.fs.mv('source file or directory', 'destination directory', True) # Set the last parameter as True to firstly create the parent directory if it does not exist
mssparkutils.fs.mv('source file or directory', 'destination directory', True, True) # Set the third parameter to True to firstly create the parent directory if it does not exist. Set the last parameter to True to overwrite the updates.
Write file
This method writes the given string out to a file, encoded in UTF-8.
mssparkutils.fs.put("file path", "content to write", True) # Set the last parameter as True to overwrite the file if it existed already
Append content to a file
This method appends the given string to a file, encoded in UTF-8.
mssparkutils.fs.append("file path", "content to append", True) # Set the last parameter as True to create the file if it does not exist
Note
When you use the mssparkutils.fs.append API in a for loop to write to the same file, we recommend that you add a sleep statement of about 0.5 to 1 seconds between the recurring writes. The mssparkutils.fs.append API's internal flush operation is asynchronous, so a short delay helps ensure data integrity.
Delete file or directory
This method removes a file or directory.
mssparkutils.fs.rm('file path', True) # Set the last parameter as True to remove all files and directories recursively
Mount/unmount directory
For more information about detailed usage, see File mount and unmount.
Notebook utilities
Use the MSSparkUtils Notebook Utilities to run a notebook or exit a notebook with a value. Run the following command to get an overview of the available methods:
mssparkutils.notebook.help()
Output:
exit(value: String): Raises NotebookExit Exception -> This method lets you exit a notebook with a value.
run(path: String, timeoutSeconds: int, arguments: Map): String -> This method runs a notebook and returns its exit value.
Note
Notebook utilities don't apply to Apache Spark job definitions (SJD).
Reference a notebook
This method references a notebook and returns its exit value. You can run nesting function calls in a notebook interactively or in a pipeline. The notebook being referenced runs on the Spark pool of the notebook that calls this function.
mssparkutils.notebook.run("notebook name", <timeoutSeconds>, <parameterMap>, <workspaceId>)
For example:
mssparkutils.notebook.run("Sample1", 90, {"input": 20 })
Fabric notebook also supports referencing notebooks across multiple workspaces by specifying the workspace ID.
mssparkutils.notebook.run("Sample1", 90, {"input": 20 }, "fe0a6e2a-a909-4aa3-a698-0a651de790aa")
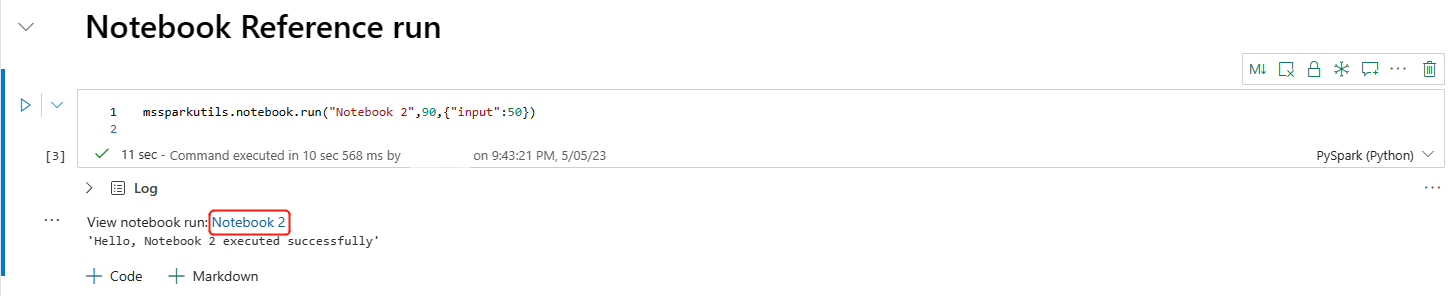
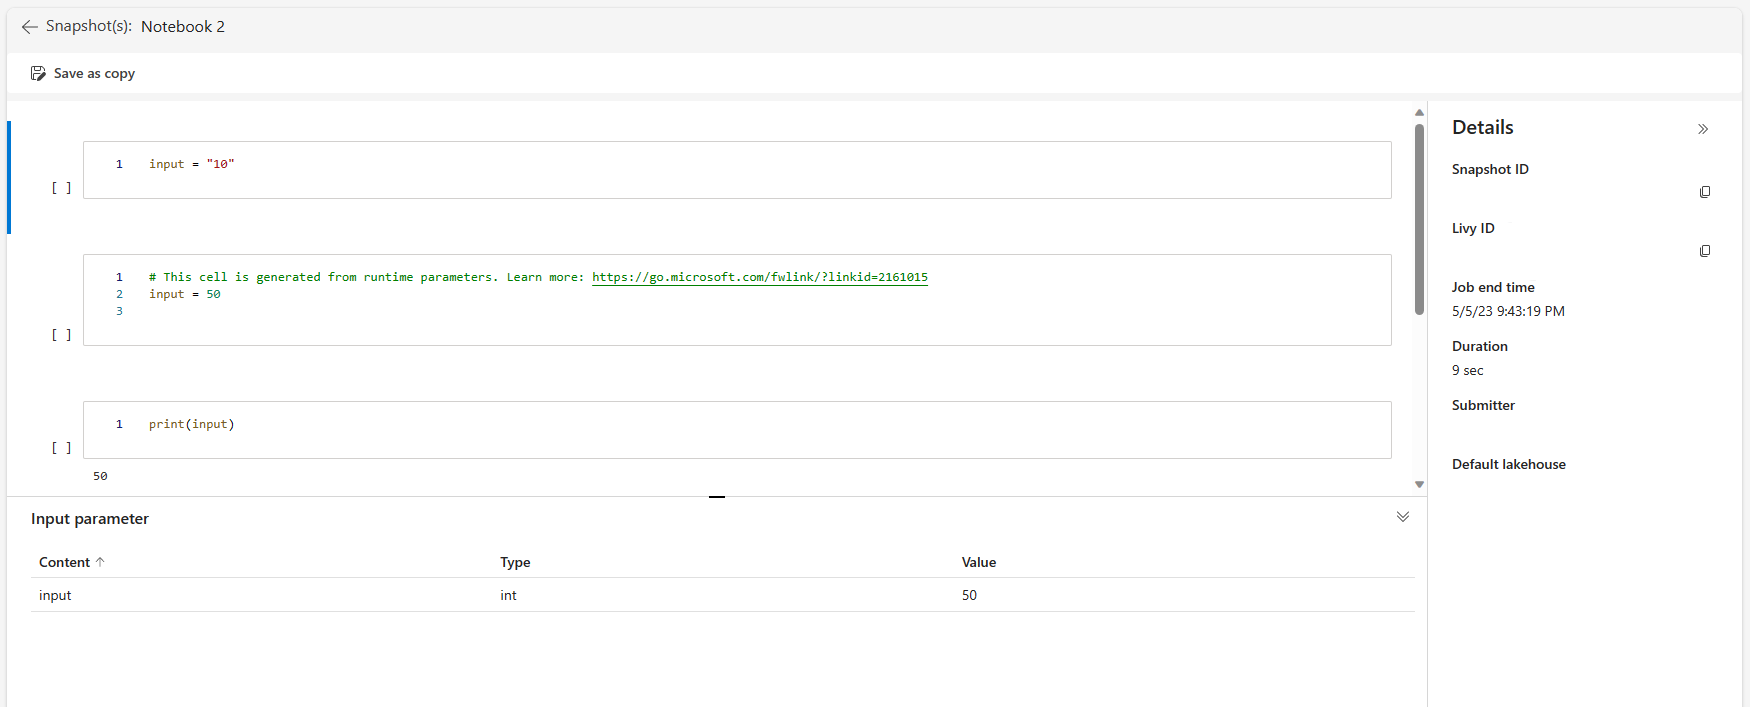
You can open the snapshot link of the reference run in the cell output. The snapshot captures the code run results and allows you to easily debug a reference run.
Note
- The cross-workspace reference notebook is supported by runtime version 1.2 and above.
- If you use the files under Notebook resources, use
mssparkutils.nbResPathin the referenced notebook to make sure it points to the same folder as the interactive run.
Reference run multiple notebooks in parallel
Important
This feature is in preview.
The method mssparkutils.notebook.runMultiple() allows you to run multiple notebooks in parallel or with a predefined topological structure. The API uses a multithreaded implementation to submit, queue, and monitor child notebooks that execute on isolated REPL instances (read-eval-print-loop) within the existing Spark session. The referenced child notebooks share the session's compute resources.
With mssparkutils.notebook.runMultiple(), you can:
Execute multiple notebooks simultaneously, without waiting for each one to finish.
Specify the dependencies and order of execution for your notebooks, using a simple JSON format.
Optimize the use of Spark compute resources and reduce the cost of your Fabric projects.
View the snapshots of each notebook run record in the output, and debug and monitor your notebook tasks conveniently.
Get the exit value of each executive activity and use them in downstream tasks.
You can also try to run the mssparkutils.notebook.help("runMultiple") to find the example and detailed usage.
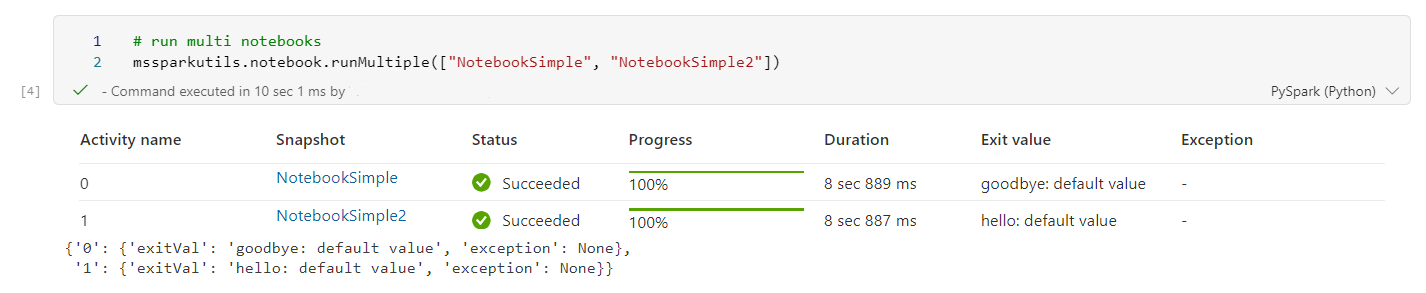
Here's a simple example of running a list of notebooks in parallel using this method:
mssparkutils.notebook.runMultiple(["NotebookSimple", "NotebookSimple2"])
The execution result from the root notebook is as follows:
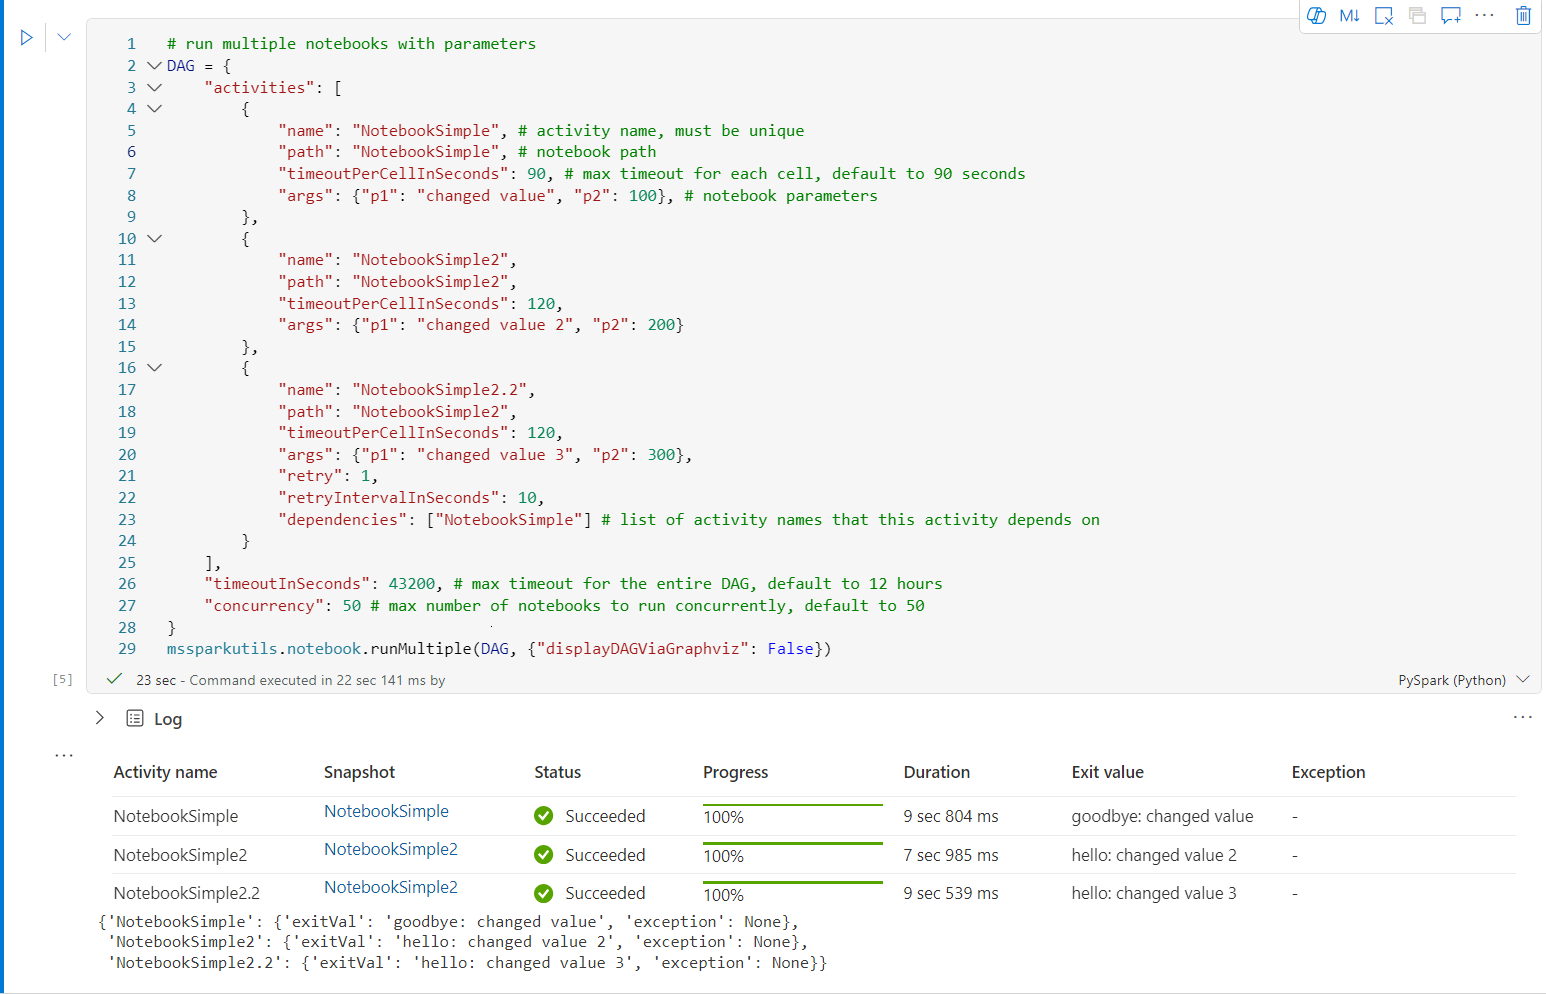
The following example shows running notebooks with a topological structure by using mssparkutils.notebook.runMultiple(). Use this method to easily orchestrate notebooks through a code experience.
# run multiple notebooks with parameters
DAG = {
    "activities": [
        {
            "name": "NotebookSimple", # activity name, must be unique
            "path": "NotebookSimple", # notebook path
            "timeoutPerCellInSeconds": 90, # max timeout for each cell, default to 90 seconds
            "args": {"p1": "changed value", "p2": 100}, # notebook parameters
        },
        {
            "name": "NotebookSimple2",
            "path": "NotebookSimple2",
            "timeoutPerCellInSeconds": 120,
            "args": {"p1": "changed value 2", "p2": 200}
        },
        {
            "name": "NotebookSimple2.2",
            "path": "NotebookSimple2",
            "timeoutPerCellInSeconds": 120,
            "args": {"p1": "changed value 3", "p2": 300},
            "retry": 1,
            "retryIntervalInSeconds": 10,
            "dependencies": ["NotebookSimple"] # list of activity names that this activity depends on
        }
    ],
    "timeoutInSeconds": 43200, # max timeout for the entire DAG, default to 12 hours
    "concurrency": 50 # max number of notebooks to run concurrently, defaults to 50 but ultimately constrained by the number of driver cores
}
mssparkutils.notebook.runMultiple(DAG, {"displayDAGViaGraphviz": False})
The execution result from the root notebook is as follows:
Note
- The upper limit for notebook activities or concurrent notebooks is constrained by the number of driver cores. For example, a Medium node driver with eight cores can execute up to eight notebooks concurrently. This limit exists because each submitted notebook executes on its own REPL (read-eval-print-loop) instance, and each instance consumes one driver core.
- The default concurrency parameter is set to 50 to support automatically scaling the max concurrency as users configure Spark pools with larger nodes and thus more driver cores. While you can set this parameter to a higher value when using a larger driver node, increasing the number of concurrent processes running on a single driver node typically doesn't scale linearly. Increasing concurrency can lead to reduced efficiency due to driver and executor resource contention. Each running notebook runs on a dedicated REPL instance which consumes CPU and memory on the driver. Under high concurrency, this consumption can increase the risk of driver instability or out-of-memory errors, particularly for long-running workloads.
- You might experience longer execution times for each individual job due to the overhead of initializing REPL instances and orchestrating many notebooks. If problems arise, consider separating notebooks into multiple
runMultiplecalls or reducing the concurrency by adjusting the concurrency field in the DAG parameter. - When you run short-lived notebooks (for example, 5 seconds of code execution time), the initialization overhead becomes dominant. Variability in prep time might reduce the chance of notebooks overlapping, and therefore result in lower realized concurrency. In these scenarios, it might be more optimal to combine small operations into one or multiple notebooks.
- While multithreading is used for submission, queuing, and monitoring, note that the code that runs in each notebook isn't multithreaded on each executor. There's no resource sharing between notebooks. Each notebook process is allocated a portion of the total executor resources. This allocation can cause shorter jobs to run inefficiently and longer jobs to contend for resources.
- The default timeout for the entire DAG is 12 hours, and the default timeout for each cell in child notebooks is 90 seconds. You can change the timeout by setting the timeoutInSeconds and timeoutPerCellInSeconds fields in the DAG parameter. As you increase concurrency, you might need to increase timeoutPerCellInSeconds to prevent possible resource contention from causing unnecessary timeouts.
Exit a notebook
This method exits a notebook with a value. You can run nesting function calls in a notebook interactively or in a pipeline.
When you call an exit() function from a notebook interactively, the Fabric notebook throws an exception, skips running subsequent cells, and keeps the Spark session alive.
When you orchestrate a notebook in a pipeline that calls an exit() function, the notebook activity returns with an exit value, completes the pipeline run, and stops the Spark session. Don't enclose the exit() function around a try/catch as this NotebookExit Exception must propagate for the pipeline to get the return value.
When you call an exit() function in a notebook that is being referenced, Fabric Spark stops the further execution of the referenced notebook, and continues to run the next cells in the main notebook that calls the run() function. For example: Notebook1 has three cells and calls an exit() function in the second cell. Notebook2 has five cells and calls run(notebook1) in the third cell. When you run Notebook2, Notebook1 stops at the second cell when hitting the exit() function. Notebook2 continues to run its fourth cell and fifth cell.
mssparkutils.notebook.exit("value string")
For example:
Sample1 notebook with following two cells:
Cell 1 defines an input parameter with default value set to 10.
Cell 2 exits the notebook with input as exit value.
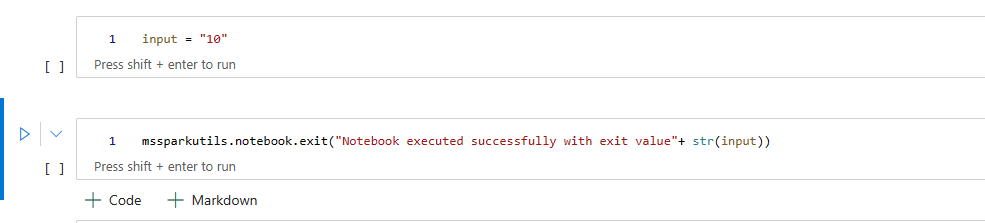
You can run the Sample1 in another notebook with default values:
exitVal = mssparkutils.notebook.run("Sample1")
print (exitVal)
Output:
Notebook executed successfully with exit value 10
You can run the Sample1 in another notebook and set the input value as 20:
exitVal = mssparkutils.notebook.run("Sample1", 90, {"input": 20 })
print (exitVal)
Output:
Notebook executed successfully with exit value 20
Credentials utilities
You can use the MSSparkUtils Credentials Utilities to get access tokens and manage secrets in Azure Key Vault.
Run the following command to get an overview of the available methods:
mssparkutils.credentials.help()
Output:
getToken(audience, name): returns AAD token for a given audience, name (optional)
getSecret(keyvault_endpoint, secret_name): returns secret for a given Key Vault and secret name
Get token
getToken returns a Microsoft Entra token for a given audience and name (optional). The following list shows the currently available audience keys:
- Storage Audience Resource:
storage - Power BI Resource:
pbi - Azure Key Vault Resource:
keyvault - Synapse RTA KQL DB Resource:
kusto
Run the following command to get the token:
mssparkutils.credentials.getToken('audience Key')
Get secret by using user credentials
getSecret returns an Azure Key Vault secret for a given Azure Key Vault endpoint and secret name by using user credentials.
mssparkutils.credentials.getSecret('https://<name>.vault.azure.net/', 'secret name')
File mount and unmount
Fabric supports the following mount scenarios in the Microsoft Spark Utilities package. You can use the mount, unmount, getMountPath(), and mounts() APIs to attach remote storage (Azure Data Lake Storage Gen2) to all working nodes (driver node and worker nodes). After the storage mount point is in place, use the local file API to access data as if it's stored in the local file system.
How to mount an Azure Data Lake Storage Gen2 account
The following example shows how to mount Azure Data Lake Storage Gen2. Mounting Blob Storage works similarly.
This example assumes that you have one Data Lake Storage Gen2 account named storegen2, and the account has one container named mycontainer that you want to mount to /test into your notebook Spark session.
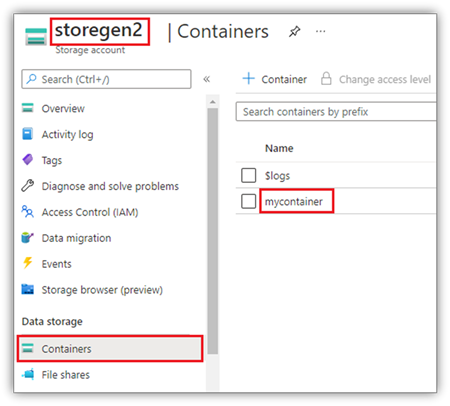
To mount the container named mycontainer, mssparkutils first checks whether you have permission to access the container. Fabric supports three authentication methods for the trigger mount operation: Microsoft Entra token (default and recommended), accountKey, and sastoken. For more information about Microsoft Entra token authentication and the current notebookutils API, see NotebookUtils file mount and unmount for Fabric.
Mount by using a shared access signature token or account key
MSSparkUtils supports explicitly passing an account key or Shared access signature (SAS) token as a parameter to mount the target.
For security reasons, we recommend that you store account keys or SAS tokens in Azure Key Vault (as the following screenshot shows). You can then retrieve them by using the mssparkutils.credentials.getSecret API. For more information about Azure Key Vault, see About Azure Key Vault managed storage account keys.
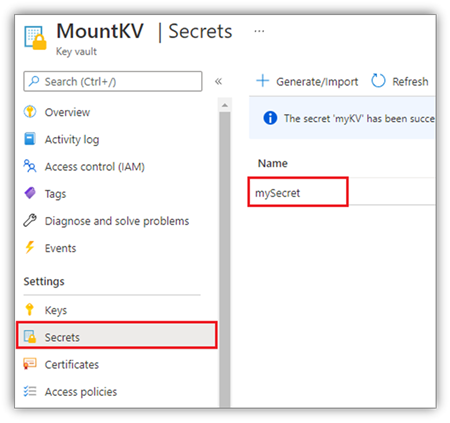
Sample code for the accountKey method:
from notebookutils import mssparkutils
# get access token for keyvault resource
# you can also use full audience here like https://vault.azure.net
accountKey = mssparkutils.credentials.getSecret("<vaultURI>", "<secretName>")
mssparkutils.fs.mount(
    "abfss://mycontainer@<accountname>.dfs.core.windows.net",
    "/test",
    {"accountKey":accountKey}
)
Sample code for sastoken:
from notebookutils import mssparkutils
# get access token for keyvault resource
# you can also use full audience here like https://vault.azure.net
sasToken = mssparkutils.credentials.getSecret("<vaultURI>", "<secretName>")
mssparkutils.fs.mount(
    "abfss://mycontainer@<accountname>.dfs.core.windows.net",
    "/test",
    {"sasToken":sasToken}
)
Note
You might need to import mssparkutils if it's not available:
from notebookutils import mssparkutils
Mount parameters:
fileCacheTimeout: Blobs cache in the local temp folder for 120 seconds by default. During this time, blobfuse doesn't check whether the file is up to date. Set this parameter to change the default timeout. When multiple clients modify files at the same time, to avoid inconsistencies between local and remote files, we recommend that you shorten the cache time, or even change it to 0, and always get the latest files from the server.timeout: The mount operation timeout is 120 seconds by default. Set this parameter to change the default timeout. When there are too many executors or when mount times out, we recommend that you increase the value.
You can use these parameters like this:
mssparkutils.fs.mount(
   "abfss://mycontainer@<accountname>.dfs.core.windows.net",
   "/test",
   {"fileCacheTimeout": 120, "timeout": 120}
)
Note
For security reasons, don't store credentials in code. To further protect your credentials, the secret is redacted in notebook output. For more information, see Secret redaction.
How to mount a lakehouse
Sample code for mounting a lakehouse to /test:
from notebookutils import mssparkutils
mssparkutils.fs.mount(
 "abfss://<workspace_id>@onelake.dfs.fabric.microsoft.com/<lakehouse_id>",
 "/test"
)
Note
Mounting a regional endpoint isn't supported. Fabric only supports mounting the global endpoint, onelake.dfs.fabric.microsoft.com.
Access files under the mount point by using the mssparkutils fs API
The main purpose of the mount operation is to let you access the data stored in a remote storage account by using a local file system API. You can also access the data by using the mssparkutils fs API with a mounted path as a parameter. This path format is a little different.
Assume that you mounted the Data Lake Storage Gen2 container mycontainer to /test by using the mount API. When you access the data by using a local file system API, the path format is like this:
/synfs/notebook/{sessionId}/test/{filename}
When you want to access the data by using the mssparkutils fs API, we recommend that you use getMountPath() to get the accurate path:
path = mssparkutils.fs.getMountPath("/test")
List directories:
mssparkutils.fs.ls(f"file://{mssparkutils.fs.getMountPath('/test')}")Read file content:
mssparkutils.fs.head(f"file://{mssparkutils.fs.getMountPath('/test')}/myFile.txt")Create a directory:
mssparkutils.fs.mkdirs(f"file://{mssparkutils.fs.getMountPath('/test')}/newdir")
Access files under the mount point via local path
You can easily read and write the files in mount point using the standard file system. Here's a Python example:
#File read
with open(mssparkutils.fs.getMountPath('/test2') + "/myFile.txt", "r") as f:
    print(f.read())
#File write
with open(mssparkutils.fs.getMountPath('/test2') + "/myFile.txt", "w") as f:
    print(f.write("dummy data"))
How to check existing mount points
You can use mssparkutils.fs.mounts() API to check all existing mount point info:
mssparkutils.fs.mounts()
How to unmount the mount point
Use the following code to unmount your mount point (/test in this example):
mssparkutils.fs.unmount("/test")
Known limitations
The current mount is a job level configuration. We recommend that you use the mounts API to check if a mount point exists or isn't available.
The unmount mechanism isn't automatic. When the application run finishes, to unmount the mount point and release the disk space, you need to explicitly call an unmount API in your code. Otherwise, the mount point still exists in the node after the application run finishes.
Mounting an Azure Data Lake Storage Gen1 storage account isn't supported.
Lakehouse utilities
The mssparkutils.lakehouse module provides utilities for managing lakehouse items. These utilities make it easy to create, retrieve, update, and delete lakehouse items.
Note
Lakehouse APIs are supported only on Runtime version 1.2 or later.
Overview of methods
The following methods are available in the mssparkutils.lakehouse module:
# Create a new Lakehouse artifact
create(name: String, description: String = "", workspaceId: String = ""): Artifact

# Retrieve a Lakehouse artifact
get(name: String, workspaceId: String = ""): Artifact

# Update an existing Lakehouse artifact
update(name: String, newName: String, description: String = "", workspaceId: String = ""): Artifact

# Delete a Lakehouse artifact
delete(name: String, workspaceId: String = ""): Boolean

# List all Lakehouse artifacts
list(workspaceId: String = ""): Array[Artifact]
Usage examples
To use these methods effectively, consider the following usage examples:
Creating a lakehouse item
artifact = mssparkutils.lakehouse.create("artifact_name", "Description of the artifact", "optional_workspace_id")
Retrieving a lakehouse item
artifact = mssparkutils.lakehouse.get("artifact_name", "optional_workspace_id")
Updating a lakehouse item
updated_artifact = mssparkutils.lakehouse.update("old_name", "new_name", "Updated description", "optional_workspace_id")
Deleting a lakehouse item
is_deleted = mssparkutils.lakehouse.delete("artifact_name", "optional_workspace_id")
Listing lakehouse items
artifacts_list = mssparkutils.lakehouse.list("optional_workspace_id")
Additional information
For more detailed information about each method and its parameters, use the mssparkutils.lakehouse.help("methodName") function.
By using MSSparkUtils' Lakehouse utilities, you can more efficiently manage your lakehouse items and integrate this management into your Fabric pipelines, enhancing your overall data management experience.
Explore these utilities and incorporate them into your Fabric workflows for seamless lakehouse item management.
Runtime utilities
Show the session context info
By using mssparkutils.runtime.context, you can get the context information for the current live session, including the notebook name, default lakehouse, workspace info, if it's a pipeline run, and more.
mssparkutils.runtime.context
Note
mssparkutils.env isn't officially supported on Fabric. Use notebookutils.runtime.context as an alternative.
Known issue
When you use a runtime version that's later than 1.2 and run mssparkutils.help(), the listed fabricClient, warehouse, and workspace APIs aren't currently supported.