Pastaba.
Prieigai prie šio puslapio reikalingas įgaliojimas. Galite bandyti prisijungti arba pakeisti katalogus.
Prieigai prie šio puslapio reikalingas įgaliojimas. Galite bandyti pakeisti katalogus.
Applies to: Azure Logic Apps (Consumption)
As an integration developer, you often need to automate business processes across SaaS apps, enterprise systems, and data sources without managing infrastructure. You also need a code-first way to build workflows so you can version definitions, make updates, and review changes efficiently.
This quickstart shows how to create and manage Consumption workflows in multitenant Azure Logic Apps by using the local, code-first tools in Visual Studio Code. Consumption workflows provide a serverless integration model for event-driven and scheduled workflows, so you can connect services and automate processes while paying only for the actions that run.
In Visual Studio Code, you can edit workflow definitions in JavaScript Object Notation (JSON) by using the code editor, use the visual designer when needed, and manage deployed workflows in Azure. You can also work on workflows and integration accounts from any development platform where Visual Studio Code runs, such as Linux, Windows, and macOS.
The following screenshot shows how an example Consumption workflow definition might look:

For more information, see:
Prerequisites
An Azure account and subscription. Get a free Azure account.
Basic knowledge about logic app workflow definitions and their structure in JSON format.
The example in this article creates the same logic app workflow as in this quickstart that focuses more on the basic concepts. You can also learn to create and manage workflows through the Azure CLI.
Access to the web for signing in to Azure and your Azure subscription.
Download and install the following tools, if you don't have them already:
Visual Studio Code version 1.25.1 or later, which is free.
Visual Studio Code extension for Azure Logic Apps (Consumption).
Install this extension from the Visual Studio Marketplace or directly from inside Visual Studio Code.

Reload Visual Studio Code after installation.
For more information, see Extension Marketplace. To contribute to this extension's open-source version, visit the Azure Logic Apps extension for Visual Studio Code on GitHub.
If your logic app workflow needs to communicate through a firewall that limits traffic to specific IP addresses, the firewall must allow access for both inbound and outbound IP addresses used by Azure Logic Apps or the runtime in the Azure region where your logic app workflow exists.
If your logic app workflow also uses managed connectors, such as the Office 365 Outlook connector or SQL connector, or uses custom connectors, the firewall must allow access for all the managed connector outbound IP addresses in your logic app's Azure region.
Access Azure from Visual Studio Code
In Visual Studio Code, sign in to your Azure account.
If sign in takes longer than usual, Visual Studio Code prompts you to sign in through a Microsoft authentication website by providing you with a device code. To sign in by using the code instead, follow these steps:
Select Use Device Code, and then select Copy & Open.
Select Open Link to open a new browser window and continue to the authentication website.
On the Sign in to your account page, enter your authentication code, and select Next.
On the Activity bar, select the Azure icon.

In the Azure pane, the Logic Apps (Consumption) and Integration Accounts sections now show the Azure subscriptions that are associated with your account. If you don't see the subscriptions that you expect, or if the sections show too many subscriptions, follow these steps:
In the Logic Apps (Consumption) section, select Select Subscriptions.

From the subscriptions list, select the subscriptions you want to use.
In the Logic Apps (Consumption) section, expand your subscription to view any deployed logic apps in that subscription.

Create a logic app
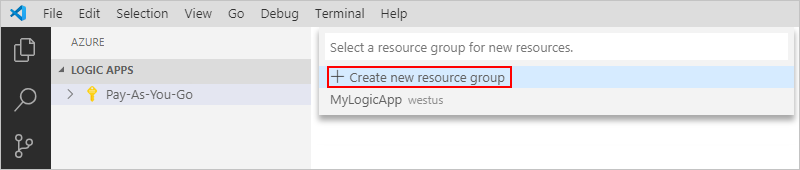
In Visual Studio Code, in the Logic Apps (Consumption) section, from the subscription shortcut menu, select Create Logic App.

A list appears and shows any Azure resource groups in your subscription.
From the resource group list, select either Create new resource group or an existing resource group.
For this example, select Create a new resource group, for example:
Enter a name for your Azure resource group.

Select the Azure region where to save the logic app metadata.

Enter a name for your logic app.

In the Azure window, under your Azure subscription, your new logic app and empty workflow appear. Visual Studio Code also opens a JSON (.logicapp.json) file, which includes a skeleton workflow definition, for example:

You can now start manually authoring your workflow definition in this JSON file. For a technical reference about the structure and syntax of a workflow definition, see Workflow Definition Language schema for Azure Logic Apps.
The following sample logic app workflow definition starts with an RSS trigger and an Office 365 Outlook action. Usually, JSON elements appear alphabetically in each section. However, this sample shows these elements roughly in the order that the workflow operations appear in the designer.
{
   "$schema": "https://schema.management.azure.com/providers/Microsoft.Logic/schemas/2016-06-01/workflowdefinition.json#",
   "contentVersion": "1.0.0.0",
   "parameters": {
      "$connections": {
         "defaultValue": {},
         "type": "Object"
      }
   },
   "triggers": {
      "When_a_feed_item_is_published": {
         "recurrence": {
            "frequency": "Minute",
            "interval": 30
         },
         "splitOn": "@triggerBody()?['value']",
         "type": "ApiConnection",
         "inputs": {
            "host": {
               "connection": {
                  "name": "@parameters('$connections')['rss']['connectionId']"
               }
            },
            "method": "get",
            "path": "/OnNewFeed",
            "queries": {
               "feedUrl": "@{encodeURIComponent('https://feeds.content.dowjones.io/public/rss/RSSMarketsMain')}",
               "sinceProperty": "PublishDate"
            }
         }
      }
   },
   "actions": {
      "Send_an_email_(V2)": {
         "runAfter": {},
         "type": "ApiConnection",
         "inputs": {
            "body": {
               "Body": "<p>Title: @{triggerBody()?['title']}<br>\n<br>\nDate published: @{triggerBody()?['updatedOn']}<br>\n<br>\nLink: @{triggerBody()?['primaryLink']}</p>",
               "Subject": "RSS item: @{triggerBody()?['title']}",
               "To": "sophia-owen@fabrikam.com"
            },
            "host": {
               "connection": {
                  "name": "@parameters('$connections')['office365']['connectionId']"
               }
            },
            "method": "post",
            "path": "/v2/Mail"
         }
      }
   },
   "outputs": {}
}
Important
To reuse this sample workflow definition, you need an organizational work or school account, for example, @fabrikam.com. Make sure that you replace the fictitious email address with your own email address.
To use a different email connector, such as Outlook.com or Gmail, replace the
Send_an_email_actionaction with a similar action available from an email connector that Azure Logic Apps supports.If you want to use the Gmail connector, only G-Suite business accounts can use this connector without restriction in logic apps. If you have a Gmail consumer account, you can use this connector with only specific Google-approved services, or create a Google client app to use for authentication with your Gmail connector. For more information, see Data security and privacy policies for Google connectors in Azure Logic Apps.
When you finish, save the workflow definition. (File > Save or press Ctrl+S).
When you're prompted to upload your logic app workflow definition to your Azure subscription, select Upload.
This step publishes your logic app workflow definition from Visual Studio Code to the Azure portal, which makes the workflow live and running in Azure.

View workflow in the designer
In Visual Studio Code, you can open your logic app workflow in read-only design view. Although you can't edit your workflow definition in the designer, you can visually check your workflow by using the designer view.
In the Azure window, in the Logic Apps (Consumption) section, from your logic app shortcut menu, select Open in Designer.
The read-only designer opens in a separate tab and shows the logic app workflow, for example:

View workflow in the Azure portal
To review your logic app workflow definition in Azure portal, follow these steps:
In the Azure portal, sign in by using the same Azure account and subscription associated with your logic app.
In the Azure portal search box, enter the logic app name. From the results list, select the logic app.

On the logic app sidebar, under Development Tools, open the workflow in the designer or code view.
Edit deployed logic app
In Visual Studio Code, you can open and edit the workflow definition for an already deployed logic app resource in Azure.
Important
Before you edit an actively running logic app workflow in production, minimize disruption and avoid the risk of breaking the workflow by first disabling your logic app resource.
In Visual Studio Code, on the Activity bar, select the Azure icon.
In the Azure window, in the Logic Apps (Consumption) section, expand your Azure subscription, and select the logic app you want.
From the logic app shortcut menu, select Open in Editor. Or, next to the logic app name, select the edit icon.

Visual Studio Code opens the .logicapp.json file in your local temporary folder so you can view the workflow definition.

Make your changes in the workflow definition file.
When you finish, save your changes (File > Save or press Ctrl+S).
When you're prompted to upload your changes and overwrite your existing logic app workflow in the Azure portal, select Upload.
This step publishes your updates to your logic app resource in the Azure portal.

View or promote other versions
In Visual Studio Code, you can open and review earlier versions for your logic app workflow. You can also promote an earlier version to the current version.
Important
Before you change an actively running logic app workflow in production, minimize disruption and avoid the risk of breaking that logic app by first disabling your logic app resource.
In the Azure window, in the Logic Apps (Consumption) section, expand your Azure subscription to view the associated logic apps.
Under your subscription, expand your logic app, and expand Versions.
The Versions list shows the logic app's earlier versions, if any exist.

To view an earlier version, choose one of the following steps:
To view the JSON definition, under Versions, select the version number for that definition. Or, from the version shortcut menu, select Open in Editor.
A new file opens on your local computer and shows that version's JSON definition.
To view the version in the read-only designer, from the version's shortcut menu, select Open in Designer.
To promote an earlier version to the current version, follow these steps:
Under Versions, from the earlier version's shortcut menu, select Promote.

To continue after Visual Studio Code prompts you for confirmation, select Yes.
Visual Studio Code promotes the selected version to the current version and assigns a new number to the promoted version. The previously current version now appears under the promoted version.
Disable or enable logic apps
In Visual Studio Code, if you edit a published logic app workflow and save your changes, you overwrite your already deployed logic app. To avoid breaking your logic app workflow in production and minimize disruption, disable your logic app resource first. After you confirm the workflow still functions as expected, you can reactivate the logic app resource.
Disabling or enabling a logic app resource affects workflow instances in the following ways:
Azure Logic Apps continues in-progress and pending workflow runs until they finish. Based on the volume or backlog, this process might take time to complete.
Azure Logic Apps doesn't create or run new workflow instances.
The trigger doesn't fire the next time that its conditions are met.
The trigger state remembers the point where the workflow stopped. So, if you reactivate the logic app, the trigger fires for any items not yet processed since the last run.
To stop the trigger from firing on these unprocessed items, before you reactivate the logic app resource, clear the trigger state:
- In the workflow, edit any part of the trigger.
- Save your changes. This step resets your trigger's current state.
- Reactivate your logic app resource.
When the logic app resource is disabled, you can still resubmit workflow runs.
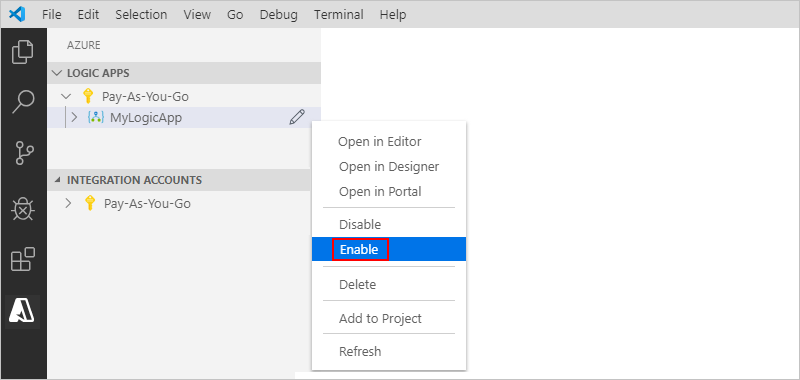
To disable or enable a logic app resource in Visual Studio Code, follow these steps:
In Visual Studio Code, open the Azure window.
In the Logic Apps (Consumption) section, expand your Azure subscription to view the associated logic apps.
To disable a logic app resource, from the logic app shortcut menu, select Disable.

When you're ready to reactivate the logic app resource, from the logic app shortcut menu, select Enable.
Delete logic apps
Deleting a logic app affects workflow instances in the following ways:
Azure Logic Apps tries to cancel any in-progress and pending workflow runs.
Even with a large volume or backlog, most runs are canceled before they finish or start. However, the cancellation process might take time to complete. Meanwhile, the service might pick up some runs for execution while it works through the cancellation process.
Azure Logic Apps doesn't create or run new workflow instances.
If you delete a workflow and then recreate the same workflow, the recreated workflow has different metadata. You need to resave any workflow that called the deleted workflow. When you resave, the caller gets the correct information for the recreated workflow. Otherwise, calls to the recreated workflow fail with an
Unauthorizederror. This behavior also applies to workflows that use artifacts in integration accounts and workflows that call Azure functions.
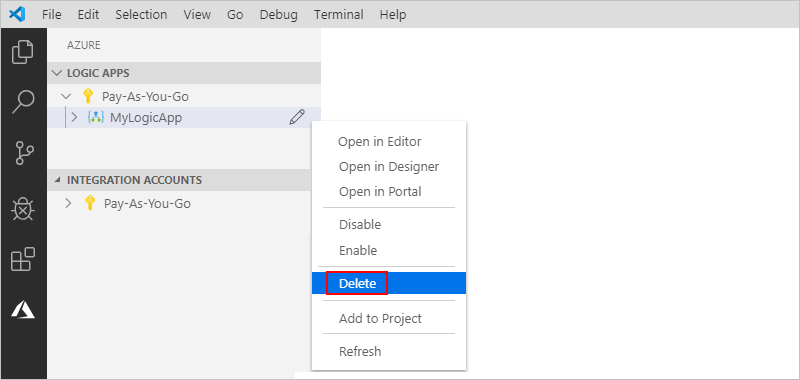
To delete a logic app resource from Visual Studio Code, follow these steps:
In Visual Studio Code, open the Azure window.
In the Logic Apps (Consumption) section, expand your Azure subscription to view the associated logic app resources. Find the logic app resource you want to delete.
From the logic app shortcut menu, select Delete.