Connect to AWS with the multicloud connector in the Azure portal
The multicloud connector enabled by Azure Arc lets you connect non-Azure public cloud resources to Azure by using the Azure portal. Currently, AWS public cloud environments are supported.
As part of connecting an AWS account to Azure, you deploy a CloudFormation template to the AWS account. This template creates all of the required resources for the connection.
Important
Multicloud connector enabled by Azure Arc is currently in PREVIEW. See the Supplemental Terms of Use for Microsoft Azure Previews for legal terms that apply to Azure features that are in beta, preview, or otherwise not yet released into general availability.
Prerequisites
To use the multicloud connector, you need the appropriate permissions in both AWS and Azure.
AWS prerequisites
To create the connector and to use multicloud inventory, you need the following permissions in AWS:
- AmazonS3FullAccess
- AWSCloudFormationFullAccess
- IAMFullAccess
For Arc onboarding, there are additional prerequisites that must be met.
When you upload your CloudFormation template, additional permissions will be requested, based on the solutions that you selected:
- For Inventory, we request Global Read permission to your account.
- For Arc Onboarding, our service requires EC2 Write access in order to install the Azure Connected Machine agent.
Azure prerequisites
To use the multicloud connector in an Azure subscription, you need the Contributor built-in role.
If this is the first time you're using the service, you need to register these resource providers, which requires Contributor access on the subscription:
- Microsoft.HybridCompute
- Microsoft.HybridConnectivity
- Microsoft.AwsConnector
Note
The multicloud connector can work side-by-side with the AWS connector in Defender for Cloud. If you choose, you can use both of these connectors.
Add your public cloud in the Azure portal
To add your AWS public cloud to Azure, use the Azure portal to enter details and generate a CloudFormation template.
In the Azure portal, navigate to Azure Arc.
Under Management, select Multicloud connectors (preview).
In the Connectors pane, select Create.
On the Basics page:
- Select the subscription and resource group in which to create your connector resource.
- Enter a unique name for the connector and select a supported region.
- Provide the ID for the AWS account that you want to connect, and indicate whether it's a single account or an organization account.
- Select Next.
On the Solutions page, select which solutions you'd like to use with this connector and configure them. Select Add to enable Inventory, Arc onboarding, or both.
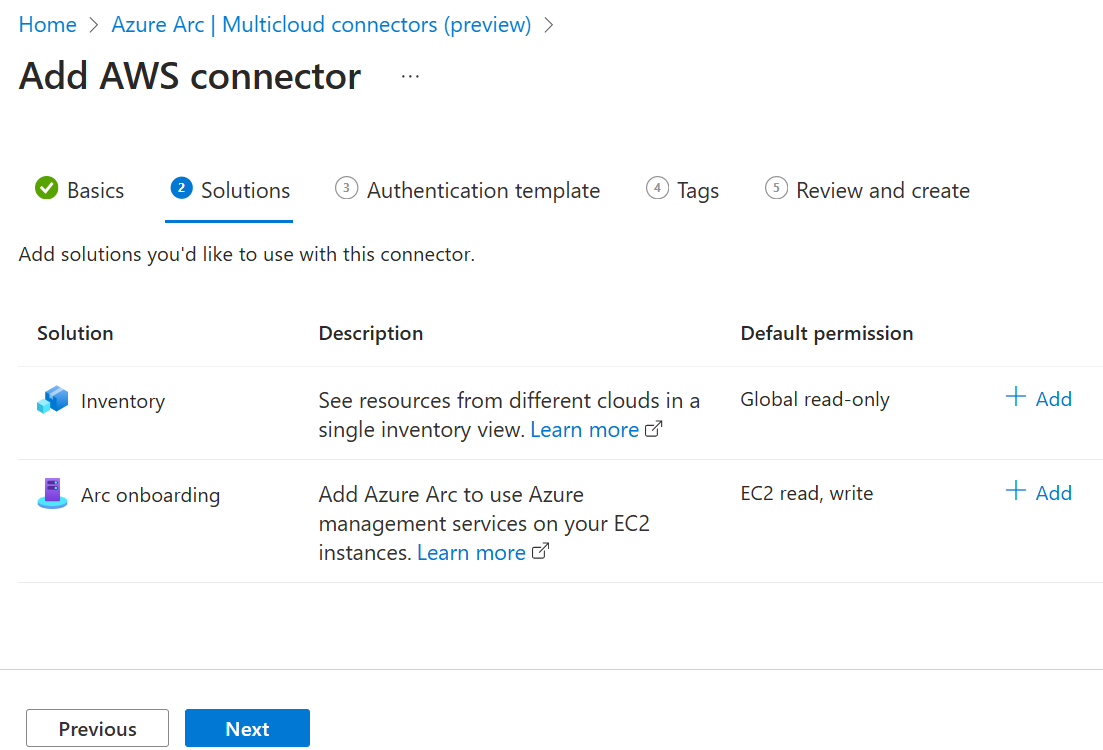
For Inventory, you can modify the following options:
- Choose the AWS Services for which you want to scan and import resources. By default, all available services are selected.
- Choose whether or not to enable periodic sync. By default, this is enabled so that the connector will scan your AWS account regularly. If you uncheck the box, your AWS account will only be scanned once.
- If Enable periodic sync is checked, confirm or change the Recur every selection to specify how often your AWS account will be scanned.
- Choose which regions to scan for resources in your AWS account. By default, all available regions are selected.
- When you have finished making selections, select Save to return to the Solutions page.
For Arc onboarding:
- Select a Connectivity method to determine whether the Connected Machine agent should connect to the internet via a public endpoint or by proxy server. If you select Proxy server, provide a Proxy server URL to which the EC2 instance can connect.
- Choose whether or not to enable periodic sync. By default, this is enabled so that the connector will scan your AWS account regularly. If you uncheck the box, your AWS account will only be scanned once.
- If Enable periodic sync is checked, confirm or change the Recur every selection to specify how often your AWS account will be scanned.
- Choose which regions to scan for EC2 instances in your AWS account. By default, all available regions are selected.
On the Authentication template page, download the CloudFormation template that you'll upload to AWS. This template is created based on the information you provided in Basics and the solutions you selected. You can upload the template right away, or wait until you finish adding your public cloud.
On the Tags page, enter any tags you'd like to use.
On the Review and create page, confirm your information and then select Create.
If you didn't upload your template during this process, follow the steps in the next section to do so.
Upload CloudFormation template to AWS
After you've saved the CloudFormation template generated in the previous section, you need to upload it to your AWS public cloud. If you upload the template before you finish connecting your AWS cloud in the Azure portal, your AWS resources will be scanned immediately. If you complete the Add public cloud process in the Azure portal before uploading the template, it will take a bit longer to scan your AWS resources and make them available in Azure.
Create stack
Follow these steps to create a stack and upload your template:
- Open the AWS CloudFormation console and select Create stack.
- Select Template is ready, then select Upload a template file. Select Choose file and browse to select your template. Then select Next.
- In Specify stack details, enter a stack name. Leave the other options set to their default settings and select Next.
- In Configure stack options, leave the options set to their default settings and select Next.
- In Review and create, confirm that the information is correct, select the acknowledgment checkbox, and then select Submit.
Create StackSet
If your AWS account is an organization account, you also need to create a StackSet and upload your template again. To do so:
- Open the AWS CloudFormation console and select StackSets, then select Create StackSet.
- Select Template is ready, then select Upload a template file. Select Choose file and browse to select your template. Then select Next.
- In Specify stack details, enter
AzureArcMultiCloudStacksetas the StackSet name, then select Next. - In Configure stack options, leave the options set to their default settings and select Next.
- In Set deployment options, enter the ID for the AWS account where the StackSet will be deployed, and select any AWS region to deploy the stack. Leave the other options set to their default settings and select Next.
- In Review, confirm that the information is correct, select the acknowledgment checkbox, and then select Submit.
Confirm deployment
After you complete the Add public cloud option in Azure, and you upload your template to AWS, your connector and selected solutions will be created. On average, it takes about one hour for your AWS resources to become available in Azure. If you upload the template after creating the public cloud in Azure, it may take a bit more time before you see the AWS resources.
AWS resources are stored in a resource group using the naming convention aws_yourAwsAccountId. Scans will run regularly to update these resources, based on your Enable periodic sync selections.
Next steps
- Query your inventory with the multicloud connector Inventory solution.
- Learn how to use the multicloud connector Arc onboarding solution.
Atsauksmes
Drīzumā: 2024. gada laikā mēs pakāpeniski pārtrauksim izmantot “GitHub problēmas” kā atsauksmju par saturu mehānismu un aizstāsim to ar jaunu atsauksmju sistēmu. Papildinformāciju skatiet: https://aka.ms/ContentUserFeedback.
Iesniegt un skatīt atsauksmes par