Default processes and process templates
Azure DevOps Services | Azure DevOps Server 2022 - Azure DevOps Server 2019
Azure Boards offers various processes for managing work items. Selecting the right process helps optimize project workflow and ensure your project's success. In this article, explore the different processes available with Azure Boards. This article provides guidance on how to choose the most suitable process for your project.
When you create a project, you choose a process or process template based on the process model for which your organization or collection was created. Before you choose a process for your project, you should understand the following terms.
| Term | Description |
|---|---|
| Process model | Refers to the model used to support projects created for an organization or project collection. Only one process model is supported for a project at a time. |
| Process | Defines the building blocks of the work item tracking system and supports the Inheritance process model for Azure Boards. This model supports customization of projects through a What You See Is What You Get (WYSIWYG) user interface. |
| Process template | Defines the building blocks of the work item tracking system and other subsystems you access through Azure DevOps. Process templates are only used with the Hosted XML and On-premises XML process models. You can customize projects by modifying and importing process template XML definition files. |
The default process types are Basic, Agile, Capability Maturity Model Integration (CMMI), and Scrum. The work tracking objects in the default processes and process templates are the same. They're summarized in this article.
Tip
With Azure DevOps Server, you can choose between using the Inherited process model or the On-premises XML process model. For more information, see Choose the process model for your project collection. To access the latest versions of the default processes or process templates:
Inherited process model: Open the Processes page. For more information, see Manage processes.
On-premises XML process model:
- Install or upgrade to the latest version of Azure DevOps Server.
- Download the zipped template file by using the Process Template Manager. Use a version of Visual Studio that's at the same version level as Azure DevOps Server. You can install the latest version of Visual Studio Community for free.
- You can access the latest versions of the default process templates installed on Azure DevOps Server, for example:
%programfiles%/Azure DevOps Server 2020/Tools/Deploy/ProcessTemplateManagerFiles/1033. For descriptions of each file and folder, see Overview of process template files.
Default processes
The default processes differ mainly in the work item types they provide for planning and tracking work. The default processes are:
- Basic: Is the most lightweight and is in a selective preview.
- Scrum: Is the next most lightweight.
- Agile: Supports many Agile method terms.
- CMMI: Provides the most support for formal processes and change management.
Note
The Basic process is available with Azure DevOps Server 2019 Update 1 and later versions.
Basic
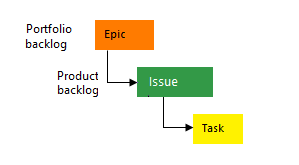
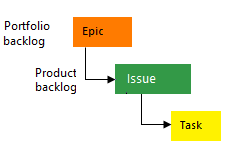
Choose Basic when your team wants the simplest model that uses Issue, Task, and Epic work item types to track work.
Tasks support tracking Remaining Work.
Agile
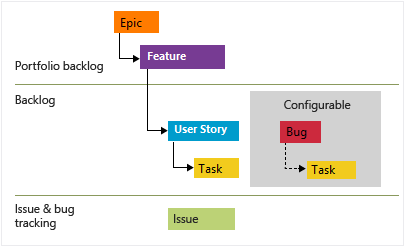
Choose Agile when your team uses Agile planning methods, including Scrum, and tracks development and test activities separately. This process works great for tracking User Stories and, optionally, bugs on the board. You can also track bugs and tasks on the taskboard.
For more information about Agile methodologies, see Agile Alliance.
Tasks support tracking Original Estimate, Remaining Work, and Completed Work.
Scrum
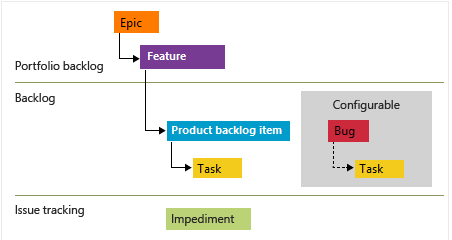
Choose Scrum when your team practices Scrum. This process works great for tracking product backlog items and bugs on the board. You can also break down product backlog items and bugs into tasks on the taskboard.
This process supports the Scrum methodology as defined by the Scrum organization.
Tasks support tracking Remaining Work only.
CMMI
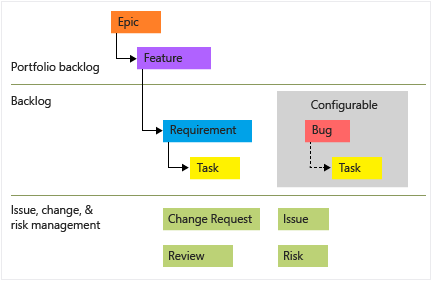
Choose CMMI when your team follows more formal project methods that require a framework for process improvement and an auditable record of decisions. With this process, you can track requirements, change requests, risks, and reviews.
This process supports formal change management activities. Tasks support tracking Original Estimate, Remaining Work, and Completed Work.
If you need more than two or three backlog levels, add more based on the process model that you use:
- Inheritance: Customize your backlogs or boards for a process
- Hosted XML or On-premises XML: Add portfolio backlogs
Main distinctions among the default processes
The default processes are designed to meet the needs of most teams. If your team has unusual needs and connects to an on-premises server, customize a process and then create the project. You can also create a project from a process and then customize the project.
The following table summarizes the main distinctions between the work item types and states used by the four default processes.
Tracking area
Basic
Agile
Scrum
CMMI
Workflow states
- To Do
- Doing
- Done
- New
- Active
- Resolved
- Closed
- Removed
- New
- Approved
- Committed
- Done
- Removed
- Proposed
- Active
- Resolved
- Closed
Product planning (see Note 1)
- Issue
- User Story
- Bug (optional)
- Product backlog item
- Bug (optional)
- Requirement
- Bug (optional)
Portfolio backlogs (see Note 2)
- Epic
- Epic
- Feature
- Epic
- Feature
- Epic
- Feature
Task and sprint planning (see Note 3)
- Task
- Task
- Bug (optional)
- Task
- Bug (optional)
- Task
- Bug (optional)
Bug backlog management (see Note 1)
- Issue
- Bug
- Bug
- Bug
Issue and risk management
- Issue
- Issue
- Impediment
- Issue
- Risk
- Review
Notes:
- Add work items from the product backlog or board. The product backlog shows a single view of the current backlog of work that can be dynamically reordered and grouped. Product owners can prioritize work and outline dependencies and relationships. Each team can configure how they want bugs to show up on their backlogs and boards.
- Define a hierarchy of portfolio backlogs to understand the scope of work across several teams and see how that work rolls up into broader initiatives. Each team configures which portfolio backlogs appear for their use.
- Define tasks from the sprint backlog and taskboard. With capacity planning, teams can determine if they're over capacity or under capacity for a sprint.
Workflow states, transitions, and reasons
Workflow states support tracking the status of work as it moves from a New state to a Closed or a Done state. Each workflow consists of a set of states, the valid transitions between the states, and the reasons for transitioning the work item to the selected state.
Important
For Azure DevOps Services and Azure DevOps Server 2019, the default workflow transitions support any state to any state transition. Customize these workflows to restrict some transitions. For more information, see Customize your work tracking experience.
View the supported workflow transitions for each work item type by installing the State Model Visualization Marketplace extension. This extension adds a new hub under Boards labeled State Visualizer. On that page, choose a work item type and view the workflow state model.
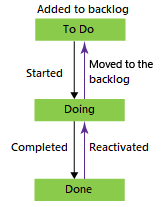
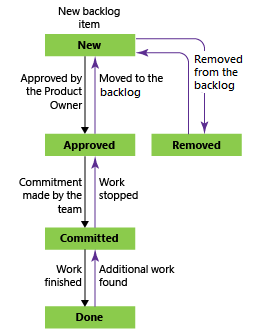
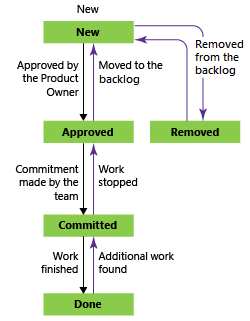
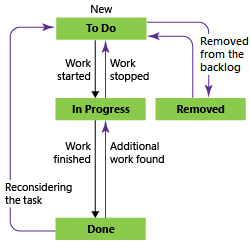
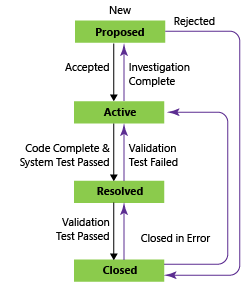
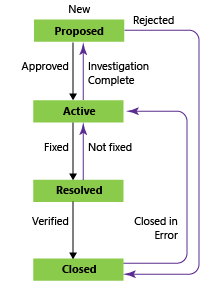
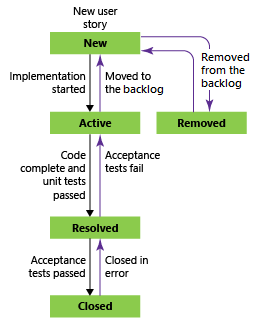
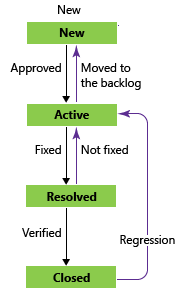
The following diagrams show the typical forward progression of those work item types used to track work and code defects for the three default processes. They also show some of the regressions to former states and transitions to removed states.
Each image shows only the default reason associated with the transition.
User Story
Feature

Epic

Bug
Task
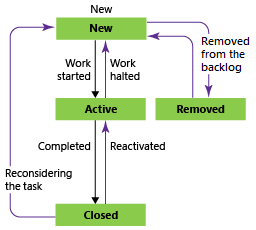
Most work item types used by Agile tools, the ones that appear on backlogs and boards, support any-to-any transitions. Update the status of a work item by using the board or the taskboard. Drag a work item to its corresponding state column.
Change the workflow to support other states, transitions, and reasons. For more information, see Customize your work tracking experience.
Work item states
When you change the state of a work item to Removed, Closed, or Done, the system responds as follows:
ClosedorDone: Work items in this state don't appear on the portfolio backlog and backlog pages. They do appear on the sprint backlog pages, board, and taskboard. When you change the portfolio backlog view to Show backlog items, for example, to view features to product backlog items, work items in theClosedandDonestate appear.Removed: Work items in this state don't appear on any backlog or board.
Your project maintains work items as long as the project is active. Even if you set work items to Closed, Done, or Removed, the data store keeps a record. Use a record to create queries or reports.
Note
Completed or closed work items don't display on the backlogs and boards after their Changed Date value is greater than 183 days (about a half a year). You can still list these items by using a query. If you want them to show up on a backlog or board, you can make a minor change to them, which resets the clock.
Note
Completed or closed work items don't display on the backlogs and boards after their Changed Date value is greater than a year old. You can still list these items by using a query. If you want them to show up on a backlog or board, you can make a minor change to them, which resets the clock.
If you need to permanently delete work items, see Remove or delete work items.
Work item types added to all processes
The following work item types are added to all processes except the Basic process.

Your team can create and work with these types by using the corresponding tool.
| Tool | Work item types |
|---|---|
| Microsoft Test Manager | Test Plan, Test Suite, Test Case Shared Steps, Shared Parameters |
| Request Feedback | Feedback Request, Feedback Response |
| My Work (from Team Explorer), Code Review | Code Review Request, Code Review Response |
Work items from these type definitions aren't meant to be created manually and are then added to the Hidden Types category. Work item types added to the Hidden Types category don't appear on the menus that create new work items.
Work item types that support the test experience
Work item types that support the test experience and work with Test Manager and the web portal are linked together by using the link types shown in the following image.
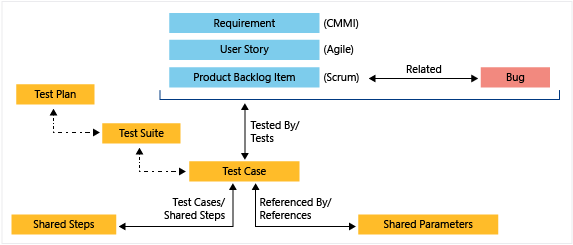
From the web portal or Microsoft Test Manager, view which test cases are defined for a test suite and view which test suites are defined for a test plan. However, these objects aren't connected to each other through link types. Customize these work item types as you would any other work item types. For more information, see Customize your work tracking experience.
If you change the workflow for the test plan and test suite, you might need to update the process configuration as described here. For definitions of each test field, see Create a query based on build and test integration fields.
