Create rules using the Microsoft Rules Composer (Preview)
Applies to: Azure Logic Apps (Standard)
Important
This capability is in preview and is subject to the Supplemental Terms of Use for Microsoft Azure Previews.
Rules govern the business logic for how business processes work. To help you create these rules for use with your Azure Logic Apps Rules Engine project, the Microsoft Rules Composer provides a visual tool for authoring and versioning rulesets and vocabularies.
This how-to guide provides an overview for how rules work and how to create a rule using the Microsoft Rules Composer.
Prerequisites
Download and install the Microsoft Rules Composer.
If you have an existing ruleset that you want to work on, you need the XML file that contains that ruleset. Otherwise, this guide shows you how to create a new ruleset, which you save as an XML file.
Important
If your existing XML file depends on any .NET assemblies, or if the assemblies that you use to add facts have other dependencies, make sure to keep all these files in the same folder and in a directory local to the Microsoft Rules Composer.
What is a rule?
A rule is a declarative statement that includes a condition and actions where the condition is evaluated. If the result is true, the rules engine performs one or more actions. The following format defines the syntax for rules in the Azure Logic Apps Rules Engine:
IF <condition> THEN <action>
The following example rule determines whether to conduct a transaction and applies business logic by comparing two monetary values to data or facts, which use the form of a transaction amount and discount:
IF amount purchased is larger than quantity THEN give an additional discount to the customer
Condition: A true-or-false Boolean expression that includes one or more predicates that are applied to facts. A predicate is clause that contains a verb and states something about the subject. In our example, the predicate is larger than applies to the fact amount purchased. This condition always evaluates to either true or false. You can combine predicates with the logical operators AND, OR, and NOT to form a potentially long logical expression, but always evaluates to either true or false.
Action: An action is a functional consequence of condition evaluation. If a rule condition is met, a corresponding action or actions are started. In our example, give an additional discount is an action that happens only when the condition is true, which is IF amount purchased is larger than $1,000. Actions are represented in the Azure Logic Apps Rules Engine by calling methods, setting properties on objects, or performing set operations on XML documents.
Fact: A fact is a discrete piece of information about the world on which rules operate. In our example, amount and quantity are facts. Facts can originate from many sources, such as event systems, objects in hybrid applications, and so on, and must be fed into the rules engine in Azure Logic Apps by using one of the following elements:
- .NET objects, such as methods, properties, and fields.
- XML documents, such as elements, attributes, and document subsections.
Vocabulary: A friendly name for facts used in conditions and actions. For more information, see Create and manage vocabularies.
The following diagram and sections describe how conditions, actions, and facts, fit together:

Microsoft Rules Composer
You can use the Microsoft Rules Composer to create, modify, version, and save rules. Alternatively, you can perform these tasks programmatically. The Rules Composer includes the following UI elements:
| Window | Description |
|---|---|
| RuleSet Explorer | Create rulesets that contain one or more rules. |
| Conditions editor | Build a condition for a rule. |
| Actions editor | Build actions that run when the condition evaluates to true. |
| Facts Explorer | Browse for XML and .NET facts, and then drag those facts to the conditions editor or actions editor. |

Create and manage a ruleset
A ruleset is a set of rules that you group together based on domain, bounded context, or any business boundary. To manage rulesets and rules in the rule store, use the RuleSet Explorer. You can create, modify, test, or delete rulesets and their rules.
In the Microsoft Rules Composer, open the Rule Store menu, and select Load.
Find and select the XML file that contains the rule store you want to open.
In the RuleSet Explorer window, open the RuleSets shortcut menu, and select Add New RuleSet.
The Microsoft Rules Composer creates a new empty ruleset with a ruleset version numbered 1.0 as the default version.
Save your ruleset. On the Rule Store menu, select Save, which creates an XML file for your ruleset.
The following table describes other RuleSet Explorer commands that you can use to work with rulesets:
| Task | Command |
|---|---|
| Create a new ruleset. | Add New Ruleset |
| Create a new empty version of the selected ruleset. You can copy rules from other versions and paste them into the new version. | Add New Version |
| Copy the selected ruleset version to the clipboard. | Copy |
| Paste a ruleset version and its contents into a selected ruleset. | Paste |
| Delete the selected ruleset version. | Delete |
| Delete the selected ruleset and all its versions. | Delete at the parent ruleset level |
| Reload the selected ruleset version and its rules with the option to discard any current changes in that version and restore the contents from the rule store. | Reload |
| Save any changes made to the selected version and its rules. | Save |
| Test the selected ruleset version before using with your rules engine project. | Test Ruleset |
The following table describes a ruleset version's properties:
| Property | Value |
|---|---|
| Name | The name for the ruleset. Note: You can change this value only by updating the Name property of the ruleset, not the ruleset version. |
| Current Version | The version of the ruleset currently selected in the RuleSet Explorer. |
| Fact Retriever | The fact retriever to use for supplying facts to the ruleset version. The Microsoft Rules Composer supports the capability build and use a fact retriever to supply facts. For more information, see the following documentation: - Perform advanced tasks on rulesets - Build fact creators and retrievers |
| Maximum Execution Loop Depth | The maximum depth of the forward-chaining algorithm before an execution loop exception is thrown. The default loop count is 65,536. |
| Translation Duration | The maximum amount of time to translate the rules before a translation time-out exception is thrown. The default duration is 60,000 milliseconds. |
| Translator | The translator to use for translating the rules. The Microsoft Rules Composer currently supports only the default built-in translator, but also supports extensibility to add more translators. |
| Version Description | The description of the current version. |
For more information on working with rulesets, see Perform advanced tasks on rulesets.
Create and manage a rule
In the Microsoft Rules Composer, from the Rule Store menu, select Load.
Find and select the XML file that contains the rule store that you want to work on.
In the RuleSet Explorer window, find the ruleset version where you want to add a rule.
Open the shortcut menu for the ruleset version, and select Add New Rule.
The rules editor opens so that you can add your conditions and actions.
The following list describes the ways that you can change a rule:
Create a new version of the ruleset.
Directly edit an existing ruleset version. You can change individual rules, add new rules, or delete existing rules.
The following table describes all the RuleSet Explorer shortcut commands that you can use to work with rules:
| Task | Shortcut command |
|---|---|
| Create a new rule in the selected ruleset version. | Add New Rule |
| Copy the selected rule to the clipboard. | Copy |
| Copy the selected rule to the clipboard and delete the rule. | Cut |
| Paste a rule into the selected ruleset version. | Paste |
| Delete the selected rule. | Delete |
The following table describes the properties for a rule:
| Property | Value |
|---|---|
| Name | The name for the rule. |
| Active | Indicates whether the rule is enabled or disabled. |
| Priority | The priority for the rule within the ruleset. The higher the index, the higher the rule priority. The actions for a higher priority rule run first. The default value is 0 and represents middle priority. You can make the value positive or negative. For more information, see Rules engine optimization. |
Disable or enable a rule
You can set a rule to inactive so that the rule doesn't execute when the ruleset executes, or you can reactivate a rule that was deactivated.
In the RuleSet Explorer, select the rule.
In the Properties window, set the Active property to either of the following values:
- False: Disabled
- True: Enabled
Set rule priority
You can set the priority for a rule so that actions run before or after the actions of another rule with a different priority. Priorities are relative, so all the actions in a rule with a specific priority run in order before any actions in a rule with a lower priority value.
In the RuleSet Explorer, select the rule.
In the Properties window, set Priority to the integer value that you want.
Create or edit a condition
To build, edit, or view a condition that triggers a rule, use the conditions editor, which is part of the rules editor. To build a condition, you can perform the following tasks:
Add built-in or user-defined predicates, if any.
Define arguments in predicates by dragging items from the Facts Explorer window.
Enter argument values inline by selecting an argument link.
Move predicates and logical operators within a condition.
Note
The order in which the predicates and logical operators appear don't determine their order of evaluation.
Delete predicates and logical operators from a condition.
Add a predicate to a condition
In the RuleSet Explorer, select the rule.
In the IF window, which is the conditions editor, open the Conditions shortcut menu, and choose one of the following:
Select a logical operator. From the operator's shortcut menu, add the predicates or nested logical operators that you want to evaluate.
For more information about setting up logical operators, see Add arithmetic and logic operators to rules
From the Predicates shortcut menu, select a built-in predicate or user-defined predicate, if you have any.
The following tables describe the available predicate expressions for you to select from the Predicates shortcut menus:
Built-in predicate Description After The temporal predicate that answers the question, "Is time1 chronologically after time2?" Before The temporal predicate that answers the question, "Is time1 chronologically before time2?" Between The temporal predicate that answers the question, "Is time1 chronologically between time2 and time3?" Equal The relational equality operator. Exists The existence predicate that answers the question, "Does the specified XML element or attribute exist?" GreaterThan The relational greater than operator. GreaterThanEqual The relational greater than or equal to operator. LessThan The relational less than operator. LessThanEqual The relational less than or equal to operator. Match Determine whether a regular expression exists in a specified input string. NotEqual The relational inequality operator. Range Determine whether a value exists within a range.
Specify an argument for a predicate in a condition
Follow these steps, which are the same for a function in an action.
Move a logical operator or predicate in a condition
In the conditions editor, perform one of the following steps:
Drag the logical operator or predicate onto another logical operator or onto the Conditions node.
Open the shortcut menu for the logical operator or predicate, and select Move Up or Move Down to move the item one position or level, respectively.
Create or edit an action
To build, edit, or view an action that runs when a condition is met, use the actions editor, which is part of the rules editor. To build an action, you can perform the following tasks:
- Add built-in or user-defined functions, if any.
- Define arguments in functions by dragging items from the Facts Explorer window.
- Enter argument values inline by selecting an argument link.
- Move functions within an action.
Add a function
In the RuleSet Explorer, select the rule.
In the THEN window, which is the actions editor, open the Actions shortcut menu, and select a built-in function to add an action and argument.
The following table describes the available functions for you to select from the Actions shortcut menu:
Function Description Assert Add a new fact to the working memory of the rules engine instance. Clear Reset the working memory and agenda of the rules engine instance. For more information about working memory and agenda, see Rules engine optimization. Halt Terminate rule processing. Retract Remove a fact from the working memory of the rules engine instance. RetractByType Remove a fact with the specified type from the working memory of the rules engine instance. Update Update a fact in the working memory of the rules engine instance.
For more information, see Optimize rules with control functions.
Specify an argument for a function in an action
Follow these steps, which are the same for a predicate in a condition.
Move a function in an action
The actions in a rule execute based on the specified order except for the rules engine control functions, which execute following other actions.
- In the actions editor, open the action's shortcut menu, and select Move Up or Move Down to move the action one position or level, respectively.
Specify an argument for a predicate in a condition or a function in an action
In the conditions editor or actions editor accordingly, perform one of the following steps:
In the predicate or function, select the default argument, and enter the value that you want or select from a list, if available, where appropriate.
In the Facts Explorer window, select the tab that has the term that you want to use as an argument, and drag that term onto the argument in the predicate or function in the respective editor.
The term must have a type that the predicate or function expects. Otherwise, you get an error.
To replace an argument with an empty string value, open the argument's shortcut menu, and select Set to empty string.
To replace an argument with a null constant definition, open the argument's shortcut menu, and select Set to null.
Note
This option might not appear if your argument type isn't a type that you can set to null.
To add an arithmetic or logical operator to an argument, see Add arithmetic and logical operators to rules.
Find item source in a condition or action
In the conditions or actions editor accordingly, perform one of the following steps:
To locate the vocabulary definition in the Facts Explorer that you used to create a predicate in a condition, a function in an action, or an argument in either, open the shortcut menu for the predicate, function, or argument, and select Go to vocabulary.
To locate a .NET member or XML element in the Facts Explorer that you used to create a predicate in a condition, a function in an action, or argument in either, open the shortcut menu for the predicate, function, or argument, and select Go to source fact.
Delete a predicate, logical operator, or action
In the conditions editor, perform one of the following steps:
Select the item, and then press the Delete key.
Select the item, such as a predicate, logical operator, or action, and select Delete <item-type>.
To delete an argument plus any nested arguments and restore the default definition, open the argument's shortcut menu, and select Reset argument.
Add facts to your rules
You can specify data source references that you can save in your rule store for subsequent use as facts in your rules and vocabularies. You can specify .NET assemblies that have classes and class members or XSD schemas that have XML document elements and attributes.
To browse data that you already added from a .NET assembly, XSD schema, or as vocabulary definitions, from the Facts Explorer window, select the Vocabularies tab, XML Schemas tab, or .NET Classes tab, based on where the data that you want exists.
Drag the data from the corresponding tab to where you want inside a condition in the conditions editor or inside an action in the actions editor.
Add a .NET assembly as a data source for .NET facts
In the Facts Explorer window, select the .NET Classes tab.
Open the shortcut menu for the .NET Assemblies node, and select Browse.
Find and open the .NET assembly that you want to use.
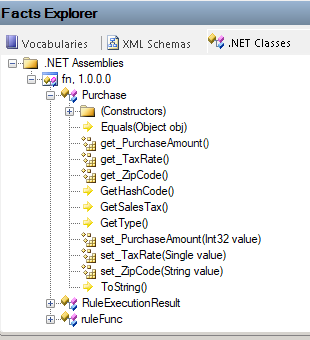
Under .NET Assemblies, the selected assembly appears along with its classes and members, for example:

Important
If you update the .NET assembly in the local directory, the Microsoft Rules Composer doesn't automatically refresh the .NET assembly. For the steps to refresh references to an updated assembly, see Update .NET assembly references.
Update .NET assembly references
If you add a new .NET assembly, either with a different name or version, you must update your ruleset to reference the new assembly. For this task, in the Microsoft Rules Composer, you must create a new ruleset version, and update the references to the new assembly, including the classes, methods, and so on. To load the updated assembly, make sure to restart the Microsoft Rules Composer.
If your updated .NET assembly uses the same name, version number, and so on, you only need to add the new assembly to your Azure Logic Apps Rules Engine function project.
Remove a .NET assembly as a data source
In the Facts Explorer window, select the .NET Classes tab.
Under .NET Assemblies, open the assembly's shortcut menu, and select Remove.
Add an XML schema as a data source for XML facts
In the Facts Explorer window, select the XML Schemas tab.
Open the shortcut menu for the Schemas node, and select Browse.
In the Schema Files box, find and select the XML schema (.xsd) file, and select Open.
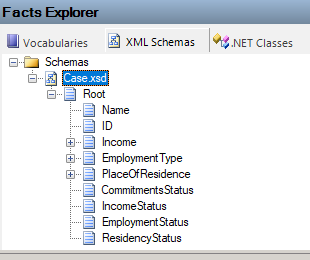
Under Schemas, the XML schema appears along with its XML elements, for example:

Bindings for XML elements used in arguments
In the Business Rules Framework, the TypedXmlDocument class is a Microsoft .NET-compliant class library that represents the XML document type and is one of the classes that implements the ITypedFact interface. These classes are known as typed facts.
When you use a node from an XML document as an argument in a rule, two XPath expressions are created: a selector binding and a field binding, based on the node that you choose to use:
If the node has child nodes, a selector binding, also known as an XmlDocument binding, is created to the node, but no field binding is created.
If the node doesn't have child nodes, a selector binding, also known as an XmlDocument binding, is created to the node's parent node. A field binding, also known as an XmlDocumentMember binding, is created to the node itself. This field binding is relative to the selector binding.
Before you drag an XML node into a rule argument, you can change the default XPath expressions for the XML nodes, and the new binding information is placed in the ruleset.
Note
When the schema is reloaded in the Microsoft Rules Composer, you must reenter any edits that you made to the XPath expressions in the Microsoft Rules Composer.
For example, suppose you have the following XML schema:

If you use the Income node in an argument, only a selector binding is created because the node has child nodes.
In the Properties window, the node's XPath Selector property contains the following default XPath expression:
/*[local-name()='Root' and namespace-uri()='http://LoansProcessor.Case']/*[local-name()='Income' and namespace-uri()='']If you use the Name node in an argument, both a selector binding and a field binding are created.
In the Properties window, the node's binding information appears as the following:
Property Value XPath Field *[local-name()='Name' and namespace-uri()='']XPath Selector /*[local-name()='Root' and namespace-uri()='http://LoansProcessor.Case']
Related content
Atsauksmes
Drīzumā: 2024. gada laikā mēs pakāpeniski pārtrauksim izmantot “GitHub problēmas” kā atsauksmju par saturu mehānismu un aizstāsim to ar jaunu atsauksmju sistēmu. Papildinformāciju skatiet: https://aka.ms/ContentUserFeedback.
Iesniegt un skatīt atsauksmes par