Create an Azure Logic Apps Rules Engine project using Visual Studio Code (Preview)
Applies to: Azure Logic Apps (Standard)
Important
This capability is in preview and is subject to the Supplemental Terms of Use for Microsoft Azure Previews.
When you want to integrate business logic with your Standard workflows in Azure Logic Apps, you can create and build an Azure Logic Apps Rules Engine project using Visual Studio Code. Rules govern the business logic for how business processes work.
This how-to guide describes how to create an Azure Logic Apps Rules Engine project:
Prerequisites and setup for creating your Azure Logic Apps Rules Engine project, including creating the business rules for your project with the Microsoft Rules Composer.
Export existing rules from Microsoft BizTalk Server, if you have any.
Create a Standard logic apps project for the Azure Logic Apps Rules Engine using Visual Studio Code.
Prerequisites
Download and install the Microsoft Rules Composer, which you use to create rulesets, business rules, and vocabularies.
To build the business for your rules engine project, see the following documentation:
For this release, only Visual Studio Code supports the development experience for an Azure Logic Apps Rules Engine project. To meet the prerequisites for using Visual Studio Code, see Create a Standard logic app workflow in single-tenant Azure Logic Apps using Visual Studio Code.
The Azure Logic Apps Rules Engine uses the custom code function capability in Visual Studio Code. To meet the prerequisites for using this capability, see Create and run .NET Framework code from Standard workflows in Azure Logic Apps.
Before you create your project
To help you ensure a successful rules engine project, review and perform the following general tasks and best practices:
Determine how business rules fit into your business processes.
Plan how to incorporate business rules into your application.
Identify the business logic that you want to represent with rules in your application.
The term "business logic" can refer to many things. For example, business logic might be "Purchase orders greater than 500 dollars requires manager approval."
Identify data sources for your rule elements. You can optionally define vocabularies, which are domain-specific nomenclature that represents underlying bindings.
Define the rules to use from vocabulary definitions or directly from data bindings. From those rules, create a ruleset that represents your business logic.
Export rules from Microsoft BizTalk Server
To reuse existing rules from Microsoft BizTalk Server, you can export them. However, DB facts currently aren't supported. Before you export your rules, remove or refactor them into other types of facts using the Microsoft BizTalk Rules Composer.
From Microsoft BizTalk Server, start the Business Rules Engine Deployment Wizard.
On the Welcome to the Rules Engine Deployment Wizard page, select Next.
On the Deployment Task page, select Export Policy/Vocabulary to file from database, and select Next.
On the Policy Store page, in the SQL Server Name list, select your SQL server. In the Configuration Database on selected server list, select BizTalkRuleEngineDb, and then select Next.
On the Export Policy/Vocabulary page, from the Policy list, select the policy that you want. To find and choose the definition file, select Browse.
When you're ready, select Next.
Confirm the server, database, and policy or vocabulary information, and select Next.
After the import or export finishes, select Next.
Review the completion status for the import or export, and select Finish.
Create an Azure Logic Apps Rules Engine project
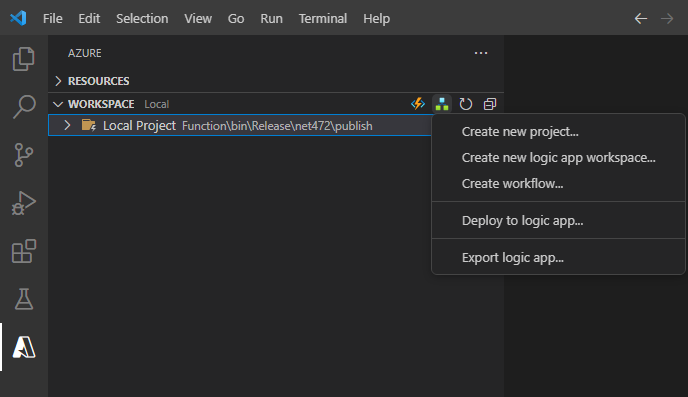
In Visual Studio Code, on the Activity Bar, select the Azure icon. (Keyboard: Shift+Alt+A)
In the Azure window that opens, on the Workspace section toolbar, from the Azure Logic Apps menu, select Create new logic app workspace.
In the Select folder box, browse to and select the local folder that you created for your project.
When the Create new logic app workspace prompt box appears, provide a name for your workspace:

This example continues with MyLogicAppRulesWorkspace.
When the Select a project template for your logic app workspace prompt box appears, select Logic app with rules engine project (preview).

Follow the subsequent prompts to provide the following example values:
Item Example value Function name for functions project RulesFunction Namespace name for functions project Contoso.Enterprise Workflow template:
- Stateful Workflow
- Stateless WorkflowStateful Workflow Workflow name MyRulesWorkflow Select Open in current window.
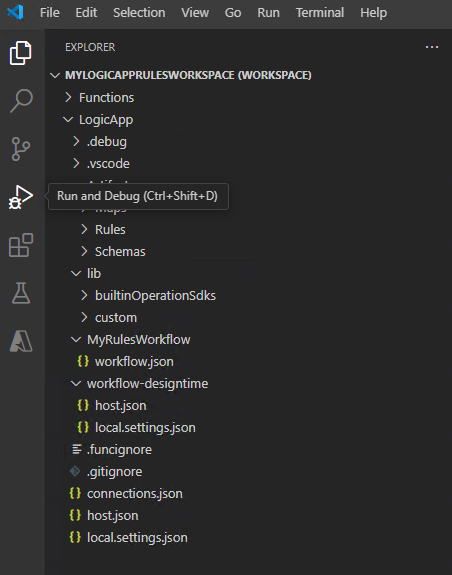
After you finish this step, Visual Studio Code creates your workspace, which includes a functions project and a logic app rules engine project, by default, for example:
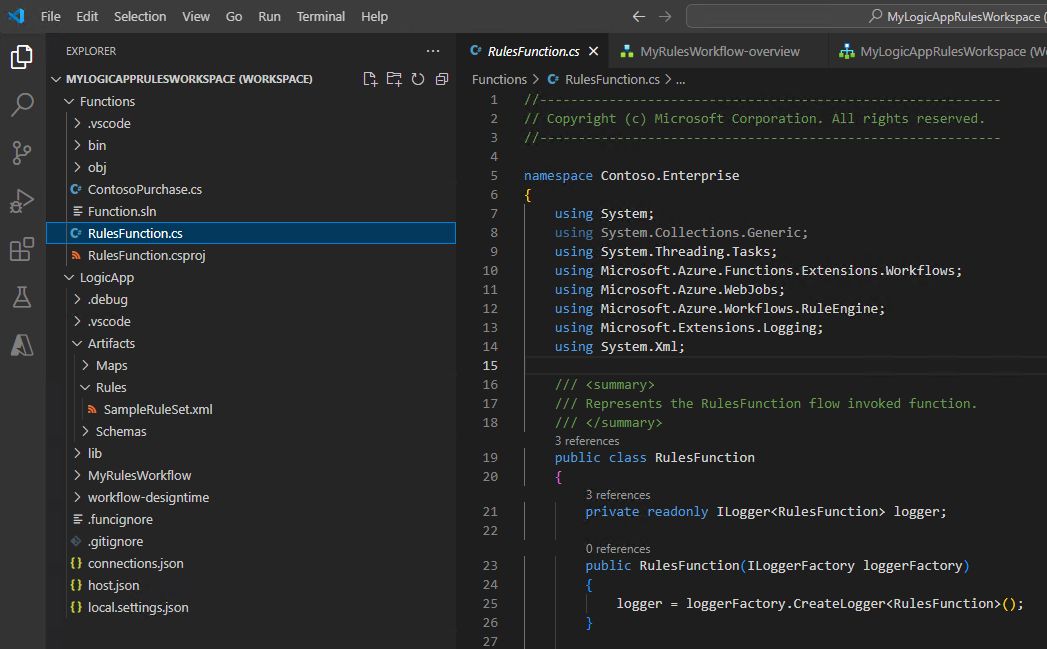
Node Description <workspace-name> Contains both your function project and logic app workflow project. Function Contains the artifacts for your function project. For example, the <function-name>.cs file is the code file where you can author your code. LogicApp Contains the artifacts for your logic app rules engine project, including a workflow.


Write your rules engine code
In your workspace, expand the Functions node, if not already expanded.
Open the <function-name>.cs file, which is named RulesFunction.cs in this example.
By default, this file contains sample code that has the following code elements along with the previously provided example values where appropriate:
- Namespace name
- Class name
- Function name
- Function parameters
- Return type
- Complex type
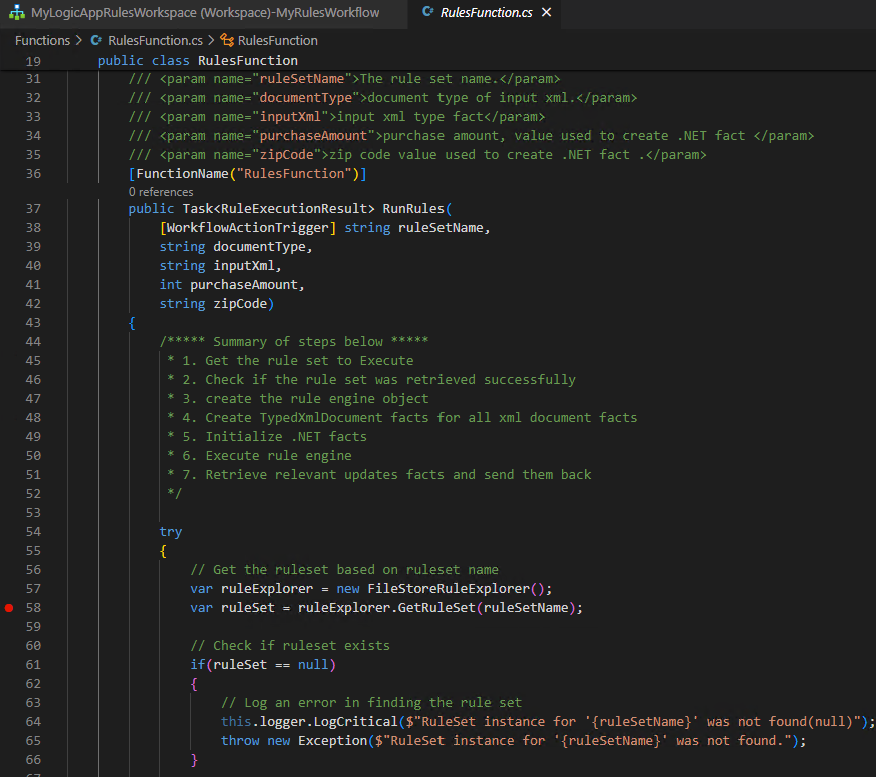
The following example shows the complete sample code for the function named
RulesFunction://------------------------------------------------------------ // Copyright (c) Microsoft Corporation. All rights reserved. //------------------------------------------------------------ namespace Contoso.Enterprise { using System; using System.Collections.Generic; using System.Threading.Tasks; using Microsoft.Azure.Functions.Extensions.Workflows; using Microsoft.Azure.WebJobs; using Microsoft.Azure.Workflows.RuleEngine; using Microsoft.Extensions.Logging; using System.Xml; /// <summary> /// Represents the RulesFunction flow invoked function. /// </summary> public class RulesFunction { private readonly ILogger<RulesFunction> logger; public RulesFunction(ILoggerFactory loggerFactory) { logger = loggerFactory.CreateLogger<RulesFunction>(); } /// <summary> /// Execute the logic app workflow. /// </summary> /// <param name="ruleSetName">The ruleset name.</param> /// <param name="documentType">The document type for the input XML.</param> /// <param name="inputXml">The input XML type fact.</param> /// <param name="purchaseAmount">The purchase amount value used to create a .NET fact.</param> /// <param name="zipCode">The zip code value used to create a .NET fact.</param> [FunctionName("RulesFunction")] public Task<RuleExecutionResult> RunRules([WorkflowActionTrigger] string ruleSetName, string documentType, string inputXml, int purchaseAmount, string zipCode) { /***** Summary of steps below ***** * 1. Get the ruleset to execute. * 2. Check if the ruleset was successfully retrieved. * 3. Create the rules engine object. * 4. Create TypedXmlDocument facts for all XML document facts. * 5. Initialize .NET facts. * 6. Execute rules engine. * 7. Retrieve relevant updates facts and send them back. */ try { // Get the ruleset based on the ruleset name. var ruleExplorer = new FileStoreRuleExplorer(); var ruleSet = ruleExplorer.GetRuleSet(ruleSetName); // Check if ruleset exists. if(ruleSet == null) { // Log an error if ruleset not found. this.logger.LogCritical($"RuleSet instance for '{ruleSetName}' was not found(null)"); throw new Exception($"RuleSet instance for '{ruleSetName}' was not found."); } // Create rules engine instance. var ruleEngine = new RuleEngine(ruleSet: ruleSet); // Create one or more typedXmlDcoument facts from one or more input XML documents. XmlDocument doc = new XmlDocument(); doc.LoadXml(inputXml); var typedXmlDocument = new TypedXmlDocument(documentType, doc); // Initialize .NET facts. var currentPurchase = new ContosoNamespace.ContosoPurchase(purchaseAmount, zipCode); // Provide facts and run the rules engine. ruleEngine.Execute(new object[] { typedXmlDocument, currentPurchase }); // Send back the relevant results (facts). var updatedDoc = typedXmlDocument.Document as XmlDocument; var ruleExectionOutput = new RuleExecutionResult() { XmlDoc = updatedDoc.OuterXml, PurchaseAmountPostTax = currentPurchase.PurchaseAmount + currentPurchase.GetSalesTax() }; return Task.FromResult(ruleExectionOutput); } catch(RuleEngineException ruleEngineException) { // Log any rules engine exceptions. this.logger.LogCritical(ruleEngineException.ToString()); throw; } } /// <summary> /// Results from rules execution /// </summary> public class RuleExecutionResult { /// <summary> /// Rules updated XML document /// </summary> public string XmlDoc { get; set;} /// <summary> /// Purchase amount after tax /// </summary> public int PurchaseAmountPostTax { get; set;} } } }The function definition for
RulesFunctionincludes a defaultRunRulesmethod that you can use to get started. This sampleRunRulesmethod shows how to pass parameters to the Azure Logic Apps Rules Engine. In this example, the method passes the ruleset name, the input document type, an XML fact, and other values for further processing.The <function-name>.cs file also includes the
ILoggerinterface, which provides support for logging events to an Application Insights resource. You can send tracing information to Application Insights and store that information alongside the trace information from your workflows, for example:private readonly ILogger<RulesFunction> logger; public RulesFunction(ILoggerFactory loggerFactory) { logger = loggerFactory.CreateLogger<RulesFunction>(); } <...>The Azure Logic Apps Rules Engine operates as described in the following steps:
The engine uses the
FileStoreRuleExplorerobject to access the ruleset. The ruleset file is stored in the Rules directory for your Standard logic app.For this example, the ruleset file is called
SampleRuleSet.xml, which was created using either the Microsoft Rules Composer or exported using Microsoft BizTalk Server.var ruleExplorer = new FileStoreRuleExplorer(); var ruleSet = ruleExplorer.GetRuleSet(ruleSetName); // Check if the ruleset exists. if(ruleSet == null) { // Log an error if the ruleset isn't found. this.logger.LogCritical($"RuleSet instance for '{ruleSetName}' was not found(null)"); throw new Exception($"RuleSet instance for '{ruleSetName}' was not found."); }Important
Rulesets hold references to their facts. The Microsoft Rules Composer looks for the facts' assemblies to validate the ruleset for editing. To open rulesets such as
SampleRuleSet.xmlin the Microsoft Rules Composer, you must place them with the corresponding .NET facts assemblies. Otherwise, you get an exception.The engine uses the
ruleSetobject to create an instance of theRuleEngineobject.The
RuleEngineobject receives the rule's facts using theExecutemethod.In this example, the
Executemethod receives two facts: an XML fact namedtypedXmlDocumentand a .NET fact namedcurrentPurchase.After the engine runs, the facts' values are overwritten with the values that result from the engine execution:
// Create rules engine instance.
var ruleEngine = new RuleEngine(ruleSet: ruleSet);

// Create one or more typedXml facts from one or more input XML documents.
XmlDocument doc = new XmlDocument();
doc.LoadXml(inputXml);
var typedXmlDocument = new TypedXmlDocument(documentType, doc);

// Initialize .NET facts.
var currentPurchase = new ContosoNamespace.ContosoPurchase(purchaseAmount, zipCode);

// Provide facts and run the rules engine.
ruleEngine.Execute(new object[] { typedXmlDocument, currentPurchase });

// Send back the relevant results (facts).
var updatedDoc = typedXmlDocument.Document as XmlDocument;
The engine uses the
RuleExecutionResultcustom class to return the values to theRunRulesmethod:var ruleExectionOutput = new RuleExecutionResult() { XmlDoc = updatedDoc.OuterXml, PurchaseAmountPostTax = currentPurchase.PurchaseAmount + currentPurchase.GetSalesTax() }; return Task.FromResult(ruleExectionOutput);Replace the sample function code with your own, and edit the default
RunRulesmethod for your own scenarios.This example continues using the sample code without any changes.
Compile and build your code
After you finish writing your code, compile to make sure that no build errors exist. Your function project automatically include build tasks, which compile and then add any of your custom code libraries, including your .NET facts assemblies, to the lib\custom folder in your logic app project where workflows look for custom functions to run. These tasks put the assemblies in the lib\custom\net472 folder.
In Visual Studio Code, from the Terminal menu, select New Terminal.
From the working directory list that appears, select Functions as your current working directory for the new terminal.

Visual Studio Code opens a terminal window with a command prompt.
In the Terminal window, at the command prompt, enter dotnet restore .\RulesFunction.csproj.
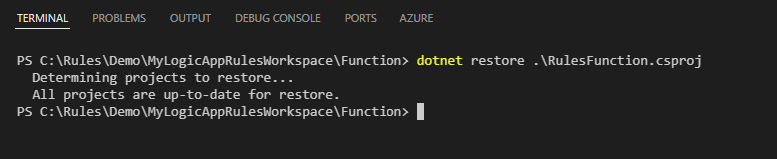
After the command prompt reappears, enter dotnet build .\RulesFunction.csproj.
If your build succeeds, the Terminal window reports that the Build succeeded.
Confirm that the following items exist in your logic app project:
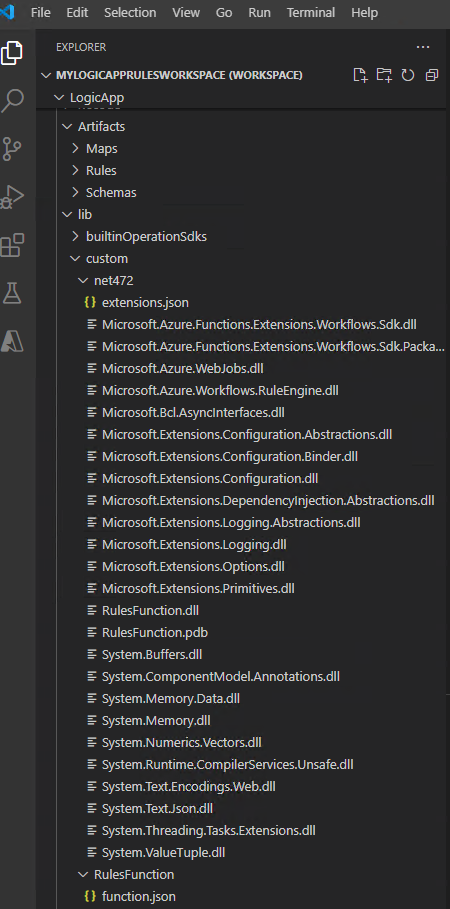
In your workspace, expand the following folders: LogicApp > lib\custom > net472. Confirm that the subfolder named net472 contains the multiple assemblies required to run your code, including a file named <function-name>.dll.
In your workspace, expand the following folders: LogicApp > lib\custom > <function-name>. Confirm that the subfolder named <function-name> contains a function.json file, which includes the metadata about the function code that you wrote. The workflow designer uses this file to determine the necessary inputs and outputs when calling your code.
The following example shows sample generated assemblies and other files in the logic app project:


Call your rules from a workflow
After you confirm that your code compiles and that your logic app rules engine project has the necessary files for your code to run, open the default workflow that is included with your logic app project.
In your workspace, under LogicApp, expand the <workflow-name> node, open the shortcut menu for workflow.json, and select Open Designer.
On the workflow designer that opens, the default workflow, included with your logic app project, appears with the following trigger and actions:
- The built-in Request trigger named When a HTTP request is received.
- The built-in action named Call a local rules function in this logic app.
- The built-in Response action named Response, which you use to reply to the caller only when you use the Request trigger.
Select the action named Call a local rules function in this logic app.
The action's information pane opens to the right side.
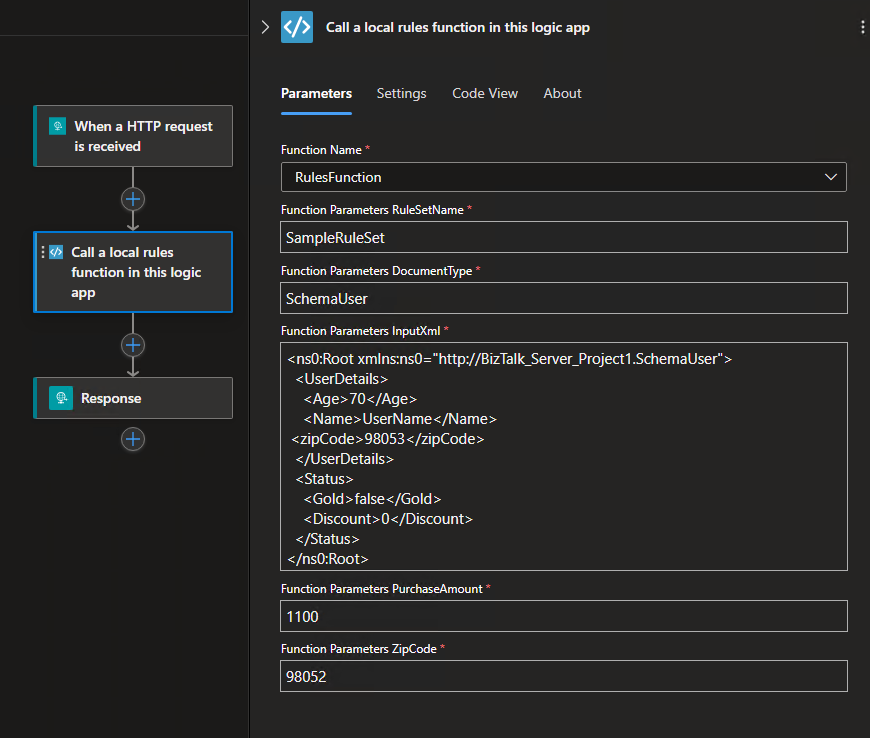
Review and confirm that the Function Name parameter value is set to the rules function that you want to run. Review or change any other parameter values that your function uses.

Debug your code and workflow
Repeat the following steps to start the Azurite storage emulator three times: one time each for the following Azure Storage services:
- Azure Blob Service
- Azure Queue Service
- Azure Table Service
From the Visual Studio Code View menu, select Command Palette.
At the prompt that appears, find and select Azurite: Start Blob Service.
From the working directory list that appears, select LogicApp.
Repeat these steps for Azurite: Start Queue Service and Azurite: Start Table Service.
You're successful when the Visual Studio Code taskbar at the bottom of the screen shows the three storage services running, for example:

On the Visual Studio Code Activity Bar, select Run and Debug. (Keyboard: Ctrl+Shift+D)
From the Run and Debug list, select Attach to logic app (LogicApp), if not already selected, and then select Play (green arrow).

The Terminal window opens and shows the started debugging process. The Debug Console window then appears and shows the debugging statuses. At the bottom of Visual Studio Code, the task bar turns orange, indicating that the .NET debugger is loaded.
From the Run and Debug list, select Attach to .NET Functions (Functions), and then select Play (green arrow).

To set any breakpoints, in your function definition (<function-name>.cs) or workflow definition (workflow.json), find the line number where you want the breakpoint, and select the column to the left side, for example:
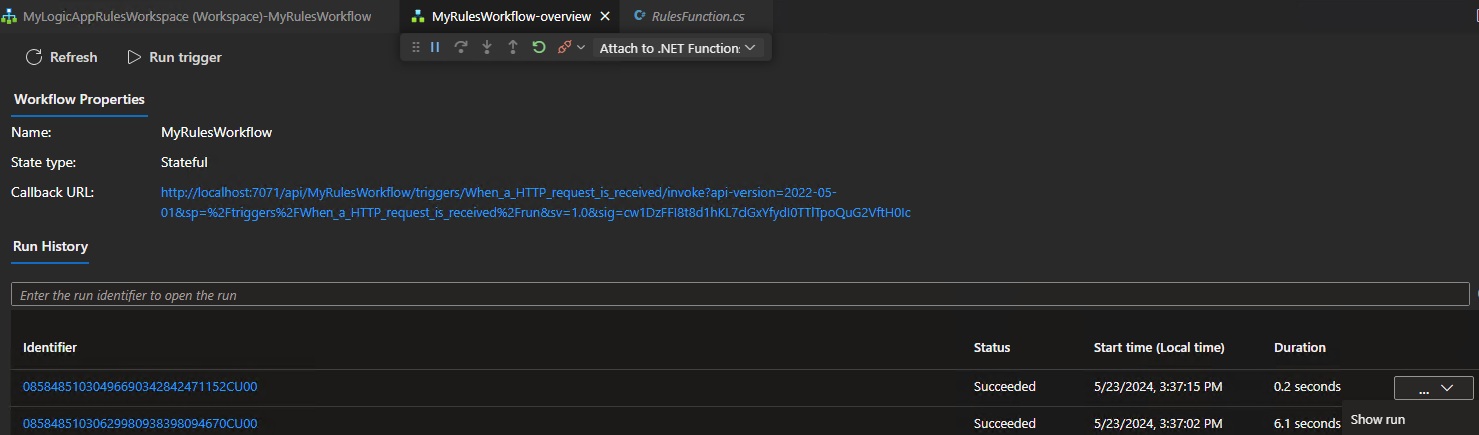
To manually run the Request trigger in your workflow, open the workflow's Overview page.
From your logic app project, open the workflow.json file's shortcut menu, and select Overview.
On the workflow's Overview page, the Run trigger button is available for when you want to manually start the workflow. Under Workflow Properties, the Callback URL value is the URL for a callable endpoint that is created by the Request trigger in your workflow. You can send requests to this URL to trigger your workflow from other apps, including other logic app workflows.
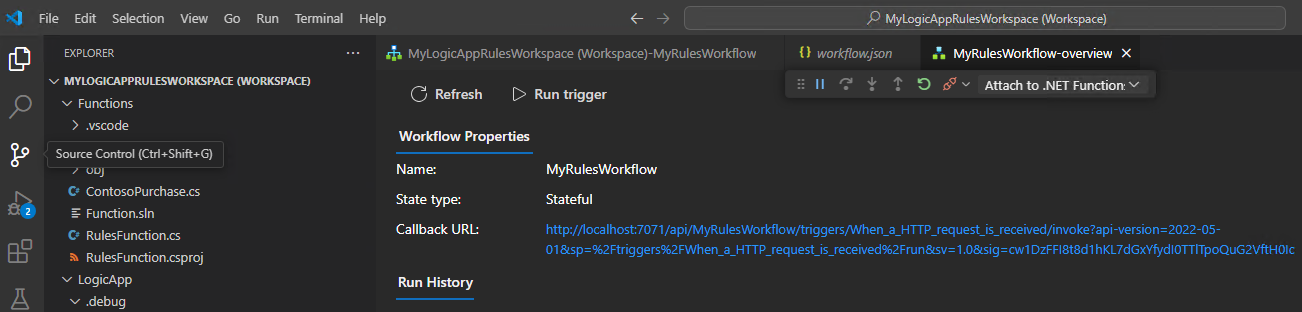
On the Overview page toolbar, select Run trigger.
After your workflow starts to run, the debugger activates your first breakpoint.
On the Run menu or debugger toolbar, select a debug action.
After the workflow run completes, the Overview page shows the finished run and basic details about that run.
To review more information about the workflow run, select the finished run. Or, from the list next to the Duration column, select Show run.


Related content
Atsauksmes
Drīzumā: 2024. gada laikā mēs pakāpeniski pārtrauksim izmantot “GitHub problēmas” kā atsauksmju par saturu mehānismu un aizstāsim to ar jaunu atsauksmju sistēmu. Papildinformāciju skatiet: https://aka.ms/ContentUserFeedback.
Iesniegt un skatīt atsauksmes par