Share a filtered Power BI report
APPLIES TO:
Power BI Desktop
Power BI service
Sharing is a good way to give a few people access to your reports and dashboards. What if you want to share a filtered version of a report? Maybe you want the report to show only data for a specific city or salesperson or year. This article explains how to filter a report and share the filtered version of the report.
You can share the filtered report in several different ways:
- Link sharing
- Chat in Teams
- Share an individual visual
- Direct access sharing
- PowerPoint, via the Power BI add-in for PowerPoint
In every case, the report is filtered when recipients first open it. They can clear the filter selections in the report. In this example, we're filtering the report page to show only values where Business Area equals Distribution, Infrastructure, or Manufacturing.
Another way to share a filtered report is to add query parameters to the report URL. Again, the report is filtered when recipients first open it. They can clear the filter selections in the report.
Power BI also offers other ways to collaborate and distribute your reports. With sharing, you and your recipients need a Power BI Pro license, or the content needs to be in a Premium capacity. To learn more about interacting with reports that have been shared with you, see Working with content shared with you.
Share via link
Open a report in Reading view and apply a filter.
Select Share and make sure Include my changes is selected:

Share a report in Teams
Open a report in Reading view and apply a filter.
You can access Chat in Teams from the action bar:

For the Chat in Teams dialog, you need provide the name of the Team or Channel that you wish to share to, then select Share:

Share a visual
You can also share individual visuals.
Open a report in Reading view and apply a filter.
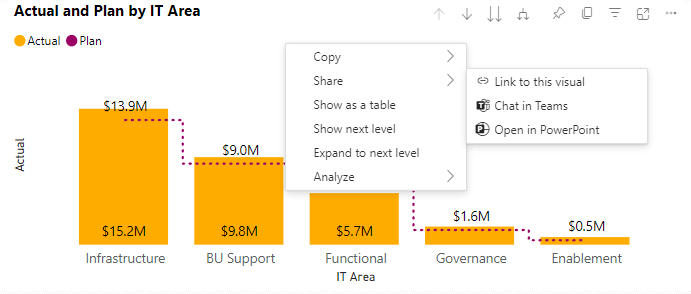
Right-click a visual, then select Share > Link to this visual.

In the Copy link dialog, select Copy.

In the Link copied dialog, select Copy for the provided link.

Share a report or visual in PowerPoint
You can share live, filtered report pages or visuals by adding them to a PowerPoint presentation and then sharing it with colleagues. For more information, see Add live Power BI data to PowerPoint.
Share directly
If you prefer to share directly to users, you can also share your filtered report through direct access sharing.
Open a report in Reading view and apply a filter.
Select Share > More options (...) > Manage permissions:

Select the plus icon (+) to Grant people access:

In the Grant people access dialog, make sure the Include my changes option is selected so that filters are included when you share the report with others.

The Include my changes setting includes any changes to the following:
- Filters (filter pane)
- Slicers
- Personalize visuals
- Cross-filtering or cross-highlighting
- Drill down or drill up
- Applied bookmark
- Spotlight
Manage the shared view
After you've shared the filtered report, you can also manage the shared view.
To navigate to the management page, select Advanced in the footer of the Manage Permissions pane:

Select Shared views in the Related content section:

Here you can see any shared views for the report and when those views were created and when they expire.
To copy the link to the view, right-click the URL you want, and select Copy link.

When you share this link, recipients with access to the report will see your filtered report.
Considerations and limitations
Things to keep in mind about sharing reports:
- When you share a semantic model by managing permissions, by sharing reports or dashboards, or by publishing an app, you're granting access to the entire semantic model unless row-level security (RLS) limits access. Report authors may use capabilities that customize user experiences when viewing or interacting with reports, for example hiding columns, limiting the actions on visuals, and others. These customized user experiences don't restrict what data users can access in the semantic model. Use row-level security (RLS) in the semantic model so that each person's credentials determine which data they can access.
- The shared report view will automatically expire after 180 days. Each time the link shared report view is accessed the expiration is reset to 180 days.
- You can't share reports that are distributed to you in an app. Ask the app owner to add the person you want to share the report with, and republish the app.
- Share link to selection for visuals in reports creates a shared view with the visual in spotlight mode.
Related content
- Ways to share your work in Power BI
- Share a report or dashboard
- Interact with content that has been shared with you
- More questions? Try the Power BI Community.
- Have feedback? Go to the Power BI Community site with your suggestions.
