How to use Azure Queue Storage from Node.js
Overview
This guide shows you how to accomplish common scenarios using Azure Queue Storage. The samples are written using the Node.js API. The scenarios covered include inserting, peeking, getting, and deleting queue messages. Also learn to create and delete queues.
What is Queue storage?
Azure Queue storage is a service for storing large numbers of messages that can be accessed from anywhere in the world via authenticated calls using HTTP or HTTPS. A single queue message can be up to 64 KB in size, and a queue can contain millions of messages, up to the total capacity limit of a storage account. Queue storage is often used to create a backlog of work to process asynchronously.
Queue service concepts
The Azure Queue service contains the following components:
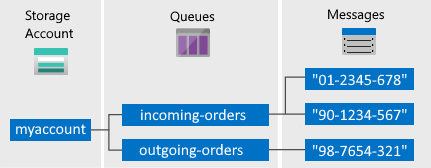
Storage Account: All access to Azure Storage is done through a storage account. For more information about storage accounts, see Storage account overview.
Queue: A queue contains a set of messages. All messages must be in a queue. Note that the queue name must be all lowercase. For information on naming queues, see Naming Queues and Metadata.
Message: A message, in any format, of up to 64 KB. The maximum time that a message can remain in the queue is 7 days. For version 2017-07-29 or later, the maximum time-to-live can be any positive number, or -1 indicating that the message doesn't expire. If this parameter is omitted, the default time-to-live is seven days.
URL format: Queues are addressable using the following URL format: http://
<storage account>.queue.core.windows.net/<queue>The following URL addresses a queue in the diagram:
http://myaccount.queue.core.windows.net/incoming-orders
Create an Azure storage account
The easiest way to create your first Azure storage account is by using the Azure portal. To learn more, see Create a storage account.
You can also create an Azure storage account by using Azure PowerShell, Azure CLI, or the Azure Storage Resource Provider for .NET.
If you prefer not to create a storage account in Azure at this time, you can also use the Azurite storage emulator to run and test your code in a local environment. For more information, see Use the Azurite emulator for local Azure Storage development.
Create a Node.js application
To create a blank Node.js application, see Create a Node.js web app in Azure App Service, build and deploy a Node.js application to Azure Cloud Services using PowerShell or Visual Studio Code.
Configure your application to access storage
The Azure Storage client library for JavaScript includes a set of convenience libraries that communicate with the storage REST services.
Use Node package manager (npm) to obtain the package
Use a command-line interface such as PowerShell (Windows), Terminal (Mac), or Bash (Unix), navigate to the folder where you created your sample application.
Type
npm install @azure/storage-queuein the command window.Verify that a
node_modulesfolder was created. Inside that folder you'll find the@azure/storage-queuepackage, which contains the client library you need to access storage.
Import the package
Using your code editor, add the following to the top the JavaScript file where you intend to use queues.
const { QueueClient, QueueServiceClient } = require("@azure/storage-queue");
How to create a queue
The following code gets the value of an environment variable called AZURE_STORAGE_CONNECTION_STRING and uses it to create a QueueServiceClient object. This object is then used to create a QueueClient object that allows you to work with a specific queue.
// Retrieve the connection from an environment
// variable called AZURE_STORAGE_CONNECTION_STRING
const connectionString = process.env.AZURE_STORAGE_CONNECTION_STRING;

// Create a unique name for the queue
const queueName = "myqueue-" + Date.now().toString();

console.log("Creating queue: ", queueName);

// Instantiate a QueueServiceClient which will be used
// to create a QueueClient and to list all the queues
const queueServiceClient = QueueServiceClient.fromConnectionString(connectionString);

// Get a QueueClient which will be used
// to create and manipulate a queue
const queueClient = queueServiceClient.getQueueClient(queueName);

// Create the queue
await queueClient.create();
If the queue already exists, an exception is thrown.
How to format the message
The message type is a string. All messages are treated as strings. If you need to send a different data type, you need to serialize that datatype into a string when sending the message and deserialize the string format when reading the message.
To convert JSON to a string format and back again in Node.js, use the following helper functions:
function jsonToBase64(jsonObj) {
    const jsonString = JSON.stringify(jsonObj)
    return  Buffer.from(jsonString).toString('base64')
}
function encodeBase64ToJson(base64String) {
    const jsonString = Buffer.from(base64String,'base64').toString()
    return JSON.parse(jsonString)
}
How to insert a message into a queue
To add a message to a queue, call the sendMessage method.
messageText = "Hello, World";
console.log("Adding message to the queue: ", messageText);

// Add a message to the queue
await queueClient.sendMessage(messageText);
How to peek at the next message
You can peek at messages in the queue without removing them from the queue by calling the peekMessages method.
By default, peekMessages peeks at a single message. The following example peeks at the first five messages in the queue. If fewer than five messages are visible, just the visible messages are returned.
// Peek at messages in the queue
const peekedMessages = await queueClient.peekMessages({ numberOfMessages: 5 });

for (i = 0; i < peekedMessages.peekedMessageItems.length; i++) {
    // Display the peeked message
    console.log("Peeked message: ", peekedMessages.peekedMessageItems[i].messageText);
}
Calling peekMessages when there are no messages in the queue won't return an error. However, no messages are returned.
How to change the contents of a queued message
The following example updates the text of a message.
Change the contents of a message in-place in the queue by calling updateMessage.
// Get the first message in the queue
var receivedMessages = await queueClient.receiveMessages();
const firstMessage = receivedMessages.receivedMessageItems[0];

// Update the received message
await queueClient.updateMessage(
    firstMessage.messageId,
    firstMessage.popReceipt,
    "This message has been updated"
);
How to dequeue a message
Dequeueing a message is a two-stage process:
Get the message.
Delete the message.
The following example gets a message, then deletes it.
To get a message, call the receiveMessages method. This call makes the messages invisible in the queue, so no other clients can process them. Once your application has processed a message, call deleteMessage to delete it from the queue.
// Get next message from the queue
receivedMessages = await queueClient.receiveMessages();
var message = receivedMessages.receivedMessageItems[0];

console.log("Dequeuing message: ", message.messageText);

await queueClient.deleteMessage(message.messageId, message.popReceipt);
By default, a message is only hidden for 30 seconds. After 30 seconds it's visible to other clients. You can specify a different value by setting options.visibilityTimeout when you call receiveMessages.
Calling receiveMessages when there are no messages in the queue won't return an error. However, no messages will be returned.
Additional options for dequeuing messages
There are two ways you can customize message retrieval from a queue:
options.numberOfMessages: Retrieve a batch of messages (up to 32).options.visibilityTimeout: Set a longer or shorter invisibility timeout.
The following example uses the receiveMessages method to get five messages in one call. Then it processes each message using a for loop. It also sets the invisibility timeout to five minutes for all messages returned by this method.
// Get up to 5 messages from the queue
const receivedMsgsResp = await queueClient.receiveMessages({ numberOfMessages: 5, visibilityTimeout: 5 * 60 });

for (i = 0; i < receivedMsgsResp.receivedMessageItems.length; i++)
{
    message = receivedMsgsResp.receivedMessageItems[i];
    console.log("Dequeuing message: ", message.messageText);
    await queueClient.deleteMessage(message.messageId, message.popReceipt);
}
How to get the queue length
The getProperties method returns metadata about the queue, including the approximate number of messages waiting in the queue.
const properties = await queueClient.getProperties();
console.log("Approximate queue length: ", properties.approximateMessagesCount);
How to list queues
To retrieve a list of queues, call QueueServiceClient.listQueues. To retrieve a list filtered by a specific prefix, set options.prefix in your call to listQueues.
for await (const item of queueServiceClient.listQueues()) {
  console.log("Queue: ", item.name);
}
How to delete a queue
To delete a queue and all the messages contained in it, call the DeleteQueue method on the QueueClient object.
// Delete the queue
console.log("Deleting queue: ", queueClient.name);
await queueClient.delete();
To clear all messages from a queue without deleting it, call ClearMessages.
Tip
Check out the Azure Storage code samples repository
For easy-to-use end-to-end Azure Storage code samples that you can download and run, please check out our list of Azure Storage Samples.
Next steps
Now that you've learned the basics of Queue Storage, follow these links to learn about more complex storage tasks.
- Visit the Azure Storage team blog to learn what's new
- Visit the Azure Storage client library for JavaScript repository on GitHub