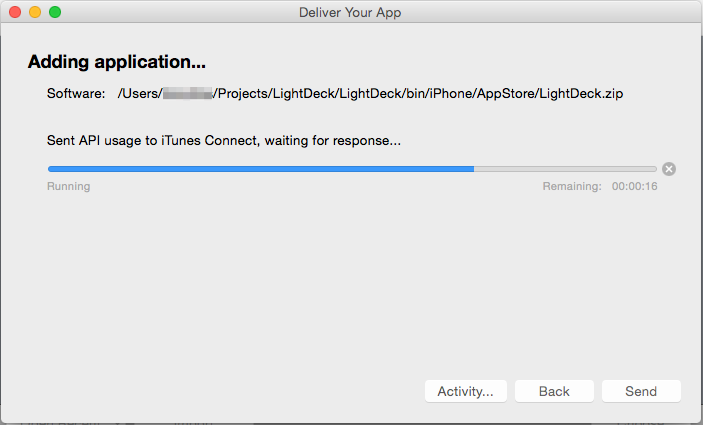
Publishing Xamarin.iOS apps to the App Store
To publish an app to the App Store, an app developer must first submit it – along with screenshots, a description, icons, and other information – to Apple for review. After approving the app, Apple places it on the App Store, where users can purchase it and install it directly from their iOS devices.
This guide describes the steps to follow to prepare an app for the App Store and send it to Apple for review. In particular, it describes:
- Following the App Store Review Guidelines
- Setting up an App ID and entitlements
- Providing an App Store icon and app icons
- Setting up an App Store provisioning profile
- Updating the Release build configuration
- Configuring your app in iTunes Connect
- Building your app and submitting it to Apple
Important
Apple has indicated that starting in March 2019, all apps and updates submitted to the App Store must have been built with the iOS 12.1 SDK or later, included in Xcode 10.1 or later. Apps should also support the iPhone XS and 12.9" iPad Pro screen sizes.
App Store guidelines
Before submitting an app for publication in the App Store, make sure that it meets the standards defined by Apple's App Store Review Guidelines. When you submit an app to the App Store, Apple reviews it to make sure that it meets these requirements. If it does not, Apple will reject it – and you will need to address the cited problems and resubmit. Therefore, it is a good idea to become familiar the guidelines as early as possible in the development process.
A couple of things to watch out for when submitting an app:
- Make sure the app’s description matches its functionality.
- Test that the app doesn’t crash under normal usage. This includes usage on every iOS device it supports.
Also take a look at App Store-related resources that Apple provides.
Set up an App ID and entitlements
Every iOS app has a unique App ID, which has an associated set of application services called entitlements. Entitlements allow apps to do various things such as receive push notification, access iOS features such as HealthKit, and more.
To create an App ID and select any needed entitlements, visit the Apple Developer Portal and follow these steps:
- Login to the Apple Developer Portal. If you don't already have an Apple ID, create an Apple ID first.
- Go to the Certificates, IDs & Profiles section, and then to the Identifiers section.
- Click the + button next to the Identifiers heading at the top of the page.
- Select App IDs and click Continue.
- Select App and then click Continue.
- Enter a Description and Bundle ID for the new application, and select any Capabilities that will be required by your Xamarin.iOS application. App Services are further described in the Working with capabilities in Xamarin.iOS guide. When you finish making your selections, click Continue.
- Click the Register button to complete the process for creating the new App ID.
In addition to selecting and configuring the required application services when defining your App ID, you must configure the App ID and entitlements in your Xamarin.iOS project by editing the Info.plist and Entitlements.plist files. For more information, take a look at the Working with Entitlements in Xamarin.iOS guide, which describes how to create an Entitlements.plist file and the meaning of the various entitlement settings it contains.
Include an App Store icon
When you submit an app to Apple, be sure that it includes an asset catalog that contains an App Store icon. To learn how to do this, take a look at the App Store icons in Xamarin.iOS guide.
Set the apps icons and launch screens
For Apple to make an iOS app available on the App Store, it must have proper icons and launch screens for all of the iOS devices on which it can run. For more information about setting up app icons and launch screens, read the following guides:
Create and install an App Store provisioning profile
iOS uses provisioning profiles to control how a particular application build can be deployed. These are files that contain information about the certificate used to sign an app, the App ID, and where the app can be installed. For development and ad hoc distribution, the provisioning profile also includes the list of allowed devices to which you can deploy the app. However, for App Store distribution, only certificate and App ID information are included since the only mechanism for public distribution is the App Store.
To create and install an App Store provisioning profile, follow these steps:
- Login to the Apple Developer Portal.
- Go to the Certificates, IDs & Profiles section, and then to the Profiles section.
- Click the + button, select iOS App Development and App Store, and click Continue.
- Select your app's App ID from the list and click Continue.
- Select a signing certificate and click Continue.
- Select devices to include in this profile and click Continue.
- Enter a Provisioning Profile Name and click Generate to generate the profile.
- Use Xamarin's Apple Account Management tools to download the newly-created provisioning profile to your Mac. If you're on a Mac, you can also download the provisioning profile directly from the Apple Developer Portal and double-click on it to install.
For detailed instructions, see the Creating a distribution profile and Selecting a distribution profile in a Xamarin.iOS project.
Update the Release build configuration
New Xamarin.iOS projects automatically set up Debug and Release build configurations. To properly configure the Release build, follow these steps:
From the Solution Pad, open Info.plist file located inside the iOS project.
Make sure you're in Application view. This can be set by clicking on the option in the bottom navigation bar.
Select Manual Provisioning as the Signing option. Save and close the file.
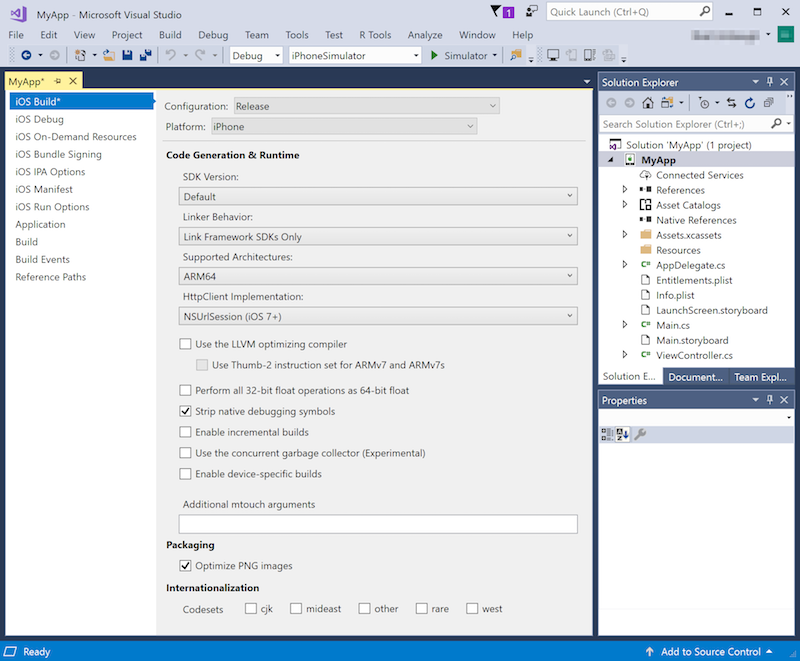
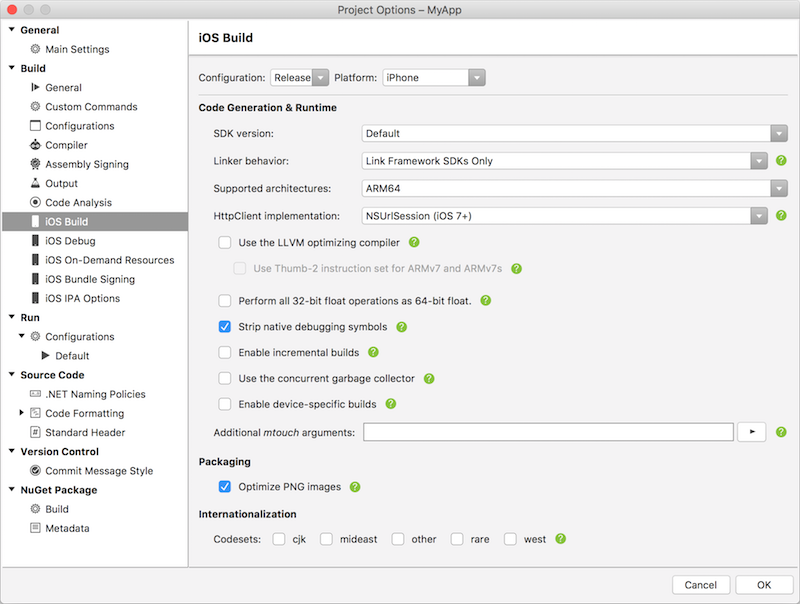
Right-click on the Project Name in the Solution Pad, select Options, and navigate to the iOS Build tab.
Set Configuration to Release and Platform to iPhone.
To build with a specific iOS SDK, select it from the SDK version list. Otherwise, leave this value at Default.
Linking reduces the overall size of your application by stripping out unused code.
- In most cases, Linker Behavior should be set to the default value of Link Framework SDKs only.
- Using the Don't Link option can cause Apple to reject the app due to the presence of non-public iOS APIs in Xamarin.iOS that would be linked out with the Link Framework SDKs only option
- Link All should be used with care as it will strip code from all assemblies in the project, including 3rd party libraries. It can strip out code that the 3rd party library may only use via reflection that the linker cannot detect, as it does static code analysis to determine what library code is being used. Use Link All with care as you may have to manually preserve some classes and/or methods to avoid runtime failures due to missing code.
- For more information, refer to the Linking Xamarin.iOS apps guide.
For iOS 11, select one of the device architectures that supports ARM64. For more information on building for 64-bit iOS devices, please see the Enabling 64-Bit Builds of Xamarin.iOS Apps section of the 32/64-bit platform considerations documentation.
You may wish to use the LLVM compiler to build smaller and faster code. However, this option increases compile times.
Check Optimize PNG images to further decrease your application's size.
Debugging should not be enabled, as it will make the build unnecessarily large.
Based on your application's needs, you may also wish to adjust the type of Garbage Collection being used and setup for Internationalization.
After setting the options as described above, your build settings should look similar to this:
Also take a look at the iOS build mechanics guide, which further describes build settings.
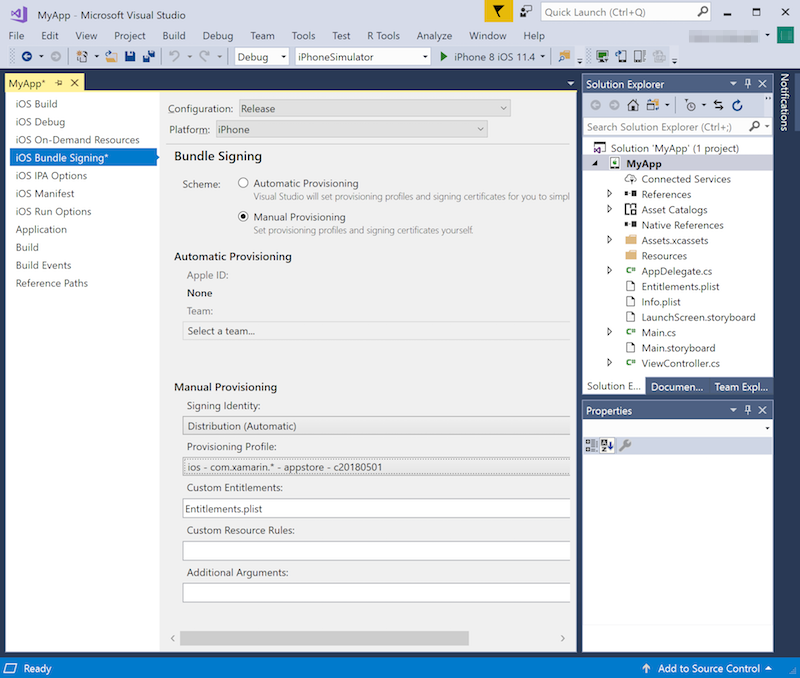
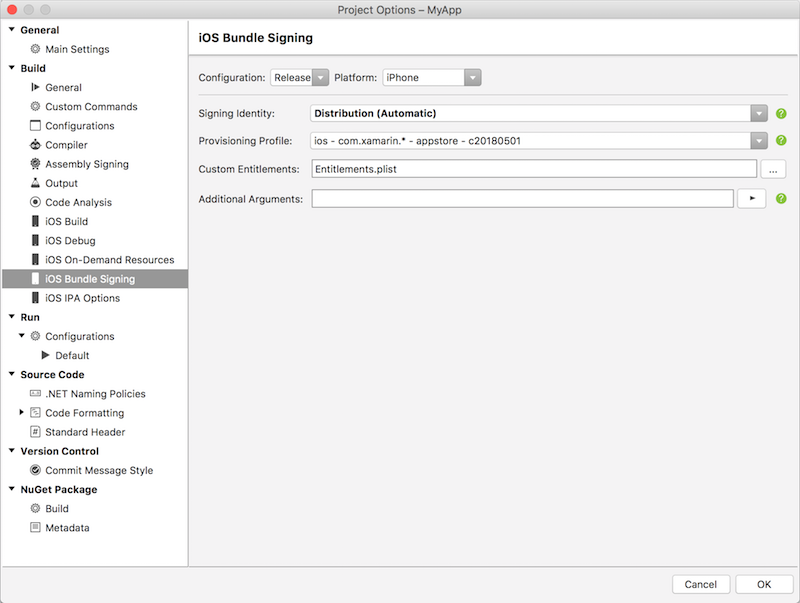
Navigate to the iOS Bundle Signing tab. If the options here are not editable, ensure that Manual Provisioning is selected in the Info.plist file.
Make sure that Configuration is set to Release and Platform is set to iPhone.
Set Signing Identity to Distribution (Automatic).
For Provisioning Profile, select the App Store provisioning profile created above.
Your project's bundle signing options should now look similar to this:
Click OK to save changes to the project properties.
Configure your app in iTunes Connect
iTunes Connect is a suite of web-based tools for managing your iOS applications on the App Store. Your Xamarin.iOS application must be properly configured in iTunes Connect before it can be submitted to Apple for review and released on the App Store.
To learn how to do this, read the Configuring an app in iTunes Connect guide.
Build and submit your app
With your build settings properly configured and iTunes Connect awaiting your submission, you can now build your app and submit it to Apple.
In Visual Studio for Mac, select the Release build configuration and a device (not a simulator) for which to build.

From the Build menu, select Archive for Publishing.
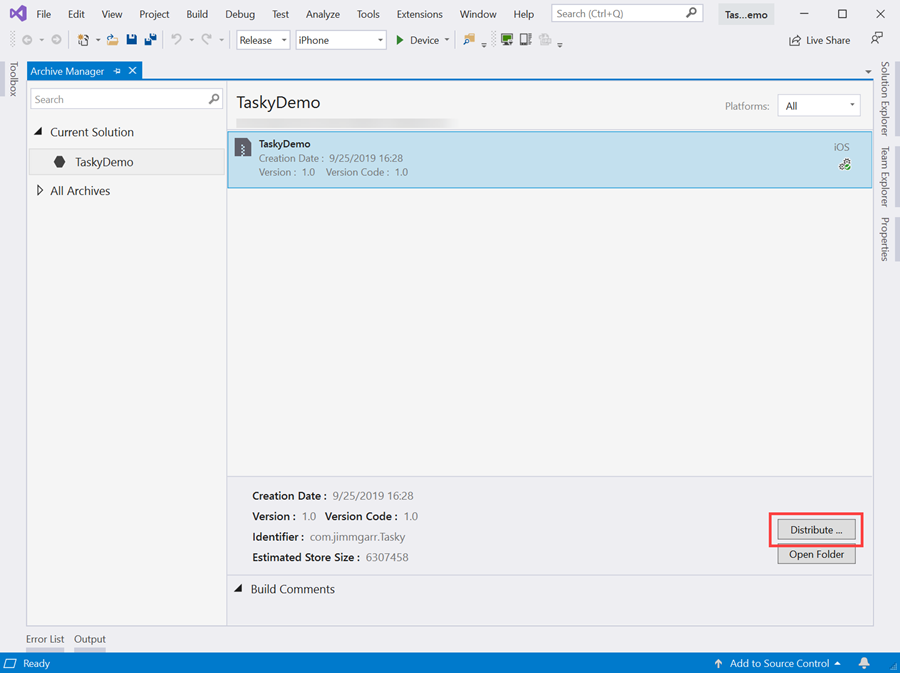
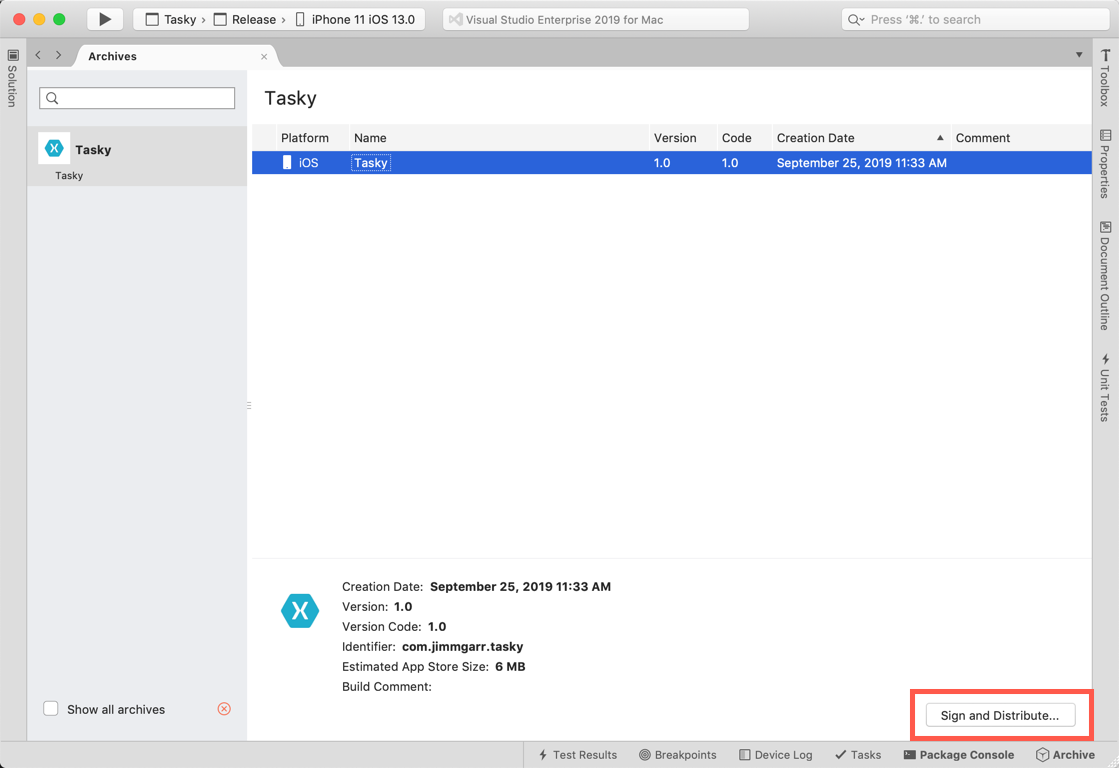
Once the archive has been created, the Archives view will be displayed. Click Sign and Distribute... to open the publishing wizard.
Note
By default the Archives view only shows archives for the open solution. To see all solutions that have archives, check the Show all archives checkbox. It is a good idea to keep old archives so that the debug information they include can be used to symbolicate crash reports if necessary.
Select the App Store distribution channel. Click Next.
Select Upload as the destination. Click Next.
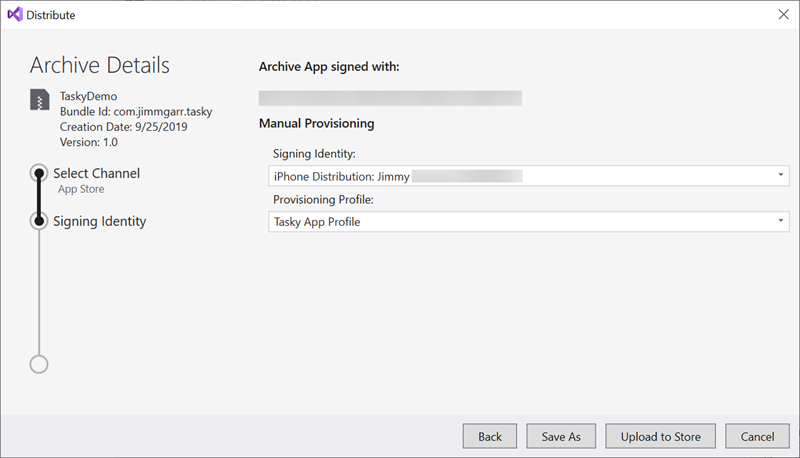
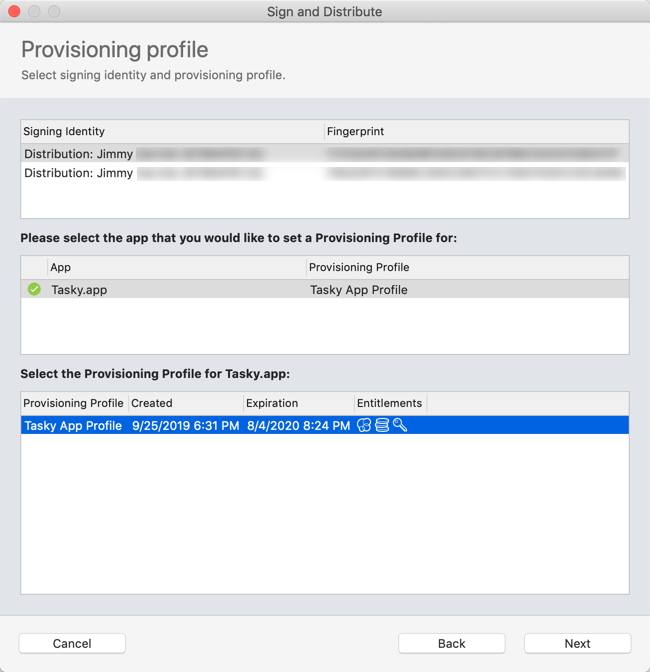
In the Provisioning profile window, select your signing identity, app, and provisioning profile. Click Next.
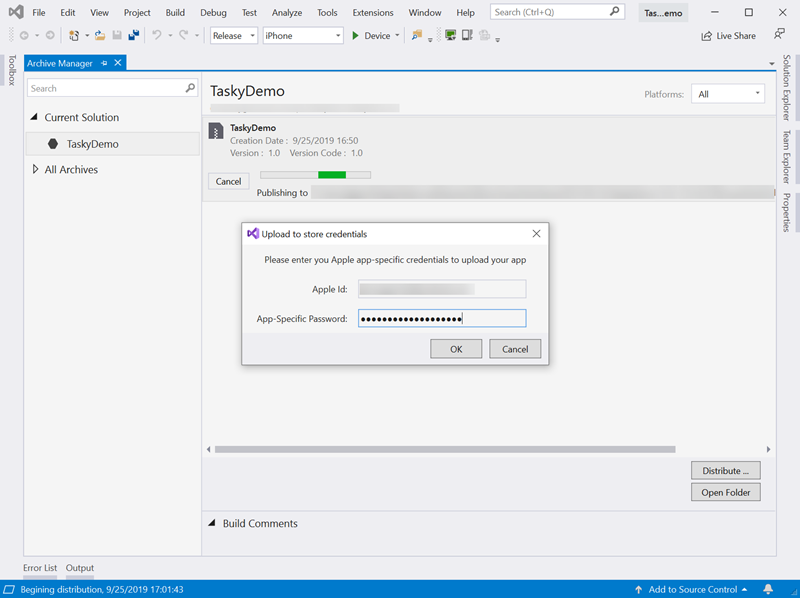
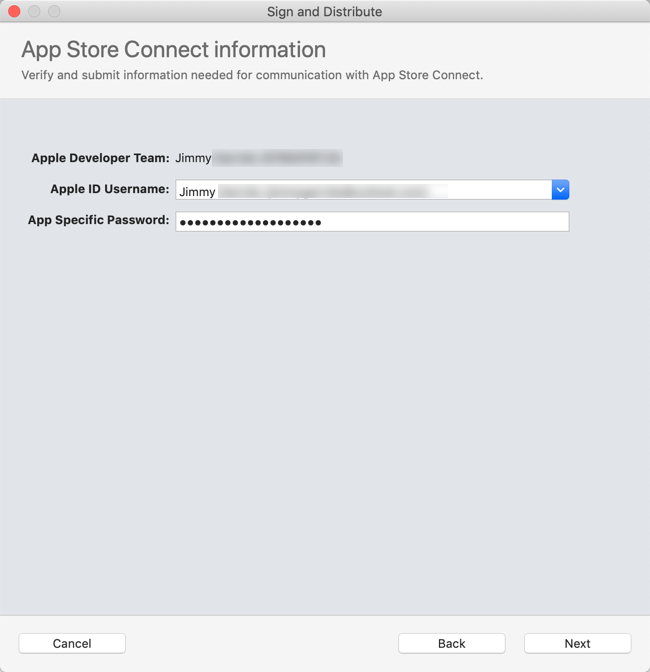
In the App Store Connect information window, select an Apple ID username from the menu and enter an app-specific password. Click Next.
Verify the details of your package and click Publish. After selecting a location to save the .ipa file, the wizard will upload your app to App Store Connect.
Note
Apple may reject apps with the iTunesMetadata.plist included in the .ipa file, resulting in an error such as the following:
ERROR: ERROR ITMS-90047: "Disallowed paths ( "iTunesMetadata.plist" ) found at: Payload/iPhoneApp1.app"For a workaround to this error, take a look at this post in the Xamarin Forums.
iTunes Connect status
To see the status of your app submission, log in to iTunes Connect and select your app. The initial status should be Waiting For Review, though it may temporarily read Upload Received while it is being processed.

Tips and tricks
Customize the .ipa location
An MSBuild property, IpaPackageDir, makes it possible to customize the .ipa file output location. If IpaPackageDir is set to a custom location, the .ipa file will be placed in that location instead of the default timestamped subdirectory. This can be useful when creating automated builds that rely on a specific directory path to work correctly, such as those used for Continuous Integration (CI) builds.
There are several possible ways to use the new property. For example, to output the .ipa file to the old default directory (as in Xamarin.iOS 9.6 and lower), you can set the IpaPackageDir property to $(OutputPath) using one of the following approaches. Both approaches are compatible with all Unified API Xamarin.iOS builds, including IDE builds as well as command-line builds that use msbuild or mdtool:
The first option is to set the
IpaPackageDirproperty within a<PropertyGroup>element in an MSBuild file. For example, you could add the following<PropertyGroup>to the bottom of the iOS app project .csproj file (just before the closing</Project>tag):<PropertyGroup> <IpaPackageDir>$(OutputPath)</IpaPackageDir> </PropertyGroup>A better approach is to add a
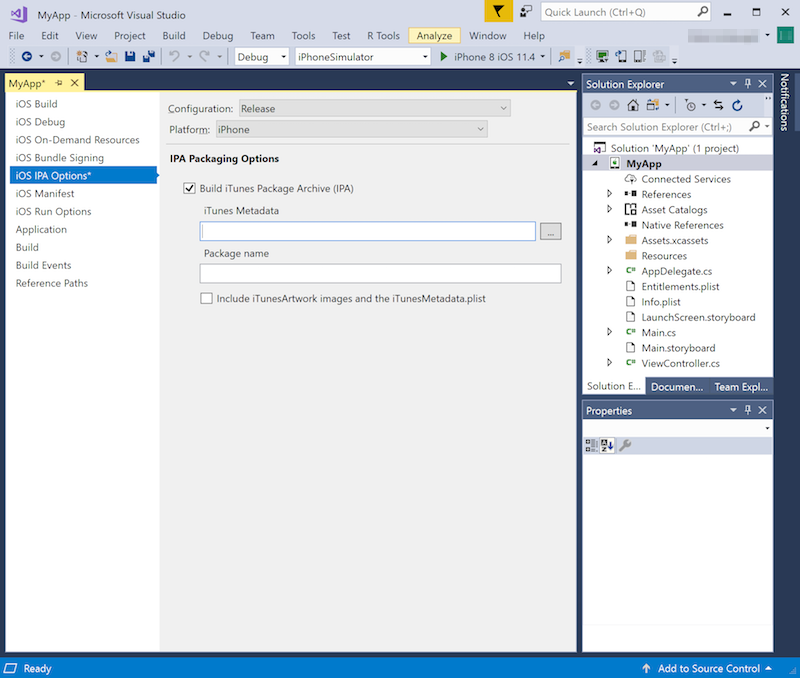
<IpaPackageDir>element to the bottom of the existing<PropertyGroup>that corresponds to the configuration used to build the .ipa file. This is better because it will prepare the project for future compatibility with a planned setting on the iOS IPA Options project properties page. If you currently use theRelease|iPhoneconfiguration to build the .ipa file, the complete updated property group might look similar to the following:<PropertyGroup Condition=" '$(Configuration)|$(Platform)' == 'Release|iPhone'"> <Optimize>true</Optimize> <OutputPath>bin\iPhone\Release</OutputPath> <ErrorReport>prompt</ErrorReport> <WarningLevel>4</WarningLevel> <ConsolePause>false</ConsolePause> <CodesignKey>iPhone Developer</CodesignKey> <MtouchUseSGen>true</MtouchUseSGen> <MtouchUseRefCounting>true</MtouchUseRefCounting> <MtouchFloat32>true</MtouchFloat32> <CodesignEntitlements>Entitlements.plist</CodesignEntitlements> <MtouchLink>SdkOnly</MtouchLink> <MtouchArch>ARMv7, ARM64</MtouchArch> <MtouchHttpClientHandler>HttpClientHandler</MtouchHttpClientHandler> <MtouchTlsProvider>Default</MtouchTlsProvider> <BuildIpa>true</BuildIpa> <IpaPackageDir>$(OutputPath)</IpaPackageDir> </PropertyGroup>
An alternate technique for msbuild command-line builds is to add a /p: command line argument to set the IpaPackageDir property. In this case note that msbuild does not expand $() expressions passed in on the command line, so it is not possible to use the $(OutputPath) syntax. You must instead provide a full path name.
msbuild /p:Configuration="Release" /p:Platform="iPhone" /p:ServerAddress="192.168.1.3" /p:ServerUser="macuser" /p:IpaPackageDir="%USERPROFILE%\Builds" /t:Build SingleViewIphone1.sln
Or the following on Mac:
msbuild /p:Configuration="Release" /p:Platform="iPhone" /p:IpaPackageDir="$HOME/Builds" /t:Build SingleViewIphone1.sln
With your distribution build created and archived, you are now ready to submit your application to iTunes Connect.
Summary
This article described how to configure, build, and submit an iOS app for release on the App Store.
Related links
- Apple Developer Portal (Apple)
- iTunes Connect (Apple)
- App Store Review Guidelines (Apple)
- Common App Rejections (Apple)
- Working with capabilities in Xamarin.iOS
- Working with entitlements in Xamarin.iOS
- Configuring an app in iTunes Connect
- Application icons in Xamarin.iOS
- Launch screens for Xamarin.iOS apps
