This article addresses some common questions about support for remote NVM Express (NVMe) disks on virtual machines (VMs) created in Azure.
What are the prerequisites to enable the remote NVMe interface on my VM?
You can use DiskControllerType during VM configuration to select your preferred controller type as NVMe or Small Computer System Interface (SCSI). If you don't specify a DiskControllerType value, the platform automatically chooses the default controller based on the VM size configuration. If the VM size is configured for SCSI as the default and supports NVMe, the VM uses SCSI unless you update the DiskControllerType value to NVMe.
To enable the NVMe interface on your VM, you must meet the following prerequisites:
Choose a VM family that supports NVMe. Only Ebsv5 and Ebdsv5 VM sizes are equipped with NVMe in the Intel v5 generation VMs.
Select the operating system image that's tagged with NVMe support. After you select a supported VM family and OS image value, you're prompted to select the NVMe disk controller type.
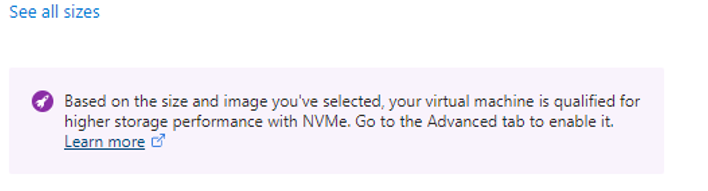
Opt in to NVMe by selecting the NVMe disk controller type in the Azure portal or in the Azure Resource Manager, Azure CLI, or Azure PowerShell template. For step-by-step instructions, refer to the general NVMe FAQ.
Make sure that you're using a Generation 2 VM, because NVMe supports only Generation 2 images.
Choose one of the Azure regions where NVMe is enabled.
Can I encrypt my remote NVMe disks?
There's no native way within Azure to encrypt these disks. You can encrypt them within the OS, but you'll need to re-encrypt them after mounting on startup.
How can I resize a SCSI-based VM to a remote NVMe-enabled VM of a different size?
You can use the following process to either:
- Resize a SCSI-based VM created using an untagged image to an NVMe-enabled VM of a different size without re-creating the VM configurations and without tagging the image.
- Resize a SCSI-based VM to an NVMe-enabled VM of a different size without re-creating the VM configurations.
The source VM can be either:
- An untagged OS image that supports NVMe.
- An NVMe-tagged OS image.
To resize the VM, use the following command to run an Azure PowerShell script that sets the destination discontrollertype value of the VM as NVMe:
azure-nvme-VM-update.ps1 [-subscription_id] <String> [-resource_group_name] <String> [-vm_name] <String> [[-disk_controller_change_to] <String>] [-vm_size_change_to] <String> [[-start_vm_after_update] <Boolean>] [[-write_logfile] <Boolean>]
How can I check if an image is tagged as NVMe?
To check if an image is tagged as NVMe, use the following command:
az vm image show --urn URN_OF_IMAGE
How do I tag an image that supports NVMe for remote disks?
To tag an image that supports NVMe, follow these steps:
Upload an NVMe-supported virtual hard disk (VHD) to your storage account. AzCopy is a fast way, but you can also use the portal to upload.
azcopy copy <local path to your VHD> <container in your storage account>Create an image gallery by using Azure PowerShell, the portal, or the Azure CLI.
Create an image definition. Be sure to include
--feature DiskControllerTypes=SCSI,NVMe.Here's an Azure CLI example:
az sig image-definition create --resource-group <resourceGroupName> --gallery-name <galleryName> --gallery-image-definition <imageName> --publisher <publisher> --offer <offerName> --sku <skuName> --os-type <osType> --os-state <osState> --feature DiskControllerTypes=SCSI,NVMeCreate the image version under the NVMe-tagged gallery with the NVMe-supported VHD.
Here's an Azure CLI example:
az sig image-version create --resource-group <resourceGroupName> --gallery-name <galleryName> --gallery-image-definition <imageName> --gallery-image-version <version> --target-regions <region1> <region2> --replica-count <replicaCount> --os-vhd-uri <NVMe-supported vhd uri> --os-vhd-storage-account <storageAccount>
How do I configure an ARM template for VM creation?
You can use the Azure Custom Script Extension in conjunction with Azure Resource Manager templates (ARM templates). This solution allows you to download and run scripts on Azure virtual machines and is compatible with both Windows and Linux. For detailed guidance, refer to the Azure Custom Script Extension documentation for Windows and Linux.
What happens if I want to use another VM family that doesn't support remote NVMe disks?
If you select an unsupported VM family, you'll get this error message: "The selected VM size can't boot with DiskControllerType. Check that the disk controller type provided is one of the supported disk controller types for the VM size."
Be sure to select a VM family that supports the NVMe interface. To determine which disk controller types are supported for the VM size, refer to the list of resource SKUs in the REST API.
Which Azure disk storage options are compatible with remote NVMe disks?
NVMe sizes can be combined with Azure Premium SSD v1, Premium SSD v2, and Ultra Disk Storage. For more information on Azure disk offerings, see Azure managed disk types.
Does Azure support live resizing on disks with NVMe VM sizes?
Live resizing of NVMe is supported on Azure Premium SSD v1 disks, Standard SSD disks, and Standard HDD disks. You can also add NVMe disks without restarting the VM.
How can I identify remote NVMe disks on a Linux VM?
Get the
nvme-clipackage:sudo apt install nvme-cliRun the NVMe
listcommand to fetch NVMe disk details:sudo nvme list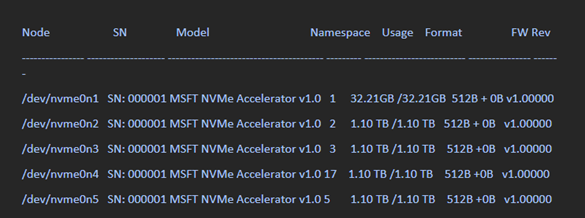
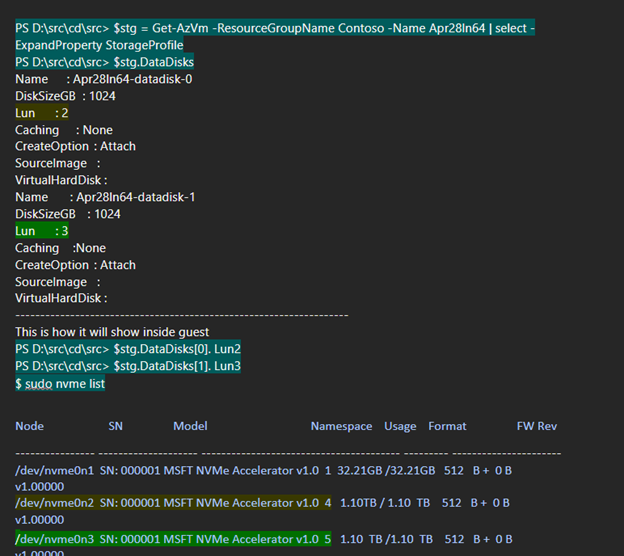
Here's how the data appears in response to Azure PowerShell commands:
How can I identify NVMe disks on a Windows VM?
Open Azure PowerShell and use the following command:
wmic diskdrive get model,scsilogicalunit
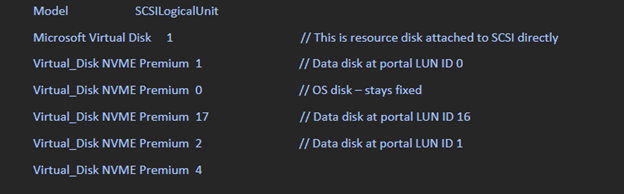
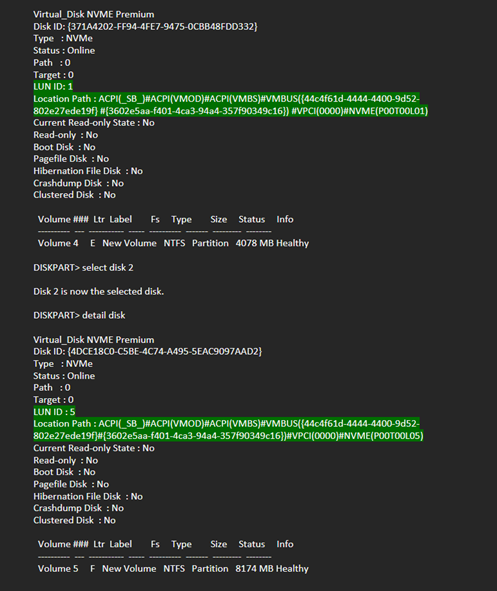
The ASAP attached disks are presented in the guest with the model string Virtual_Disk NVME Premium. The SCSI logical unit has the value for the portal-visible LUN ID incremented by 1.
Here's a snapshot of how NVMe disks appear in an NVMe-enabled Windows VM:
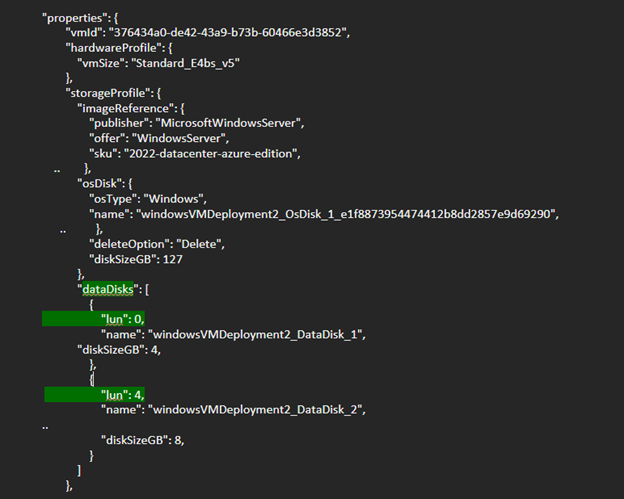
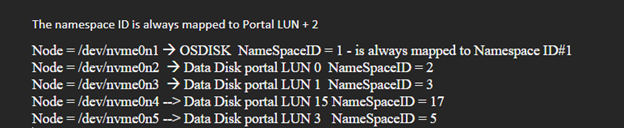
The following snapshot shows guest output for data disks attached at LUN 0 and LUN 4 (CRP). The LUN ID is equivalent to the namespace ID.
Can I convert a SCSI-based VM to NVMe-enabled while retaining the same VM vCPU size with an NVMe-tagged OS image?
This scenario is supported only on Linux operating systems and is not supported on Windows operating systems.
Are shared disks in remote disks supported with NVMe-enabled VMs?
The shared disk feature is supported for Premium SSD, Premium SSD v2, and Ultra Disk Storage disks.
Can I use Azure PowerShell or the Azure CLI to create a VM with an OS disk from an existing blob with NVMe enabled?
It's currently not possible. Instead, you can use the following REST API workaround to create a VM with an OS disk from an existing blob with NVMe enabled:
$subscriptionID = '<Your Subscription ID>'
$resourceGroupName = '<Your Resource Group Name>'
$storageAccountName = '<Your Account Name>'
$storageAccountContainer = '<Your Account Container>'
$blobName = 'blob-nvme_OsDisk_1.vhd'

$diskName = 'test'
$diskSkuName = 'Standard_LRS'
$diskSizeGB = 30
$osType = 'Linux'
$hyperVGeneration = 'V2'
$location = 'eastus'

$azContext = Get-AzContext
$azProfile = [Microsoft.Azure.Commands.Common.Authentication.Abstractions.AzureRmProfileProvider]::Instance.Profile
$profileClient = New-Object -TypeName Microsoft.Azure.Commands.ResourceManager.Common.RMProfileClient -ArgumentList ($azProfile)
$token = ($profileClient.AcquireAccessToken($azContext.Subscription.TenantId)).AccessToken

$body = @{
    location = $location
    sku = @{ name = $diskSkuName }
    properties = @{
        osType                  = $osType
        hyperVGeneration        = $hyperVGeneration
        supportedCapabilities   = @{diskControllerTypes = 'SCSI, NVMe'}
        diskSizeGB              = $diskSizeGB
        creationData = @{
            storageAccountId	= "/subscriptions/$subscriptionID/resourceGroups/$resourceGroupName/providers/Microsoft.Storage/storageAccounts/$storageAccountName"

            sourceUri           = "https://$storageAccountName.blob.core.windows.net/$storageAccountContainer/$blobName"
            createOption		= 'Import'
        }
    }
}

$apiVersion='2023-10-02'
$restUri = "https://management.azure.com/subscriptions/$subscriptionID/resourceGroups/$resourceGroupName/providers/Microsoft.Compute/disks/$diskName`?api-version=$apiVersion"
$authHeader = @{
    'Content-Type'='application/json'
    'Authorization'='Bearer ' + $token
}

Invoke-RestMethod `
    -Uri $restUri `
    -Method 'Put' `
    -Headers $authHeader `
    -Body ($body | ConvertTo-Json)