Vis oppdagede apper med instrumentbordet for søk i skyen
Siden for søk i skyen gir et instrumentbord som er utformet for å gi deg mer innsikt i hvordan skyapper brukes i organisasjonen. Instrumentbordet gir en oversikt over hvilke typer apper som brukes, åpne varsler og risikonivåene for apper i organisasjonen. Den viser også hvem de beste appbrukerne er, og gir et plasseringskart for apphovedkvarteret .
Filtrer dataene for søk i skyen for å generere bestemte visninger, avhengig av hva som interesserer deg mest. Hvis du vil ha mer informasjon, kan du se Oppdagede appfiltre.
Forutsetninger
Hvis du vil ha informasjon om nødvendige roller, kan du se Administrere administratortilgang.
Se gjennom instrumentbordet for skyoppdagelse
Denne fremgangsmåten beskriver hvordan du får et innledende, generelt bilde av appene for søk i skyen i instrumentbordet for søk i skyen .
Velg Cloud apps > Cloud discovery i Microsoft Defender-portalen.
Eksempel:
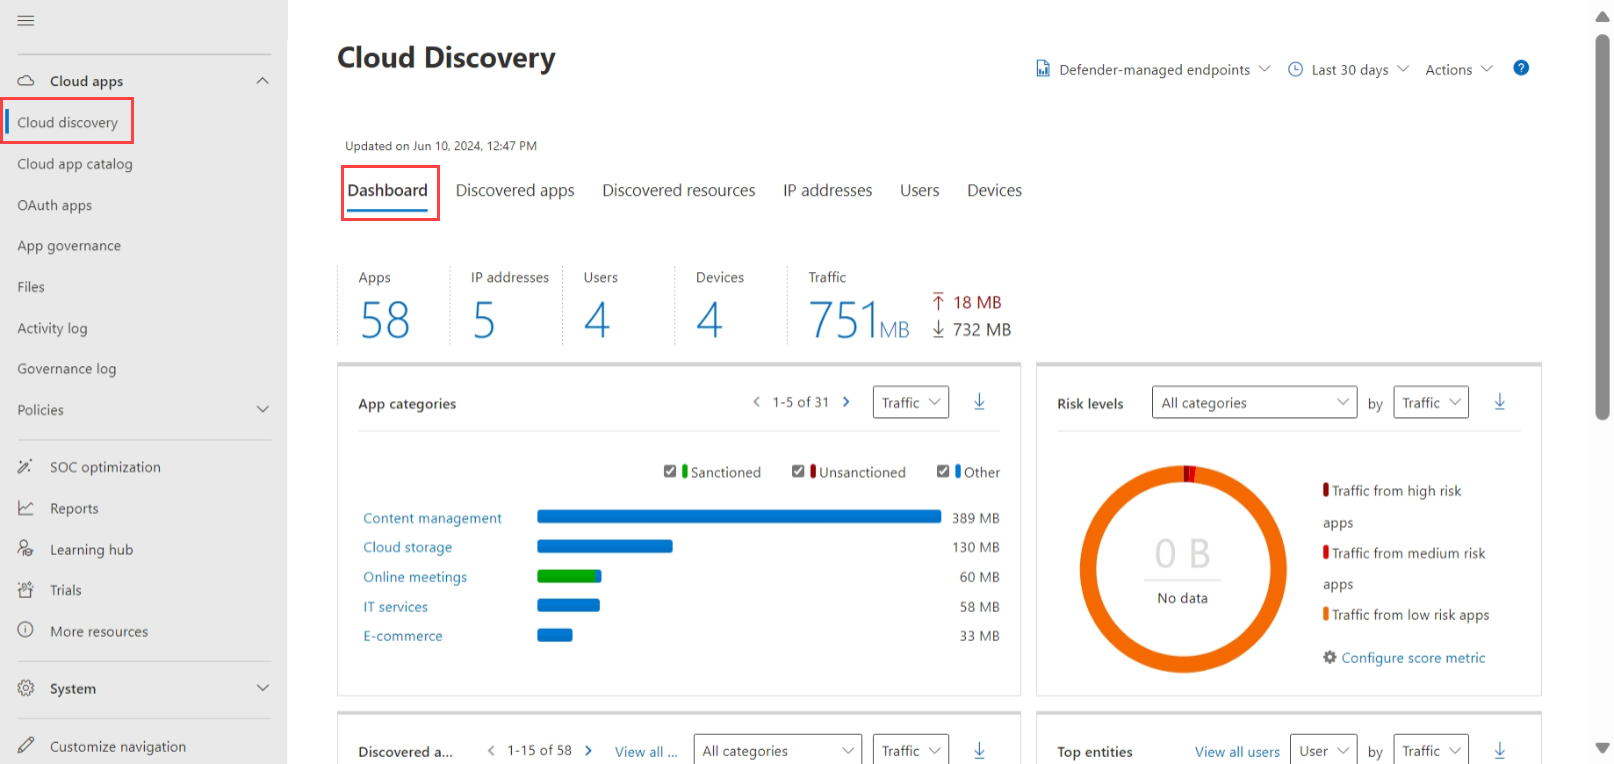
Støttede apper inkluderer Windows- og macOS-apper, som begge er oppført under Defender – administrert endepunktstrøm .
Se gjennom følgende informasjon:
Bruk oversikten over bruk på høyt nivå for å forstå generell bruk av skyapper i organisasjonen.
Dykk ett nivå dypere for å forstå de beste kategoriene som brukes i organisasjonen for hver av de ulike bruksparameterne. Legg merke til hvor mye av denne bruken som er av sanksjonerte apper.
Bruk Fanen Oppdagede apper til å gå enda dypere og se alle appene i en bestemt kategori.
Kontroller de viktigste brukerne og kilde-IP-adressene for å identifisere hvilke brukere som er de mest dominerende brukerne av skyapper i organisasjonen.
Bruk apphovedkvarterkartet til å sjekke hvordan de oppdagede appene spres i henhold til geografisk plassering, ifølge hovedkvarteret.
Bruk apprisikooversikten til å forstå risikoresultatet for oppdagede apper, og kontroller statusen for oppdagelsesvarsler for å se hvor mange åpne varsler du bør undersøke.
Dypdykk i oppdagede apper
Hvis du vil gå dypere inn i data for søk i skyen, kan du bruke filtrene til å se etter risikable eller ofte brukte apper.
Hvis du for eksempel vil identifisere ofte brukte, risikable skylagrings- og samarbeidsapper, kan du bruke siden Oppdagede apper til å filtrere etter appene du vil bruke. Deretter opphever eller blokkerer du dem på følgende måte:
Velg Skysøk under Skyapper i Microsoft Defender-portalen. Velg deretter Fanen Oppdagede apper .
Velg både skylagring og samarbeid under Bla gjennom etter kategori i fanen Oppdagede apper.
Bruk de avanserte filtrene til å angi samsvarsrisikofaktor til SOC 2 = Nr.
Angi brukere til mer enn 50 brukere og transaksjoner til større enn 100 for Bruk.
Angi sikkerhetsrisikofaktoren for kryptering av inaktive data er lik Ikke støttet. Angi deretter risikopoengsummen er lik 6 eller lavere.
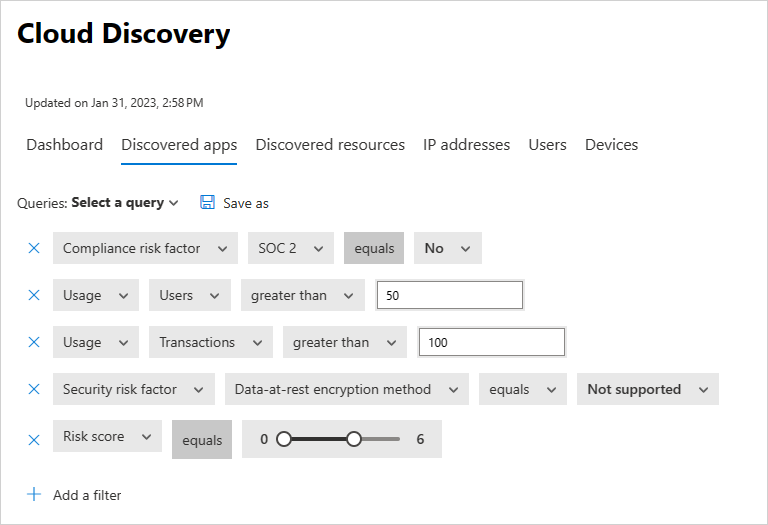
Når resultatene er filtrert, opphever du dem og blokkerer dem ved å bruke avmerkingsboksen for massehandling til å oppheve avmerkingsboksen for å oppheve dem i én handling. Når de ikke er helliggjort, kan du bruke et blokkeringsskript til å blokkere dem fra å bli brukt i miljøet ditt.
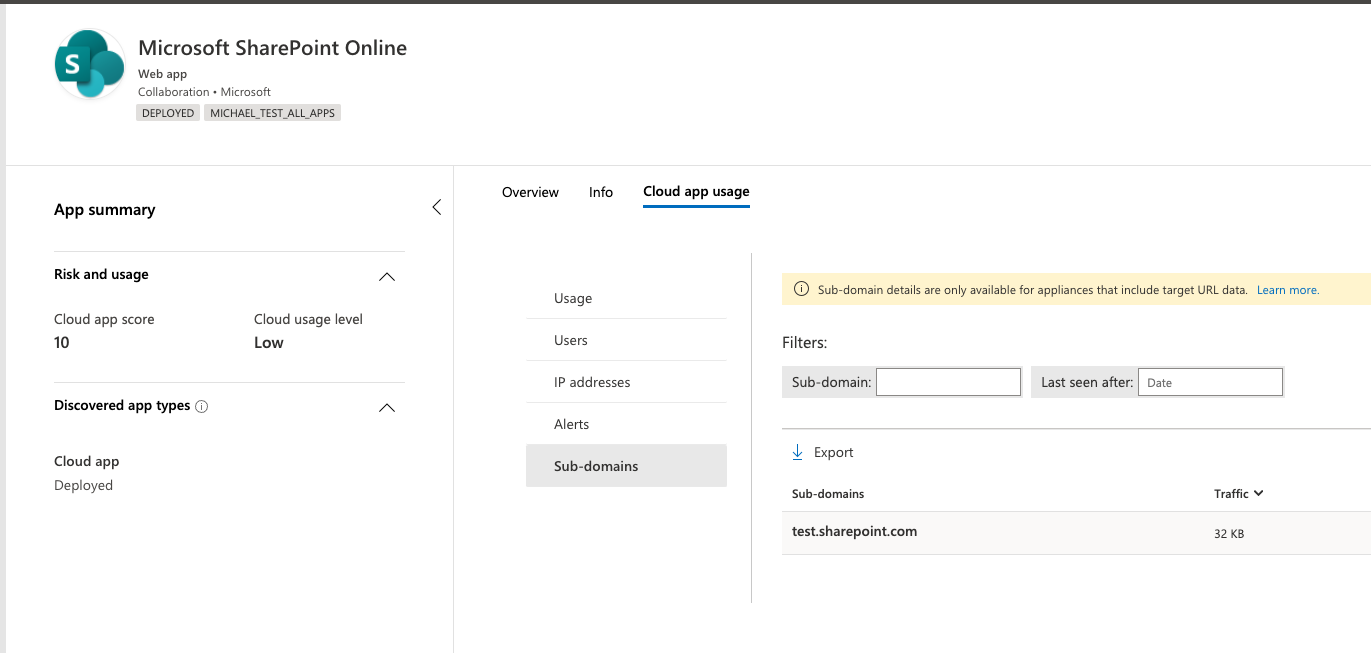
Det kan også være lurt å identifisere bestemte appforekomster som er i bruk ved å undersøke de oppdagede underdomenene. Du kan for eksempel skille mellom ulike SharePoint-områder:
Obs!
Dypdykk i oppdagede apper støttes bare i brannmurer og proxyer som inneholder nettadressedata. Hvis du vil ha mer informasjon, kan du se Støttede brannmurer og proxyer.
Hvis Defender for Cloud Apps ikke samsvarer med underdomenet som ble oppdaget i trafikkloggene med dataene som er lagret i appkatalogen, merkes underdomenet som Annet.
Oppdag ressurser og egendefinerte apper
Skyoppdagelse gjør det også mulig å fordype deg i IaaS- og PaaS-ressursene dine. Oppdag aktivitet på tvers av ressursvertsplattformene dine, og vis tilgang til data på tvers av selvdriftede apper og ressurser, inkludert lagringskontoer, infrastruktur og egendefinerte apper som driftes på Azure, Google Cloud Platform og AWS. Ikke bare kan du se generell bruk i IaaS-løsningene dine, men du kan få innsyn i de bestemte ressursene som driftes på hver ressurs, og den totale bruken av ressursene, for å redusere risikoen per ressurs.
Hvis for eksempel en stor mengde data lastes opp, kan du finne ut hvilken ressurs den er lastet opp til, og drille ned for å se hvem som utførte aktiviteten.
Obs!
Dette støttes bare i brannmurer og proxyer som inneholder nettadressedata. Hvis du vil ha mer informasjon, kan du se listen over støttede apparater i støttede brannmurer og proxyer.
Slik viser du oppdagede ressurser:
Velg Skysøk under Skyapper i Microsoft Defender-portalen. Velg deretter fanen Oppdagede ressurser .
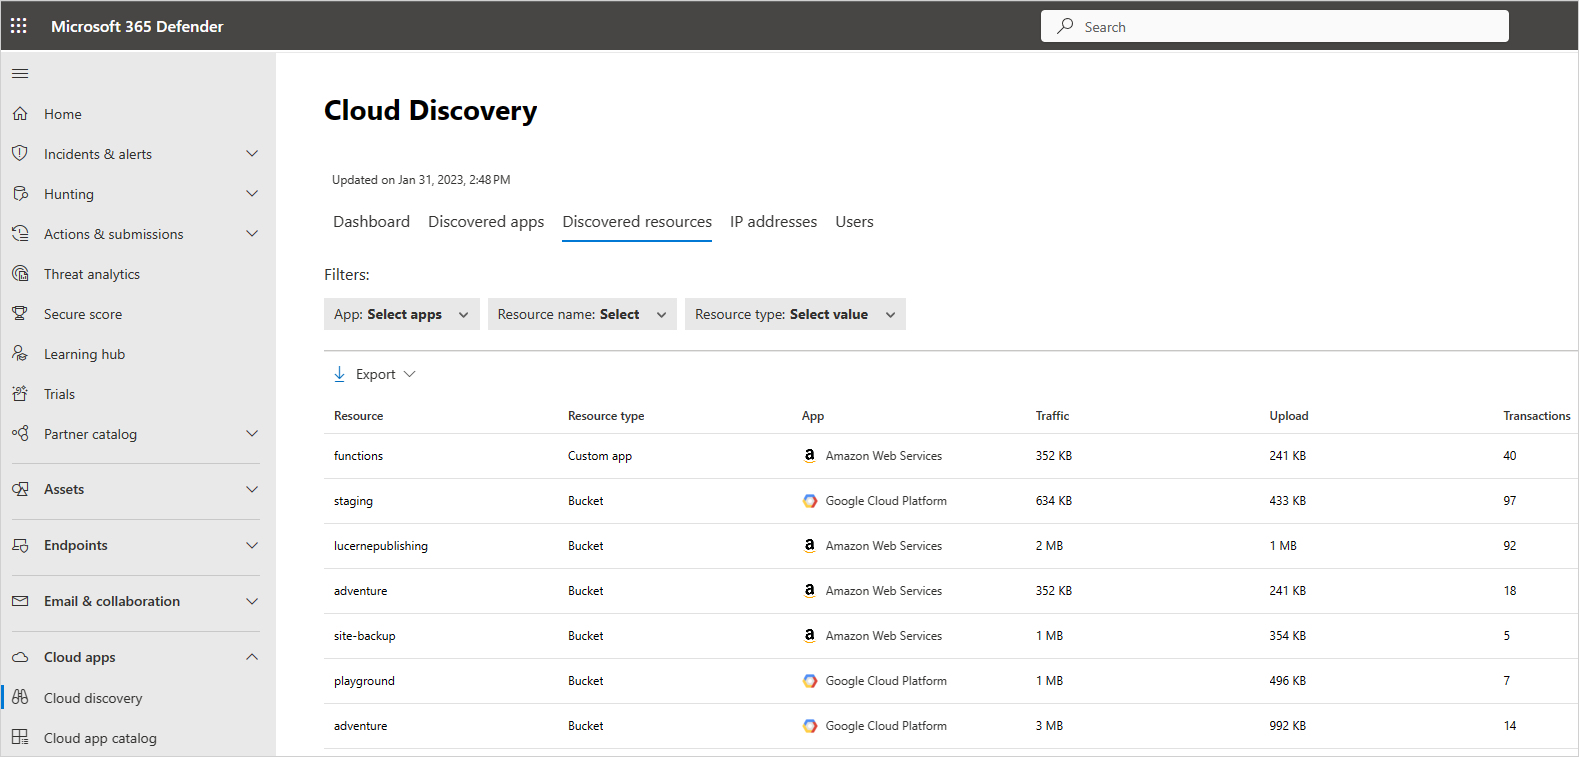
På siden Oppdagede ressurser driller du ned i hver ressurs for å se hvilke typer transaksjoner som har skjedd, hvem som fikk tilgang til den, og deretter driller du ned for å undersøke brukerne ytterligere.
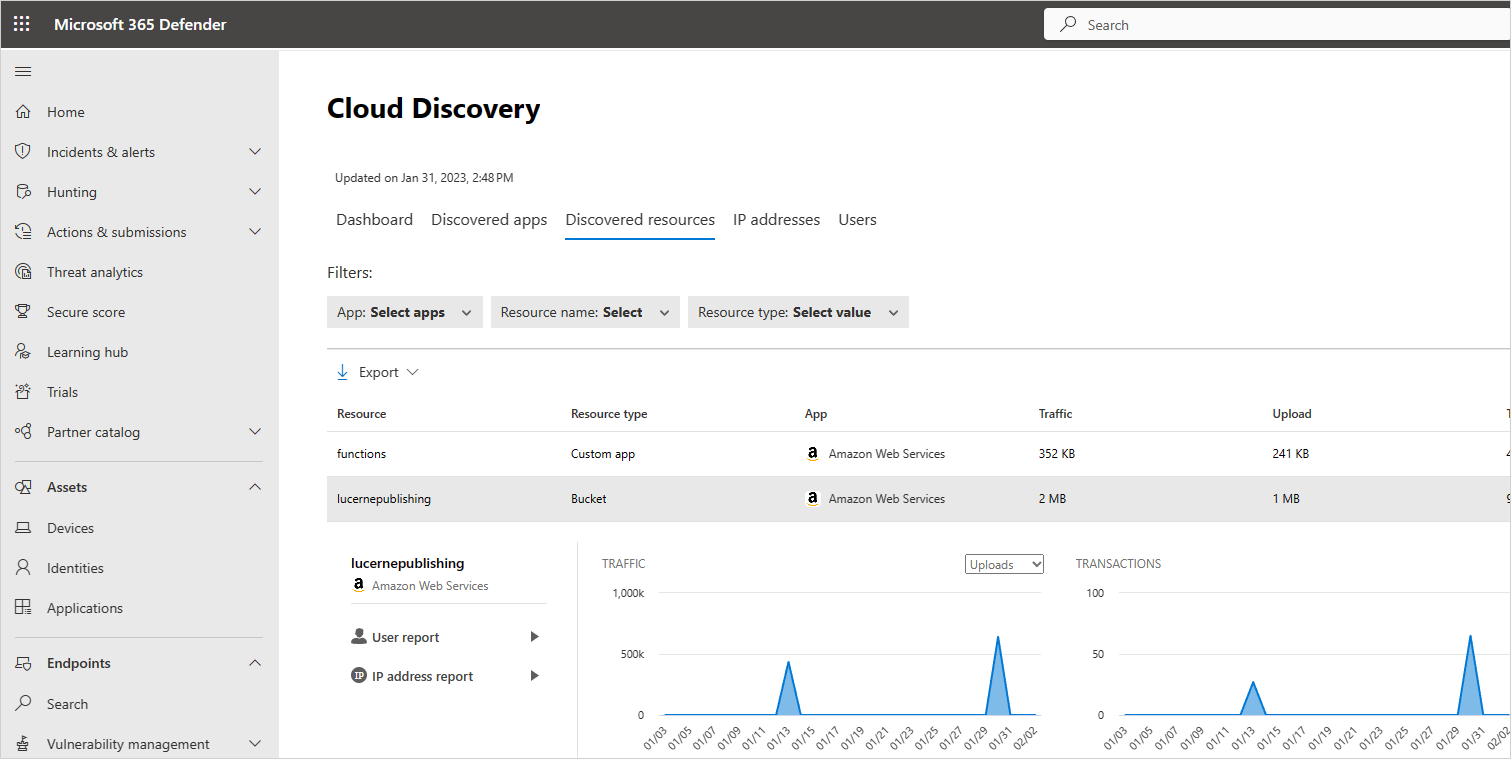
Velg Alternativer-menyen på slutten av raden for egendefinerte apper, og velg deretter Legg til ny egendefinert app. Dette åpner dialogboksen Legg til denne appen , der du kan gi navn til og identifisere appen slik at den kan inkluderes i instrumentbordet for søk i skyen.
Generer en rapport for administrasjon av skyoppdagelse
Den beste måten å få oversikt over Shadow IT-bruk på tvers av organisasjonen, er ved å generere en rapport for administrasjon av skyoppdagelse. Denne rapporten identifiserer de største potensielle risikoene og hjelper deg med å planlegge en arbeidsflyt for å redusere og administrere risikoer til de er løst.
Slik genererer du en lederrapport for skyoppdagelse:
Velg Skysøk under Skyapper i Microsoft Defender-portalen.
Velg rapporten Handlinger generer>skyoppdagelse fra skyoppdagelsessiden.
Du kan eventuelt endre rapportnavnet og deretter velge Generer.
Utelat enheter
Hvis du har systembrukere, IP-adresser eller enheter som er støyende, men uinteressante eller enheter som ikke bør presenteres i Shadow IT-rapportene, kan det hende du vil utelate dataene fra dataene for skyoppdagelse som er analysert. Det kan for eksempel hende at du vil utelate all informasjon som kommer fra en lokal vert.
Slik oppretter du en utelatelse:
Velg Innstillinger> CloudApps>Cloud Discovery>Exclude-enheter i Microsoft Defender-portalen.
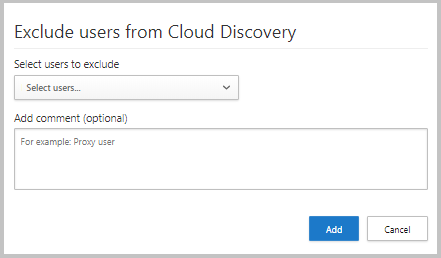
Velg fanen Utelatte brukere, Utelatte grupper, Utelatte IP-adresser eller Utelatte enheter , og velg +Legg til-knappen for å legge til utelukkelsen.
Legg til et brukernavn, en IP-adresse eller et enhetsnavn. Vi anbefaler at du legger til informasjon om hvorfor utelukkelsen ble gjort.
Obs!
Alle enhetsutelukker gjelder bare for nylig mottatte data. Historiske data for de ekskluderte enhetene forblir gjennom oppbevaringsperioden (90 dager).
Administrer kontinuerlige rapporter
Egendefinerte kontinuerlige rapporter gir deg mer detaljerthet når du overvåker organisasjonens loggdata for skyoppdagelse. Opprett egendefinerte rapporter for å filtrere på bestemte geografiske plasseringer, nettverk og nettsteder eller organisasjonsenheter. Som standard vises bare følgende rapporter i rapportvelgeren for skyoppdagelse:
Den globale rapporten konsoliderer all informasjonen i portalen fra alle datakildene du inkluderte i loggene. Den globale rapporten inneholder ikke data fra Microsoft Defender for endepunkt.
Den spesifikke datakilderapporten viser bare informasjon fra en bestemt datakilde.
Slik oppretter du en ny kontinuerlig rapport:
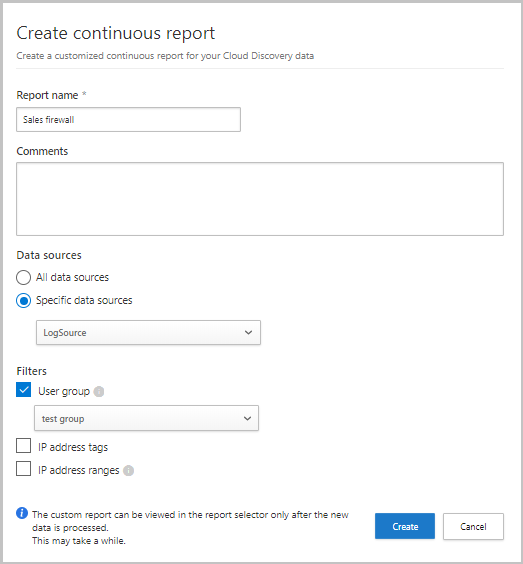
IMicrosoft Defender-portalen velger du Fortløpende>rapport>opprett rapport forSkyapper i Skyapper>>.
Skriv inn et rapportnavn.
Velg datakildene du vil inkludere (alle eller spesifikke).
Angi filtrene du vil bruke på dataene. Disse filtrene kan være brukergrupper, IP-adressekoder eller IP-adresseområder. Hvis du vil ha mer informasjon om hvordan du arbeider med IP-adressekoder og IP-adresseområder, kan du se Organisere dataene i henhold til dine behov.
Obs!
Alle egendefinerte rapporter er begrenset til maksimalt 1 GB ukomprimerte data. Hvis det er mer enn 1 GB data, eksporteres de første 1 GB med data til rapporten.
Sletting av data for skyoppdagelse
Vi anbefaler at du sletter data for søk i skyen i følgende tilfeller:
Hvis du har lastet opp loggfiler manuelt, har det gått lang tid siden du oppdaterte systemet med nye loggfiler, og du vil ikke at gamle data skal påvirke resultatene.
Når du angir en ny egendefinert datavisning, gjelder den bare for nye data fra nå av. I slike tilfeller vil du kanskje slette gamle data og deretter laste opp loggfilene på nytt for å aktivere den egendefinerte datavisningen for å hente hendelser i loggfildataene.
Hvis mange brukere eller IP-adresser nylig begynte å arbeide på nytt etter å ha vært frakoblet en stund, identifiseres aktiviteten som uregelmessig og kan gi deg falske positive brudd.
Viktig
Kontroller at du vil slette data før du gjør det. Denne handlingen er irreversbile og sletter alle skyoppdagelsesdata i systemet.
Slik sletter du data for skyoppdagelse:
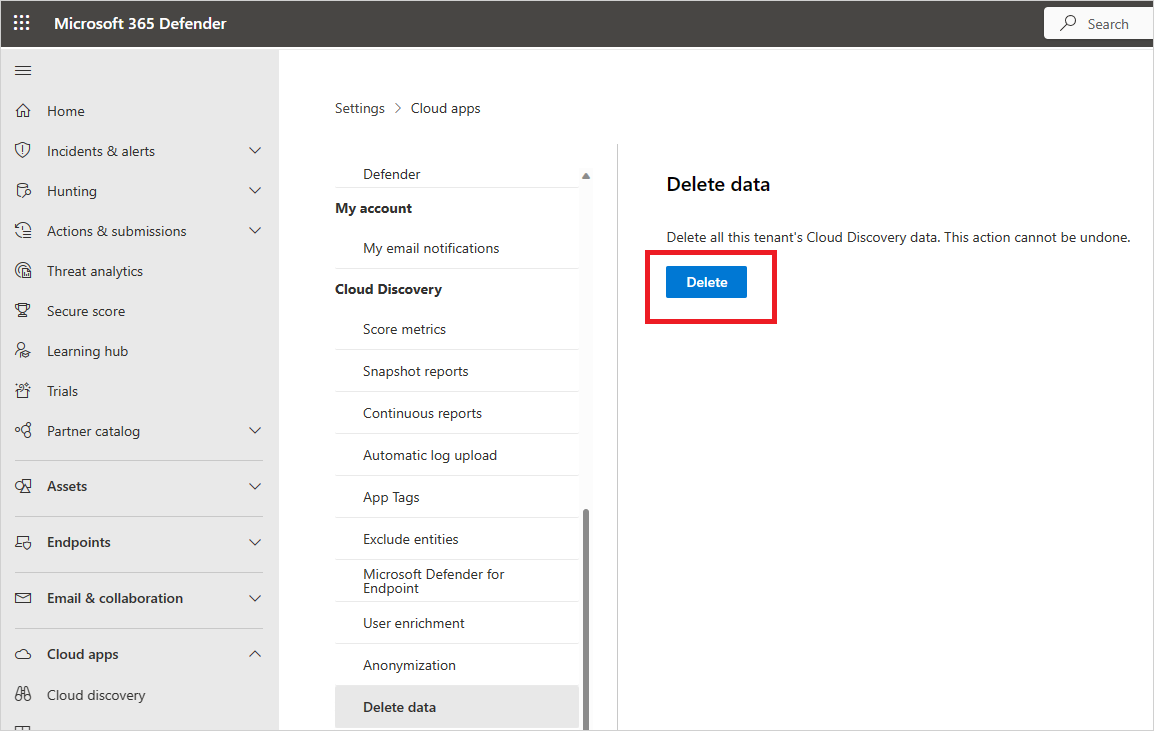
I Microsoft Defender-portalen velger du Slettdatafor> CloudApps>Cloud Discovery>.
Velg Slett-knappen .
Obs!
Slettingsprosessen tar noen minutter og er ikke umiddelbar.