Geforceerde tunneling configureren voor Virtual WAN-punt-naar-site-VPN
Met geforceerde tunneling kunt u al het verkeer (inclusief internetverkeer) van externe gebruikers naar Azure verzenden. In Virtual WAN betekent geforceerde tunneling voor externe punt-naar-site-VPN-gebruikers dat de standaardroute 0.0.0.0/0 wordt aangekondigd aan externe VPN-gebruikers.
Een Virtual WAN-hub maken
Bij de stappen in dit artikel wordt ervan uitgegaan dat u al een virtueel WAN met een of meer hubs hebt geïmplementeerd.
Als u een nieuw virtueel WAN en een nieuwe hub wilt maken, gebruikt u de stappen in de volgende artikelen:
Punt-naar-site-VPN instellen
Bij de stappen in dit artikel wordt ook ervan uitgegaan dat u al een punt-naar-site-VPN-gateway hebt geïmplementeerd in de Virtual WAN-hub. Er wordt ook van uitgegaan dat u punt-naar-site-VPN-profielen hebt gemaakt om aan de gateway toe te wijzen.
Zie Een punt-naar-site-VPN-gateway maken voor informatie over het maken van de punt-naar-site-VPN-gateway en gerelateerde profielen.
Standaardroute naar clients adverteren
Er zijn een aantal manieren om geforceerde tunneling te configureren en de standaardroute (0.0.0.0/0) te adverteren naar de VPN-clients van uw externe gebruiker die zijn verbonden met Virtual WAN.
- U kunt een statische 0.0.0.0/0-route opgeven in de defaultRouteTable met de volgende hop Virtual Network Connection. Hiermee dwingt u af dat al het internetverkeer wordt verzonden naar een virtueel netwerkapparaat dat is geïmplementeerd in die spaak Virtual Network. Voor meer gedetailleerde instructies kunt u de alternatieve werkstroom overwegen die wordt beschreven in Routeren via NVA's.
- U kunt Azure Firewall Manager gebruiken om Virtual WAN te configureren voor het verzenden van al het internetverkeer via Azure Firewall dat is geïmplementeerd in de Virtual WAN-hub. Zie de Azure Firewall Manager-documentatie Virtuele hubs beveiligen voor configuratiestappen en een zelfstudie. Dit kan ook worden geconfigureerd met behulp van een beleid voor routering van internetverkeer. Zie Routeringsintentie en Routeringsbeleid voor meer informatie.
- U kunt Firewall Manager gebruiken om internetverkeer te verzenden via een externe beveiligingsprovider. Zie Vertrouwde beveiligingsproviders voor meer informatie over deze mogelijkheid.
- U kunt een van uw vertakkingen (site-naar-site-VPN, ExpressRoute-circuit) configureren om de route 0.0.0.0/0 naar Virtual WAN te adverteren.
Nadat u een van de bovenstaande vier methoden hebt geconfigureerd, moet u ervoor zorgen dat de vlag EnableInternetSecurity is ingeschakeld voor uw punt-naar-site-VPN-gateway. Deze vlag moet worden ingesteld op true om uw clients correct te kunnen configureren voor geforceerde tunneling.
Als u de vlag EnableInternetSecurity wilt inschakelen, gebruikt u de volgende PowerShell-opdracht, waarbij u de juiste waarden voor uw omgeving vervangt.
Update-AzP2sVpnGateway -ResourceGroupName "sampleRG" -Name "p2sgwsamplename" -EnableInternetSecurityFlag
Het punt-naar-site-VPN-profiel downloaden
Zie Globale profielen en hubprofielen om het punt-naar-site-VPN-profiel te downloaden. De informatie in het zip-bestand dat is gedownload van Azure Portal is essentieel voor het correct configureren van uw clients.
Geforceerde tunneling configureren voor Azure VPN-clients (OpenVPN)
De stappen voor het configureren van geforceerde tunneling verschillen, afhankelijk van het besturingssysteem van het apparaat van de eindgebruiker.
Windows-clients
Notitie
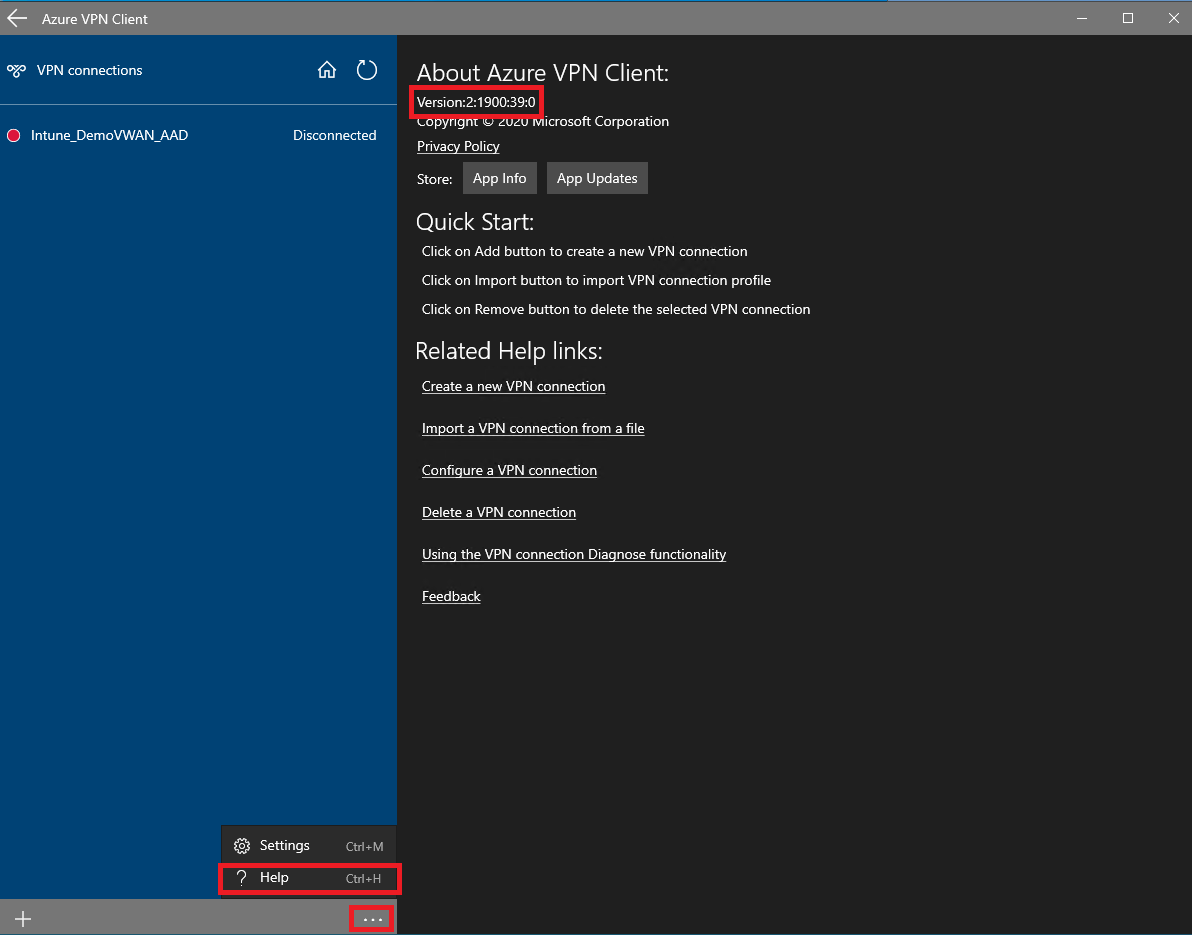
Voor Windows-clients is geforceerde tunneling met de Azure VPN-client alleen beschikbaar met softwareversie 2:1900:39.0 of hoger.
Controleer of de versie van uw Azure VPN-client compatibel is met geforceerde tunneling. Klik hiervoor op de drie puntjes onder aan de Azure VPN-client en klik op Help. U kunt ook ctrl-H gebruiken om naar Help te navigeren. Het versienummer vindt u bovenaan het scherm. Zorg ervoor dat uw versienummer 2:1900:39.0 of hoger is.
Open het zip-bestand dat u in de vorige sectie hebt gedownload. U ziet nu een map met de naam AzureVPN. Open de map en open azurevpnconfig.xml in uw favoriete XML-bewerkingsprogramma.
In azureconfig.xmlbevindt zich een veld met de naam versie. Als het nummer tussen de versietags 1 is, wijzigt u het versienummer in 2.
<version>2</version>Importeer het profiel in de Azure VPN-client. Zie Instructies voor het importeren van een Azure VPN-client voor meer informatie over het importeren van een profiel.
Maak verbinding met de zojuist toegevoegde verbinding. U gaat nu al het verkeer geforceerd tunnelen naar Azure Virtual WAN.

MacOS-clients
Zodra een macOS-client de standaardroute van Azure heeft geleerd, wordt geforceerde tunneling automatisch geconfigureerd op het clientapparaat. Er zijn geen extra stappen om te nemen. Zie de macOS-configuratiehandleiding voor instructies over het gebruik van de macOS Azure VPN-client om verbinding te maken met de Virtual WAN punt-naar-site-VPN-gateway.
Geforceerde tunneling configureren voor IKEv2-clients
Voor IKEv2-clients kunt u de uitvoerbare profielen die zijn gedownload van Azure Portal niet rechtstreeks gebruiken. Als u de client correct wilt configureren, moet u een PowerShell-script uitvoeren of het VPN-profiel distribueren via Intune.
Gebruik een ander EAP-configuratiebestand op basis van de verificatiemethode die is geconfigureerd op uw punt-naar-site-VPN-gateway. Hieronder ziet u voorbeeld van EAP-configuratiebestanden.
IKEv2 met verificatie van gebruikerscertificaten
Als u gebruikerscertificaten wilt gebruiken om externe gebruikers te verifiëren, gebruikt u het onderstaande PowerShell-voorbeeldscript. Als u de inhoud van de VPNSettings- en EAP XML-bestanden correct wilt importeren in PowerShell, navigeert u naar de juiste map voordat u de Opdracht Get-Content PowerShell uitvoert.
# specify the name of the VPN Connection to be installed on the client
$vpnConnectionName = "SampleConnectionName"

# get the VPN Server FQDN from the profile downloaded from Azure Portal
$downloadedXML = [xml] (Get-Content VpnSettings.xml)
$vpnserverFQDN = $downloadedXML.VpnProfile.VpnServer

# use the appropriate EAP XML file based on the authentication method specified on the Point-to-site VPN gateway
$EAPXML = [xml] (Get-Content EapXML.xml)

# create the VPN Connection
Add-VpnConnection -Name $vpnConnectionName -ServerAddress $vpnserverFQDN -TunnelType Ikev2 -AuthenticationMethod Eap -EapConfigXmlStream $EAPXML

# enabled forced tunneling
Set-VpnConnection -Name $vpnConnectionName -SplitTunneling $false
In het volgende voorbeeld ziet u een EAP XML-bestand voor verificatie op basis van een gebruikerscertificaat. Vervang het veld IssuerHash door de vingerafdruk van het basiscertificaat om ervoor te zorgen dat uw clientapparaat het juiste certificaat selecteert dat moet worden weergegeven aan de VPN-server voor verificatie.
<EapHostConfig xmlns="http://www.microsoft.com/provisioning/EapHostConfig">
    <EapMethod>
        <Type xmlns="http://www.microsoft.com/provisioning/EapCommon">13</Type>
        <VendorId xmlns="http://www.microsoft.com/provisioning/EapCommon">0</VendorId>
        <VendorType xmlns="http://www.microsoft.com/provisioning/EapCommon">0</VendorType>
        <AuthorId xmlns="http://www.microsoft.com/provisioning/EapCommon">0</AuthorId>
    </EapMethod>
    <Config xmlns="http://www.microsoft.com/provisioning/EapHostConfig">
        <Eap xmlns="http://www.microsoft.com/provisioning/BaseEapConnectionPropertiesV1">
            <Type>13</Type>
            <EapType xmlns="http://www.microsoft.com/provisioning/EapTlsConnectionPropertiesV1">
                <CredentialsSource>
                    <CertificateStore>
                        <SimpleCertSelection>true</SimpleCertSelection>
                    </CertificateStore>
                </CredentialsSource>
                <ServerValidation>
                    <DisableUserPromptForServerValidation>false</DisableUserPromptForServerValidation>
                    <ServerNames></ServerNames>
                </ServerValidation>
                <DifferentUsername>false</DifferentUsername>
                <PerformServerValidation xmlns="http://www.microsoft.com/provisioning/EapTlsConnectionPropertiesV2">false</PerformServerValidation>
                <AcceptServerName xmlns="http://www.microsoft.com/provisioning/EapTlsConnectionPropertiesV2">false</AcceptServerName>
                <TLSExtensions xmlns="http://www.microsoft.com/provisioning/EapTlsConnectionPropertiesV2">
                    <FilteringInfo xmlns="http://www.microsoft.com/provisioning/EapTlsConnectionPropertiesV3">
                        <CAHashList Enabled="true">
                            <IssuerHash> REPLACE THIS WITH ROOT CERTIFICATE THUMBPRINT </IssuerHash>
                        </CAHashList>
                    </FilteringInfo>
                </TLSExtensions>
            </EapType>
        </Eap>
    </Config>
</EapHostConfig>
IKEv2 met verificatie van computercertificaten
Als u computercertificaten wilt gebruiken om externe gebruikers te verifiëren, gebruikt u het onderstaande PowerShell-voorbeeldscript. Als u de inhoud van de VPNSettings- en EAP XML-bestanden correct wilt importeren in PowerShell, navigeert u naar de juiste map voordat u de Opdracht Get-Content PowerShell uitvoert.
# specify the name of the VPN Connection to be installed on the client
$vpnConnectionName = "UserCertVPNConnection"

# get the VPN Server FQDN from the profile downloaded from Azure portal
$downloadedXML = [xml] (Get-Content VpnSettings.xml)
$vpnserverFQDN = $downloadedXML.VpnProfile.VpnServer

# create the VPN Connection
Add-VpnConnection -Name $vpnConnectionName -ServerAddress $vpnserverFQDN -TunnelType Ikev2 -AuthenticationMethod MachineCertificate

# enabled forced tunneling
Set-VpnConnection -Name $vpnConnectionName -SplitTunneling $false
IKEv2 met RADIUS-serververificatie met gebruikersnaam en wachtwoord (EAP-MSCHAPv2)
Als u RADIUS-verificatie op basis van een gebruikersnaam en wachtwoord (EAP-MASCHAPv2) wilt gebruiken om externe gebruikers te verifiëren, gebruikt u het onderstaande PowerShell-voorbeeldscript. Als u de inhoud van de VPNSettings- en EAP XML-bestanden correct wilt importeren in PowerShell, navigeert u naar de juiste map voordat u de Opdracht Get-Content PowerShell uitvoert.
# specify the name of the VPN Connection to be installed on the client
$vpnConnectionName = "SampleConnectionName"

# get the VPN Server FQDN from the profile downloaded from Azure portal
$downloadedXML = [xml] (Get-Content VpnSettings.xml)
$vpnserverFQDN = $downloadedXML.VpnProfile.VpnServer

# use the appropriate EAP XML file based on the authentication method specified on the Point-to-site VPN gateway
$EAPXML = [xml] (Get-Content EapXML.xml)

# create the VPN Connection
Add-VpnConnection -Name $vpnConnectionName -ServerAddress $vpnserverFQDN -TunnelType Point-to-sitev2 -AuthenticationMethod Eap -EapConfigXmlStream $EAPXML

# enabled forced tunneling
Set-VpnConnection -Name $vpnConnectionName -SplitTunneling $false
Een voorbeeld van een EAP XML-bestand is het volgende.
<EapHostConfig xmlns="http://www.microsoft.com/provisioning/EapHostConfig">
    <EapMethod>
        <Type xmlns="http://www.microsoft.com/provisioning/EapCommon">26</Type>
        <VendorId xmlns="http://www.microsoft.com/provisioning/EapCommon">0</VendorId>
        <VendorType xmlns="http://www.microsoft.com/provisioning/EapCommon">0</VendorType>
        <AuthorId xmlns="http://www.microsoft.com/provisioning/EapCommon">0</AuthorId>
    </EapMethod>
    <Config xmlns="http://www.microsoft.com/provisioning/EapHostConfig">
        <Eap xmlns="http://www.microsoft.com/provisioning/BaseEapConnectionPropertiesV1">
            <Type>26</Type>
            <EapType xmlns="http://www.microsoft.com/provisioning/MsChapV2ConnectionPropertiesV1">
                <UseWinLogonCredentials>false</UseWinLogonCredentials>
            </EapType>
        </Eap>
    </Config>
</EapHostConfig>
IKEv2 met RADIUS-serververificatie met gebruikerscertificaten (EAP-TLS)
Als u op certificaten gebaseerde RADIUS-verificatie (EAP-TLS) wilt gebruiken om externe gebruikers te verifiëren, gebruikt u het onderstaande PowerShell-voorbeeldscript. Als u de inhoud van de VpnSettings- en EAP XML-bestanden in PowerShell wilt importeren, moet u naar de juiste map navigeren voordat u de PowerShell-opdracht Get-Content uitvoert.
# specify the name of the VPN Connection to be installed on the client
$vpnConnectionName = "SampleConnectionName"

# get the VPN Server FQDN from the profile downloaded from Azure portal
$downloadedXML = [xml] (Get-Content VpnSettings.xml)
$vpnserverFQDN = $downloadedXML.VpnProfile.VpnServer

# use the appropriate EAP XML file based on the authentication method specified on the Point-to-site VPN gateway
$EAPXML = [xml] (Get-Content EapXML.xml)

# create the VPN Connection
Add-VpnConnection -Name $vpnConnectionName -ServerAddress $vpnserverFQDN -TunnelType Ikev2 -AuthenticationMethod Eap -EapConfigXmlStream $EAPXML

# enabled forced tunneling
Set-VpnConnection -Name $vpnConnectionName -SplitTunneling $false
Hieronder ziet u een voorbeeld van een EAP XML-bestand. Wijzig het veld TrustedRootCA in de vingerafdruk van het certificaat van uw certificeringsinstantie en de IssuerHash in de vingerafdruk van het basiscertificaat.
<EapHostConfig xmlns="http://www.microsoft.com/provisioning/EapHostConfig">
    <EapMethod>
        <Type xmlns="http://www.microsoft.com/provisioning/EapCommon">13</Type>
        <VendorId xmlns="http://www.microsoft.com/provisioning/EapCommon">0</VendorId>
        <VendorType xmlns="http://www.microsoft.com/provisioning/EapCommon">0</VendorType>
        <AuthorId xmlns="http://www.microsoft.com/provisioning/EapCommon">0</AuthorId>
    </EapMethod>
    <Config xmlns="http://www.microsoft.com/provisioning/EapHostConfig">
        <Eap xmlns="http://www.microsoft.com/provisioning/BaseEapConnectionPropertiesV1">
            <Type>13</Type>
            <EapType xmlns="http://www.microsoft.com/provisioning/EapTlsConnectionPropertiesV1">
                <CredentialsSource>
                    <CertificateStore>
                        <SimpleCertSelection>false</SimpleCertSelection>
                    </CertificateStore>
                </CredentialsSource>
                <ServerValidation>
                    <DisableUserPromptForServerValidation>false</DisableUserPromptForServerValidation>
                    <ServerNames></ServerNames>
                    <TrustedRootCA> CERTIFICATE AUTHORITY THUMBPRINT </TrustedRootCA>
                </ServerValidation>
                <DifferentUsername>true</DifferentUsername>
                <PerformServerValidation xmlns="http://www.microsoft.com/provisioning/EapTlsConnectionPropertiesV2">true</PerformServerValidation>
                <AcceptServerName xmlns="http://www.microsoft.com/provisioning/EapTlsConnectionPropertiesV2">true</AcceptServerName>
                <TLSExtensions xmlns="http://www.microsoft.com/provisioning/EapTlsConnectionPropertiesV2">
                    <FilteringInfo xmlns="http://www.microsoft.com/provisioning/EapTlsConnectionPropertiesV3">
                        <CAHashList Enabled="true">
                            <IssuerHash> ROOT CERTIFCATE THUMBPRINT  </IssuerHash>
                        </CAHashList>
                    </FilteringInfo>
                </TLSExtensions>
            </EapType>
        </Eap>
    </Config>
</EapHostConfig>
Volgende stappen
Zie de veelgestelde vragen voor meer informatie over Virtual WAN.