Tutorial: Using automation to set up the Microsoft Entra admin for SQL Server
Artikel
Applies to:
SQL Server 2022 (16.x)
Note
This feature is available in SQL Server 2022 (16.x) or later versions, and is only supported for SQL Server on-premises, for Windows and Linux hosts and SQL Server 2022 on Windows Azure VMs.
In this article, we'll go over how to set up the Microsoft Entra admin to allow authentication with Microsoft Entra ID (formerly Azure Active Directory) for SQL Server using the Azure portal, and APIs such as:
While Microsoft Entra ID is the new name for Azure Active Directory (Azure AD), to prevent disrupting existing environments, Azure AD still remains in some hardcoded elements such as UI fields, connection providers, error codes, and cmdlets. In this article, the two names are interchangeable.
Preparation before setting the Microsoft Entra admin
The following permissions are necessary to set up Microsoft Entra admin in the SQL Server – Azure Arc and Key vault resources.
Configure permissions for Azure Arc
Follow the guide to make sure your SQL Server is connected to Azure Arc. The user setting up Microsoft Entra admin for the SQL Server – Azure Arc resource should have the Contributor role for the server.
Select SQL Server – Azure Arc, and select the instance for your SQL Server host.
Select Access control (IAM).
Select Add > Add role assignment to add the Contributor role to the user setting up the Microsoft Entra admin.
Configure permissions for Azure Key Vault
Create an Azure Key Vault if you don't already have one. The user setting up Microsoft Entra admin should have the Contributor role for your Azure Key Vault. To add a role to a user in Azure Key Vault:
Select Add > Add role assignment to add the Contributor role to the user setting up the Microsoft Entra admin.
Set access policies for the SQL Server host
In the Azure portal, navigate to your Azure Key Vault instance, and select Access policies.
Select Add Access Policy.
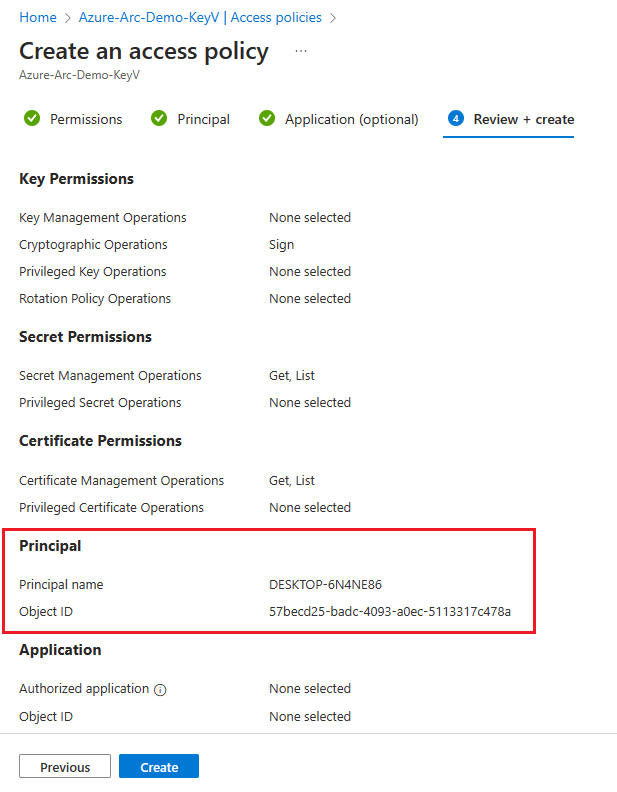
For Key permissions, use Sign.
For Secret permissions, select Get and List.
For Certificate permissions, select Get and List.
Select Next.
On the Principal page, search for the name of your Machine - Azure Arc instance, which is the hostname of the SQL Server host.
Skip the Application (optional) page by selecting Next twice, or selecting Review + create.
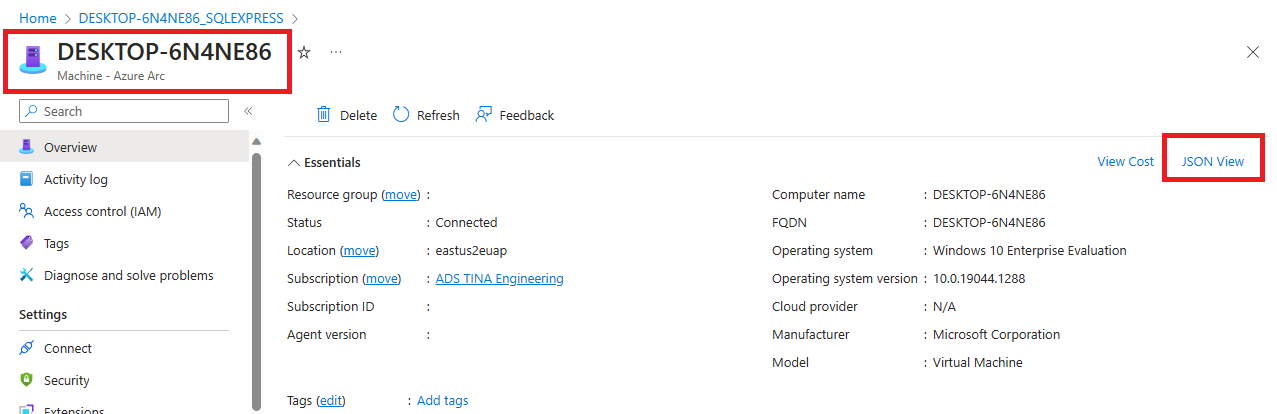
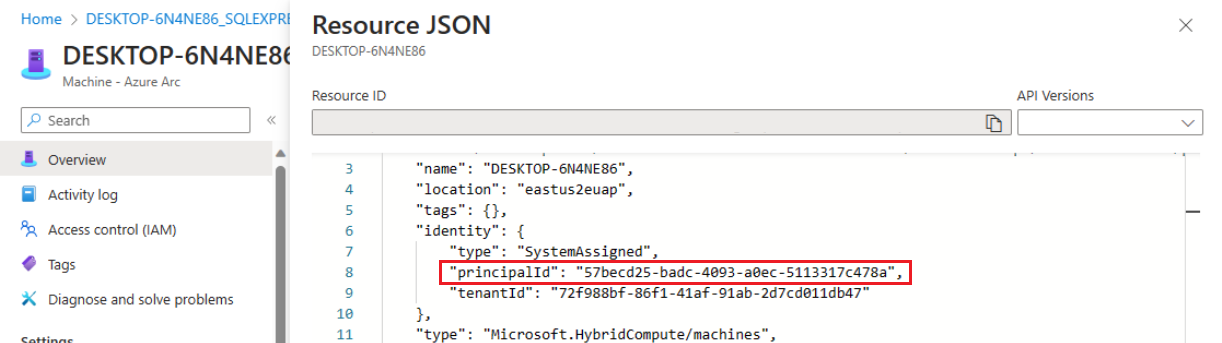
Verify that the "Object ID" of the Principal matches the Principal ID of the managed identity assigned to the instance.
To confirm, go to the resource page and select JSON View in the top right of the Essentials box on the Overview page. Under identity you'll find the principalId.
Select Create.
You must select Create to ensure that the permissions are applied. To ensure permissions have been stored, refresh the browser window, and check that the row for your Azure Arc instance is still present.
Set access policies for Microsoft Entra users
In the Azure portal, navigate to your Azure Key Vault instance, and select Access policies.
Select Add Access Policy.
For Key permissions, select Get, List, and Create.
For Secret permissions, select Get, List, and Set.
For Certificate permissions, select Get, List, and Create.
For Select principal, add the Microsoft Entra user you want to use to connect to SQL Server.
Select Add and then select Save.
Setting up the Microsoft Entra admin for SQL Server
New APIs and portal functionality allows users to set up a Microsoft Entra admin for SQL Server without having to separately create an Azure certificate and Microsoft Entra application. Select a tab to learn how to set up a Microsoft Entra admin for your SQL Server connected to Azure Arc with automatic certificate and application creation.
Note
The ARM template still requires the creation of an Azure Key Vault certificate and Microsoft Entra application before setting up a Microsoft Entra admin. For more information on this process, see Tutorial: Set up Microsoft Entra authentication for SQL Server.
Use the Azure portal to set up a Microsoft Entra admin, create an Azure Key Vault certificate and Microsoft Entra application in the same process. This is necessary to use Microsoft Entra authentication with SQL Server.
Setting up Microsoft Entra admin using the Azure portal
Go to the Azure portal, and select SQL Server – Azure Arc. Select the instance for your SQL Server host.
Check the status of your SQL Server - Azure Arc resource and see if it's connected by going to the Properties menu. For more information, see Validate your Arc-enabled SQL Server resources.
Select Microsoft Entra ID and Purview under Settings from the resource menu.
Select Set Admin to open the Microsoft Entra ID pane, and choose an account that will be added as an admin login to SQL Server.
Select Service-managed cert.
Select Change key vault and select your existing Azure Key vault resource.
Select Service-managed app registration.
Select Save. This sends a request to the Arc server agent, which configures Microsoft Entra authentication for that SQL Server instance. The operation can take several minutes to complete; wait until the save process is confirmed with Saved successfully before attempting a Microsoft Entra login.
The service-managed app registration does the following for you:
Creates a certificate in your key vault with a name in the form <hostname>-<instanceName><uniqueNumber>.
Creates a Microsoft Entra application with a name like <hostname>-<instanceName><uniqueNumber>, and assigns the necessary permissions to that application. For more information, see Grant application permissions
Assigns the new certificate in the Azure Key Vault to the application.
Saves these settings to Azure Arc.
Note
The certificates created for Microsoft Entra are not rotated automatically. Customers can choose to provide their own certificate and application for the Microsoft Entra admin setup. For more information, see Tutorial: Set up Microsoft Entra authentication for SQL Server.
To install the Az.ConnectedMachine module, use az extension add --name ConnectedMachine. To check which version of the Azure CLI is installed, use az version.
The following input parameters are used for the Azure CLI script:
<applicationName> - Application name that will be created
<certSubjectName> - Certificate name that will be created
<keyVaultName> - Your key vault name. This key vault must be created before running the script
<machineName> - Machine name of your SQL Server host
<resourceGroupName> - Resource group name that contains your SQL Server – Azure Arc instance
<adminAccountName> - Microsoft Entra admin account that you want to set for your SQL Server
<instanceName> - Optional parameter for SQL Server named instances. Use this parameter when you have a named instance. If omitted, the default name of MSSQLSERVER is used
<tenantId> - Optional parameter for tenant ID. The tenant ID can be found by going to the Azure portal, and going to your Microsoft Entra ID resource. In the Overview pane, you should see your Tenant ID. If omitted, the default tenant ID is used as a parameter
<subscriptionId> - Optional parameter for subscription ID. Your subscription ID can be found in the Azure portal. If omitted, the default subscription ID is used
To use the Azure CLI script below, save the script as a .ps1 file, and run the following command:
For SQL Server on Linux host machines, replace WindowsAgent.SqlServer with LinuxAgent.SqlServer in the script.
# AZ CLI and AZ CLI's connected machine extension must be installed before running this script
param (
    [Parameter(mandatory=$true)] $applicationName,
    [Parameter(mandatory=$true)] $certSubjectName,
    [Parameter(mandatory=$true)] $keyVaultName,
    [Parameter(mandatory=$true)] $machineName,
    [Parameter(mandatory=$true)] $resourceGroupName,
    [Parameter(mandatory=$true)] $adminAccountName,
    $instanceName,
    $tenantId,
    $subscriptionId
)

# Constants
#
$NUMRETRIES = 60

# Helper functions
#
function ConvertFrom-StringArray {
    param (
        [string[]] $stringArray
    )

    if (!$stringArray)
    {
        return $null
    }
    else
    {
        return ConvertFrom-JSON ($stringArray -join "`n")
    }
}

# Check parameters
#
if ([string]::IsNullOrEmpty($instanceName))
{
    Write-Host "Warning: SQL Instance name (-instanceName) not provided. Default of MSSQLSERVER will be used"
    $instanceName = "MSSQLSERVER"
}

$tenantIdArgument = ""

if ([string]::IsNullOrEmpty($tenantId))
{
    Write-Host "Warning: Tenant ID (-tenantId) not supplied to the script, so default tenant is being used"
}
else
{
    $tenantIdArgument = "-TenantId '" + $tenantId + "'"
}

$subscriptionIdArgument = ""

if ([string]::IsNullOrEmpty($subscriptionId))
{
    Write-Host "Warning: Subscription ID (-subscriptionId) not supplied to the script, so default subscription is being used"
}
else
{
    $subscriptionIdArgument = "-SubscriptionId '" + $subscriptionId + "'"
}

# Login and select subscription
#
$login = az login --tenant $tenantId --use-device-code

if (!$login)
{
    Write-Error "Login to Azure AD failed. Exiting."
    exit 1
}

if ($subscriptionId)
{
    az account set -s $subscriptionId
}

$accountInfo = ConvertFrom-StringArray (az account show)

if (!$accountInfo)
{
    Write-Error "Cannot query logged in Azure AD account. Check that 'az login' and 'az account set' succeeded"
    exit 1
}

if ($subscriptionId)
{
    if ($subscriptionId.ToLower() -ne $accountInfo.id.ToLower())
    {
        Write-Error "Could not select the desired subscription"
        exit 1
    }
}
else
{
    $subscriptionId = $accountInfo.id
}


# Check AKV path exists
#
$keyVault = ConvertFrom-StringArray (az keyvault show --name $keyVaultName)

if (!$keyVault)
{
    Write-Error "Azure key vault '$keyVaultName' does not exist"
    exit 1
}

# Check certificate doesn't exist
#
$cert = ConvertFrom-StringArray (az keyvault certificate show --name $certSubjectName --vault-name $keyVaultName 2>$null)

if ($cert)
{
    Write-Error "Certificate '$certSubjectName' already exists in key vault '$keyVaultName'"
    exit 1
}

# Check app registration doesn't exist
#
$applications = ConvertFrom-StringArray (az ad app list --display-name $applicationName  --only-show-errors)

if ($applications.length -gt 0)
{
    Write-Error "App registration with name '$applicationName' already exists"
    exit 1
}

# Check Arc SQL instance is valid
#
$extension = ConvertFrom-StringArray (az connectedmachine extension show --machine-name $machineName --name "WindowsAgent.SqlServer" --resource-group $resourceGroupName)

if (!$extension)
{
    Write-Error "SQL Server Arc Server not found for machine '$machineName' in resource group '$resourceGroupName'"
    exit 1
}

$arcServicePrincipals = ConvertFrom-StringArray(az ad sp list --display-name $machineName --only-show-errors)

if (!$arcServicePrincipals -or $arcServicePrincipals.length -eq 0)
{
    Write-Error "Could not find a service principal account with the name '$machineName'"
    exit 1
}
else
{
    $principalFound = $false

    for ($i = 0; $i -lt $arcServicePrincipals.length; $i++)
    {
        if ($arcServicePrincipals[$i].displayName.toLower() -eq $machineName.toLower()) {
            if ($principalFound) {
                Write-Error "Could not find exactly one service principal account with the name '$machineName'"
                exit 1
            }

            $arcServicePrincipal = $arcServicePrincipals[$i]
            $principalFound = $true
        }
    }

    if (!$principalFound) {
        Write-Error "Could not find a service principal account with the name '$machineName'"
        exit 1
    }
}


# Check if admin account exists
#
$adminAccount = ConvertFrom-StringArray (az ad user show --id $adminAccountName --only-show-errors 2>$null)
$adminAccountType = 0

if (!$adminAccount)
{
    $adminAccounts = ConvertFrom-StringArray (az ad user list --filter "mail eq '$adminAccountName'" --only-show-errors 2>$null)

    if ($adminAccounts -and $adminAccounts.length -gt 0)
    {
        if ($adminAccounts.length -eq 1)
        {
            $adminAccount = $adminAccounts[0]
        }
        else
        {
            Write-Error "Multiple Azure AD accounts found with identifier '$adminAccountName'"
            exit 1
        }
    }
    else
    {
        $adminAccount =  ConvertFrom-StringArray (az ad group show --group $adminAccountName --only-show-errors 2>$null)

        if (!$adminAccount)
        {
            $adminAccounts = ConvertFrom-StringArray (az ad app list --display-name $adminAccountName --only-show-errors 2>$null)

            if ($adminAccounts -and $adminAccounts.length -gt 0)
            {
                if ($adminAccounts.length -eq 1)
                {
                    $adminAccount = $adminAccounts[0]
                }
                else
                {
                    Write-Error "Multiple Azure AD applications found with identifier '$adminAccountName'"
                    exit 1
                }
            }
            else
            {
                Write-Error "Admin account not found"
                exit 1
            }
        }
        else
        {
            $adminAccountType = 1
        }
    }
}

if ($adminAccount)
{
    $adminAccountSid = $adminAccount.id
}
else
{
    Write-Error "Admin account not found"
    exit 1
}

# Create certificate in AKV
#
$keyVaultPolicy = ConvertFrom-StringArray (az keyvault certificate get-default-policy)

if (!$keyVaultPolicy)
{
    Write-Error "Could not get default key vault policy"
    exit 1
}

$keyVaultPolicy.x509CertificateProperties.subject = "CN=" + $certSubjectName
$policyString = (ConvertTo-JSON -Depth 8 $keyVaultPolicy).replace("`r`n", "")
$escapedPolicyString = $policyString.replace("`"", "\`"")
$cert = ConvertFrom-StringArray (az keyvault certificate create --vault-name $keyVaultName --name $certSubjectName --policy $escapedPolicyString)

if (!$cert)
{
    Write-Error "Failed to create certificate '$certSubjectName'"
    exit 1
}

# Wait until cert is created?
#
$cert = ConvertFrom-StringArray (az keyvault certificate show --vault-name $keyVaultName --name $certSubjectName)

for (($i = 0); $i -lt $NUMRETRIES -and (!$cert -or !$cert.attributes.enabled); $i++)
{
    $cert = ConvertFrom-StringArray (az keyvault certificate show --vault-name $keyVaultName --name $certSubjectName)

    if (!$cert -or !$cert.attributes.enabled)
    {
        Start-Sleep -Seconds 5
    }
}

# Allow Arc to access AKV
#
$newPerms = ConvertFrom-StringArray (az keyvault set-policy --name $keyVaultName --secret-permissions get list --certificate-permissions get list --object-id $arcServicePrincipal.id)

if (!$newPerms)
{
    Write-Host "Warning: Unable to add permissions to key vault '$keyVaultName' for Arc's service principal's identity '$($arcServicePrincipal.id)'. Arc may not be able to configure Azure AD authentication"
}

# Create an Azure AD application
#
$application = ConvertFrom-StringArray (az ad app create --display-name $applicationName --only-show-errors)

if (!$application)
{
    Write-Error "Unable to create the app registration '$applicationName'"
    exit 1
}

# Set perms on app registration
#
az ad app permission add --id $application.id --api 00000003-0000-0000-c000-000000000000 --api-permissions c79f8feb-a9db-4090-85f9-90d820caa0eb=Scope --only-show-errors # Delegated Application.Read.All
az ad app permission add --id $application.id --api 00000003-0000-0000-c000-000000000000 --api-permissions 0e263e50-5827-48a4-b97c-d940288653c7=Scope --only-show-errors # Delegated Directory.AccessAsUser.All
az ad app permission add --id $application.id --api 00000003-0000-0000-c000-000000000000 --api-permissions 7ab1d382-f21e-4acd-a863-ba3e13f7da61=Role --only-show-errors # Application Directory.Read.All
az ad app permission add --id $application.id --api 00000003-0000-0000-c000-000000000000 --api-permissions 5f8c59db-677d-491f-a6b8-5f174b11ec1d=Scope --only-show-errors # Delegated Group.Read.All
az ad app permission add --id $application.id --api 00000003-0000-0000-c000-000000000000 --api-permissions a154be20-db9c-4678-8ab7-66f6cc099a59=Scope --only-show-errors # Delegated User.Read.All

# Upload cert to Azure AD
#
$certUploadRes = ConvertFrom-StringArray (az ad app credential reset --id $application.id --cert $certSubjectName --keyvault $keyVaultName --append --only-show-errors)

if (!$certUploadRes)
{
    Write-Error "Failed to set certificate '$certSubjectName' as a credential for app registration '$applicationName'"
    exit 1
}

# Remove the version from the secret ID if present
#
$secretId = $cert.sid

if ($secretId -Match "(https:\/\/[^\/]+\/secrets\/[^\/]+)(\/.*){0,1}$") {
    if ($Matches[1])     {
        $secretId = $Matches[1]
    }
}

# Create the settings object to write to the Azure extension for SQL Server
#
$instanceSettings = @{
    instanceName = $instanceName
    adminLoginName = $adminAccountName
    adminLoginSid = $adminAccountSid
    azureCertSecretId = $secretId
    azureCertUri = $cert.id
    azureKeyVaultResourceUID = $keyVault.id
    managedCertSetting = "CUSTOMER MANAGED CERT"
    managedAppSetting = "CUSTOMER MANAGED APP"
    appRegistrationName = $application.displayName
    appRegistrationSid = $application.appId
    tenantId = $tenantId
    aadCertSubjectName = $certSubjectName
    adminLoginType = $adminAccountType
}

$extension = ConvertFrom-StringArray (az connectedmachine extension show --machine-name $machineName --name "WindowsAgent.SqlServer" --resource-group $resourceGroupName)

if ($extension.properties.Settings.AzureAD)
{
    $aadSettings = $extension.properties.Settings.AzureAD
    $instanceFound = $false
    $instanceNameLower = $instanceName.ToLower()
    $instanceIndex = 0

    for (($i = 0); $i -lt $aadSettings.Length; $i++)
    {
        if ($aadSettings[$i].instanceName.ToLower() -eq $instanceNameLower)
        {
            $instanceIndex = $i
            $instanceFound = $true
            break
        }
    }

    if ($instanceFound)
    {
        $aadSettings[$instanceIndex] = $instanceSettings
    }
    else
    {
        $aadSettings += $instanceSettings
    }

    $extension.properties.Settings.AzureAD = $aadSettings
}
else
{
    $aadSettings = , $instanceSettings
    $extension.properties.Settings | Add-Member -Name 'AzureAD' -Value $aadSettings -MemberType NoteProperty
}

$settingsString = (ConvertTo-Json $extension.properties.Settings).replace("`"", "\`"").replace("`r`n", "")

# Push settings to Arc
#
Write-Host "Writing Azure AD setting to Azure extension for SQL Server. This may take several minutes..."
$updateRes = az connectedmachine extension update --machine-name $machineName --name "WindowsAgent.SqlServer" --resource-group $resourceGroupName --settings $settingsString

if (!$updateRes)
{
    Write-Error "Failed to update Azure extension for SQL Server with Azure AD settings"
    exit 1
}

Write-Output "Success"
Running the script can take several minutes to complete. When the process is finished, a message similar to the following will appear:
Name                   Location ProvisioningState
----                   -------- -----------------
WindowsAgent.SqlServer westus2 Succeeded
Success
Setting up a Microsoft Entra admin with existing certificate and application using the Azure CLI
If you already have an existing Azure Key Vault certificate, and an Azure application that you wish to use to set up a Microsoft Entra admin, you can use the following CLI script:
# Set up Microsoft Entra admin for user's existing key vault, certificate, and application
# Requires input parameters indicated below

# Connect statement
AZ Login

#Input parameters
$subscriptionId="<subscriptionId>"
$tenantId="<tenantId>"
$machineName="<machineName>"  # hostname
$instanceName="<instanceName>"  # SQL Server is define as `machine_name\instance_name`
$resourceGroupName="<resourceGroupName>"
$keyVaultName="<keyVaultName>"
$certSubjectName="<certSubjectName>" # Your existing certificate name
$applicationName="<applicationName>" # Your existing application name
$adminAccountName="<adminAccountName>"
$adminAccountSid="<adminID>"  # Use object ID for the Azure AD user and group, or client ID for the Azure AD application
$adminAccountType= 0  # 0 – for Azure AD user and application, 1 for Azure AD group

# Helper function
#
function ConvertFrom-StringArray {
    param (
        [string[]] $stringArray
    )
    if (!$stringArray)
    {
        return $null
    }
    else
    {
        return ConvertFrom-JSON ($stringArray -join "`n")
    }
}

$keyVault = ConvertFrom-StringArray (az keyvault show --name $keyVaultName)

if (!$keyVault)
{
    Write-Error "Azure key vault '$keyVaultName' does not exist"
    exit 1
}

$cert = ConvertFrom-StringArray (az keyvault certificate show --name $certSubjectName --vault-name $keyVaultName 2>$null)

if (!$cert)
{
  Write-Error "Supplied certificate $certSubjectName was not found for this key vault. Please specify an existing certficate"
    exit 1
}

$secretId = $cert.sid

if ($secretId -Match "(https:\/\/[^\/]+\/secrets\/[^\/]+)(\/.*){0,1}$") {
    if ($Matches[1])     {
        $secretId = $Matches[1]
    }
}

$application = ConvertFrom-StringArray (az ad app list --display-name $applicationName  --only-show-errors)

if (!$application)
{
 Write-Error "Supplied application was not found in the subscription. Please specify an existing application"
    exit 1
}

# Create the settings object to write to the Arc extension
#
$instanceSettings = @{
    instanceName = $instanceName
    adminLoginName = $adminAccountName
    adminLoginSid = $adminAccountSid
    azureCertSecretId = $secretId
    azureCertUri = $cert.id
    azureKeyVaultResourceUID = $keyVault.id
    managedCertSetting = "CUSTOMER MANAGED CERT"
    managedAppSetting = "CUSTOMER MANAGED APP"
    appRegistrationName = $application.displayName
    appRegistrationSid = $application.appId
    tenantId = $tenantId
    aadCertSubjectName = $certSubjectName
    adminLoginType = $adminAccountType
}

$extension = ConvertFrom-StringArray (az connectedmachine extension show --machine-name $machineName --name "WindowsAgent.SqlServer" --resource-group $resourceGroupName)

if ($extension.properties.Settings.AzureAD)
{
    $aadSettings = $extension.properties.Settings.AzureAD
    $instanceFound = $false
    $instanceNameLower = $instanceName.ToLower()
    $instanceIndex = 0

    for (($i = 0); $i -lt $aadSettings.Length; $i++)
    {
        if ($aadSettings[$i].instanceName.ToLower() -eq $instanceNameLower)
        {
            $instanceIndex = $i
            $instanceFound = $true
            break
        }
    }

    if ($instanceFound)
    {
        $aadSettings[$instanceIndex] = $instanceSettings
    }
    else
    {
        $aadSettings += $instanceSettings
    }

    $extension.properties.Settings.AzureAD = $aadSettings
}
else
{
    $aadSettings = , $instanceSettings
    $extension.properties.Settings | Add-Member -Name 'AzureAD' -Value $aadSettings -MemberType NoteProperty
}

$settingsString = (ConvertTo-Json $extension.properties.Settings).replace("`"", "\`"").replace("`r`n", "")

# Push settings to Arc
#
Write-Host "Writing Azure AD setting to SQL Server Arc Extension. This may take several minutes..."
$updateRes = az connectedmachine extension update --machine-name $machineName --name "WindowsAgent.SqlServer" --resource-group $resourceGroupName --settings $settingsString

if (!$updateRes)
{
    Write-Error "Failed to update SQL Arc Extension with Azure AD settings"
    exit 1
}

Write-Output "Success"
The certificates created for Microsoft Entra setup are not rotated automatically.
The following modules are required for this tutorial. Install the latest versions of the modules or higher than the noted version below:
Az.Accounts 3.37.0
Az.ConnectedMachine 0.5.0
Az.KeyVault 4.5.0
Az.Resources 6.0.0
The following input parameters are used for the PowerShell script:
<applicationName> - Application name that will be created
<certSubjectName> - Certificate name that will be created
<keyVaultName> - Your key vault name. This key vault must be created before running the script
<machineName> - Machine name of your SQL Server host
<resourceGroupName> - Resource group name that contains your SQL Server – Azure Arc instance
<adminAccountName> - Microsoft Entra admin account that you want to set for your SQL Server
<instanceName> - Optional parameter for SQL Server named instances. Use this parameter when you have a named instance. If omitted, the default name of MSSQLSERVER is used
<tenantId> - Optional parameter for tenant ID. The tenant ID can be found by going to the Azure portal, and going to your Microsoft Entra ID resource. In the Overview pane, you should see your Tenant ID. If omitted, the default tenant ID is used as a parameter
<subscriptionId> - Optional parameter for subscription ID. Your subscription ID can be found in the Azure portal. If omitted, the default subscription ID is used
To use the PowerShell script below, save the script as a .ps1 file, and run the following command:
For SQL Server on Linux host machines, replace WindowsAgent.SqlServer with LinuxAgent.SqlServer in the script.
param (
    [Parameter(mandatory=$true)] $applicationName,
    [Parameter(mandatory=$true)] $certSubjectName,
    [Parameter(mandatory=$true)] $keyVaultName,
    [Parameter(mandatory=$true)] $machineName,
    [Parameter(mandatory=$true)] $resourceGroupName,
    [Parameter(mandatory=$true)] $adminAccountName,
    $instanceName,
    $tenantId,
    $subscriptionId
)

Import-Module Az.Accounts
Import-Module Az.ConnectedMachine
Import-Module Az.KeyVault
Import-Module Az.Resources

# Constants
#
$NUMRETRIES = 60

# Check parameters
#
if ([string]::IsNullOrEmpty($instanceName))
{
    Write-Host "Warning: SQL Instance name (-instanceName) not provided. Default of MSSQLSERVER will be used"
    $instanceName = "MSSQLSERVER"
}

$tenantIdArgument = ""

if ([string]::IsNullOrEmpty($tenantId))
{
    Write-Host "Warning: Tenant ID (-tenantId) not supplied to the script, so default tenant is being used"
}
else
{
    $tenantIdArgument = "-TenantId '" + $tenantId + "'"
}

$subscriptionIdArgument = ""

if ([string]::IsNullOrEmpty($subscriptionId))
{
    Write-Host "Warning: Subscription ID (-subscriptionId) not supplied to the script, so default subscription is being used"
}
else
{
    $subscriptionIdArgument = "-SubscriptionId '" + $subscriptionId + "'"
}

# Login
#
try
{
    $loginRes = Invoke-Expression -Command ("Connect-AzAccount " + $tenantIdArgument + " " + $subscriptionIdArgument + " -ErrorAction stop -UseDeviceAuthentication")
}
catch
{
    Write-Error $_
    Write-Error "Failed to login to Azure. Script can not continue"
    exit 1
}

# Get subscription ID
#
if ([string]::IsNullOrEmpty($subscriptionId))
{
    $context = Get-AzContext

    if ($context)
    {
        if ($context.Name -Match "[^(]+\(([^)]{36})\)")
        {
            if ($Matches[1])
            {
                $subscriptionId = $Matches[1]
            }
        }
    }
}

if ([string]::IsNullOrEmpty($subscriptionId))
{
    Write-Error "Failed to find default subscription"
    exit 1
}


# Check AKV path exists
#
$keyVault = Get-AzKeyVault -VaultName $keyVaultName

if (!$keyVault)
{
    Write-Error "Supplied key vault was not found in the subscription. Please specify an existing key vault"
    exit 1
}

# Check certificate doesn't exist
#
$cert = Get-AzKeyVaultCertificate -VaultName $keyVaultName -Name $certSubjectName

if ($cert)
{
    Write-Error "Certificate $certSubjectName already exists"
    exit 1
}

# Check app registration doesn't exist
#
$application = Get-AzADApplication -DisplayName $applicationName

if ($application)
{
    Write-Error "Application $applicationName already exists"
    exit 1
}

# Check Arc SQL instance is valid
#
$arcInstance = Get-AzConnectedMachineExtension -SubscriptionId $subscriptionId -MachineName $machineName -ResourceGroupName $resourceGroupName -Name "WindowsAgent.SqlServer"

if (!$arcInstance)
{
    Write-Error "Could not find a SQL Server Arc instance in subscription '$subscriptionId' and resource group '$resourceGroupName' with name '$machineName'"
    exit 1
}

# Check if admin account exists
#
$adminAccount = Get-AzADUser -UserPrincipalName $adminAccountName
$adminAccountType = 0

if (!$adminAccount)
{
    # Check for guest user
    #
    $adminAccount = Get-AzADUser -Mail $adminAccountName

    if (!$adminAccount)
    {
        $adminAccount = Get-AzADGroup -DisplayName $adminAccountName

        if (!$adminAccount)
        {
            $adminAccount = Get-AzADServicePrincipal -DisplayName $adminAccountName
        }
        else
        {
            $adminAccountType = 1
        }
    }
}

if ($adminAccount)
{
    if ($adminAccount.Length -gt 1)
    {
        Write-Error "Multiple accounts with found with name $adminAccountName"
        exit 1
    }

    $adminAccountSid = $adminAccount.Id
}
else
{
    Write-Error "Could not find an account with name $adminAccountName"
    exit 1
}

# Create certificate in AKV
#
$Policy = New-AzKeyVaultCertificatePolicy -SecretContentType "application/x-pkcs12" -SubjectName "CN=$certSubjectName" -IssuerName "Self" -ValidityInMonths 12 -ReuseKeyOnRenewal

try
{
    $addCertRes = Add-AzKeyVaultCertificate -VaultName $keyVaultName -Name $certSubjectName -CertificatePolicy $Policy -ErrorAction stop
}
catch
{
    Write-Error $_
    Write-Error "Certificate $certSubjectName could not be created"
    exit 1
}

for (($i = 0); $i -lt $NUMRETRIES -and (!$cert -or !$cert.enabled); $i++)
{
    $cert = Get-AzKeyVaultCertificate -VaultName $keyVaultName -Name $certSubjectName

    if (!$cert -or !$cert.enabled)
    {
        Start-Sleep -Seconds 5
    }
}

if (!$cert)
{
    Write-Error "Certificate $certSubjectName could not be created"
    exit 1
}

# Allow Arc to access AKV
#
$arcServicePrincipal = Get-AzADServicePrincipal -DisplayName $machineName

if ($arcServicePrincipal -and ![string]::IsNullOrEmpty($arcServicePrincipal.Id))
{
    try
    {
        Set-AzKeyVaultAccessPolicy -VaultName $keyVaultName -ObjectId $arcServicePrincipal.Id -PermissionsToSecrets Get,List -PermissionsToCertificates Get,List
    }
    catch
    {
        Write-Error $_
        Write-Host "Warning: Could not find the identity of the Azure extension for SQL Server and thus, could not add permissions for the Arc process to read from AKV. Ensure the Arc identity has the required permissions to read from AKV."
    }
}
else
{
    Write-Host "Warning: Could not find the identity of the Azure extension for SQL Server and thus, could not add permissions for the Arc process to read from AKV. Ensure the Arc identity has the required permissions to read from AKV."
}

# Create an Azure AD application
#
$application = New-AzADApplication -DisplayName $applicationName

if (!$application)
{
    Write-Error "Application could not be created"
    exit 1
}

# Set perms on app registration
#
Add-AzADAppPermission -ObjectId $application.Id -ApiId 00000003-0000-0000-c000-000000000000 -PermissionId c79f8feb-a9db-4090-85f9-90d820caa0eb # Delegated Application.Read.All
Add-AzADAppPermission -ObjectId $application.Id -ApiId 00000003-0000-0000-c000-000000000000 -PermissionId 0e263e50-5827-48a4-b97c-d940288653c7 # Delegated Directory.AccessAsUser.All
Add-AzADAppPermission -ObjectId $application.Id -ApiId 00000003-0000-0000-c000-000000000000 -PermissionId 7ab1d382-f21e-4acd-a863-ba3e13f7da61 -Type Role # Application Directory.Read.All
Add-AzADAppPermission -ObjectId $application.Id -ApiId 00000003-0000-0000-c000-000000000000 -PermissionId 5f8c59db-677d-491f-a6b8-5f174b11ec1d # Delegated Group.Read.All
Add-AzADAppPermission -ObjectId $application.Id -ApiId 00000003-0000-0000-c000-000000000000 -PermissionId a154be20-db9c-4678-8ab7-66f6cc099a59 # Delegated User.Read.All

# Upload cert to Azure AD
#
try
{
    $base64Cert = [System.Convert]::ToBase64String($cert.Certificate.GetRawCertData())
    New-AzADAppCredential -ApplicationObject $application -CertValue $base64Cert -EndDate $cert.Certificate.NotAfter -StartDate $cert.Certificate.NotBefore -ErrorAction stop
}
catch
{
    Write-Error $_
    Write-Error "Failed to add certificate to app registration"
    exit 1
}

# Remove the version from the secret ID if present
#
$secretId = $cert.SecretId

if ($secretId -Match "(https:\/\/[^\/]+\/secrets\/[^\/]+)(\/.*){0,1}$") {
    if ($Matches[1])     {
        $secretId = $Matches[1]
    }
}

# Create the settings object to write to the Azure extension for SQL Server
#
$instanceSettings = @{
    instanceName = $instanceName
    adminLoginName = $adminAccountName
    adminLoginSid = $adminAccountSid
    azureCertSecretId = $secretId.replace(":443", "")
    azureCertUri = $cert.Id.replace(":443", "")
    azureKeyVaultResourceUID = $keyVault.ResourceId
    managedCertSetting = "CUSTOMER MANAGED CERT"
    managedAppSetting = "CUSTOMER MANAGED APP"
    appRegistrationName = $application.DisplayName
    appRegistrationSid = $application.AppId
    tenantId = $tenantId
    aadCertSubjectName = $certSubjectName
    adminLoginType = $adminAccountType
}

$arcInstance = Get-AzConnectedMachineExtension -SubscriptionId $subscriptionId -MachineName $machineName -ResourceGroupName $resourceGroupName -Name "WindowsAgent.SqlServer"

if ($arcInstance.Setting.AdditionalProperties.AzureAD)
{
    $aadSettings = $arcInstance.Setting.AdditionalProperties.AzureAD
    $instanceFound = $false
    $instanceNameLower = $instanceName.ToLower()
    $instanceIndex = 0

    for (($i = 0); $i -lt $aadSettings.Length; $i++)
    {
        if ($aadSettings[$i].instanceName.ToLower() -eq $instanceNameLower)
        {
            $instanceIndex = $i
            $instanceFound = $true
            break
        }
    }

    if ($instanceFound)
    {
        $aadSettings[$instanceIndex] = $instanceSettings
    }
    else
    {
        $aadSettings += $instanceSettings
    }

    $arcInstance.Setting.AdditionalProperties.AzureAD = $aadSettings
}
else
{
    $aadSettings = , $instanceSettings
    $arcInstance.Setting.AdditionalProperties | Add-Member -Name 'AzureAD' -Value $aadSettings -MemberType NoteProperty
}


Write-Host "Writing Microsoft Entra setting to SQL Server Arc Extension. This may take several minutes..."

# Push settings to Arc
#
try
{
    Update-AzConnectedMachineExtension -MachineName $machineName -Name "WindowsAgent.SqlServer" -ResourceGroupName $resourceGroupName -Setting $arcInstance.Setting
}
catch
{
    Write-Error $_
    Write-Error "Failed to write settings to Arc host"
    exit 1
}

Write-Output "Success"
Setting up a Microsoft Entra admin with existing certificate and application using PowerShell
If you already have an existing Azure Key Vault certificate, and an Azure application that you wish to use to set up a Microsoft Entra admin, you can use the following PowerShell script:
# Connect statement

Connect-AzAccount

#Input parameters

$subscriptionId="<subscriptionId>"
$tenantId="<tenantId>"
$machineName="<machineName>"  # hostname
$instanceName="<instanceName>"  # SQL Server is define as `machine_name\instance_name`
$resourceGroupName="<resourceGroupName>"
$keyVaultName="<keyVaultName>"
$certSubjectName="<certSubjectName>" # Your existing certificate name
$applicationName="<applicationName>" # Your existing application name
$adminAccountName="<adminAccountName>"
$adminAccountSid="<adminID>"  # Use object ID for the Microsoft Entra user and group, or client ID for the Microsoft Entra application
$adminAccountType= 0  # 0 – for Microsoft Entra user and application, 1 for Microsoft Entra group

$keyVault = Get-AzKeyVault -VaultName $keyVaultName
if (!$keyVault)
{
    Write-Error "Supplied key vault was not found in the subscription. Please specify an existing key vault"
    exit 1
}

$cert = Get-AzKeyVaultCertificate -VaultName $keyVaultName -Name $certSubjectName
if (!$cert)
{
    Write-Error "Supplied certificate $certSubjectName was not found for this key vault. Please specify an existing certificate"
    exit 1
}

$secretId = $cert.SecretId

if ($secretId -Match "(https:\/\/[^\/]+\/secrets\/[^\/]+)(\/.*){0,1}$") {
    if ($Matches[1])     {
        $secretId = $Matches[1]
    }
}

$application = Get-AzADApplication -DisplayName $applicationName
if (!$application)
{
    Write-Error "Supplied application was not found in the subscription. Please specify an existing application"
    exit 1
}

# Create the settings object to write to the Arc extension
#
$instanceSettings = @{
    instanceName = $instanceName
    adminLoginName = $adminAccountName
    adminLoginSid = $adminAccountSid
    azureCertSecretId = $secretId.replace(":443", "")
    azureCertUri = $cert.Id.replace(":443", "")
    azureKeyVaultResourceUID = $keyVault.ResourceId
    managedCertSetting = "CUSTOMER MANAGED CERT"
    managedAppSetting = "CUSTOMER MANAGED APP"
    appRegistrationName = $application.DisplayName
    appRegistrationSid = $application.AppId
    tenantId = $tenantId
    aadCertSubjectName = $certSubjectName
    adminLoginType = $adminAccountType
}

$arcInstance = Get-AzConnectedMachineExtension -SubscriptionId $subscriptionId -MachineName $machineName -ResourceGroupName $resourceGroupName -Name "WindowsAgent.SqlServer"

if ($arcInstance.Setting.AdditionalProperties.AzureAD)
{
    $aadSettings = $arcInstance.Setting.AdditionalProperties.AzureAD
    $instanceFound = $false
    $instanceNameLower = $instanceName.ToLower()
    $instanceIndex = 0

    for (($i = 0); $i -lt $aadSettings.Length; $i++)
    {
        if ($aadSettings[$i].instanceName.ToLower() -eq $instanceNameLower)
        {
            $instanceIndex = $i
            $instanceFound = $true
            break
        }
    }

    if ($instanceFound)
    {
        $aadSettings[$instanceIndex] = $instanceSettings
    }
    else
    {
        $aadSettings += $instanceSettings
    }

    $arcInstance.Setting.AdditionalProperties.AzureAD = $aadSettings
}
else
{
    $aadSettings = , $instanceSettings
    $arcInstance.Setting.AdditionalProperties | Add-Member -Name 'AzureAD' -Value $aadSettings -MemberType NoteProperty
}


Write-Host "Writing Microsoft Entra setting to SQL Server Arc Extension. This may take several minutes..."

# Push settings to Arc
#
try
{
    Update-AzConnectedMachineExtension -MachineName $machineName -Name "WindowsAgent.SqlServer" -ResourceGroupName $resourceGroupName -Setting $arcInstance.Setting
}
catch
{
    Write-Error $_
    Write-Error "Failed to write settings to Arc host"
    exit 1
}

Write-Output "Success"
The following ARM template sets up a Microsoft Entra admin using an existing Azure Key Vault certificate and Microsoft Entra application.
The following input parameters are used for the ARM template:
<machineName> - Machine name of your SQL Server host
<Location> - Location of your SQL Server – Azure Arc resource group, such as West US, or Central US
<tenantId> - The tenant ID can be found by going to the Azure portal, and going to your Microsoft Entra ID resource. In the Overview pane, you should see your Tenant ID
<instanceName> - SQL Server instance name. The default instance name of SQL Server is MSSQLSERVER
<certSubjectName> - Certificate name that you created
<subscriptionId> - Subscription ID. Your subscription ID can be found in the Azure portal
<resourceGroupName> - Resource group name that contains your key vault. The full azureKeyVaultResourceUID value can be found by going to your Key vault resource, selecting Properties and copying Resource ID
<keyVaultName> - Your key vault name
<certIdentifier> - The Certificate Identifier for your Azure Key Vault certificate. To obtain the Certificate Identifier, go to your Key vault resource, and select Certificates under Settings. Select the current version of the certificate that you created, and copy the Certificate Identifier value. For more information, see Add a certificate to Key Vault
<certSecret> - The Secret Identifier of your certificate, and can be found in the same menu as the Certificate Identifier
Once the Microsoft Entra admin has been set up, using the Microsoft Entra admin credentials allows you to connect to SQL Server. However, any further database activities involving creating new Microsoft Entra logins and users will fail until admin consent is granted to the Microsoft Entra application.
Note
To grant Admin consent for the application, the account granting consent requires a role of Microsoft Entra ID Global Administrator or Privileged Role Administrator. These roles are necessary to grant admin consent for the application, but is not necessary to set up Microsoft Entra admin.
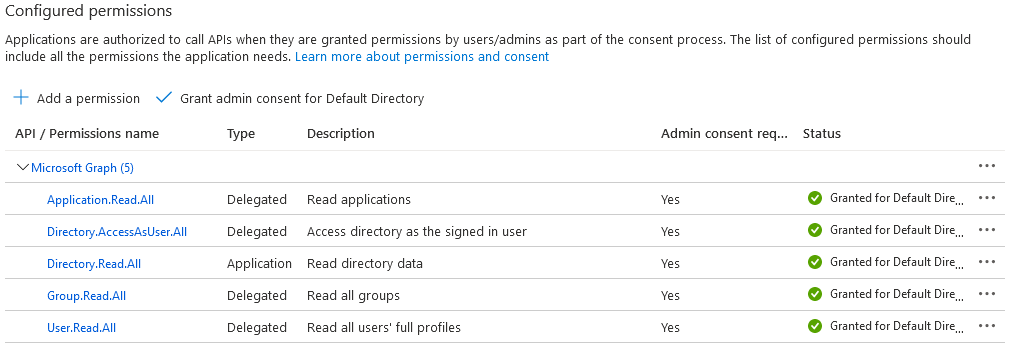
In the Azure portal, select Microsoft Entra ID > App registrations, select the newly created application. The application should have a name like <hostname>-<instanceName><uniqueNumber>.
Select the API permissions menu.
Select Grant admin consent.
Without granting admin consent to the application, creating a Microsoft Entra login or user in SQL Server will result in the following error:
Msg 37455, Level 16, State 1, Line 2
Server identity does not have permissions to access MS Graph.
Using Microsoft Entra authentication to connect to SQL Server
Microsoft Entra authentication is now set up for your SQL Server that is connected to Azure Arc. Follow the sections after setting up Microsoft Entra admin in the article, Tutorial: Set up Microsoft Entra authentication for SQL Server to connect to SQL Server using Microsoft Entra authentication.
Binnenkort beschikbaar: In de loop van 2024 zullen we GitHub-problemen geleidelijk uitfaseren als het feedbackmechanisme voor inhoud en deze vervangen door een nieuw feedbacksysteem. Zie voor meer informatie: https://aka.ms/ContentUserFeedback.