Exercise - Create the location and TypeofAccident custom tables
In this exercise, you create two more custom tables to store more data for your employee accident tracking application.
Note
If you haven't completed the previous modules within this learning path, download the packaging files. These files contain the completed work on the Accident Tracking app thus far.
Create a custom LocationTable
Follow these steps to create a custom LocationTable:
On the main menu, expand Dataverse and then select Tables.
Select New table > New table.
In the New table pane under Properties, enter this for the Display name:
LocationTable.Switch to the Primary column tab in the New table pane and enter this for the Display name:
LocationID.Select Save. Your table is created and the Tables screen appears for your LocationTable.
Look at the lower part of the screen and see LocationTable columns and data. Select the LocationId field and select Edit column.
In the Edit column pane on the right side of the screen, change the Data type dropdown menu from Single line of text to Autonumber. Leave the defaults for the other values as they are.
Select Save.
To the right of the LocationID column, select + (New column).
In the New column pane, enter the following information:
Display name -
LocationNameData type - Single line of text (default)
Required - Business required (you want to prevent users from entering a location record without a name)
Ensure the box is checked next to Searchable (default)
Select Save.
Select + (New column), as before to create a LocationCountry column.
Enter these values for the new column:
Display name -
LocationCountryData type - Choice
Under Synch this choice with (you may need to scroll down the pane), select the New choice button to create a new set of choices to store some countries/regions that Contoso has locations in.

In the New choice pane that slides in from the right, in the Display name field enter:
ChLocationCountryTip
As a good practice, name your custom choice with a prefix to help identify it as a choice object later. In this case we used the prefix "Ch" to designate it as a choice option set.
Under Choices in the first Label entry field, input
USA. Notice that the Value field has a numeric entry in it. This is an autonumber field, assigned by Dataverse, but you can change it to whatever value you wish. In this case, we don't need to change it so we'll leave it alone.Select New choice and enter
Spain.Note
You can add more choices for countries, but for this example we will only need USA and SPAIN.
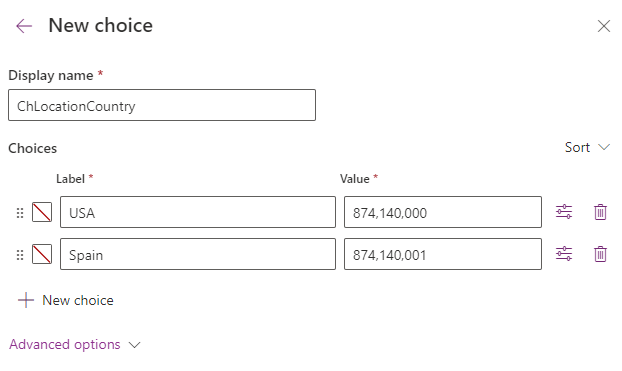
Select Save to record your ChLocationCountry choice.
Next we assign the choice we created to our LocationCountry column. Under Sync this choice with, input
ChLocationCountryin the search field. Notice how the list of choices filters as you type your choice name. Select ChLocationCountry to lock it in as the choice set for this column.Select Save.
Ensure that, under Sync with global choice?, you have Yes selected.
Note
With the Global choice option, you can use the custom choice in different tables within the same Dataverse environment.
With the Local choice option (No selected under Synch with global choice?), you can only use the custom choice in this table only.

Note
Choice fields are beneficial when the number of options is limited and when items change infrequently or not at all.
Scroll down under Synch this choice with and you can see the Default choice field. This option allows you to define which choice (if any) is the default when a new item is created. In this case leave it as None (default).
Select Save.
Another table is complete, let's move on to the TypeofAccident table.


Create a custom TypeofAccident table
To create the TypeofAccident table, follow these steps:
Return to the Tables screen (select Tables from the left-hand navigation panel).
Select New table > New table.
In the New table pane under Properties, enter the following for the Display name:
TypeofAccidentTable.Switch to the Primary column tab and for the Display name enter
TypeofAccidentIdSelect Save.
Once your table has been created, go to the columns and data pane in the lower half of the screen, and select the TypeofAccidentId field and Edit column.
Change the Data type to Autonumber and leave the other items as the defaults.
Select Save.
Select + (new column) to create a new column with the following settings:
Display name -
AccidentNameData type - Single line of text (default)
Required - Business required
Searchable - checkbox selected (default).
Save the column.
In the same manner, add the new column AccidentSeverity with these inputs:
Display name -
AccidentSeverityData type - Choice
Sync with global choice? - Yes (default)
Create a new choice option with the display name:
ChAccidentSeverityand then add five new items. Enter 1, 2, 3, 4, and 5, respectively, in the Label field.Save the new choice
Under Sync this choice with, enter
ChAccidentSeverityand select ChAccidentSeverity from the filtered results.Ensure that the Default choice is None
Save the column.
We have now added supporting tables to Dataverse, including LocationTable and TypeofAccident. To view all of the tables you have created, you can select the Custom filter tab under the Tables screen.