Authoring and publishing protection policies for Amazon S3 (preview)
Protection access control policies (protection policies) enable organizations to automatically protect sensitive data across data sources. Microsoft Purview already scans data assets and identifies sensitive data elements, and this new feature allows you to automatically restrict access to that data using sensitivity labels from Microsoft Purview Information Protection.
Protection policies ensure that Enterprise Admins must authorize data access for a sensitivity type. After enabling these policies, access control is automatically imposed whenever sensitive information is detected with Microsoft Purview Information Protection.
Actions supported
- Restrict access on labeled data assets so that only users and groups you select can access them.
- Action configured on Sensitivity Labels in the Microsoft Purview Information Protection solution.
Supported regions
These are the supported Amazon region for Amazon S3 protection policies:
US West (Oregon, Northern California), US East (Northern Virginia, Ohio), Canada (Central), Canada West (Calgary), GovCloud(US-West, US-East), Europe(Ireland, Frankfurt, London, Paris, Stockholm, Milan, Zurich, Spain), Middle East (Bahrain, UAE), Israel (Tel Aviv), Africa (Cape Town), Asia Pacific (Singapore, Tokyo, Seoul, Mumbai, Hong Kong, Osaka, Jakarta), AWS Asia Pacific (Hyderabad), Mainland China (Beijing, Ningxia), Australia (Sydney, Melbourne).
Limitations
- Even though we allow selection of Entra group when creating an information protection policy; Entra groups-based policies aren't supported by S3 buckets.
- A policy size limit of 20 KB per bucket policy.
- Maximum of ten S3 buckets can be selected within a single S3 bucket policy.
- S3 glacier isn't supported.
Prerequisites
Note
It's recommended you use a test tenant to test preview features.
- Microsoft 365 E5 licenses. For the preview, E5 licenses are required in the tenant and assigned to users testing the solution. Microsoft 365 E5 trial licenses can be attained for your tenant by navigating here from your test environment.
- Existing Microsoft Purview accounts upgraded to Microsoft Purview single tenant model and new Portal experience, using the enterprise version of Microsoft Purview.
AWS SSO must be enabled with Microsoft Entra as the IDP.
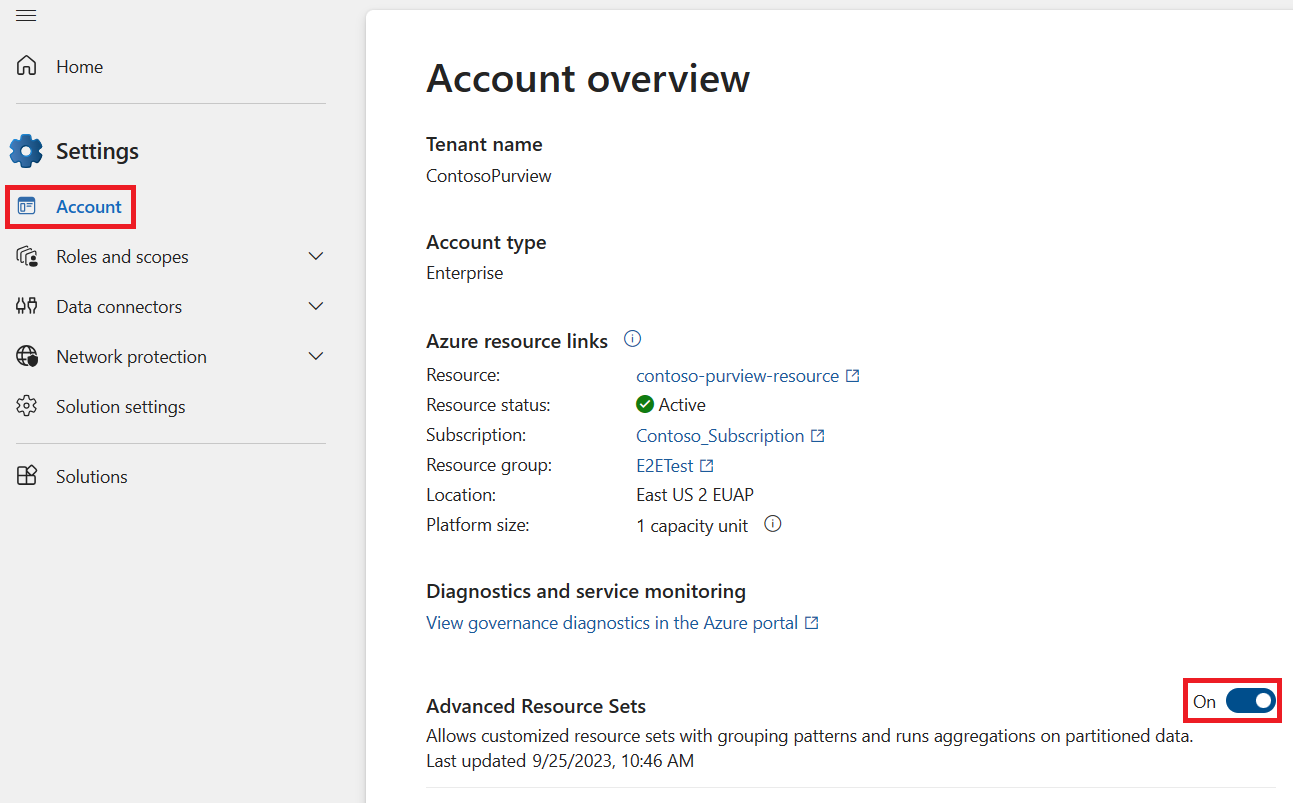
Enable advanced resource sets in Microsoft Purview:
Have a user who is a data curator or a data reader at the root collection, sign in to the Microsoft Purview portal and open the Settings menu.
Under the Account page, find Advanced Resource Sets and set the toggle to On.
Create or extend sensitivity labels from Microsoft Purview Information Protection to data map assets.
Note
Be sure to also publish your labels after creating them.
Register your Amazon S3 sources.
Note
To continue, you need to be a data source administrator in the collection where your Amazon S3 bucket is registered.
Create a Microsoft Purview credential with these fields:
Field Description Name Enter a meaningful name for this credential. Description Enter an optional description for this credential, such as Used to scan the tutorial S3 bucketsAuthentication method Select Role ARN, since you're using a role ARN to access your bucket. Role ARN Once you've created your role in AWS, navigate to your role in the AWS IAM area, copy the Role ARN value, and enter it here. For example: arn:aws:iam::181328463391:role/S3Role.
For more information, see Retrieve your new Role ARN.Add a connection for policy enforcement:
On your data source, open the Edit page, select the Connection for policy enforcement and select + New.

Enter a name, select your domain, and for the Credential select the credential you created in the previous step.
Test your connection.
Note
Microsoft Purview will test for read permissions and connection before creating the credential. If test connection passes but binding the policy fails, check to make sure that your ARN role has write permissions to edit labels and policies.
When test connection succeeds, select Save.
- Scan Amazon S3.
Note
Wait at least 24 hours after scanning.
Create protection policy access role in AWS
When you create a role in AWS to use to create access policies, make sure that it has these permissions on your S3 Bucket:
- GetBucketLocation
- GetBucketPublicAccessBlock
- GetObject
- PutBucketPolicy
- PutObjectTagging
- DeleteBucketPolicy
- List Bucket
And make sure to add this tag: msftpurview_allowlisted and the value true.
To create this role:
Follow our documentation to create an AWS role for Microsoft Purview. Be sure to set permissions and tags as listed above.
Follow the AWS documentation to create a policy using the JSON editor, using this JSON:
Note
The Sid and resource can be changed to desired values. The “*” for Resource indicates that the ARN role will have access to all S3 buckets within the AWS account.
{
    "Version": "2012-10-17",
    "Statement": [
    {
        "Sid": "msftpurviewpolicyenforcement",
        "Effect": "Allow",
        "Action": [
            "s3:PutBucketPolicy",
            "s3:PutObjectTagging",
            "s3:DeleteBucketPolicy"
        ],
        "Resource": "*"
    }
    ]

}
Open the role you created in the first step and under permissions select Attach policies.
Select the policy you created in step 2.
Users and permissions
There are several types of users you need, and you need to set up the corresponding roles and permissions for these users:
- Microsoft Purview Information Protection Admin - Broad rights to manage Information Protection solution: reviewing / creating / updating / deleting protection policies, sensitivity labels and label/auto-labeling policies, all classifier types. They should also have full access to data explorer, activity explorer, Microsoft Purview Information Protection insights, and reports.
- User needs the roles from within the built-in role group “Information Protection”, along with new roles for data map reader, insights reader, scan reader, source reader. Full permissions would be:
- Information Protection reader
- Data Map Reader
- Insights Reader
- Source Reader
- Scan Reader
- Information Protection admin
- Information Protection analyst
- Information protection investigator
- Data classification list viewer
- Data classification content viewer
- Microsoft Purview evaluation administrator
- Option 1 - Recommended:
- Within the Microsoft Purview role groups panel, search for Information Protection.
- Select the Information Protection role group, select Copy.
- Name it: "Preview - Information Protection", and select Create copy.
- Select Preview - Information Protection and select Edit.
- On the Roles page, + Choose roles and search for “reader”.
- Select these four roles: Data map reader, insights reader, scan reader, source reader.
- Add the Microsoft Purview Information Protection admin test user account to this new copied group and complete the wizard.
- Option 2- uses built-in groups (will provide more permissions than needed)
- Place a new Microsoft Purview Information Protection admin test user account within the built-in groups for Information Protection, Data Estate Insights Readers, Data Source Administrators.
- User needs the roles from within the built-in role group “Information Protection”, along with new roles for data map reader, insights reader, scan reader, source reader. Full permissions would be:
- Data Owner/Admin - This user will enable your source for data policy enforcement in Microsoft Purview.
- Data User - The user who will access the Amazon S3 Data. There are steps to create this user in the next sections.
Create protection policy
Now that you've followed the prerequisites and prepared your Microsoft Purview instance and source for protection policies and waited at least 24 hours after your most recent scan, follow these steps to create your protection policies:
Depending on the portal you're using, navigate to one of the following locations:
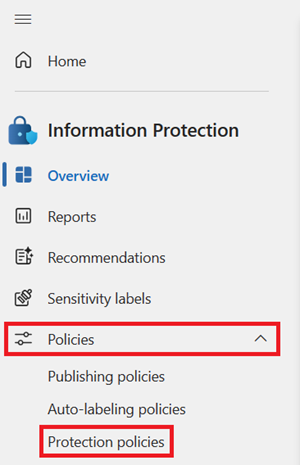
Sign in to the Microsoft Purview portal > Information Protection card > Policies
If the Information Protection solution card isn't displayed, select View all solutions and then select Information Protection from the Data Security section.
Sign in to the Microsoft Purview compliance portal > Solutions > Information protection > Policies
Select Protection policies.
Select New protection policy.
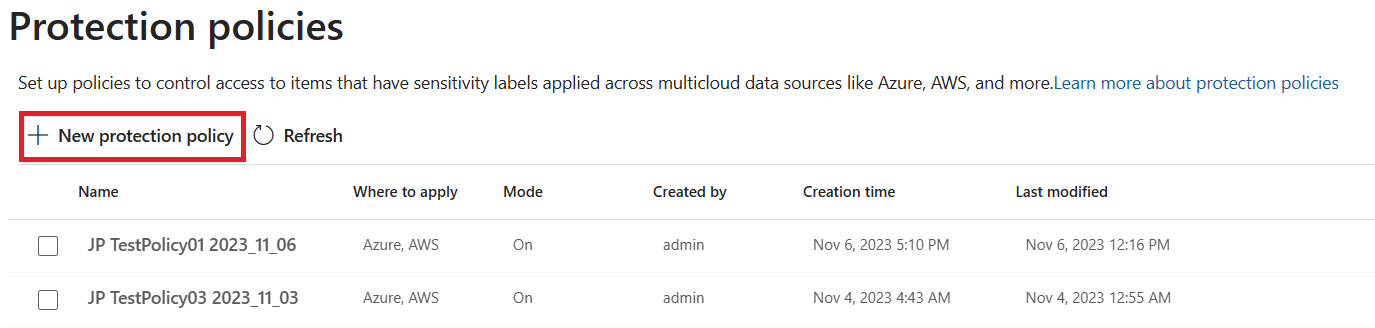
Provide a name and description and select Next.
Select + Add sensitivity label to add sensitivity label(s) to detect for the policy, and select all the labels you want the policy to apply to.
Select Add then select Next.
Select the sources you want to apply the policy to, and select the Edit button to manage the scope for each you select.
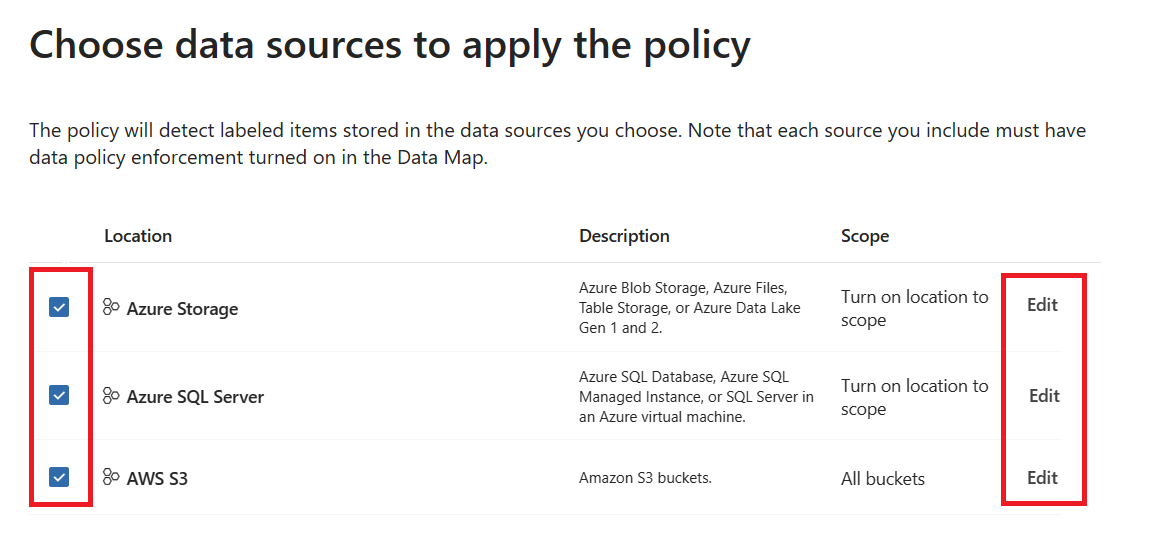
Depending on your source, select the + Include button at the top to add up to 10 resources your scope list. The policy will be applied to all the resources you select.
Note
Currently a maximum of 10 resources is supported, and they must be selected under Edit for them to be enabled.
Select Add and then select Done when your list of sources is complete.
Select the users who will NOT be denied access based on the label. Everyone in your org will be denied read access to labeled items except for the users and groups you add here.
Select Next.
Choose whether turn on the policy right away or not, and select Next.
Select Submit.
Select Done.
You should now see your new policy in the list of protection policies. Select it to confirm that all the details are correct.
Manage protection policy
To edit or delete an existing protection policy, follow these steps.
Open the Microsoft Purview portal.
Open the Information Protection solution.
Select the Policies drop down, and select Protection policies.
Select the policy you want to manage.
To change any of the details, select the Edit policy button.
To delete the policy, select the Delete policy button.

Opinia
Dostępne już wkrótce: W 2024 r. będziemy stopniowo wycofywać zgłoszenia z serwisu GitHub jako mechanizm przesyłania opinii na temat zawartości i zastępować go nowym systemem opinii. Aby uzyskać więcej informacji, sprawdź: https://aka.ms/ContentUserFeedback.
Prześlij i wyświetl opinię dla