Dane punktu klastrowania w zestawie SDK systemu iOS (wersja zapoznawcza)
Uwaga
Wycofanie zestawu AZURE Mapy iOS SDK
Zestaw Azure Mapy Native SDK dla systemu iOS jest teraz przestarzały i zostanie wycofany w dniu 3/31/25. Aby uniknąć przerw w działaniu usługi, przeprowadź migrację do zestawu Sdk sieci Web usługi Azure Mapy do 31/31/25. Aby uzyskać więcej informacji, zobacz Przewodnik migracji zestawu SDK platformy Azure Mapy iOS.
Podczas wyświetlania wielu punktów danych na mapie punkty danych mogą się nakładać na siebie nawzajem. Nakładanie się może spowodować, że mapa może stać się nieczytelna i trudna do użycia. Dane punktu klastrowania to proces łączenia danych punktów, które znajdują się blisko siebie i przedstawiania ich na mapie jako pojedynczego klastrowanego punktu danych. Gdy użytkownik powiększa mapę, klastry dzielą się na poszczególne punkty danych. Podczas pracy z dużą liczbą punktów danych użyj procesów klastrowania, aby poprawić środowisko użytkownika.
Internet rzeczy Show — dane punktów klastrowania w usłudze Azure Mapy
Wymagania wstępne
Pamiętaj, aby wykonać kroki opisane w dokumencie Szybki start: tworzenie aplikacji systemu iOS. Bloki kodu w tym artykule można wstawić do viewDidLoad funkcji ViewController.
Włączanie klastrowania w źródle danych
Włącz klastrowanie w DataSource klasie, ustawiając cluster opcję na true. Ustaw clusterRadius opcję , aby wybrać pobliskie punkty danych i połączyć je w klaster. Wartość parametru jest wyrażona clusterRadius w punktach. Użyj clusterMaxZoom polecenia , aby określić poziom powiększenia, na którym ma być wyłączona logika klastrowania. Oto przykład włączania klastrowania w źródle danych.
// Create a data source and enable clustering.
let source = DataSource(options: [
    //Tell the data source to cluster point data.
    .cluster(true),

    //The radius in points to cluster data points together.
    .clusterRadius(45),

    //The maximum zoom level in which clustering occurs.
    //If you zoom in more than this, all points are rendered as symbols.
    .clusterMaxZoom(15)
])
Uwaga
Klastrowanie działa tylko z funkcjami Point . Jeśli źródło danych zawiera funkcje innych typów geometrii, takich jak Polyline lub Polygon, wystąpi błąd.
Napiwek
Jeśli dwa punkty danych są blisko siebie na ziemi, możliwe, że klaster nigdy się nie rozbije, niezależnie od tego, jak blisko użytkownika powiększa się. Aby rozwiązać ten problem, możesz ustawić clusterMaxZoom opcję wyłączenia logiki klastrowania i po prostu wyświetlić wszystko.
Klasa DataSource udostępnia również następujące metody związane z klastrowaniem.
| Metoda | Typ zwracany | opis |
|---|---|---|
children(of cluster: Feature) |
[Feature] |
Pobiera elementy podrzędne danego klastra na następnym poziomie powiększenia. Te dzieci mogą być kombinacją cech i podciągów. Subclusters stają się funkcjami z właściwościami zgodnymi z właściwościami ClusteredProperties. |
zoomLevel(forExpanding cluster: Feature) |
Double |
Oblicza poziom powiększenia, na którym klaster zaczyna się rozszerzać lub rozbijać. |
leaves(of cluster: Feature, offset: UInt, limit: UInt) |
[Feature] |
Pobiera wszystkie punkty w klastrze. Ustaw wartość , limit aby zwrócić podzbiór punktów, i użyj elementu offset , aby przestronicować punkty. |
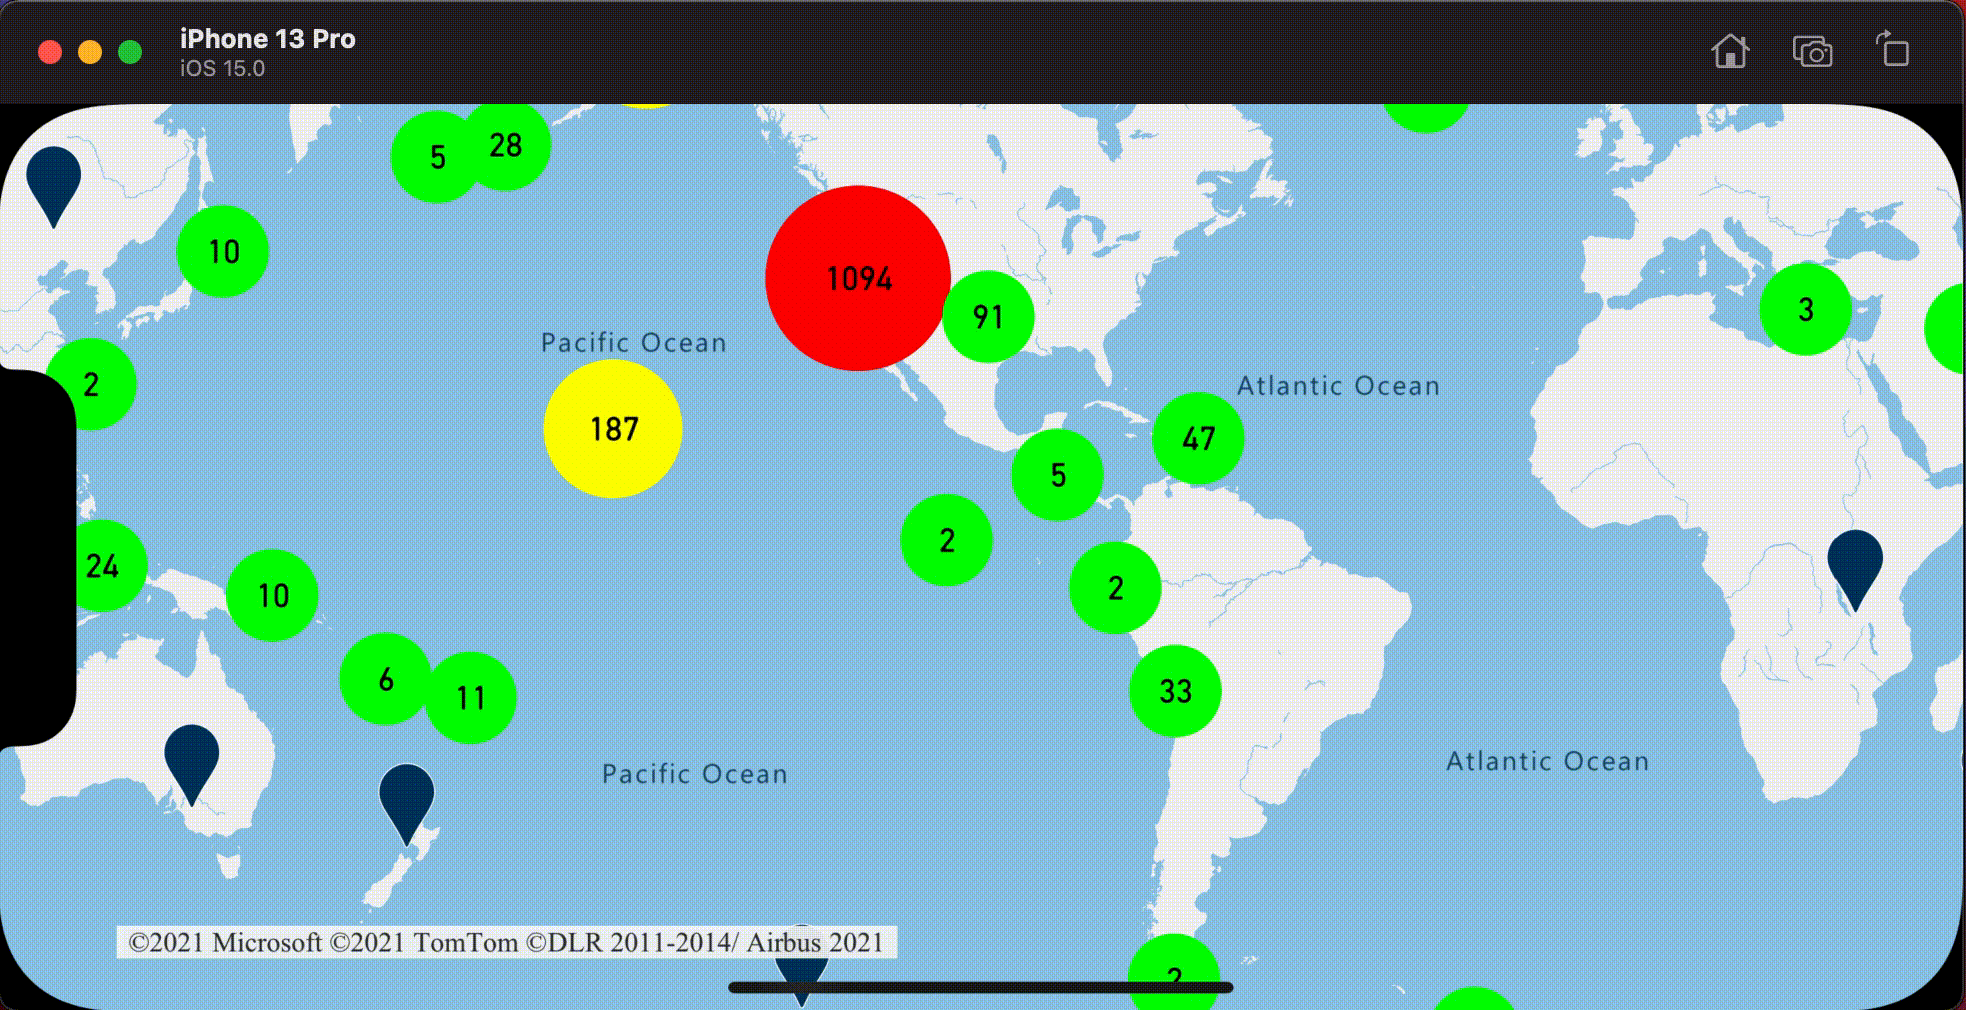
Wyświetlanie klastrów przy użyciu warstwy bąbelkowej
Warstwa bąbelkowa to doskonały sposób renderowania punktów klastrowanych. Użyj wyrażeń, aby skalować promień i zmieniać kolor na podstawie liczby punktów w klastrze. Jeśli klastry są wyświetlane przy użyciu warstwy bąbelkowej, należy użyć oddzielnej warstwy do renderowania nieklastrowanych punktów danych.
Aby wyświetlić rozmiar klastra w górnej części bąbelka, użyj warstwy symboli z tekstem i nie używaj ikony.
Poniższy kod wyświetla punkty klastrowane przy użyciu warstwy bąbelkowej i liczbę punktów w każdym klastrze przy użyciu warstwy symboli. Druga warstwa symboli służy do wyświetlania poszczególnych punktów, które nie należą do klastra.
// Create a data source and enable clustering.
let source = DataSource(options: [
    // Tell the data source to cluster point data.
    .cluster(true),

    // The radius in points to cluster data points together.
    .clusterRadius(45),

    // The maximum zoom level in which clustering occurs.
    // If you zoom in more than this, all points are rendered as symbols.
    .clusterMaxZoom(15)
])

// Import the geojson data and add it to the data source.
let url = URL(string: "https://earthquake.usgs.gov/earthquakes/feed/v1.0/summary/all_week.geojson")!
source.importData(fromURL: url)

// Add data source to the map.
map.sources.add(source)

// Create a bubble layer for rendering clustered data points.
map.layers.addLayer(
    BubbleLayer(
        source: source,
        options: [
            // Scale the size of the clustered bubble based on the number of points in the cluster.
            .bubbleRadius(
                from: NSExpression(
                    forAZMStepping: NSExpression(forKeyPath: "point_count"),
                    // Default of 20 point radius.
                    from: NSExpression(forConstantValue: 20),
                    stops: NSExpression(forConstantValue: [

                        // If point_count >= 100, radius is 30 points.
                        100: 30,

                        // If point_count >= 750, radius is 40 points.
                        750: 40
                    ])
                )
            ),

            // Change the color of the cluster based on the value on the point_count property of the cluster.
            .bubbleColor(
                from: NSExpression(
                    forAZMStepping: NSExpression(forKeyPath: "point_count"),
                    // Default to green.
                    from: NSExpression(forConstantValue: UIColor.green),
                    stops: NSExpression(forConstantValue: [

                        // If the point_count >= 100, color is yellow.
                        100: UIColor.yellow,

                        // If the point_count >= 100, color is red.
                        750: UIColor.red
                    ])
                )
            ),
            .bubbleStrokeWidth(0),

            // Only rendered data points which have a point_count property, which clusters do.
            .filter(from: NSPredicate(format: "point_count != NIL"))
        ]
    )
)

// Create a symbol layer to render the count of locations in a cluster.
map.layers.addLayer(
    SymbolLayer(
        source: source,
        options: [
            // Hide the icon image.
            .iconImage(nil),

            // Display the point count as text.
            .textField(from: NSExpression(forKeyPath: "point_count")),
            .textOffset(CGVector(dx: 0, dy: 0.4)),
            .textAllowOverlap(true),

            // Allow clustered points in this layer.
            .filter(from: NSPredicate(format: "point_count != NIL"))
        ]
    )
)

// Create a layer to render the individual locations.
map.layers.addLayer(
    SymbolLayer(
        source: source,
        options: [
            // Filter out clustered points from this layer.
            .filter(from: NSPredicate(format: "point_count = NIL"))
        ]
    )
)
Na poniższej ilustracji przedstawiono powyższe funkcje punktów klastrowanych w warstwie bąbelkowej, skalowane i kolorowe na podstawie liczby punktów w klastrze. Punkty nieklastrowane są renderowane przy użyciu warstwy symboli.
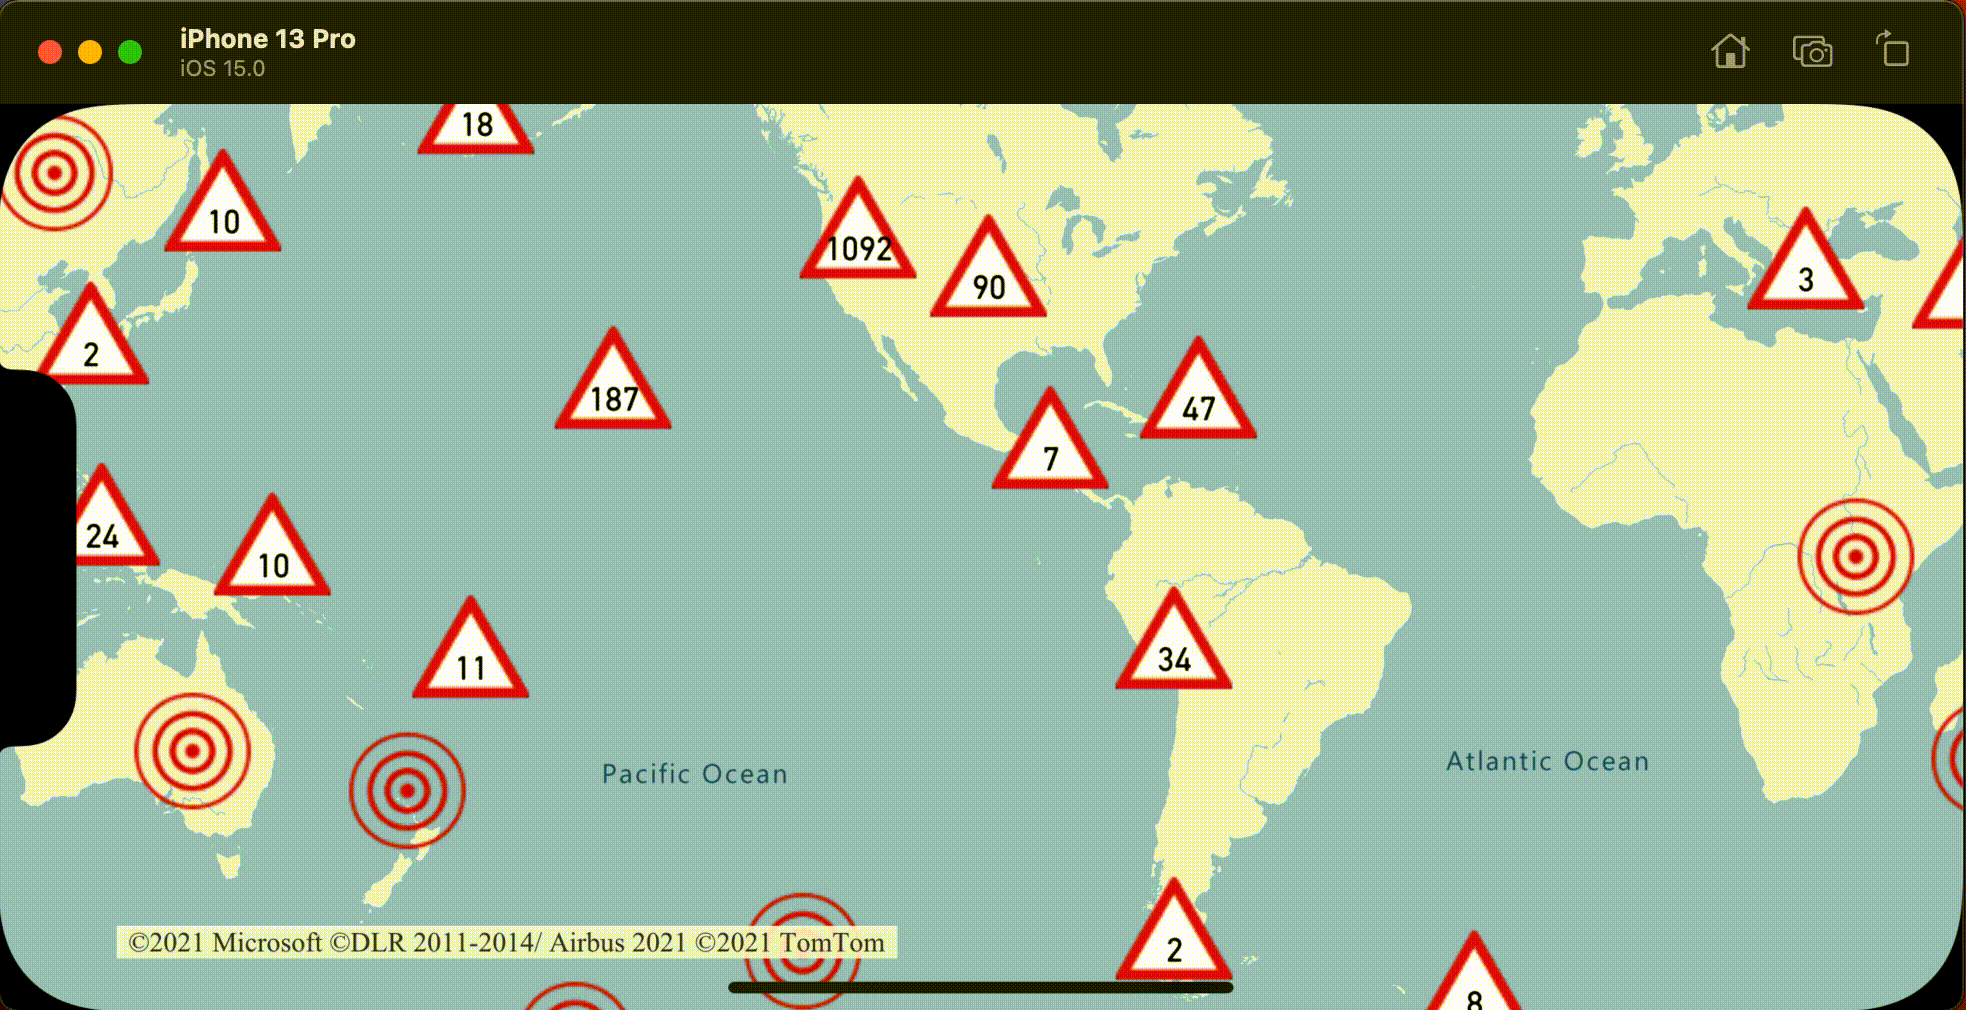
Wyświetlanie klastrów przy użyciu warstwy symboli
Podczas wyświetlania punktów danych warstwa symboli automatycznie ukrywa symbole nakładające się na siebie w celu zapewnienia czytelnego interfejsu użytkownika. To domyślne zachowanie może być niepożądane, jeśli chcesz pokazać gęstość punktów danych na mapie. Można jednak zmienić te ustawienia. Aby wyświetlić wszystkie symbole, ustaw iconAllowOverlap opcję warstwy symboli na true.
Użyj klastrowania, aby pokazać gęstość punktów danych przy zachowaniu czystego interfejsu użytkownika. W poniższym przykładzie pokazano, jak dodać niestandardowe symbole i reprezentować klastry i poszczególne punkty danych przy użyciu warstwy symboli.
// Load all the custom image icons into the map resources.
map.images.add(UIImage(named: "earthquake_icon")!, withID: "earthquake_icon")
map.images.add(UIImage(named: "warning-triangle-icon")!, withID: "warning-triangle-icon")

// Create a data source and add it to the map.
let source = DataSource(options: [
    // Tell the data source to cluster point data.
    .cluster(true)
])

// Import the geojson data and add it to the data source.
let url = URL(string: "https://earthquake.usgs.gov/earthquakes/feed/v1.0/summary/all_week.geojson")!
source.importData(fromURL: url)

// Add data source to the map.
map.sources.add(source)

// Create a layer to render the individual locations.
map.layers.addLayer(
    SymbolLayer(
        source: source,
        options: [
            .iconImage("earthquake_icon"),

            // Filter out clustered points from this layer.
            .filter(from: NSPredicate(format: "point_count = NIL"))
        ]
    )
)

// Create a symbol layer to render the clusters.
map.layers.addLayer(
    SymbolLayer(
        source: source,
        options: [
            .iconImage("warning-triangle-icon"),
            .textField(from: NSExpression(forKeyPath: "point_count")),
            .textOffset(CGVector(dx: 0, dy: -0.4)),

            // Allow clustered points in this layer.
            .filter(from: NSPredicate(format: "point_count != NIL"))
        ]
    )
)
W tym przykładzie poniższy obraz jest ładowany do folderu zasobów aplikacji.
| earthquake-icon.png | warning-triangle-icon.png |
Na poniższej ilustracji przedstawiono powyższe funkcje klastrowanych i nieklastrowanych punktów renderowania kodu przy użyciu ikon niestandardowych.
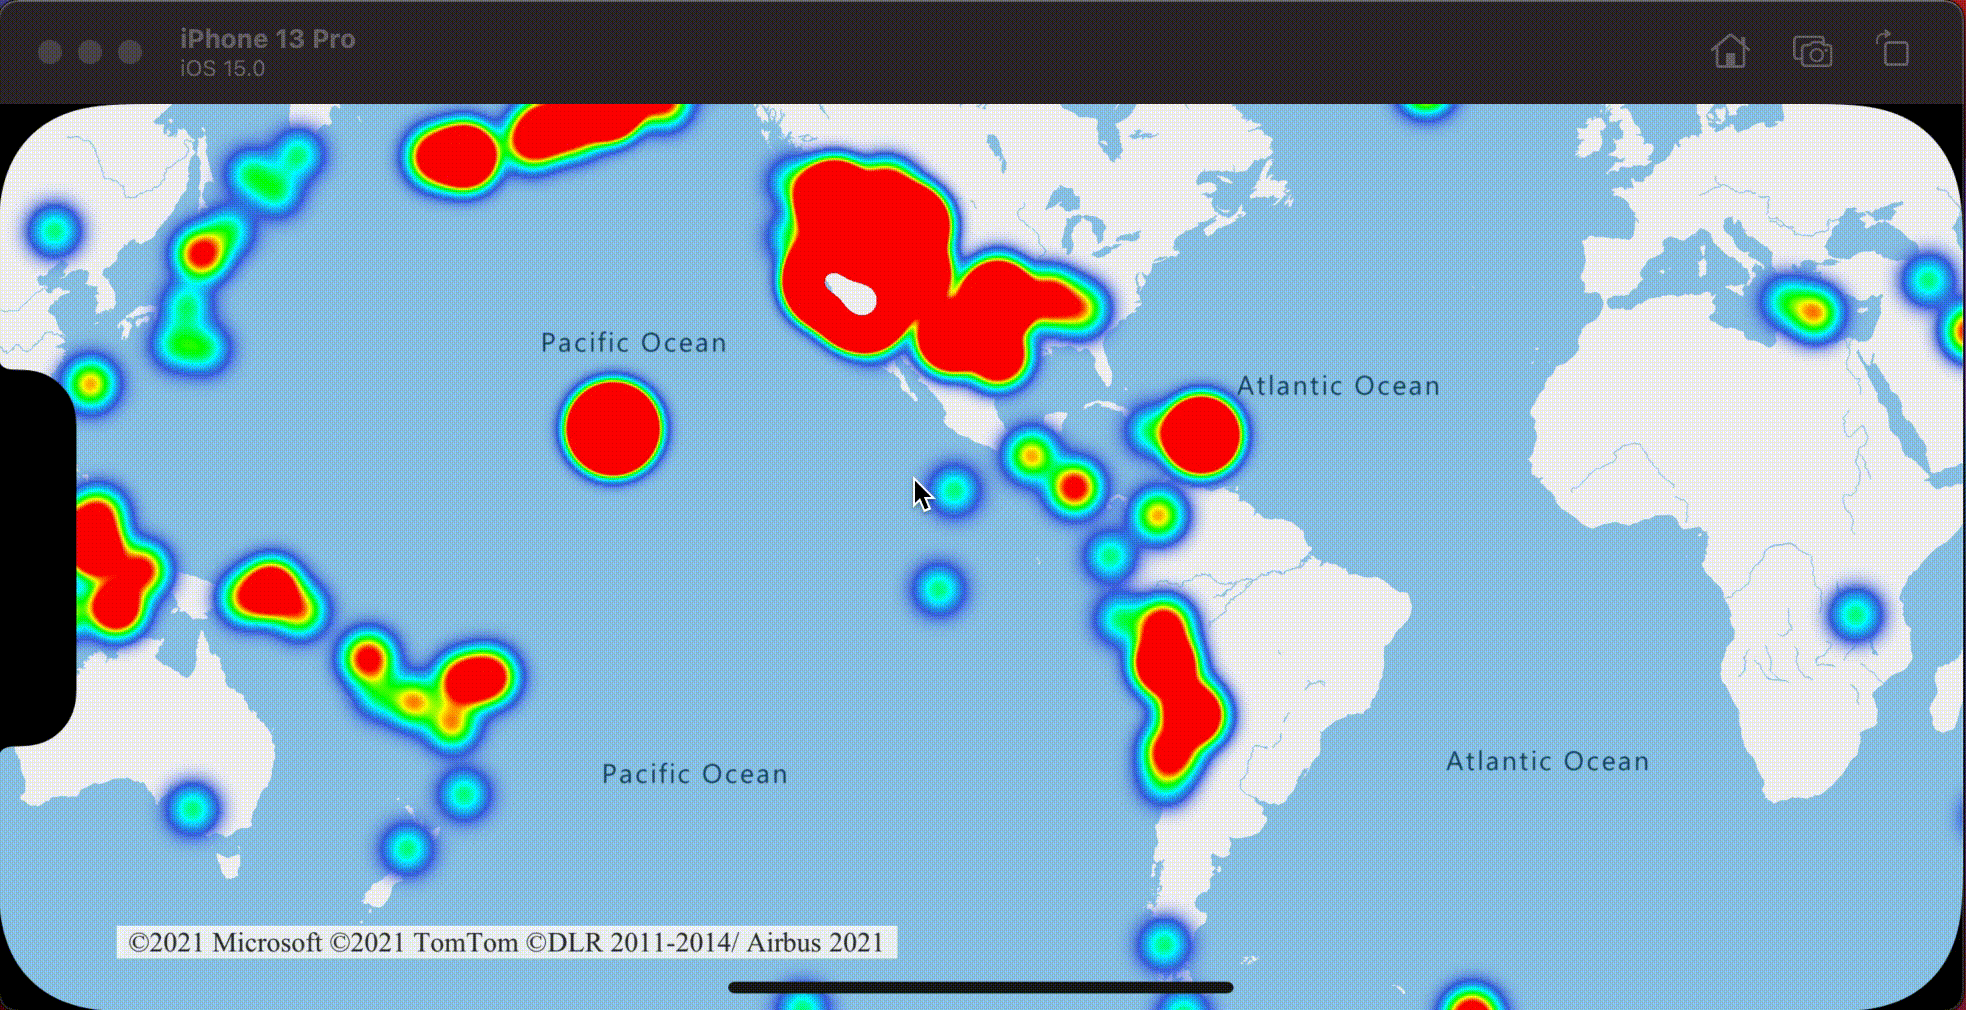
Klastrowanie i warstwa mapy cieplnej
Mapy cieplne to doskonały sposób wyświetlania gęstości danych na mapie. Ta metoda wizualizacji może obsługiwać dużą liczbę punktów danych samodzielnie. Jeśli punkty danych są klastrowane, a rozmiar klastra jest używany jako waga mapy cieplnej, mapa cieplna może obsłużyć jeszcze więcej danych. Aby osiągnąć tę opcję, ustaw heatmapWeight opcję warstwy mapy cieplnej na NSExpression(forKeyPath: "point_count")wartość . Gdy promień klastra jest mały, mapa cieplna wygląda niemal identycznie z mapą cieplną przy użyciu nieklastrowanych punktów danych, ale działa lepiej. Jednak mniejszy promień klastra, tym dokładniejszy jest mapa cieplna, ale z mniejszymi korzyściami z wydajności.
// Create a data source and enable clustering.
let source = DataSource(options: [
    // Tell the data source to cluster point data.
    .cluster(true),

    // The radius in points to cluster points together.
    .clusterRadius(10)
])

// Import the geojson data and add it to the data source.
let url = URL(string: "https://earthquake.usgs.gov/earthquakes/feed/v1.0/summary/all_week.geojson")!
source.importData(fromURL: url)

// Add data source to the map.
map.sources.add(source)

// Create a heat map and add it to the map.
map.layers.insertLayer(
    HeatMapLayer(
        source: source,
        options: [
            // Set the weight to the point_count property of the data points.
            .heatmapWeight(from: NSExpression(forKeyPath: "point_count")),

            // Optionally adjust the radius of each heat point.
            .heatmapRadius(20)
        ]
    ),
    below: "labels"
)
Na poniższej ilustracji przedstawiono powyższy kod przedstawiający mapę cieplną zoptymalizowaną przy użyciu funkcji punktów klastrowanych i liczbę klastrów jako wagę na mapie cieplnej.
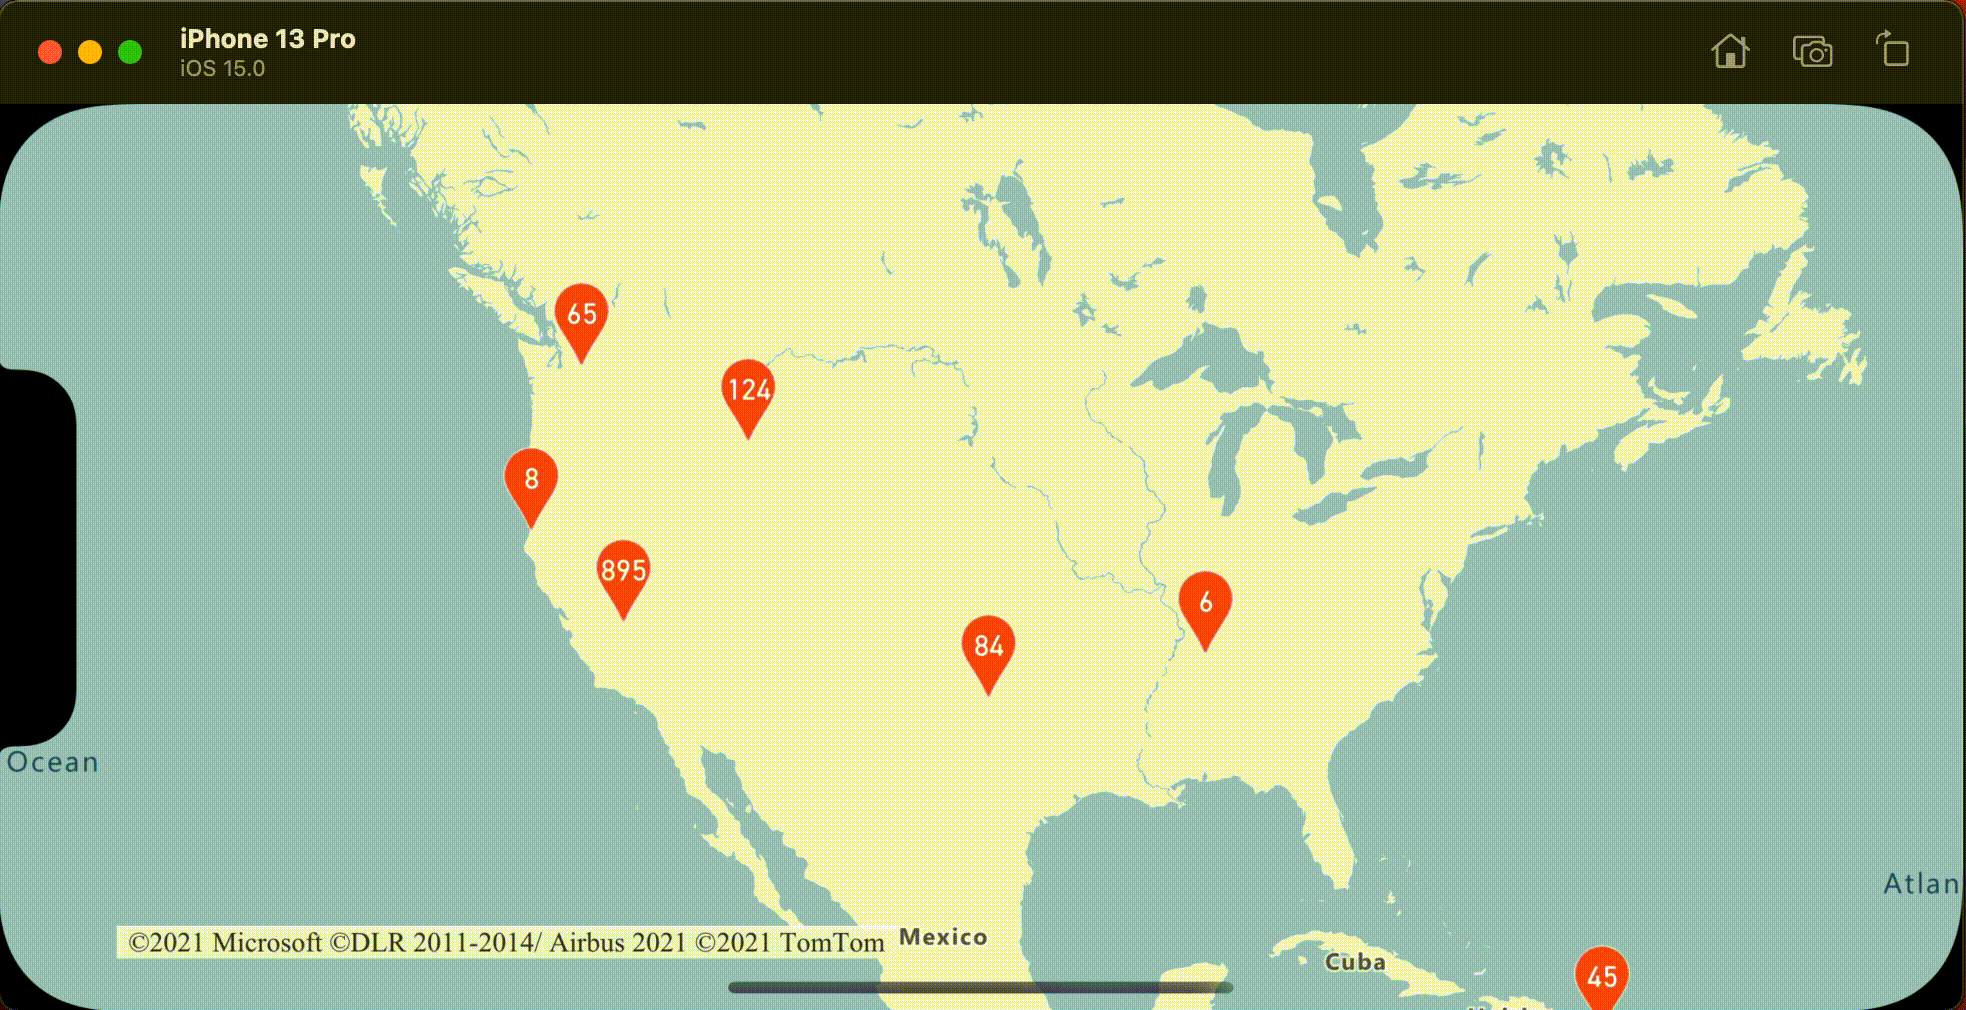
Naciśnięcie zdarzeń w klastrowanych punktach danych
Gdy na warstwie zawierającej klastrowane punkty danych wystąpią zdarzenia naciśnięcia, punkt danych klastrowanych powróci do zdarzenia jako obiekt funkcji punktu GeoJSON. Ta funkcja punktu ma następujące właściwości:
| Nazwa właściwości | Typ | Opis |
|---|---|---|
cluster |
boolean | Wskazuje, czy funkcja reprezentuje klaster. |
point_count |
Liczba | Liczba punktów, które zawiera klaster. |
point_count_abbreviated |
string | Ciąg, który skraca wartość, point_count jeśli jest długa. (na przykład 4000 staje się 4K) |
W tym przykładzie jest pobierana warstwa bąbelkowa, która renderuje punkty klastra i dodaje zdarzenie naciśnięcia. Po wyzwoleniu zdarzenia naciśnięcia kod oblicza i powiększa mapę do następnego poziomu powiększenia, na którym klaster się rozpada. Ta funkcja jest implementowana przy użyciu zoomLevel(forExpanding:) metody DataSource klasy .
// Create a data source and enable clustering.
let source = DataSource(options: [
    // Tell the data source to cluster point data.
    .cluster(true),

    // The radius in points to cluster data points together.
    .clusterRadius(45),

    // The maximum zoom level in which clustering occurs.
    // If you zoom in more than this, all points are rendered as symbols.
    .clusterMaxZoom(15)
])

// Set data source to the class property to use in events handling later.
self.source = source

// Import the geojson data and add it to the data source.
let url = URL(string: "https://earthquake.usgs.gov/earthquakes/feed/v1.0/summary/all_week.geojson")!
source.importData(fromURL: url)

// Add data source to the map.
map.sources.add(source)

// Create a bubble layer for rendering clustered data points.
let clusterBubbleLayer = BubbleLayer(
    source: source,
    options: [
        // Scale the size of the clustered bubble based on the number of points in the cluster.
        .bubbleRadius(
            from: NSExpression(
                forAZMStepping: NSExpression(forKeyPath: "point_count"),
                // Default of 20 point radius.
                from: NSExpression(forConstantValue: 20),
                stops: NSExpression(forConstantValue: [
                    // If point_count >= 100, radius is 30 points.
                    100: 30,

                    // If point_count >= 750, radius is 40 points.
                    750: 40
                ])
            )
        ),

        // Change the color of the cluster based on the value on the point_count property of the cluster.
        .bubbleColor(
            from: NSExpression(
                forAZMStepping: NSExpression(forKeyPath: "point_count"),
                // Default to green.
                from: NSExpression(forConstantValue: UIColor.green),
                stops: NSExpression(forConstantValue: [
                    // If the point_count >= 100, color is yellow.
                    100: UIColor.yellow,

                    // If the point_count >= 100, color is red.
                    750: UIColor.red
                ])
            )
        ),
        .bubbleStrokeWidth(0),

        // Only rendered data points which have a point_count property, which clusters do.
        .filter(from: NSPredicate(format: "point_count != NIL"))
    ]
)

// Add the clusterBubbleLayer to the map.
map.layers.addLayer(clusterBubbleLayer)

// Create a symbol layer to render the count of locations in a cluster.
map.layers.addLayer(
    SymbolLayer(
        source: source,
        options: [
            // Hide the icon image.
            .iconImage(nil),

            // Display the point count as text.
            .textField(from: NSExpression(forKeyPath: "point_count_abbreviated")),

            // Offset the text position so that it's centered nicely.
            .textOffset(CGVector(dx: 0, dy: 0.4)),

            // Allow text overlapping so text is visible anyway
            .textAllowOverlap(true),

            // Allow clustered points in this layer.
            .filter(from: NSPredicate(format: "point_count != NIL"))
        ]
    )
)

// Create a layer to render the individual locations.
map.layers.addLayer(
    SymbolLayer(
        source: source,
        options: [
            // Filter out clustered points from this layer.
            .filter(from: NSPredicate(format: "point_count = NIL"))
        ]
    )
)

// Add the delegate to handle taps on the clusterBubbleLayer only.
map.events.addDelegate(self, for: [clusterBubbleLayer.id])
func azureMap(_ map: AzureMap, didTapOn features: [Feature]) {
    guard let source = source, let cluster = features.first else {
        // Data source have been released or no features provided
        return
    }

    // Get the cluster expansion zoom level. This is the zoom level at which the cluster starts to break apart.
    let expansionZoom = source.zoomLevel(forExpanding: cluster)

    // Update the map camera to be centered over the cluster.
    map.setCameraOptions([
        // Center the map over the cluster points location.
        .center(cluster.coordinate),

        // Zoom to the clusters expansion zoom level.
        .zoom(expansionZoom),

        // Animate the movement of the camera to the new position.
        .animationType(.ease),
        .animationDuration(200)
    ])
}
Na poniższej ilustracji przedstawiono powyższy kod przedstawiający punkty klastrowane na mapie, które po naciśnięciu powiększają następny poziom powiększenia, który klaster zaczyna rozbić i rozwinąć.

Wyświetlanie obszaru klastra
Dane punktów reprezentowane przez klaster są rozłożone na obszar. W tym przykładzie po naciśnięciu klastra występują dwa główne zachowania. Najpierw poszczególne punkty danych zawarte w klastrze używane do obliczania wypukłego kadłuba. Następnie kadłub wypukły jest wyświetlany na mapie, aby wyświetlić obszar. Kadłub wypukły jest wielokątem, który owija zestaw punktów, takich jak elastyczne pasmo, i można go obliczyć przy użyciu convexHull(from:) metody . Wszystkie punkty zawarte w klastrze można pobrać ze źródła danych przy użyciu leaves(of:offset:limit:) metody .
// Create a data source and enable clustering.
let source = DataSource(options: [
    // Tell the data source to cluster point data.
    .cluster(true)
])

// Set data source to the class property to use in events handling later.
self.source = source

// Import the geojson data and add it to the data source.
let url = URL(string: "https://earthquake.usgs.gov/earthquakes/feed/v1.0/summary/all_week.geojson")!
source.importData(fromURL: url)

// Add data source to the map.
map.sources.add(source)

// Create a data source for the convex hull polygon.
// Since this will be updated frequently it is more efficient to separate this into its own data source.
let polygonDataSource = DataSource()

// Set polygon data source to the class property to use in events handling later.
self.polygonDataSource = polygonDataSource

// Add data source to the map.
map.sources.add(polygonDataSource)

// Add a polygon layer and a line layer to display the convex hull.
map.layers.addLayer(PolygonLayer(source: polygonDataSource))
map.layers.addLayer(LineLayer(source: polygonDataSource))

// Load an icon into the image sprite of the map.
map.images.add(.azm_markerRed, withID: "marker-red")

// Create a symbol layer to render the clusters.
let clusterLayer = SymbolLayer(
    source: source,
    options: [
        .iconImage("marker-red"),
        .textField(from: NSExpression(forKeyPath: "point_count_abbreviated")),
        .textOffset(CGVector(dx: 0, dy: -1.2)),
        .textColor(.white),
        .textSize(14),

        // Only rendered data points which have a point_count property, which clusters do.
        .filter(from: NSPredicate(format: "point_count != NIL"))
    ]
)

// Add the clusterLayer to the map.
map.layers.addLayer(clusterLayer)

// Create a layer to render the individual locations.
map.layers.addLayer(
    SymbolLayer(
        source: source,
        options: [
            // Filter out clustered points from this layer.
            .filter(from: NSPredicate(format: "point_count = NIL"))
        ]
    )
)

// Add the delegate to handle taps on the clusterLayer only
// and then calculate the convex hull of all the points within a cluster.
map.events.addDelegate(self, for: [clusterLayer.id])
func azureMap(_ map: AzureMap, didTapOn features: [Feature]) {
    guard let source = source, let polygonDataSource = polygonDataSource, let cluster = features.first else {
        // Data source have been released or no features provided
        return
    }

    // Get all points in the cluster. Set the offset to 0 and the max int value to return all points.
    let featureLeaves = source.leaves(of: cluster, offset: 0, limit: .max)

    // When only two points in a cluster. Render a line.
    if featureLeaves.count == 2 {

        // Extract the locations from the feature leaves.
        let locations = featureLeaves.map(\.coordinate)

        // Create a line from the points.
        polygonDataSource.set(geometry: Polyline(locations))

        return
    }

    // When more than two points in a cluster. Render a polygon.
    if let hullPolygon = Math.convexHull(from: featureLeaves) {

        // Overwrite all data in the polygon data source with the newly calculated convex hull polygon.
        polygonDataSource.set(geometry: hullPolygon)
    }
}
Na poniższej ilustracji przedstawiono powyższy kod przedstawiający obszar wszystkich punktów w klastrze.
Agregowanie danych w klastrach
Często klastry są reprezentowane przy użyciu symbolu z liczbą punktów znajdujących się w klastrze. Jednak czasami pożądane jest dostosowanie stylu klastrów z dodatkowymi metrykami. Za pomocą właściwości klastra można tworzyć właściwości niestandardowe i równe obliczeniu na podstawie właściwości w każdym punkcie z klastrem. Właściwości klastra można zdefiniować w clusterProperties opcji DataSource.
Poniższy kod oblicza liczbę na podstawie właściwości typu jednostki każdego punktu danych w klastrze. Gdy użytkownik naciągnie klaster, zostanie wyświetlone okno podręczne z dodatkowymi informacjami o klastrze.
// Create a popup and add it to the map.
let popup = Popup()
map.popups.add(popup)
// Set popup to the class property to use in events handling later.
self.popup = popup
// Close the popup initially.
popup.close()
// Create a data source and enable clustering.
let source = DataSource(options: [
// Tell the data source to cluster point data.
.cluster(true),
// The radius in points to cluster data points together.
.clusterRadius(50),
// Calculate counts for each entity type in a cluster as custom aggregate properties.
.clusterProperties(self.entityTypes.map { entityType in
ClusterProperty(
name: entityType,
operator: NSExpression(
forFunction: "sum:",
arguments: [
NSExpression.featureAccumulatedAZMVariable,
NSExpression(forKeyPath: entityType)
]
),
map: NSExpression(
forConditional: NSPredicate(format: "EntityType = '\(entityType)'"),
trueExpression: NSExpression(forConstantValue: 1),
falseExpression: NSExpression(forConstantValue: 0)
)
)
})
])
// Import the geojson data and add it to the data source.
let url = URL(string: "https://samples.azuremaps.com/data/geojson/SamplePoiDataSet.json")!
source.importData(fromURL: url)
// Add data source to the map.
map.sources.add(source)
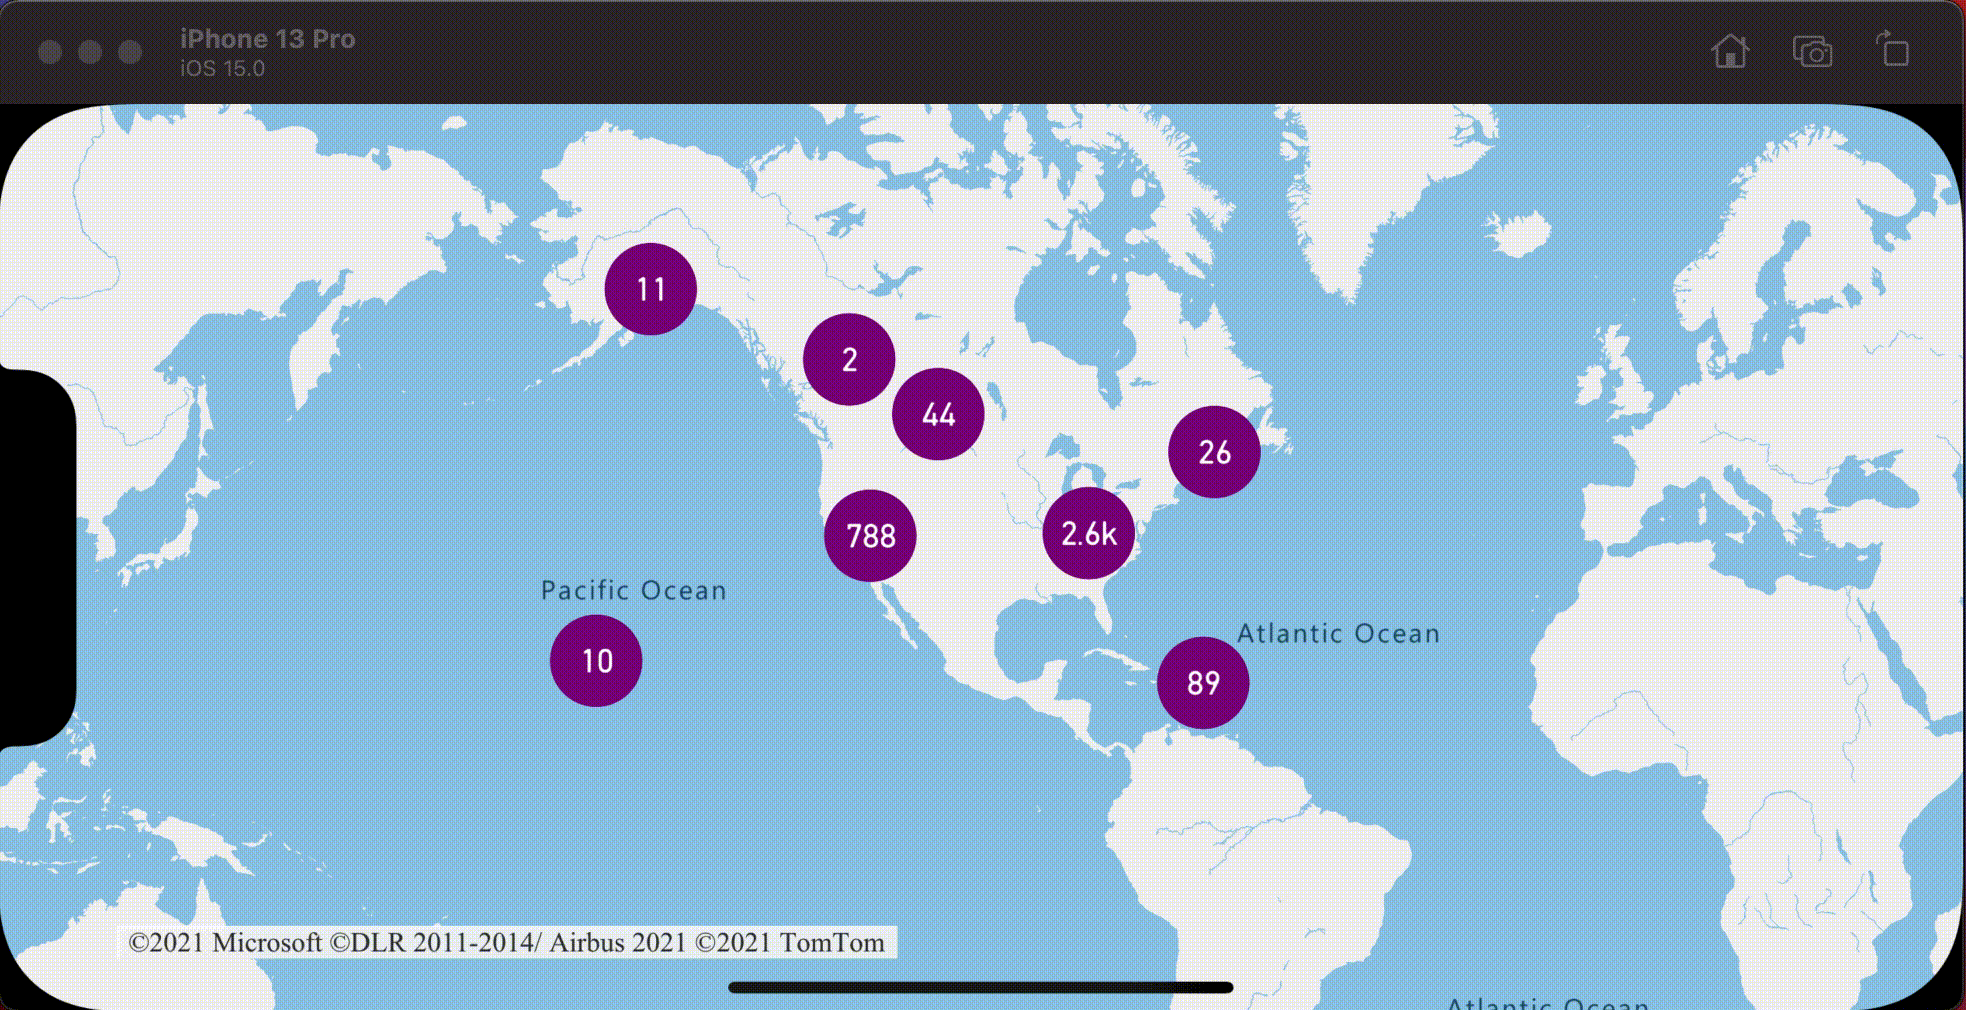
// Create a bubble layer for rendering clustered data points.
let clusterBubbleLayer = BubbleLayer(
source: source,
options: [
.bubbleRadius(20),
.bubbleColor(.purple),
.bubbleStrokeWidth(0),
// Only rendered data points which have a point_count property, which clusters do.
.filter(from: NSPredicate(format: "point_count != NIL"))
]
)
// Add the clusterBubbleLayer to the map.
map.layers.addLayer(clusterBubbleLayer)
// Create a symbol layer to render the count of locations in a cluster.
map.layers.addLayer(
SymbolLayer(
source: source,
options: [
// Hide the icon image.
.iconImage(nil),
// Display the 'point_count_abbreviated' property value.
.textField(from: NSExpression(forKeyPath: "point_count_abbreviated")),
.textColor(.white),
.textOffset(CGVector(dx: 0, dy: 0.4)),
// Allow text overlapping so text is visible anyway
.textAllowOverlap(true),
// Only rendered data points which have a point_count property, which clusters do.
.filter(from: NSPredicate(format: "point_count != NIL"))
]
)
)
// Create a layer to render the individual locations.
map.layers.addLayer(
SymbolLayer(
source: source,
options: [
// Filter out clustered points from this layer.
SymbolLayerOptions.filter(from: NSPredicate(format: "point_count = NIL"))
]
)
)
// Add the delegate to handle taps on the clusterBubbleLayer only
// and display the aggregate details of the cluster.
map.events.addDelegate(self, for: [clusterBubbleLayer.id])
func azureMap(_ map: AzureMap, didTapOn features: [Feature]) {
    guard let popup = popup, let cluster = features.first else {
        // Popup has been released or no features provided
        return
    }

    // Create a number formatter that removes decimal places.
    let nf = NumberFormatter()
    nf.maximumFractionDigits = 0

    // Create the popup's content.
    var text = ""

    let pointCount = cluster.properties["point_count"] as! Int
    let pointCountString = nf.string(from: pointCount as NSNumber)!

    text.append("Cluster size: \(pointCountString) entities\n")

    entityTypes.forEach { entityType in
        text.append("\n")
        text.append("\(entityType): ")

        // Get the aggregated entity type count from the properties of the cluster by name.
        let aggregatedCount = cluster.properties[entityType] as! Int
        let aggregatedCountString = nf.string(from: aggregatedCount as NSNumber)!

        text.append(aggregatedCountString)
    }

    // Create the custom view for the popup.
    let customView = PopupTextView()

    // Set the text to the custom view.
    customView.setText(text)

    // Get the position of the cluster.
    let position = Math.positions(from: cluster).first!

    // Set the options on the popup.
    popup.setOptions([
        // Set the popups position.
        .position(position),

        // Set the anchor point of the popup content.
        .anchor(.bottom),

        // Set the content of the popup.
        .content(customView)
    ])

    // Open the popup.
    popup.open()
}
Wyskakujące okienko postępuje zgodnie z instrukcjami opisanymi w wyświetlonym dokumencie podręcznym .
Na poniższej ilustracji przedstawiono powyższy kod przedstawiający wyskakujące okienko z zagregowanymi liczbami każdej wartości jednostki dla wszystkich punktów w punktach klastrowanych.
Dodatkowe informacje
Aby dodać więcej danych do mapy: