Nuta
Dostęp do tej strony wymaga autoryzacji. Możesz spróbować się zalogować lub zmienić katalog.
Dostęp do tej strony wymaga autoryzacji. Możesz spróbować zmienić katalogi.
DOTYCZY: Azure Data Factory
  Azure Synapse Analytics
Tip
Wypróbuj usługę Data Factory w usłudze Microsoft Fabric — rozwiązanie analityczne typu all-in-one dla przedsiębiorstw. Usługa Microsoft Fabric obejmuje wszystko, od przenoszenia danych do nauki o danych, analizy w czasie rzeczywistym, analizy biznesowej i raportowania. Dowiedz się, jak bezpłatnie rozpocząć nową wersję próbną !
W tym przewodniku Szybki start opisano, jak utworzyć usługę Azure Data Factory przy użyciu zestawu .NET SDK. Potok danych tworzony w tej fabryce danych kopiuje dane z jednego folderu do innego folderu w usłudze Azure Blob Storage. Aby zapoznać się z samouczkiem dotyczącym przekształcania danych za pomocą usługi Azure Data Factory, zobacz Tutorial: Transform data using Spark (Samouczek: Przekształcanie danych przy użyciu usługi Spark).
Wymagania wstępne
Subskrypcja platformy Azure
Jeśli nie masz subskrypcji platformy Azure, przed rozpoczęciem utwórz bezpłatne konto.
Role na platformie Azure
Aby utworzyć wystąpienia usługi Data Factory, konto użytkownika używane do logowania się na platformie Azure musi być członkiem roli współautora lub właściciela albo administratorem subskrypcji platformy Azure. Aby wyświetlić uprawnienia, które masz w subskrypcji, przejdź do witryny Azure Portal, wybierz swoją nazwę użytkownika w prawym górnym rogu, wybierz ikonę "...", aby uzyskać więcej opcji, a następnie wybierz pozycję Moje uprawnienia. Jeśli masz dostęp do wielu subskrypcji, wybierz odpowiednią subskrypcję.
Aby tworzyć i zarządzać zasobami podrzędnymi w usłudze Data Factory, w tym zestawami danych, połączonymi usługami, potokami, wyzwalaczami i środowiskami Integration Runtime — mają zastosowanie następujące wymagania:
- Aby utworzyć zasoby podrzędne i zarządzać nimi w portalu Azure, musisz należeć do roli Współtwórca usługi Data Factory na poziomie grupy zasobów lub wyższym.
- Aby utworzyć zasoby podrzędne i zarządzać nimi za pomocą programu PowerShell lub zestawu SDK, rola Contributor na poziomie zasobu lub wyższym jest wystarczająca.
Aby uzyskać przykładowe instrukcje dotyczące dodawania użytkownika do roli, zobacz artykuł Add roles (Dodawanie ról).
Aby uzyskać więcej informacji, zobacz następujące artykuły:
- Data Factory Contributor role (Rola współautora w usłudze Data Factory)
- Roles and permissions for Azure Data Factory (Role i uprawnienia w usłudze Data Factory)
Konto usługi Azure Storage
W tym szybkim starcie używasz konta ogólnego przeznaczenia usługi Azure Storage (w szczególności usługi Blob Storage) zarówno jako magazyn danych źródłowy, jak i docelowy. Jeśli nie masz ogólnego konta Azure Storage, zobacz Utwórz konto magazynowe, aby je utworzyć.
Pobierz nazwę konta magazynu
Do szybkiego startu potrzebujesz nazwy swojego konta usługi Azure Storage. Poniższa procedura zawiera kroki, aby uzyskać nazwę konta magazynowego:
- W przeglądarce internetowej przejdź do witryny Azure Portal i zaloguj się przy użyciu nazwy użytkownika i hasła platformy Azure.
- W menu portalu Azure wybierz opcję Wszystkie usługi, a następnie Magazyn>Konta magazynu. Możesz również wyszukać i wybrać Konta magazynowe na dowolnej stronie.
- Na stronie Konta magazynowe przefiltruj swoje konto magazynowe (w razie potrzeby), a następnie wybierz swoje konto magazynowe.
Możesz również wyszukać i wybrać Konta magazynowe na dowolnej stronie.
Utwórz kontener blob
W tej sekcji utworzysz kontener obiektów blob o nazwie adftutorial w usłudze Azure Blob Storage.
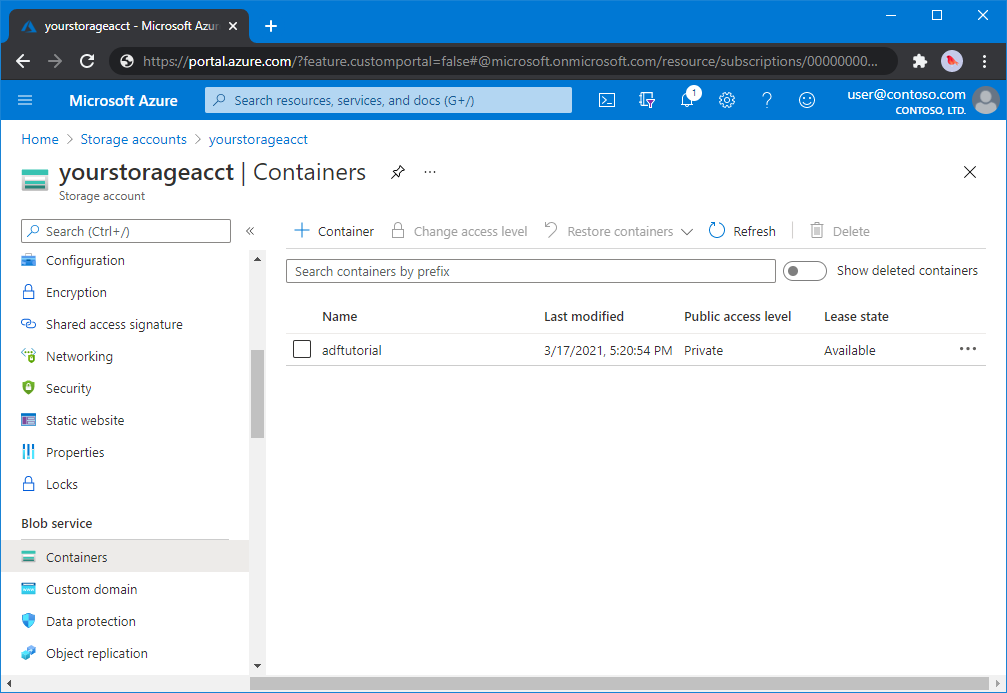
Na stronie konta przechowywania wybierz Przegląd>Kontenery.
Na pasku narzędzi strony <nazwa konta> - , wybierz pozycję Kontener.
W oknie dialogowym Nowy kontener wprowadź jako nazwę adftutorial, a następnie wybierz przycisk OK. Strona <Nazwa konta> - Kontenery jest aktualizowana w celu uwzględnienia adftutorial na liście kontenerów.
Dodaj folder wejściowy i plik dla kontenera blobów
W tej sekcji utworzysz folder o nazwie input w utworzonym kontenerze, a następnie przekażesz przykładowy plik do folderu wejściowego. Przed rozpoczęciem otwórz edytor tekstów, taki jak Notatnik, i utwórz plik o nazwie emp.txt z następującą zawartością:
John, Doe
Jane, Doe
Zapisz plik w folderze C:\ADFv2QuickStartPSH . (Jeśli folder jeszcze nie istnieje, utwórz go). Następnie wróć do witryny Azure Portal i wykonaj następujące kroki:
<Na stronie Nazwa konta> - Kontenery, na której przerwałeś, wybierz pozycję adftutorial ze zaktualizowanej listy kontenerów.
- Jeśli zamknąłeś okno lub przeszedłeś na inną stronę, zaloguj się ponownie do portalu Azure.
- W menu portalu Azure wybierz opcję Wszystkie usługi, a następnie Magazyn>Konta magazynu. Możesz również wyszukać i wybrać Konta magazynowe na dowolnej stronie.
- Wybierz swoje konto magazynu, a następnie wybierz Kontenery>adftutorial.
Na pasku narzędzi strony kontenera adftutorial wybierz pozycję Przekaż.
Na stronie Przekazywanie obiektu blob wybierz pole Pliki, a następnie znajdź i wybierz plik emp.txt.
Rozwiń nagłówek Zaawansowane . Strona jest teraz wyświetlana w następujący sposób:
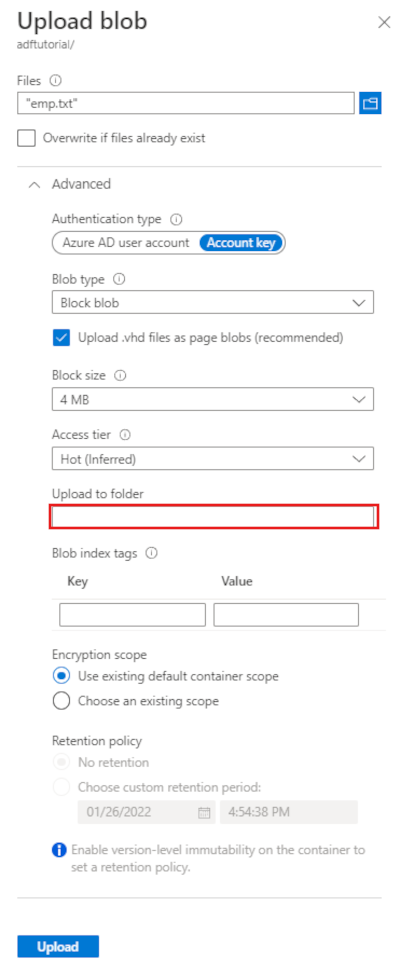
W polu Przekaż do folderu wprowadź dane wejściowe.
Wybierz przycisk Przekaż. Na liście powinien pojawić się plik emp.txt i stan przesyłania.
Wybierz ikonę Zamknij (X), aby zamknąć stronę Przekazywanie obiektu blob.
Pozostaw otwartą stronę kontenera adftutorial . Używasz go do weryfikacji danych wyjściowych na końcu tego przewodnika szybkiego startu.
Visual Studio
Przewodnik w tym artykule używa programu Visual Studio 2019. Procedury dotyczące programu Visual Studio 2013, 2015 lub 2017 różnią się nieznacznie.
Tworzenie aplikacji w identyfikatorze Entra firmy Microsoft
W sekcjach w temacie Instrukcje: tworzenie aplikacji i jednostki usługi Microsoft Entra przy użyciu portalu, które mogą uzyskiwać dostęp do zasobów, postępuj zgodnie z instrukcjami, aby wykonać następujące zadania:
- W Tworzeniu aplikacji Microsoft Entra utwórz aplikację, która reprezentuje aplikację platformy .NET, którą tworzysz w tym samouczku. W przypadku adresu URL logowania możesz podać fikcyjny adres URL, jak pokazano w artykule (
https://contoso.org/exampleapp). - W sekcji Pobierz wartości logowania zdobądź identyfikator aplikacji i identyfikator dzierżawcy, a następnie zanotuj te wartości, które później wykorzystasz w tym samouczku.
- W obszarze Certyfikaty i wpisy tajne pobierz klucz uwierzytelniania i zanotuj tę wartość, która zostanie użyta w dalszej części tego samouczka.
- W sekcji Przypisz aplikację do roli przypisz aplikację do roli Współautor na poziomie subskrypcji, aby aplikacja mogła tworzyć fabryki danych w subskrypcji.
Tworzenie projektu programu Visual Studio
Następnie utwórz aplikację konsolową .NET języka C# w programie Visual Studio:
- Uruchom program Visual Studio.
- W oknie Start wybierz pozycję Utwórz nowy projekt>Aplikacja konsolowa (.NET Framework). Wymagana jest platforma .NET w wersji 4.5.2 lub nowszej.
- W polu Nazwa projektu wprowadź ADFv2QuickStart.
- Wybierz polecenie Create (Utwórz), aby utworzyć projekt.
Instalowanie pakietów NuGet
Wybierz Narzędzia>Menedżer pakietów NuGet>Konsola Menedżera pakietów.
W okienku Menedżer pakietów Konsola uruchom następujące polecenia, aby zainstalować pakiety. Aby uzyskać więcej informacji, zobacz pakiet NuGet Azure.ResourceManager.DataFactory .
Install-Package Azure.ResourceManager.DataFactory -IncludePrerelease
Install-Package Azure.Identity
Tworzenie fabryki danych
Otwórz Program.cs i dołącz następujące instrukcje, aby dodać odwołania do przestrzeni nazw.
using Azure;
using Azure.Core;
using Azure.Core.Expressions.DataFactory;
using Azure.Identity;
using Azure.ResourceManager;
using Azure.ResourceManager.DataFactory;
using Azure.ResourceManager.DataFactory.Models;
using Azure.ResourceManager.Resources;
using System;
using System.Collections.Generic;
Dodaj do metody Main następujący kod, który określa zmienne. Zastąp symbole zastępcze własnymi wartościami. Aby uzyskać listę regionów platformy Azure, w których obecnie jest dostępna usługa Data Factory, wybierz dane regiony na poniższej stronie, a następnie rozwiń węzeł Analiza, aby zlokalizować pozycję Data Factory: Produkty dostępne według regionu. Magazyny danych (Azure Storage, Azure SQL Database i inne) i obliczenia (HDInsight i inne) używane przez fabrykę danych mogą znajdować się w innych regionach.
// Set variables
string tenantID = "<your tenant ID>";
string applicationId = "<your application ID>";
string authenticationKey = "<your authentication key for the application>";
string subscriptionId = "<your subscription ID where the data factory resides>";
string resourceGroup = "<your resource group where the data factory resides>";
string region = "<the location of your resource group>";
string dataFactoryName =
    "<specify the name of data factory to create. It must be globally unique.>";
string storageAccountName = "<your storage account name to copy data>";
string storageKey = "<your storage account key>";
// specify the container and input folder from which all files
// need to be copied to the output folder.
string inputBlobContainer = "<blob container to copy data from, e.g. containername>";
string inputBlobPath = "<path to existing blob(s) to copy data from, e.g. inputdir/file>";
//specify the contains and output folder where the files are copied
string outputBlobContainer = "<blob container to copy data from, e.g. containername>";
string outputBlobPath = "<the blob path to copy data to, e.g. outputdir/file>";

// name of the Azure Storage linked service, blob dataset, and the pipeline
string storageLinkedServiceName = "AzureStorageLinkedService";
string blobDatasetName = "BlobDataset";
string pipelineName = "Adfv2QuickStartPipeline";
Dodaj do metody Main poniższy kod, który tworzy fabrykę danych.
ArmClient armClient = new ArmClient(
    new ClientSecretCredential(tenantID, applicationId, authenticationKey, new TokenCredentialOptions
    {
        AuthorityHost = AzureAuthorityHosts.AzurePublicCloud
    }),
    subscriptionId,
    new ArmClientOptions { Environment = ArmEnvironment.AzurePublicCloud }
);

ResourceIdentifier resourceIdentifier = SubscriptionResource.CreateResourceIdentifier(subscriptionId);
SubscriptionResource subscriptionResource = armClient.GetSubscriptionResource(resourceIdentifier);

Console.WriteLine("Get an existing resource group " + resourceGroupName + "...");
var resourceGroupOperation = subscriptionResource.GetResourceGroups().Get(resourceGroupName);
ResourceGroupResource resourceGroupResource = resourceGroupOperation.Value;

Console.WriteLine("Create a data factory " + dataFactoryName + "...");
DataFactoryData dataFactoryData = new DataFactoryData(AzureLocation.EastUS2);
var dataFactoryOperation = resourceGroupResource.GetDataFactories().CreateOrUpdate(WaitUntil.Completed, dataFactoryName, dataFactoryData);
Console.WriteLine(dataFactoryOperation.WaitForCompletionResponse().Content);

// Get the data factory resource
DataFactoryResource dataFactoryResource = dataFactoryOperation.Value;
Tworzenie usługi połączonej
Dodaj do metody Main poniższy kod, który tworzy połączoną usługę Azure Storage.
Połączone usługi tworzy się w fabryce danych w celu połączenia magazynów danych i usług obliczeniowych z fabryką danych. W tym szybkim starcie musisz utworzyć tylko jedną połączoną usługę Azure Blob Storage zarówno dla źródła do kopiowania, jak i miejsca docelowego, jest nazwane "AzureBlobStorageLinkedService" w przykładzie.
// Create an Azure Storage linked service
Console.WriteLine("Create a linked service " + storageLinkedServiceName + "...");
AzureBlobStorageLinkedService azureBlobStorage = new AzureBlobStorageLinkedService()
{
    ConnectionString = azureBlobStorageConnectionString
};

DataFactoryLinkedServiceData linkedServiceData = new DataFactoryLinkedServiceData(azureBlobStorage);

var linkedServiceOperation = dataFactoryResource.GetDataFactoryLinkedServices().CreateOrUpdate(WaitUntil.Completed, storageLinkedServiceName, linkedServiceData);
Console.WriteLine(linkedServiceOperation.WaitForCompletionResponse().Content);
Tworzenie zestawu danych
Dodaj następujący kod do metody Main , która tworzy rozdzielany zestaw danych tekstowych.
Zdefiniuj zestaw danych, który reprezentuje dane do skopiowania ze źródła do ujścia. W tym przykładzie ten rozdzielany zestaw danych tekstowych odwołuje się do połączonej usługi Azure Blob Storage utworzonej w poprzednim kroku. Zestaw danych przyjmuje dwa parametry, których wartość jest ustawiana w działaniu wykorzystującym zestaw danych. Parametry są używane do konstruowania "kontenera" i "folderPath" wskazującego, gdzie znajdują się/są przechowywane dane.
// Create an Azure Blob dataset
DataFactoryLinkedServiceReference linkedServiceReference = new DataFactoryLinkedServiceReference(DataFactoryLinkedServiceReferenceType.LinkedServiceReference, storageLinkedServiceName);
DelimitedTextDataset delimitedTextDataset = new DelimitedTextDataset(linkedServiceReference)
{
    DataLocation = new AzureBlobStorageLocation
    {
        Container = DataFactoryElement<string>.FromExpression("@dataset().container"),
        FileName = DataFactoryElement<string>.FromExpression("@dataset().path")
    },
    Parameters =
    {
        new KeyValuePair<string, EntityParameterSpecification>("container",new EntityParameterSpecification(EntityParameterType.String)),
        new KeyValuePair<string, EntityParameterSpecification>("path",new EntityParameterSpecification(EntityParameterType.String))
    },
    FirstRowAsHeader = false,
    QuoteChar = "\"",
    EscapeChar = "\\",
    ColumnDelimiter = ","
};

DataFactoryDatasetData datasetData = new DataFactoryDatasetData(delimitedTextDataset);

var datasetOperation = dataFactoryResource.GetDataFactoryDatasets().CreateOrUpdate(WaitUntil.Completed, blobDatasetName, datasetData);
Console.WriteLine(datasetOperation.WaitForCompletionResponse().Content);
Utwórz potok
Dodaj do metody Main poniższy kod, który tworzy potok danych z działaniem kopiowania.
W tym przykładzie ten potok zawiera jedno zadanie i przyjmuje cztery parametry: wejściowy kontener obiektów blob i ścieżkę, oraz wyjściowy kontener obiektów blob i ścieżkę. Wartości tych parametrów są ustawiane po wyzwoleniu/uruchomieniu potoku. Działanie kopiowania dotyczy tego samego zestawu danych obiektu blob, który został utworzony w poprzednim kroku jako wejście i wyjście. Gdy zestaw danych jest używany jako wejściowy zestaw danych, określono kontener wejściowy i ścieżkę. A gdy zestaw danych jest używany jako wyjściowy zestaw danych, zostanie określony kontener wyjściowy i ścieżka.
// Create a pipeline with a copy activity
Console.WriteLine("Creating pipeline " + pipelineName + "...");
DataFactoryPipelineData pipelineData = new DataFactoryPipelineData()
{
    Parameters =
    {
        new KeyValuePair<string, EntityParameterSpecification>("inputContainer",new EntityParameterSpecification(EntityParameterType.String)),
        new KeyValuePair<string, EntityParameterSpecification>("inputPath",new EntityParameterSpecification(EntityParameterType.String)),
        new KeyValuePair<string, EntityParameterSpecification>("outputContainer",new EntityParameterSpecification(EntityParameterType.String)),
        new KeyValuePair<string, EntityParameterSpecification>("outputPath",new EntityParameterSpecification(EntityParameterType.String))
    },
    Activities =
    {
        new CopyActivity("CopyFromBlobToBlob",new DataFactoryBlobSource(),new DataFactoryBlobSink())
        {
            Inputs =
            {
                new DatasetReference(DatasetReferenceType.DatasetReference,blobDatasetName)
                {
                    Parameters =
                    {
                        new KeyValuePair<string, BinaryData>("container", BinaryData.FromString("\"@pipeline().parameters.inputContainer\"")),
                        new KeyValuePair<string, BinaryData>("path", BinaryData.FromString("\"@pipeline().parameters.inputPath\""))
                    }
                }
            },
            Outputs =
            {
                new DatasetReference(DatasetReferenceType.DatasetReference,blobDatasetName)
                {
                    Parameters =
                    {
                        new KeyValuePair<string, BinaryData>("container", BinaryData.FromString("\"@pipeline().parameters.outputContainer\"")),
                        new KeyValuePair<string, BinaryData>("path", BinaryData.FromString("\"@pipeline().parameters.outputPath\""))
                    }
                }
            }
        }
    }
};

var pipelineOperation = dataFactoryResource.GetDataFactoryPipelines().CreateOrUpdate(WaitUntil.Completed, pipelineName, pipelineData);
Console.WriteLine(pipelineOperation.WaitForCompletionResponse().Content);
Tworzenie przebiegu potoku
Dodaj następujący kod do metody Main , która wyzwala uruchomienie potoku.
Ten kod ustawia również wartości parametrów inputContainer, inputPath, outputContainer i outputPath określonych w potoku, zastępując je rzeczywistymi wartościami ścieżek blobów źródła i odbiornika.
// Create a pipeline run
Console.WriteLine("Creating pipeline run...");
Dictionary<string, BinaryData> parameters = new Dictionary<string, BinaryData>()
{
    { "inputContainer",BinaryData.FromObjectAsJson(inputBlobContainer) },
    { "inputPath",BinaryData.FromObjectAsJson(inputBlobPath) },
    { "outputContainer",BinaryData.FromObjectAsJson(outputBlobContainer) },
    { "outputPath",BinaryData.FromObjectAsJson(outputBlobPath) }
};

var pipelineResource = dataFactoryResource.GetDataFactoryPipeline(pipelineName);
var runResponse = pipelineResource.Value.CreateRun(parameters);
Console.WriteLine("Pipeline run ID: " + runResponse.Value.RunId);
Monitorowanie przebiegu potoku
Dodaj do metody Main poniższy kod, aby stale sprawdzać stan do momentu zakończenia kopiowania danych.
// Monitor the pipeline run
Console.WriteLine("Checking pipeline run status...");
DataFactoryPipelineRunInfo pipelineRun;
while (true)
{
    pipelineRun = dataFactoryResource.GetPipelineRun(runResponse.Value.RunId.ToString());
    Console.WriteLine("Status: " + pipelineRun.Status);
    if (pipelineRun.Status == "InProgress" || pipelineRun.Status == "Queued")
        System.Threading.Thread.Sleep(15000);
    else
        break;
}
Dodaj następujący kod do metody Main , która pobiera szczegóły przebiegu działania kopiowania, takie jak rozmiar odczytanych lub zapisanych danych.
// Check the copy activity run details
Console.WriteLine("Checking copy activity run details...");

var queryResponse = dataFactoryResource.GetActivityRun(pipelineRun.RunId.ToString(),
    new RunFilterContent(DateTime.UtcNow.AddMinutes(-10), DateTime.UtcNow.AddMinutes(10)));

var enumerator = queryResponse.GetEnumerator();
enumerator.MoveNext();

if (pipelineRun.Status == "Succeeded")
    Console.WriteLine(enumerator.Current.Output);
else
    Console.WriteLine(enumerator.Current.Error);
Console.WriteLine("\nPress any key to exit...");
Console.ReadKey();
Uruchamianie kodu
Zbuduj i uruchom aplikację, a następnie zweryfikuj wykonanie potoku.
Konsola wyświetla postęp procesu tworzenia fabryki danych, usługi powiązanej, zestawów danych, potoku oraz uruchamiania potoku. Następnie sprawdza stan uruchomienia potoku. Poczekaj, aż zobaczysz szczegóły działania kopiowania, w tym rozmiar danych odczytanych/zapisanych. Następnie użyj narzędzi, takich jak Eksplorator usługi Azure Storage , aby sprawdzić, czy obiekty blob są kopiowane do "outputBlobPath" z "inputBlobPath", jak określono w zmiennych.
Przykładowe dane wyjściowe
Create a data factory quickstart-adf...
{
  "name": "quickstart-adf",
  "type": "Microsoft.DataFactory/factories",
  "properties": {
    "provisioningState": "Succeeded",
    "version": "2018-06-01"
  },
  "location": "eastus2"
}
Create a linked service AzureBlobStorage...
{
  "name": "AzureBlobStorage",
  "type": "Microsoft.DataFactory/factories/linkedservices",
  "properties": {
    "type": "AzureBlobStorage",
    "typeProperties": {
      "connectionString": "DefaultEndpointsProtocol=https;AccountName=<storageAccountName>;",
      "encryptedCredential": "<encryptedCredential>"
    }
  }
}
Creating dataset BlobDelimitedDataset...
{
  "name": "BlobDelimitedDataset",
  "type": "Microsoft.DataFactory/factories/datasets",
  "properties": {
    "type": "DelimitedText",
    "linkedServiceName": {
      "type": "LinkedServiceReference",
      "referenceName": "AzureBlobStorage"
    },
    "parameters": {
      "container": {
        "type": "String"
      },
      "path": {
        "type": "String"
      }
    },
    "typeProperties": {
      "location": {
        "container": {
          "type": "Expression",
          "value": "@dataset().container"
        },
        "type": "AzureBlobStorageLocation",
        "fileName": {
          "type": "Expression",
          "value": "@dataset().path"
        }
      },
      "columnDelimiter": ",",
      "quoteChar": "\"",
      "escapeChar": "\\",
      "firstRowAsHeader": false
    }
  }
}
Creating pipeline Adfv2QuickStartPipeline...
{
  "properties": {
    "activities": [
      {
        "inputs": [
          {
            "type": "DatasetReference",
            "referenceName": "BlobDelimitedDataset",
            "parameters": {
              "container": "@pipeline().parameters.inputContainer",
              "path": "@pipeline().parameters.inputPath"
            }
          }
        ],
        "outputs": [
          {
            "type": "DatasetReference",
            "referenceName": "BlobDelimitedDataset",
            "parameters": {
              "container": "@pipeline().parameters.outputContainer",
              "path": "@pipeline().parameters.outputPath"
            }
          }
        ],
        "name": "CopyFromBlobToBlob",
        "type": "Copy",
        "typeProperties": {
          "source": {
            "type": "BlobSource"
          },
          "sink": {
            "type": "BlobSink"
          }
        }
      }
    ],
    "parameters": {
      "inputContainer": {
        "type": "String"
      },
      "inputPath": {
        "type": "String"
      },
      "outputContainer": {
        "type": "String"
      },
      "outputPath": {
        "type": "String"
      }
    }
  }
}
Creating pipeline run...
Pipeline run ID: 3aa26ffc-5bee-4db9-8bac-ccbc2d7b51c1
Checking pipeline run status...
Status: InProgress
Status: Succeeded
Checking copy activity run details...
{
  "dataRead": 1048,
  "dataWritten": 1048,
  "filesRead": 1,
  "filesWritten": 1,
  "sourcePeakConnections": 1,
  "sinkPeakConnections": 1,
  "copyDuration": 8,
  "throughput": 1.048,
  "errors": [],
  "effectiveIntegrationRuntime": "AutoResolveIntegrationRuntime (East US 2)",
  "usedDataIntegrationUnits": 4,
  "billingReference": {
    "activityType": "DataMovement",
    "billableDuration": [
      {
        "meterType": "AzureIR",
        "duration": 0.06666666666666667,
        "unit": "DIUHours"
      }
    ],
    "totalBillableDuration": [
      {
        "meterType": "AzureIR",
        "duration": 0.06666666666666667,
        "unit": "DIUHours"
      }
    ]
  },
  "usedParallelCopies": 1,
  "executionDetails": [
    {
      "source": {
        "type": "AzureBlobStorage"
      },
      "sink": {
        "type": "AzureBlobStorage"
      },
      "status": "Succeeded",
      "start": "2023-12-15T10:25:33.9991558Z",
      "duration": 8,
      "usedDataIntegrationUnits": 4,
      "usedParallelCopies": 1,
      "profile": {
        "queue": {
          "status": "Completed",
          "duration": 5
        },
        "transfer": {
          "status": "Completed",
          "duration": 1,
          "details": {
            "listingSource": {
              "type": "AzureBlobStorage",
              "workingDuration": 0
            },
            "readingFromSource": {
              "type": "AzureBlobStorage",
              "workingDuration": 0
            },
            "writingToSink": {
              "type": "AzureBlobStorage",
              "workingDuration": 0
            }
          }
        }
      },
      "detailedDurations": {
        "queuingDuration": 5,
        "transferDuration": 1
      }
    }
  ],
  "dataConsistencyVerification": {
    "VerificationResult": "NotVerified"
  }
}

Press any key to exit...
Sprawdzanie danych wyjściowych
Potok automatycznie tworzy folder wyjściowy w zasobie blob adftutorial. Następnie kopiuje plik emp.txt z folderu wejściowego do folderu wyjściowego.
- W portalu Azure na stronie kontenera adftutorial zatrzymanej w sekcji Dodawanie folderu wejściowego i pliku dla kontenera obiektów blob powyżej wybierz opcję Odśwież, aby wyświetlić folder wyjściowy.
- Na liście folderów wybierz pozycję output.
- Upewnij się, że plik emp.txt jest kopiowany do folderu wyjściowego.
Czyszczenie zasobów
Aby programowo usunąć fabrykę danych, dodaj do programu następujące wiersze kodu:
Console.WriteLine("Deleting the data factory");
dataFactoryResource.Delete(WaitUntil.Completed);
Następne kroki
Przepływ w tym przykładzie kopiuje dane z jednej lokalizacji do innej lokalizacji w magazynie obiektów BLOB platformy "Azure Blob Storage." Zapoznaj się z samouczkami, aby dowiedzieć się więcej o korzystaniu z usługi Data Factory w dalszych scenariuszach.