Rejestrowanie bieżącego użytkownika na potrzeby powiadomień wypychanych przy użyciu ASP.NET
Omówienie
W tym temacie pokazano, jak zażądać rejestracji powiadomień wypychanych w usłudze Azure Notification Hubs, gdy rejestracja jest wykonywana przez ASP.NET internetowy interfejs API. Ten temat rozszerza samouczek Powiadamianie użytkowników za pomocą usługi Notification Hubs. Aby utworzyć uwierzytelnianą usługę mobilną, musisz już wykonać kroki wymagane w tym samouczku. Aby uzyskać więcej informacji na temat scenariusza powiadamiania użytkowników, zobacz Powiadamianie użytkowników za pomocą usługi Notification Hubs.
Aktualizowanie aplikacji
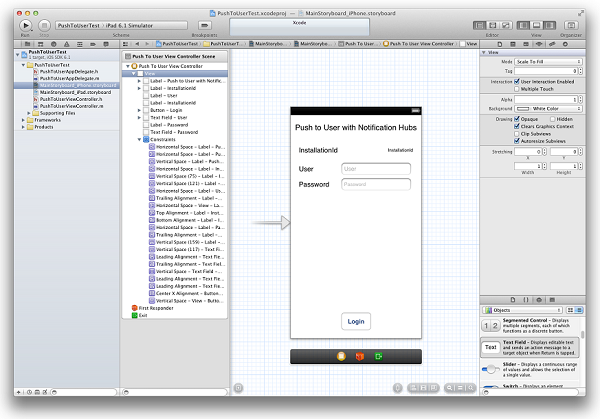
W MainStoryboard_iPhone.storyboard dodaj następujące składniki z biblioteki obiektów:
Etykieta: "Wypychanie do użytkownika za pomocą usługi Notification Hubs"
Etykieta: "InstallationId"
Etykieta: "Użytkownik"
Pole tekstowe: "Użytkownik"
Etykieta: "Hasło"
Pole tekstowe: "Hasło"
Przycisk: "Zaloguj się"
W tym momencie scenorys wygląda następująco:
W edytorze asystenta utwórz punkty dla wszystkich przełączonych kontrolek i wywołaj je, połącz pola tekstowe z kontrolerem widoku (delegatem) i utwórz akcję dla przycisku logowania .
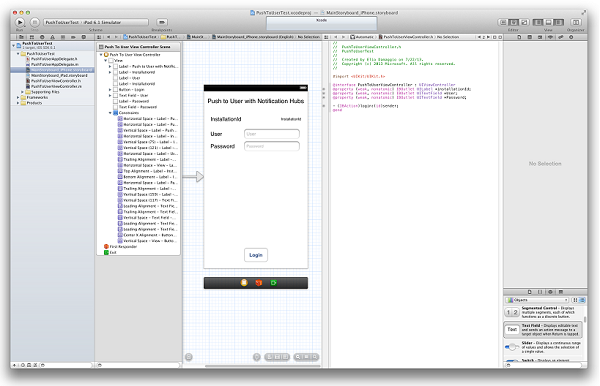
Plik BreakingNewsViewController.h powinien teraz zawierać następujący kod:
@property (weak, nonatomic) IBOutlet UILabel *installationId;
@property (weak, nonatomic) IBOutlet UITextField *User;
@property (weak, nonatomic) IBOutlet UITextField *Password;

- (IBAction)login:(id)sender;
Utwórz klasę o nazwie
DeviceInfoi skopiuj następujący kod do sekcji interfejsu pliku DeviceInfo.h:@property (readonly, nonatomic) NSString* installationId; @property (nonatomic) NSData* deviceToken;Skopiuj następujący kod w sekcji implementacji pliku DeviceInfo.m:
@synthesize installationId = _installationId;

- (id)init {
    if (!(self = [super init]))
        return nil;

    NSUserDefaults *defaults = [NSUserDefaults standardUserDefaults];
    _installationId = [defaults stringForKey:@"PushToUserInstallationId"];
    if(!_installationId) {
        CFUUIDRef newUUID = CFUUIDCreate(kCFAllocatorDefault);
        _installationId = (__bridge_transfer NSString *)CFUUIDCreateString(kCFAllocatorDefault, newUUID);
        CFRelease(newUUID);

        //store the install ID so we don't generate a new one next time
        [defaults setObject:_installationId forKey:@"PushToUserInstallationId"];
        [defaults synchronize];
    }

    return self;
}

- (NSString*)getDeviceTokenInHex {
    const unsigned *tokenBytes = [[self deviceToken] bytes];
    NSString *hexToken = [NSString stringWithFormat:@"%08X%08X%08X%08X%08X%08X%08X%08X",
                            ntohl(tokenBytes[0]), ntohl(tokenBytes[1]), ntohl(tokenBytes[2]),
                            ntohl(tokenBytes[3]), ntohl(tokenBytes[4]), ntohl(tokenBytes[5]),
                            ntohl(tokenBytes[6]), ntohl(tokenBytes[7])];
    return hexToken;
}
W pliku PushToUserAppDelegate.h dodaj następującą właściwość singleton:
@property (strong, nonatomic) DeviceInfo* deviceInfo;W metodzie
didFinishLaunchingWithOptionsw pliku PushToUserAppDelegate.m dodaj następujący kod:self.deviceInfo = [[DeviceInfo alloc] init]; [[UIApplication sharedApplication] registerForRemoteNotificationTypes: UIRemoteNotificationTypeAlert | UIRemoteNotificationTypeBadge | UIRemoteNotificationTypeSound];Pierwsza linia inicjuje
DeviceInfosingleton. Drugi wiersz rozpoczyna rejestrację powiadomień wypychanych, które są już obecne, jeśli ukończono już samouczek Rozpoczynanie pracy z usługą Notification Hubs .W pliku PushToUserAppDelegate.m zaimplementuj metodę
didRegisterForRemoteNotificationsWithDeviceTokenw aplikacji AppDelegate i dodaj następujący kod:self.deviceInfo.deviceToken = deviceToken;Spowoduje to ustawienie tokenu urządzenia dla żądania.
Uwaga
W tym momencie w tej metodzie nie powinien istnieć żaden inny kod. Jeśli masz już wywołanie
registerNativeWithDeviceTokenmetody, która została dodana po ukończeniu samouczka Wysyłanie powiadomień wypychanych do aplikacji systemu iOS przy użyciu usługi Azure Notification Hubs , musisz dodać komentarz lub usunąć to wywołanie.PushToUserAppDelegate.mW pliku dodaj następującą metodę obsługi:* (void) application:(UIApplication *) application didReceiveRemoteNotification:(NSDictionary *)userInfo { NSLog(@"%@", userInfo); UIAlertView *alert = [[UIAlertView alloc] initWithTitle:@"Notification" message: [userInfo objectForKey:@"inAppMessage"] delegate:nil cancelButtonTitle: @"OK" otherButtonTitles:nil, nil]; [alert show]; }Ta metoda wyświetla alert w interfejsie użytkownika, gdy aplikacja odbiera powiadomienia podczas jego działania.
PushToUserViewController.mOtwórz plik i zwróć klawiaturę w następującej implementacji:- (BOOL)textFieldShouldReturn:(UITextField *)theTextField { if (theTextField == self.User || theTextField == self.Password) { [theTextField resignFirstResponder]; } return YES; }W metodzie
viewDidLoadw pliku zainicjujPushToUserViewController.metykietęinstallationIdw następujący sposób:DeviceInfo* deviceInfo = [(PushToUserAppDelegate*)[[UIApplication sharedApplication]delegate] deviceInfo]; Self.installationId.text = deviceInfo.installationId;Dodaj następujące właściwości w interfejsie w pliku
PushToUserViewController.m:@property (readonly) NSOperationQueue* downloadQueue; - (NSString*)base64forData:(NSData*)theData;Następnie dodaj następującą implementację:
- (NSOperationQueue *)downloadQueue {
    if (!_downloadQueue) {
        _downloadQueue = [[NSOperationQueue alloc] init];
        _downloadQueue.name = @"Download Queue";
        _downloadQueue.maxConcurrentOperationCount = 1;
    }
    return _downloadQueue;
}

// base64 encoding
- (NSString*)base64forData:(NSData*)theData
{
    const uint8_t* input = (const uint8_t*)[theData bytes];
    NSInteger length = [theData length];

    static char table[] = "ABCDEFGHIJKLMNOPQRSTUVWXYZabcdefghijklmnopqrstuvwxyz0123456789+/=";

    NSMutableData* data = [NSMutableData dataWithLength:((length + 2) / 3) * 4];
    uint8_t* output = (uint8_t*)data.mutableBytes;

    NSInteger i;
    for (i=0; i < length; i += 3) {
        NSInteger value = 0;
        NSInteger j;
        for (j = i; j < (i + 3); j++) {
            value <<= 8;

            if (j < length) {
                value |= (0xFF & input[j]);
            }
        }

        NSInteger theIndex = (i / 3) * 4;
        output[theIndex + 0] =                    table[(value >> 18) & 0x3F];
        output[theIndex + 1] =                    table[(value >> 12) & 0x3F];
        output[theIndex + 2] = (i + 1) < length ? table[(value >> 6)  & 0x3F] : '=';
        output[theIndex + 3] = (i + 2) < length ? table[(value >> 0)  & 0x3F] : '=';
    }

    return [[NSString alloc] initWithData:data encoding:NSASCIIStringEncoding];
}
Skopiuj następujący kod do metody obsługi utworzonej
loginprzez program XCode:DeviceInfo* deviceInfo = [(PushToUserAppDelegate*)[[UIApplication sharedApplication]delegate] deviceInfo]; // build JSON NSString* json = [NSString stringWithFormat:@"{\"platform\":\"ios\", \"instId\":\"%@\", \"deviceToken\":\"%@\"}", deviceInfo.installationId, [deviceInfo getDeviceTokenInHex]]; // build auth string NSString* authString = [NSString stringWithFormat:@"%@:%@", self.User.text, self.Password.text]; NSMutableURLRequest* request = [NSMutableURLRequest requestWithURL:[NSURL URLWithString:@"http://nhnotifyuser.azurewebsites.net/api/register"]]; [request setHTTPMethod:@"POST"]; [request setHTTPBody:[json dataUsingEncoding:NSUTF8StringEncoding]]; [request addValue:[@([json lengthOfBytesUsingEncoding:NSUTF8StringEncoding]) description] forHTTPHeaderField:@"Content-Length"]; [request addValue:@"application/json" forHTTPHeaderField:@"Content-Type"]; [request addValue:[NSString stringWithFormat:@"Basic %@",[self base64forData:[authString dataUsingEncoding:NSUTF8StringEncoding]]] forHTTPHeaderField:@"Authorization"]; // connect with POST [NSURLConnection sendAsynchronousRequest:request queue:[self downloadQueue] completionHandler:^(NSURLResponse* response, NSData* data, NSError* error) { // add UIAlert depending on response. if (error != nil) { NSHTTPURLResponse* httpResponse = (NSHTTPURLResponse*)response; if ([httpResponse statusCode] == 200) { UIAlertView *alert = [[UIAlertView alloc] initWithTitle:@"Back-end registration" message:@"Registration successful" delegate:nil cancelButtonTitle: @"OK" otherButtonTitles:nil, nil]; [alert show]; } else { NSLog(@"status: %ld", (long)[httpResponse statusCode]); } } else { NSLog(@"error: %@", error); } }];Ta metoda pobiera zarówno identyfikator instalacji, jak i kanał dla powiadomień wypychanych i wysyła je wraz z typem urządzenia do uwierzytelnionej metody internetowego interfejsu API, która tworzy rejestrację w usłudze Notification Hubs. Ten internetowy interfejs API został zdefiniowany w temacie Powiadamianie użytkowników za pomocą usługi Notification Hubs.
Teraz, gdy aplikacja kliencka została zaktualizowana, wróć do usługi Notify users with Notification Hubs (Powiadamianie użytkowników przy użyciu usługi Notification Hubs ) i zaktualizuj usługę mobilną w celu wysyłania powiadomień przy użyciu usługi Notification Hubs.
Opinia
Dostępne już wkrótce: W 2024 r. będziemy stopniowo wycofywać zgłoszenia z serwisu GitHub jako mechanizm przesyłania opinii na temat zawartości i zastępować go nowym systemem opinii. Aby uzyskać więcej informacji, sprawdź: https://aka.ms/ContentUserFeedback.
Prześlij i wyświetl opinię dla