Nuta
Dostęp do tej strony wymaga autoryzacji. Możesz spróbować się zalogować lub zmienić katalog.
Dostęp do tej strony wymaga autoryzacji. Możesz spróbować zmienić katalogi.
Debugowanie zdalne umożliwia debugowanie kodu uruchomionego na innym komputerze. W tym przewodniku pokazano, jak skonfigurować serwer debugowania i połączyć klienta debugowania w celu zdalnego sterowania sesją debugowania. Poznasz dokładne kroki konfigurowania obu składników.
Kod, który debugujesz, może być uruchamiany na tym samym komputerze co serwer debugowania lub może działać na osobnym komputerze. Jeśli serwer debugowania wykonuje debugowanie w trybie użytkownika, proces debugowania można uruchomić na tym samym komputerze co serwer debugowania. Jeśli serwer debugowania wykonuje debugowanie w trybie jądra, kod, który debugujesz, zazwyczaj jest uruchamiany na osobnym komputerze docelowym.
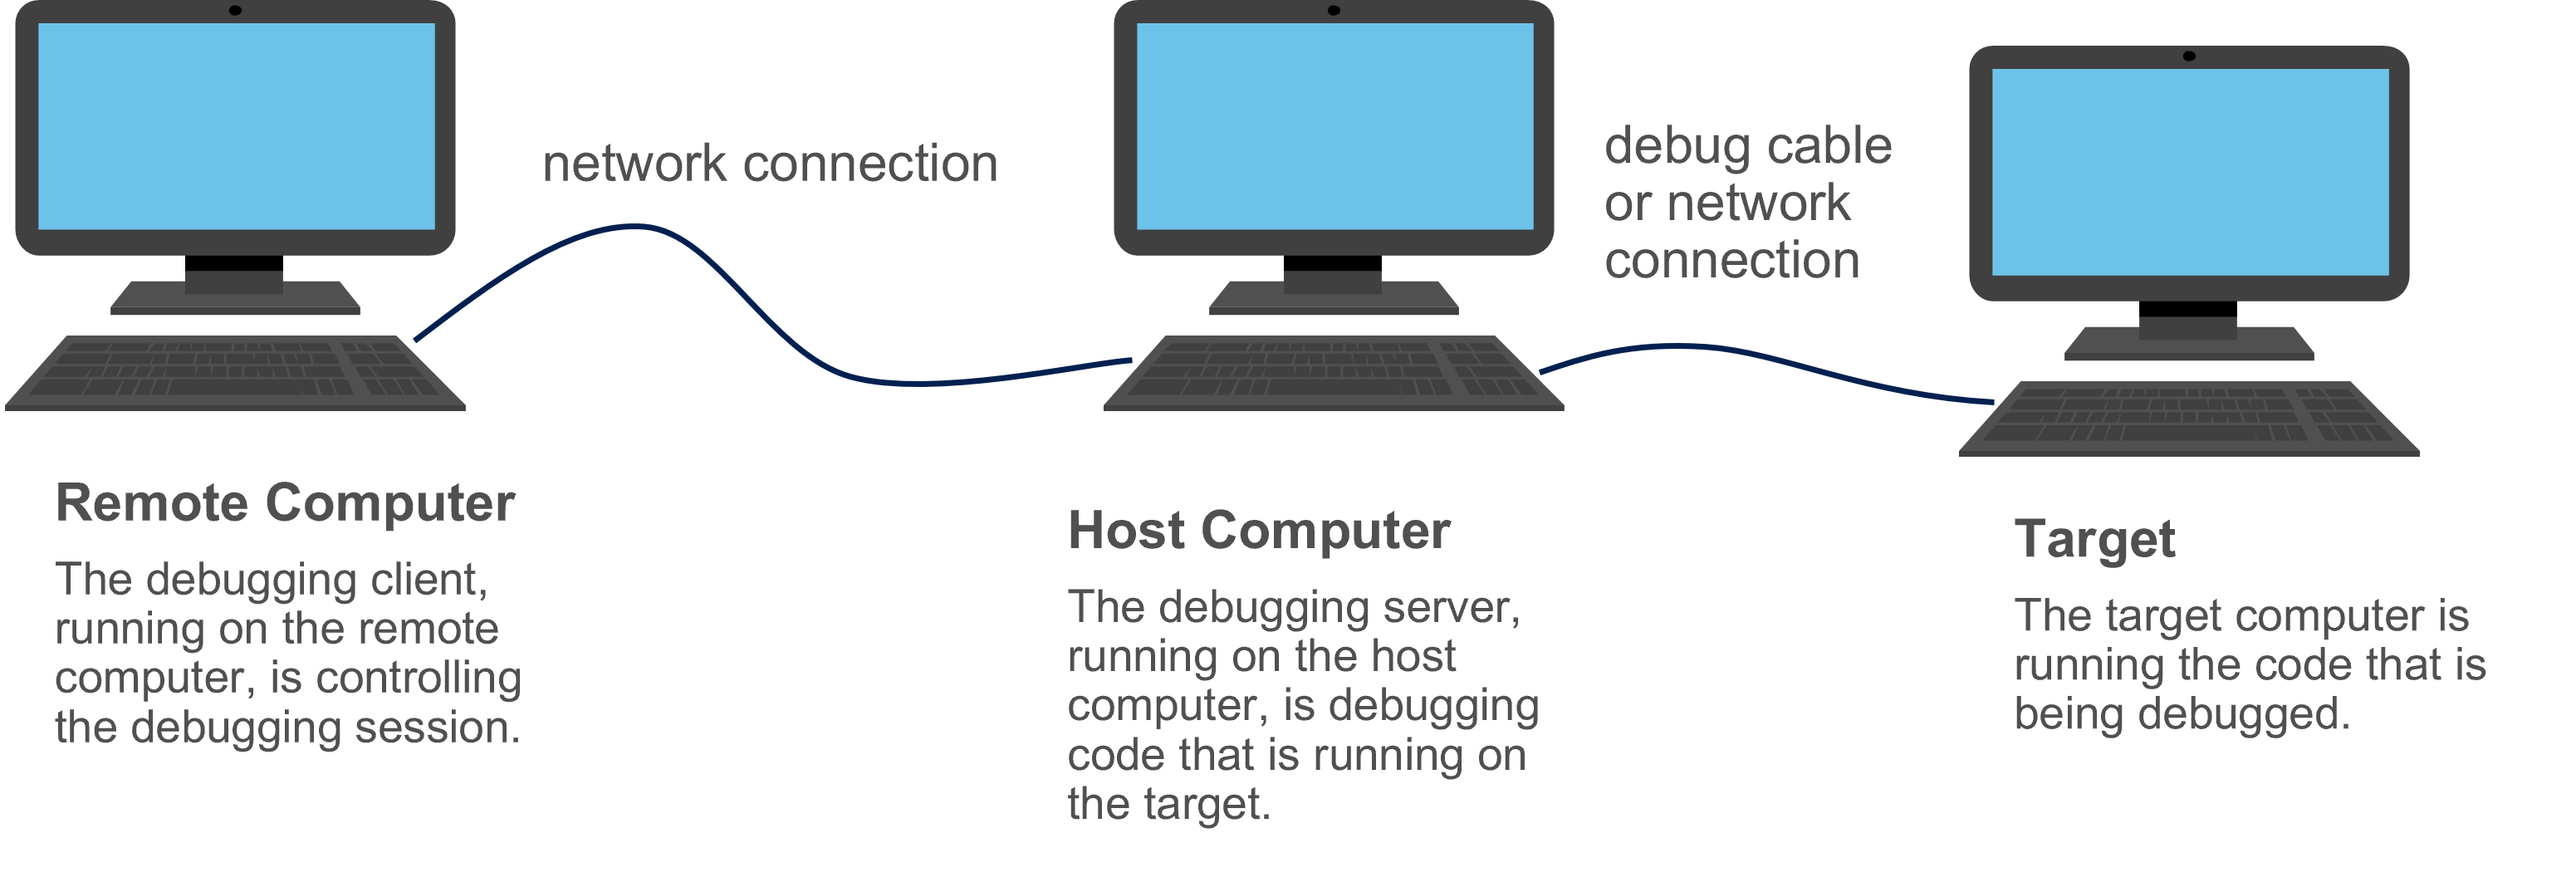
Na tym diagramie pokazano, jak trzy komputery współpracują ze sobą w typowej konfiguracji debugowania zdalnego:

Ważny
Zdalne debugowanie ujawnia systemowi potencjalne zagrożenia bezpieczeństwa. Przed kontynuowaniem:
- Przejrzyj zabezpieczenia podczas zdalnego debugowania , aby włączyć tryb bezpieczny
- Omówienie zagadnień dotyczących zabezpieczeń narzędzi debugowania systemu Windows
Do połączenia zdalnego debugowania można użyć kilku protokołów transportu: TCP, NPIPE, SPIPE, SSL i COM Port. Załóżmy, że wybierasz protokół TCP jako protokół i WinDbg jako zarówno klienta debugowania, jak i serwera debugowania. Użyj poniższej procedury, aby ustanowić sesję debugowania trybu jądra zdalnego.
Na komputerze hosta otwórz windbg i ustanów sesję debugowania trybu jądra z komputerem docelowym. (Zobacz debugowanie na żywo Kernel-Mode przy użyciu WinDbg klasycznego.)
Aby przerwać, wybierz Break z menu Debug lub naciśnij CTRL-Break.
W oknie polecenia debugera wprowadź następujące polecenie.
.server tcp:port=5005
Uwaga / Notatka
Numer portu 5005 jest dowolny. Należy wybrać numer portu.
WinDbg odpowiada danymi wyjściowymi podobnymi do poniższych. Skopiuj parametry połączenia — będą potrzebne do następnego kroku.
Server started.  Client can connect with any of these command lines
0: <debugger> -remote tcp:Port=5005,Server=YourHostComputer
Na komputerze zdalnym otwórz WinDbg i wybierz Połącz z sesją zdalną z menu Plik.
Pod ciąg połączenia, wprowadź następujący ciąg.
tcp:Port=5005,Server=YourHostComputer
gdzie YourHostComputer jest nazwą komputera hosta, który uruchamia serwer debugowania.
Wybierz pozycję OK.
Korzystanie z wiersza polecenia
Alternatywą dla procedury w poprzedniej sekcji jest skonfigurowanie sesji zdalnego debugowania w wierszu polecenia. Załóżmy, że chcesz ustanowić sesję debugowania trybu jądra między komputerem hosta a komputerem docelowym za pośrednictwem kabla 1394 w kanale 32. Aby ustanowić sesję zdalnego debugowania, wykonaj następującą procedurę:
Na komputerze hosta wprowadź następujące polecenie w oknie wiersza polecenia.
windbg -server tcp:port=5005 -k 1394:channel=32
Poczekaj na uruchomienie serwera. Zostanie wyświetlony komunikat potwierdzający ze szczegółami połączenia. Skopiuj te parametry połączenia przed przejściem do kroku 3.
Na komputerze zdalnym wprowadź następujące polecenie w oknie wiersza polecenia.
windbg -remote tcp:Port=5005,Server=YourHostComputer
gdzie YourHostComputer jest nazwą komputera hosta, który uruchamia serwer debugowania.
Ważny
Transport 1394 jest dostępny do użycia w systemie Windows 10 w wersji 1607 i starszych. Nie jest dostępna w nowszych wersjach systemu Windows. Przenoszenie projektów do innych transportów, takich jak KDNET przy użyciu sieci Ethernet. Aby uzyskać więcej informacji na temat tego transportu, zobacz Automatyczne konfigurowanie debugowania jądra sieci KDNET.
Dalsze kroki
Zdalne debugowanie można ustanowić na wiele sposobów innych niż pokazane w tym temacie.
- Aby uzyskać pełne informacje na temat konfigurowania serwera debugowania w oknie poleceń debugera WinDbg , zobacz .server (Tworzenie serwera debugowania).
- Aby uzyskać pełne informacje na temat uruchamiania windbg (i ustanawiania zdalnego debugowania) w wierszu polecenia, zobacz WinDbg Command-Line Options.