Package a desktop or UWP app in Visual Studio
Before distributing your app, you need to package it. This article describes the process of configuring, creating, and testing an MSIX package using Visual Studio.
Types of app packages
App Package (.msix or .appx)
A single package that contains your application and its resources, targeted at a single device architecture. For example, an x64 or x86 application package. To target multiple architectures with an app bundle you'd need to generate one for each architecture.App Bundle (.msixbundle or .appxbundle)
An app bundle is a type of package that can contain multiple app packages, each of which is built to support a specific device architecture. For example, an app bundle can contain three separate app packages for the x86, x64, and ARM configurations. App bundles should be generated whenever possible because they allow your app to be available on the widest possible range of devices.App Package Upload File (.msixupload or .appxupload) - for Store Submission only
A single file that can contain multiple app packages or an app bundle to support various processor architectures. The app package upload file also contains a symbol file to Analyze app performance after your app has been published in the Microsoft Store. This file will be automatically created for you if you are packaging your app with Visual Studio with the intention of submitting it to Partner Center for publishing to the Microsoft Store.
Here is an overview of the steps to prepare and create an app package:
Before packaging your app. Follow these steps to ensure your app is ready to be packaged.
Configure your project. Use the Visual Studio manifest designer to configure the package. For example, add tile images and choose the orientations your app supports.
Generate an app package. Use the Visual Studio packaging wizard to create an app package.
Run, debug, and test a packaged application. Run and debug your app package from Visual Studio or by installing the package directly.
Before packaging your app
Test your app. Before you package your application, make sure it works as expected on all device families that you plan to support. These device families may include desktop, mobile, Surface Hub, Xbox, IoT devices, or others. For more information about deploying and testing your app using Visual Studio, see Deploying and debugging UWP apps (also applies to packaged desktop apps).
Optimize your app. You can use Visual Studio’s profiling and debugging tools to optimize the performance of your packaged application. For example, the Timeline tool for UI responsiveness, the Memory Usage tool, the CPU Usage tool, and more. For more information about these tools, see the Profiling Feature Tour topic.
Check .NET Native compatibility (for VB and C# apps). In the Universal Windows Platform, there is a native compiler that will improve the runtime performance of your app. With this change, you should test your app in this compilation environment. By default, the Release build configuration enables the .NET native toolchain, so it's important to test your app with this Release configuration and check that your app behaves as expected.
Configure your project
The app manifest file (Package.appxmanifest) is an XML file that contains the properties and settings required to create your app package. For example, properties in the app manifest file describe the image to use as the tile of your app and the orientations that your app supports when a user rotates the device.
The Visual Studio manifest designer allows you to update the manifest file without editing the raw XML of the file.
Configure a package with the manifest designer
In Solution Explorer, expand the project node of your application project.
Double-click the Package.appxmanifest file. If the manifest file is already open in the XML code view, Visual Studio prompts you to close the file.
Now you can decide how to configure your app. Each tab contains information that you can configure about your app and links to more information if necessary.
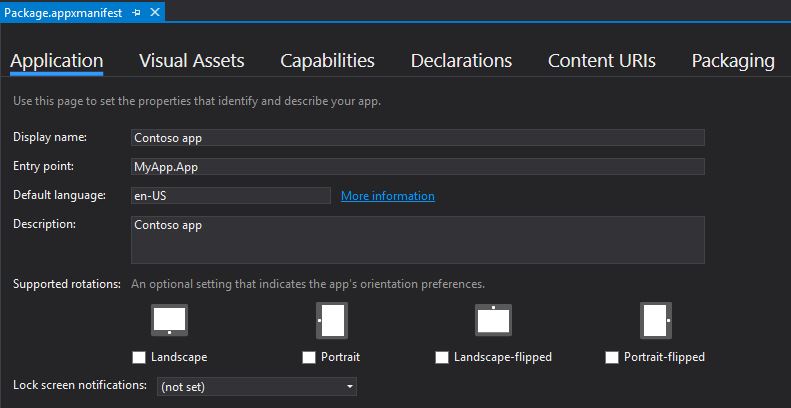
Check that you have all the images that are required for an app on the Visual Assets tab. This is where you would provide app icons and logos.
From the Packaging tab, you can enter publishing data. This is where you can choose which certificate to use to sign your app. All MSIX apps must be signed with a certificate.
Note
Starting in Visual Studio 2019, a temporary certificate is no longer generated in packaged desktop or UWP projects. To create or export certificates, use the PowerShell cmdlets described in this article. In recent versions of Visual Studio, you can also sign your app with a certificate stored in Azure Key Vault for development and test scenarios.
Important
If you're publishing your app in Microsoft Store, your app will be signed with a trusted certificate for you. This allows the user to install and run your app without installing the associated app signing certificate.
If you are installing the app package on your device, you first need to trust the package. To trust the package, the certificate must be installed on the user's device.
Save your Package.appxmanifest file after you have made the necessary edits for your app.
If you are distributing your app via the Microsoft Store, Visual Studio can associate your package with the Store. To do this, right-click your project name in Solution Explorer and choose Publish->Associate App with the Store (before Visual Studio 2019 version 16.3, the Publish menu is named Store). You can also do this in the Create App Packages wizard, which is described in the following section. When you associate your app, some of the fields in the Packaging tab of the manifest designer are automatically updated.
Generate an app package
Apps can be installed without being published in the Store by publishing them on your Website, using application management tools such as Microsoft Intune and Configuration Manager, etc. You can also directly install an MSIX package for testing on your local or remote machine.
Create an app package using the packaging wizard
Note
The following instructions and screenshots describe the process as of Visual Studio 2019 version 16.3. If you're using an earlier version, some of the UI might look different. If you're packaging a desktop application, right click on the the Windows Application Packaging Project node.
In Solution Explorer, open the solution for your application project.
Right-click the project and choose Publish->Create App Packages (before Visual Studio 2019 version 16.3, the Publish menu is named Store).
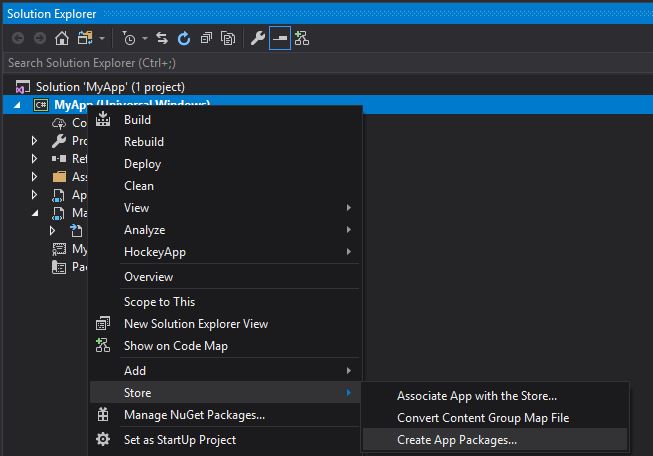
Select Sideloading in the first page of the wizard and then click Next.

On the Select signing method page, select whether to skip packaging signing or select a certificate for signing. You can select a certificate from your local certificate store, select a certificate file, or create a new certificate. For an MSIX package to be installed on an end user's machine, it must be signed with a cert that is trusted on the machine.

Complete the Select and configure packages page as described in the Create your app package upload file using Visual Studio section.
Install your app package by double clicking
App packages can be installed simply by double clicking the app package file. To do so, navigate to your app package or app bundle file, and double click it. App Installer launches and provides the basic app information as well as an install button, installation progress bar, and any relevant error messages.
Note
App Installer assumes that the package was signed with a cert trusted on the device. If it wasn't, you will need to install the signing certificate to the Trusted People or Trusted Publishers Certification Authorities store on the device. If you're not sure how to do this, see Installing Test Certificates.
Install your app package using an install script
Open the
*_Testfolder.Right-click on the Add-AppDevPackage.ps1 file. Choose Run with PowerShell and follow the prompts.
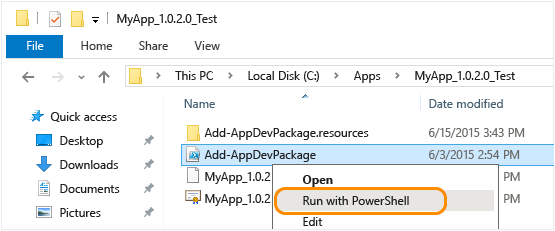
When the app package has been installed, the PowerShell window displays this message: Your app was successfully installed.
Click the Start button to search for the app by name, and then launch it.
Next Steps: Debug and test your app package
See Run, debug, and test an app package for how you can debug your application in Visual Studio or using Windows debugging tools.
Generate an app package upload file for Store submission
To distribute your app to the Microsoft Store, we recommend that you generate an app package upload file (.msixupload or .appxupload) and submit this file to Partner Center. Although it is possible to submit an app package or app bundle to Partner Center alone, we recommend that you submit an app package upload file instead.
You can create an app package upload file by using the Create App Packages wizard in Visual Studio, or you can create one manually from existing app packages or app bundles.
Note
If you want to create an app package (.msix or.appx) or app bundle (.msixbundle or .appxbundle) manually, see Create an app package with the MakeAppx.exe tool.
Create your app package upload file using Visual Studio
Note
The following instructions and screenshots describe the process as of Visual Studio 2019 version 16.3. If you're using an earlier version, some of the UI might look different.
In Solution Explorer, open the solution for your UWP app project.
Right-click the project and choose Publish->Create App Packages (before Visual Studio 2019 version 16.3, the Publish menu is named Store). If this option is disabled or does not appear at all, check that the project is a Universal Windows project.

The Create App Packages wizard appears.
Select Microsoft Store using a new app name in the first dialog and then click Next.
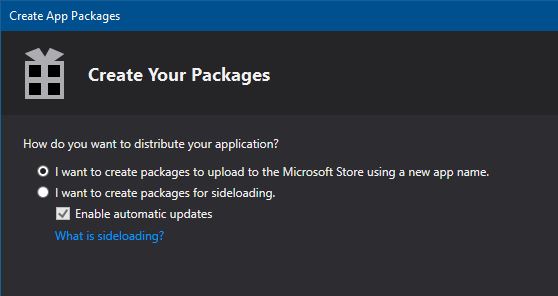
If you have already associated your project with an app in the Store, you also have an option to create packages for the associated Store app. If you choose Sideloading, Visual Studio will not generate the app package upload (.msixupload or .appxupload) file for Partner Center submissions. If you only want to create an MSIX packge or bundle for non-Store distribution, then you can select this option.
On the next page, sign in with your developer account to Partner Center. If you don't have a developer account yet, the wizard will help you create one.
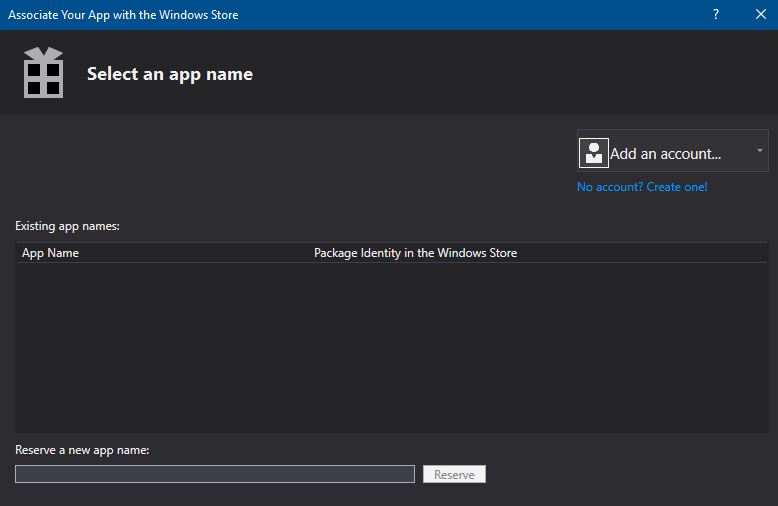
Select the app name for your package from the list of apps currently registered to your account, or reserve a new one if you have not already reserved one in Partner Center.
Make sure you select all three architecture configurations (x86, x64, and ARM) in the Select and Configure Packages dialog to ensure that your app can be deployed to the widest range of devices. In the Generate app bundle listbox, select Always. An app bundle (.appxbundle or .msixbundle) is preferred over a single app package file because it contains a collection of app packages configured for each type of processor architecture. When you choose to generate the app bundle, the app bundle will be included in the final app package upload (.appxupload or .msixupload) file along with debugging and crash analytic information. If you're unsure which architecture(s) to choose, or want to learn more about which architectures are used by various devices, see App package architectures.
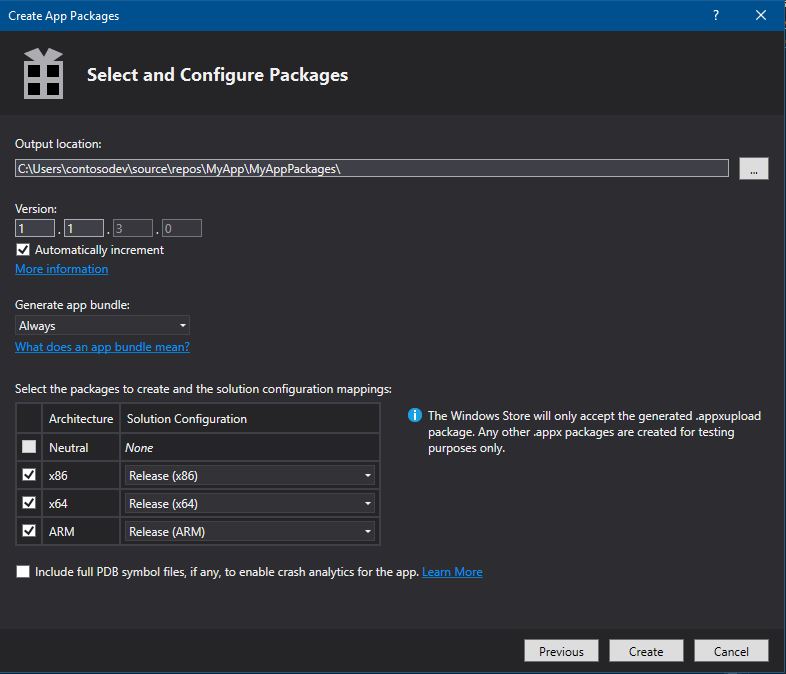
Include public symbol files to Analyze app performance from Partner Center after your app has been published. Configure any additional details such as version numbering or the package output location.
Click Create to generate the app package. If you selected one of the I want to create packages to upload to the Microsoft Store options in step 3 and are creating a package for Partner Center submission, the wizard will create a package upload (.appxupload or .msixupload) file. If you selected I want to create packages for sideloading in step 3, the wizard will create either a single app package or an app bundle based on your selections in step 6.
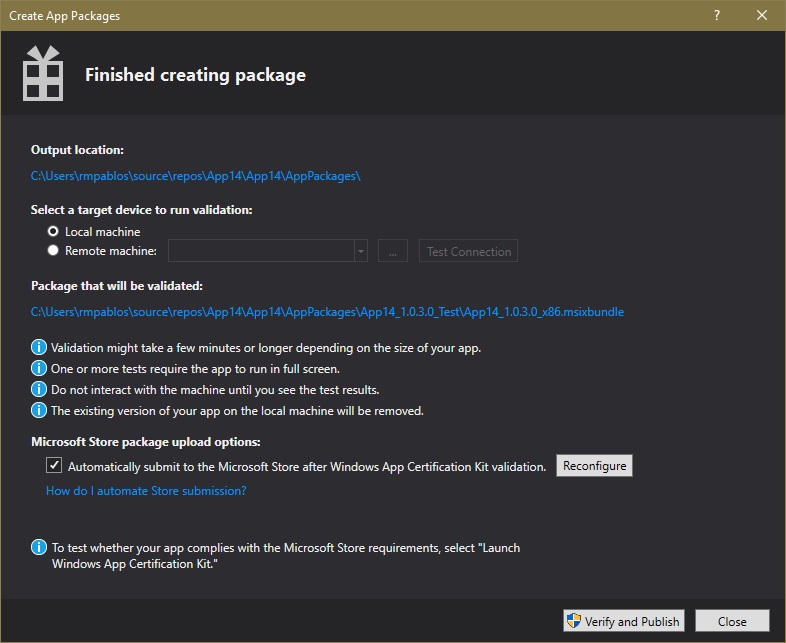
When your app has been successfully packaged, you will see this dialog and you can retrieve your app package upload file from the specified output location. At this point, you can validate your app package on the local machine or a remote machine and automate store submissions.
Create your app package upload file manually
Place the following files in a folder:
- One or more app packages (.msix or .appx) or an app bundle (.msixbundle or .appxbundle).
- An .appxsym file. This is a compressed .pdb file containing public symbols of your app used for crash analytics in Partner Center. You can omit this file, but if you do, no crash analytic or debugging information will be available for your app.
Select all the files within the folder, right-click the files, and select Send to -> Compressed (zipped) folder.
Change the new zip file's extension name from .zip to .msixupload or .appxupload.
Validate your app package
Validate your app before you submit it to Partner Center for certification on a local or remote machine. You can only validate release builds for your app package, not debug builds. For more information on submitting your app to Partner Center, see App submissions.
Validate your app package locally
In the final Package Creation Completed page of the Create App Packages wizard, leave the Local machine option selected and click Launch Windows App Certification Kit. For more information about testing your app with the Windows App Certification Kit, see Windows App Certification Kit.
The Windows App Certification Kit (WACK) performs various tests and returns the results. See Windows App Certification Kit tests for more specific information.
If you have a remote Windows 10 device that you want to use for testing, you will need to install the Windows App Certification Kit manually on that device. The next section will walk you through these steps. After you've done that, then you can select Remote machine and click Launch Windows App Certification Kit to connect to the remote device and run the validation tests.
After WACK has finished and your app has passed certification, you are ready to submit your app to Partner Center. Make sure you upload the correct file. The default location of the file can be found in the root folder of your solution
\[AppName]\AppPackagesand it will end with the .appxupload or .msixupload file extension. The name will be of the form[AppName]_[AppVersion]_x86_x64_arm_bundle.appxuploador[AppName]_[AppVersion]_x86_x64_arm_bundle.msixuploadif you opted for an app bundle with all of the package architecture selected.
Validate your app package on a remote Windows 10 device
Enable your Windows 10 device for development by following the Enable your device for development instructions.
Important
You cannot validate your app package on a remote ARM device for Windows 10.
Download and install the remote tools for Visual Studio. These tools are used to run the Windows App Certification Kit remotely. You can get more information about these tools including where to download them by visiting Run MSIX applications on a remote machine.
Download the required Windows App Certification Kit and then install it on your remote Windows 10 device.
On the Package Creation Completed page of the wizard, choose the Remote Machine option button, and then choose the ellipsis button next to the Test Connection button.
Note
The Remote Machine option button is available only if you selected at least one solution configuration that supports validation. For more information about testing your app with the WACK, see Windows App Certification Kit.
Specify a device form inside your subnet, or provide the Domain Name Server (DNS) name or IP address of a device that's outside of your subnet.
In the Authentication Mode list, choose None if your device doesn't require you to log onto it by using your Windows credentials.
Choose the Select button, and then choose the Launch Windows App Certification Kit button. If the remote tools are running on that device, Visual Studio connects to the device and then performs the validation tests. See Windows App Certification Kit tests.
Automate Store submissions
Starting in Visual Studio 2019, you can submit the generated .appxupload file to the Microsoft Store directly from the IDE by selecting the Automatically submit to the Microsoft Store after Windows App Certification Kit validation option at the end of the Create App Packages wizard. This feature leverages Azure Active Directory for accessing the Partner Center account info needed to publish your app. To use this feature, you'll need associate Azure Active Directory with your Partner Center account and retrieve several credentials required for submissions.
Associate Azure Active Directory with your Partner Center account
Before you can retrieve the credentials that are required for automatic Store submissions, you must first follow these steps in the Partner Center dashboard if you have not done so already.
Associate your Partner Center account with your organization's Azure Active Directory. If your organization already uses Office 365 or other business services from Microsoft, you already have Azure AD. Otherwise, you can create a new Azure AD tenant from within Partner Center at no additional charge.
Add an Azure AD application to your partner Center account. This Azure AD application represents the app or service that you will use to access submissions for your Dev Center account. You must assign this application to the Manager role. If this application already exists in your Azure AD directory, you can select it on the Add Azure AD applications page to add it to your Dev Center account. Otherwise, you can create a new Azure AD application on the Add Azure AD applications page.
Retrieve the credentials required for submissions
Next, you can retrieve the Partner Center credentials required for submissions: the Azure Tenant ID, the Client ID and the Client key.
Go to the Partner Center dashboard and sign in with your Azure AD credentials.
On the Partner Center dashboard, select the gear icon (near the upper right corner of the dashboard) and then select Developer settings.
In the Settings menu in the left pane, click Users.
Click the name of your Azure AD application to go to the application's settings. On this page, copy the Tenant ID and Client ID values.
In the Keys section, click Add new key. On the next screen, copy the Key value, which corresponds to the client secret. You will not be able to access this info again after you leave this page, so make sure to not lose it. For more information, see Manage keys for an Azure AD application.
Configure automatic Store submissions in Visual Studio
After you complete the previous steps, you can configure automatic Store submissions in Visual Studio 2019.
At the end of the Create App Packages wizard, select Automatically submit to the Microsoft Store after Windows App Certification Kit validation and click Reconfigure.
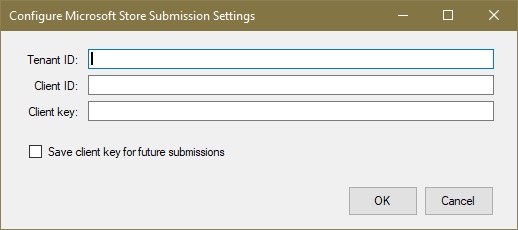
In the Configure Microsoft Store Submission settings dialog, enter the Azure tenant ID, Client ID, and Client key.
Important
Your credentials can be saved to your profile to be used in future submissions
Click OK.
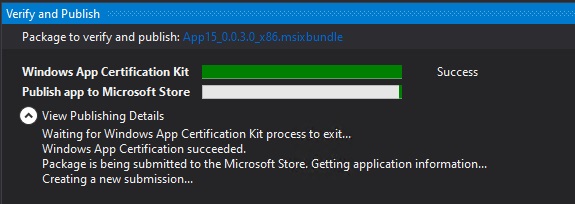
The submission will start after the WACK test have finished. You can track the submission progress in the Verify and Publish window.
