Note
Access to this page requires authorization. You can try signing in or changing directories.
Access to this page requires authorization. You can try changing directories.
Power Platform enables web API developers to quickly build mobile or web applications using a Power Apps canvas app as a front end. With the Power Platform connected service in Visual Studio 2022, ASP.NET web API developers can easily create a custom connector for use with Power Apps and Power Automate.
You can use Visual Studio dev tunnels to create a canvas app before you publish your API to a public endpoint. Dev tunnels create an ad-hoc connection between your web API running locally and your Power Apps. You can use them to locally test and debug your web API in the context of the Power Platform in real-time (inner loop).
This tutorial uses the sample ASP.NET Weather web API to add a connection to a canvas app. It's based on the Create a web API with ASP.NET Core tutorial.
Prerequisites
- Visual Studio 2022 version 17.6 Preview 2 with the ASP.NET and web development workload installed. You need to be signed in to Visual Studio to create and use dev tunnels. The feature isn't available in Visual Studio for Mac.
- A Power Platform developer environment with permission to create custom connectors
Create an ASP.NET project in Visual Studio
- Create an ASP.NET Core web API project.
- Select Next.
- Enter WeatherSample for the Project name, and then select Next.
- Select Create.
The WeatherSample project contains an example controller for a RESTful HTTP service.
Add Power Platform as a connected service

In Solution Explorer, right-click the Connected Services node and select Manage Connected Services from the context menu.
In the Connected Services tab, select the + icon for Service Dependencies.
On the Add dependency dialog, type
Power Platforminto the search box.Select Microsoft Power Platform, and then select Next.
If you aren't signed in already, sign into your Microsoft Power Platform account. If you don't have a Power Platform account, Create a Developer Environment.
In the Connect to Microsoft Power Platform screen: select your developer environment.
In Custom connectors name, the value
WeatherSample_Connectorshould already be set.In Select a public dev tunnel, select the + icon.
- In the field Name, type
SampleTunnel. - Select Tunnel Type: Persistent.
- Select Access : public.
- Select OK.
- In the field Name, type
Select Finish
Once the connected service is configured, select Close.
Create a canvas app with the custom connector
When Visual Studio runs a web app and a tunnel is active, the web browser opens to a tunnel URL instead of a localhost URL.
Run your Visual Studio solution and start debugging.
When the browser opens, a warning page opens with the first request sent to the tunnel URL. Select Continue.
With the web API running, open Power Apps in a new browser tab.
Select your developer environment in the upper-right corner.
Create a blank canvas app with Phone as the format.
In the top menu, select Add data.
Search for and select the WeatherSample_Connector, and then select Connect. More information: Add connections to your canvas app
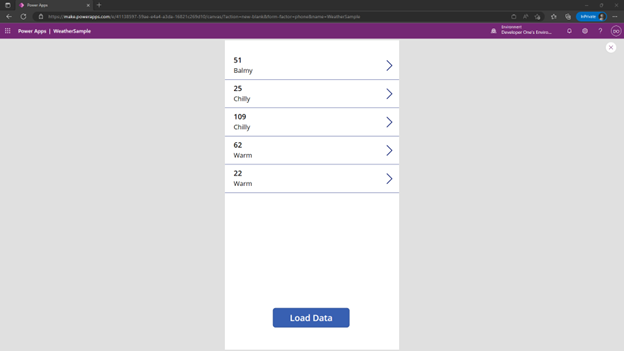
Insert a button and drag it to the bottom of the form.
Change the button Text to Load Data.
Enter the following formula in the button's OnSelect property:
ClearCollect(weatherCollection, WeatherSample_Connector.GetWeatherForecast())Insert a vertical gallery
Select the weatherCollection as the data source, and then change the layout to Title and subtitle.
Run the app. It should look like the following example:
Debug your API
With your canvas app running, set a breakpoint and debug it. You can also use Hot Reload.
See also
What are canvas apps
How to use dev tunnels in Visual Studio 2022 with ASP.NET Core apps