Registrar o usuário atual para notificações por push usando o ASP.NET
Visão geral
Este tópico mostra como solicitar o registro de notificações por push com os Hubs de Notificação do Azure, quando o registro é executado pela ASP.NET Web API. Este tópico estende o tutorial Notificar usuários com Hubs de Notificação. Você já deve ter concluído as etapas necessárias nesse tutorial para criar o serviço móvel autenticado. Para obter mais informações sobre o cenário de notificação aos usuários, consulte Notificar usuários com Hubs de Notificação.
Atualizar o aplicativo
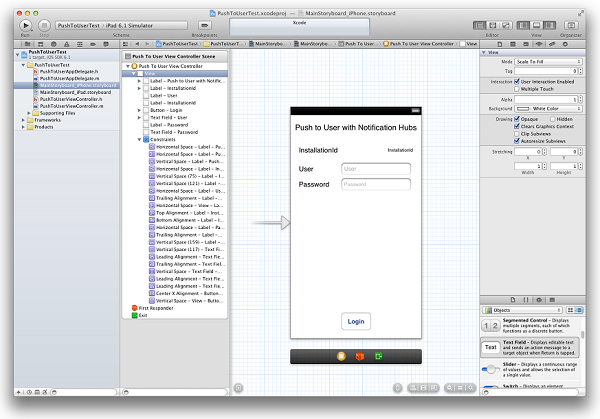
No MainStoryboard_iPhone.storyboard, adicione os seguintes componentes da biblioteca de objetos:
Label: "Push to User with Notification Hubs"
Label: "InstallationId"
Label: "User"
Text Field: "User"
Label: "Password"
Text Field: "Password"
Button: "Login"
Neste ponto, o storyboard é semelhante ao seguinte:
No editor do assistente, crie saídas para todos os controles comutados e chame-os, conecte os campos de texto com o Controlador de Exibição (delegado) e crie uma Ação para o botão de logon.

O arquivo BreakingNewsViewController.h agora deve conter o seguinte código:
@property (weak, nonatomic) IBOutlet UILabel *installationId;
@property (weak, nonatomic) IBOutlet UITextField *User;
@property (weak, nonatomic) IBOutlet UITextField *Password;

- (IBAction)login:(id)sender;
Criar uma classe chamada
DeviceInfo, e copiar o seguinte código na seção de interface do arquivo DeviceInfo.h:@property (readonly, nonatomic) NSString* installationId; @property (nonatomic) NSData* deviceToken;Copie o código a seguir na seção de implementação do arquivo DeviceInfo.m:
@synthesize installationId = _installationId;

- (id)init {
    if (!(self = [super init]))
        return nil;

    NSUserDefaults *defaults = [NSUserDefaults standardUserDefaults];
    _installationId = [defaults stringForKey:@"PushToUserInstallationId"];
    if(!_installationId) {
        CFUUIDRef newUUID = CFUUIDCreate(kCFAllocatorDefault);
        _installationId = (__bridge_transfer NSString *)CFUUIDCreateString(kCFAllocatorDefault, newUUID);
        CFRelease(newUUID);

        //store the install ID so we don't generate a new one next time
        [defaults setObject:_installationId forKey:@"PushToUserInstallationId"];
        [defaults synchronize];
    }

    return self;
}

- (NSString*)getDeviceTokenInHex {
    const unsigned *tokenBytes = [[self deviceToken] bytes];
    NSString *hexToken = [NSString stringWithFormat:@"%08X%08X%08X%08X%08X%08X%08X%08X",
                            ntohl(tokenBytes[0]), ntohl(tokenBytes[1]), ntohl(tokenBytes[2]),
                            ntohl(tokenBytes[3]), ntohl(tokenBytes[4]), ntohl(tokenBytes[5]),
                            ntohl(tokenBytes[6]), ntohl(tokenBytes[7])];
    return hexToken;
}
No PushToUserAppDelegate.h, adicione o seguinte singleton de propriedade:
@property (strong, nonatomic) DeviceInfo* deviceInfo;No método
didFinishLaunchingWithOptionsem PushToUserAppDelegate.m, adicione o seguinte código:self.deviceInfo = [[DeviceInfo alloc] init]; [[UIApplication sharedApplication] registerForRemoteNotificationTypes: UIRemoteNotificationTypeAlert | UIRemoteNotificationTypeBadge | UIRemoteNotificationTypeSound];A primeira linha inicializa o singleton
DeviceInfo. A segunda linha inicia o registro das notificações por push, que já estará presente se você já tiver concluído o tutorial Introdução aos Hubs de Notificação.Em PushToUserAppDelegate.m, implemente o método
didRegisterForRemoteNotificationsWithDeviceTokenem seu AppDelegate e adicione o seguinte código:self.deviceInfo.deviceToken = deviceToken;Isso define o token de dispositivo para a solicitação.
Observação
Neste ponto, não deve haver nenhum outro código nesse método. Se você já tiver uma chamada para o método
registerNativeWithDeviceTokenque foi adicionado quando concluiu o tutorial Enviar notificações por push para aplicativos iOS usando os Hubs de Notificação do Azure, deve comentar ou remover essa chamada.No arquivo
PushToUserAppDelegate.m, adicione o seguinte método de manipulador:* (void) application:(UIApplication *) application didReceiveRemoteNotification:(NSDictionary *)userInfo { NSLog(@"%@", userInfo); UIAlertView *alert = [[UIAlertView alloc] initWithTitle:@"Notification" message: [userInfo objectForKey:@"inAppMessage"] delegate:nil cancelButtonTitle: @"OK" otherButtonTitles:nil, nil]; [alert show]; }Esse método exibe um alerta na interface do usuário quando seu aplicativo recebe notificações enquanto está em execução.
Abra o arquivo
PushToUserViewController.me retorne o teclado na seguinte implementação:- (BOOL)textFieldShouldReturn:(UITextField *)theTextField { if (theTextField == self.User || theTextField == self.Password) { [theTextField resignFirstResponder]; } return YES; }No método
viewDidLoadno arquivoPushToUserViewController.m, inicialize o rótuloinstallationIdda seguinte maneira:DeviceInfo* deviceInfo = [(PushToUserAppDelegate*)[[UIApplication sharedApplication]delegate] deviceInfo]; Self.installationId.text = deviceInfo.installationId;Adicione as seguintes propriedades na interface em
PushToUserViewController.m:@property (readonly) NSOperationQueue* downloadQueue; - (NSString*)base64forData:(NSData*)theData;Em seguida, adicione a seguinte implementação:
- (NSOperationQueue *)downloadQueue {
    if (!_downloadQueue) {
        _downloadQueue = [[NSOperationQueue alloc] init];
        _downloadQueue.name = @"Download Queue";
        _downloadQueue.maxConcurrentOperationCount = 1;
    }
    return _downloadQueue;
}

// base64 encoding
- (NSString*)base64forData:(NSData*)theData
{
    const uint8_t* input = (const uint8_t*)[theData bytes];
    NSInteger length = [theData length];

    static char table[] = "ABCDEFGHIJKLMNOPQRSTUVWXYZabcdefghijklmnopqrstuvwxyz0123456789+/=";

    NSMutableData* data = [NSMutableData dataWithLength:((length + 2) / 3) * 4];
    uint8_t* output = (uint8_t*)data.mutableBytes;

    NSInteger i;
    for (i=0; i < length; i += 3) {
        NSInteger value = 0;
        NSInteger j;
        for (j = i; j < (i + 3); j++) {
            value <<= 8;

            if (j < length) {
                value |= (0xFF & input[j]);
            }
        }

        NSInteger theIndex = (i / 3) * 4;
        output[theIndex + 0] =                    table[(value >> 18) & 0x3F];
        output[theIndex + 1] =                    table[(value >> 12) & 0x3F];
        output[theIndex + 2] = (i + 1) < length ? table[(value >> 6)  & 0x3F] : '=';
        output[theIndex + 3] = (i + 2) < length ? table[(value >> 0)  & 0x3F] : '=';
    }

    return [[NSString alloc] initWithData:data encoding:NSASCIIStringEncoding];
}
Copie o seguinte código no método de manipulador de
logincriado pelo XCode:DeviceInfo* deviceInfo = [(PushToUserAppDelegate*)[[UIApplication sharedApplication]delegate] deviceInfo]; // build JSON NSString* json = [NSString stringWithFormat:@"{\"platform\":\"ios\", \"instId\":\"%@\", \"deviceToken\":\"%@\"}", deviceInfo.installationId, [deviceInfo getDeviceTokenInHex]]; // build auth string NSString* authString = [NSString stringWithFormat:@"%@:%@", self.User.text, self.Password.text]; NSMutableURLRequest* request = [NSMutableURLRequest requestWithURL:[NSURL URLWithString:@"http://nhnotifyuser.azurewebsites.net/api/register"]]; [request setHTTPMethod:@"POST"]; [request setHTTPBody:[json dataUsingEncoding:NSUTF8StringEncoding]]; [request addValue:[@([json lengthOfBytesUsingEncoding:NSUTF8StringEncoding]) description] forHTTPHeaderField:@"Content-Length"]; [request addValue:@"application/json" forHTTPHeaderField:@"Content-Type"]; [request addValue:[NSString stringWithFormat:@"Basic %@",[self base64forData:[authString dataUsingEncoding:NSUTF8StringEncoding]]] forHTTPHeaderField:@"Authorization"]; // connect with POST [NSURLConnection sendAsynchronousRequest:request queue:[self downloadQueue] completionHandler:^(NSURLResponse* response, NSData* data, NSError* error) { // add UIAlert depending on response. if (error != nil) { NSHTTPURLResponse* httpResponse = (NSHTTPURLResponse*)response; if ([httpResponse statusCode] == 200) { UIAlertView *alert = [[UIAlertView alloc] initWithTitle:@"Back-end registration" message:@"Registration successful" delegate:nil cancelButtonTitle: @"OK" otherButtonTitles:nil, nil]; [alert show]; } else { NSLog(@"status: %ld", (long)[httpResponse statusCode]); } } else { NSLog(@"error: %@", error); } }];Esse método recebe uma ID de instalação e o canal para notificações por push e a envia juntamente com o tipo de dispositivo para o método da API Web autenticada que cria um registro em Hubs de Notificação. Essa API Web foi definida em Notificar usuários com Hubs de Notificação.
Agora que o aplicativo cliente foi atualizado, retorne para Notificar usuários com Hubs de Notificação e atualize o serviço móvel para enviar notificações por meio de Hubs de Notificação.