Tutorial: Criar um aplicativo com um serviço front-end de API do Java e um serviço back-end com estado no Azure Service Fabric
Este tutorial é a primeira parte de uma série. Ao terminar, você terá um aplicativo de Votação com um front-end da Web em Java que salva os resultados da votação em um serviço de back-end com estado no Azure Service Fabric. Esta série de tutoriais exige que você tenha um computador de desenvolvedor com Mac OSX ou Linux. Se você não quiser criar manualmente o aplicativo de votação, baixe o código-fonte do aplicativo concluído e vá direto para Percorrer o aplicativo de exemplo votação. Além disso, siga o Guia de Início Rápido para serviços confiáveis do Java.
Nesta série de tutoriais, você aprenderá a:
- Implantar um aplicativo Reliable Services no Service Fabric em Java
- Implantar e depurar o aplicativo em um cluster local
- Implantar o aplicativo em um cluster do Azure
- Configurar monitoramento e diagnóstico para o aplicativo
- Configurar CI/CD
Na primeira parte da série, você aprenderá a:
- Criar um serviço confiável com estado Java
- Criar um serviço de aplicativo Web sem estado Java
- Usar o serviço remoto para se comunicar com o serviço com estado
- Implantar o aplicativo em um cluster local do Service Fabric
Pré-requisitos
Antes de começar este tutorial:
- Se você não tiver uma assinatura do Azure, crie uma conta gratuita.
- Configurar seu ambiente de desenvolvimento no Mac ou no Linux. Siga as instruções para instalar o plug-in do Eclipse, o Gradle, o SDK do Service Fabric e a CLI do Service Fabric (sfctl).
Criar o serviço sem estado Java de front-end
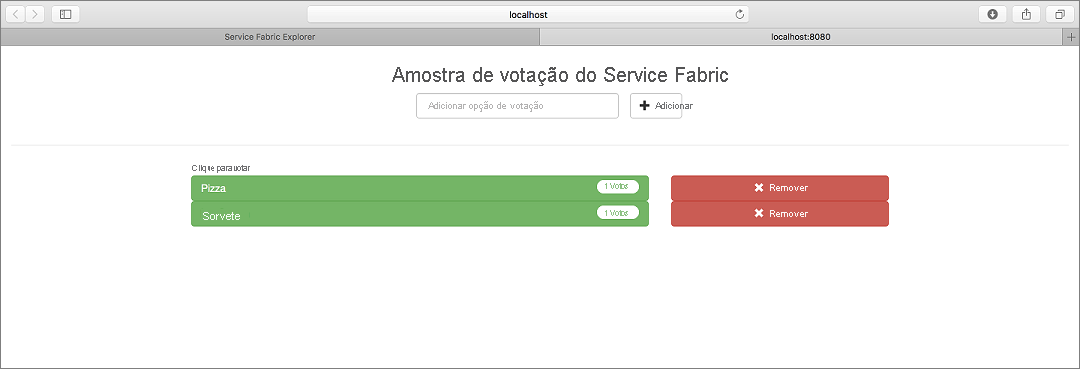
Primeiro, crie o front-end da Web do aplicativo de votação. Uma interface do usuário da Web desenvolvida com AngularJS envia solicitações para o serviço sem estado Java, que executa um servidor HTTP leve. Esse serviço processa cada solicitação e envia uma chamada de procedimento remoto ao serviço com estado para armazenar os votos.
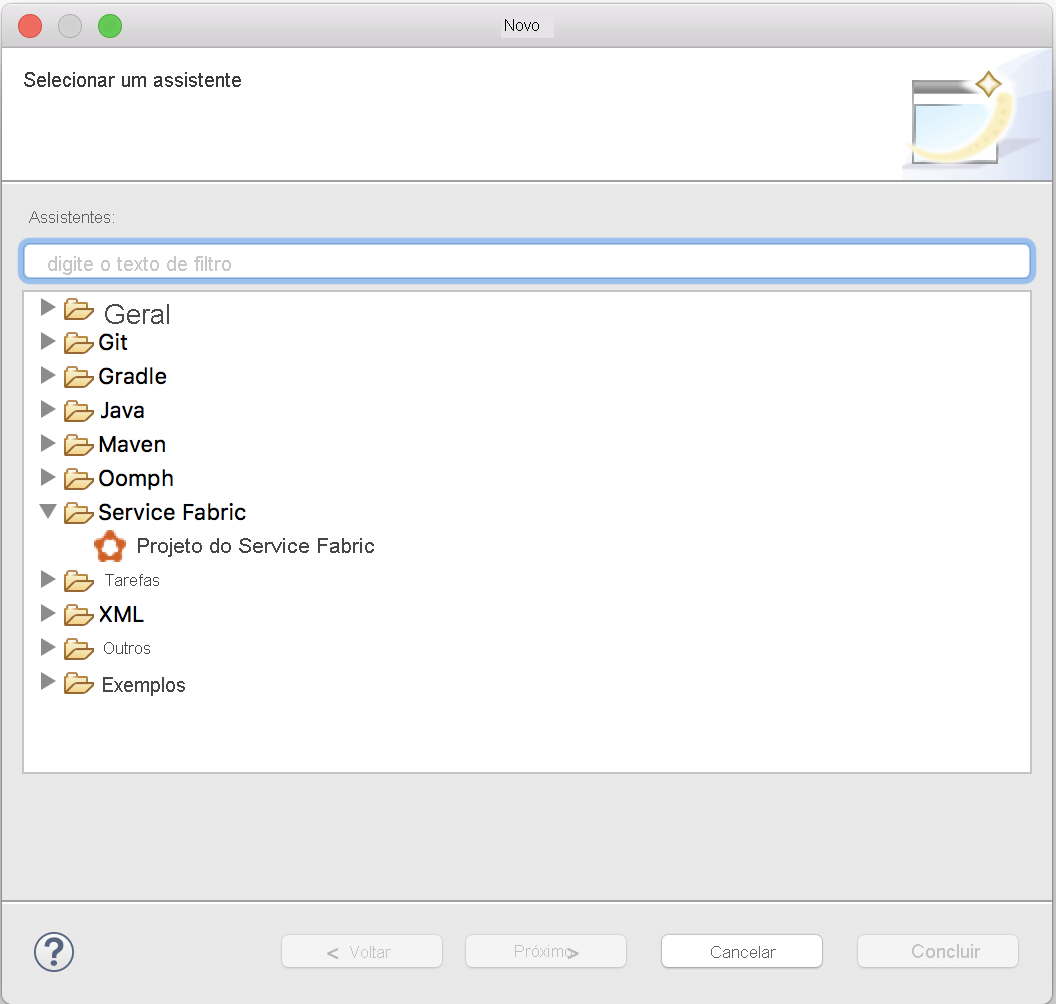
Abra o Eclipse.
Crie um projeto com Arquivo>Novo>Outros>Service Fabric>Projeto do Service Fabric.
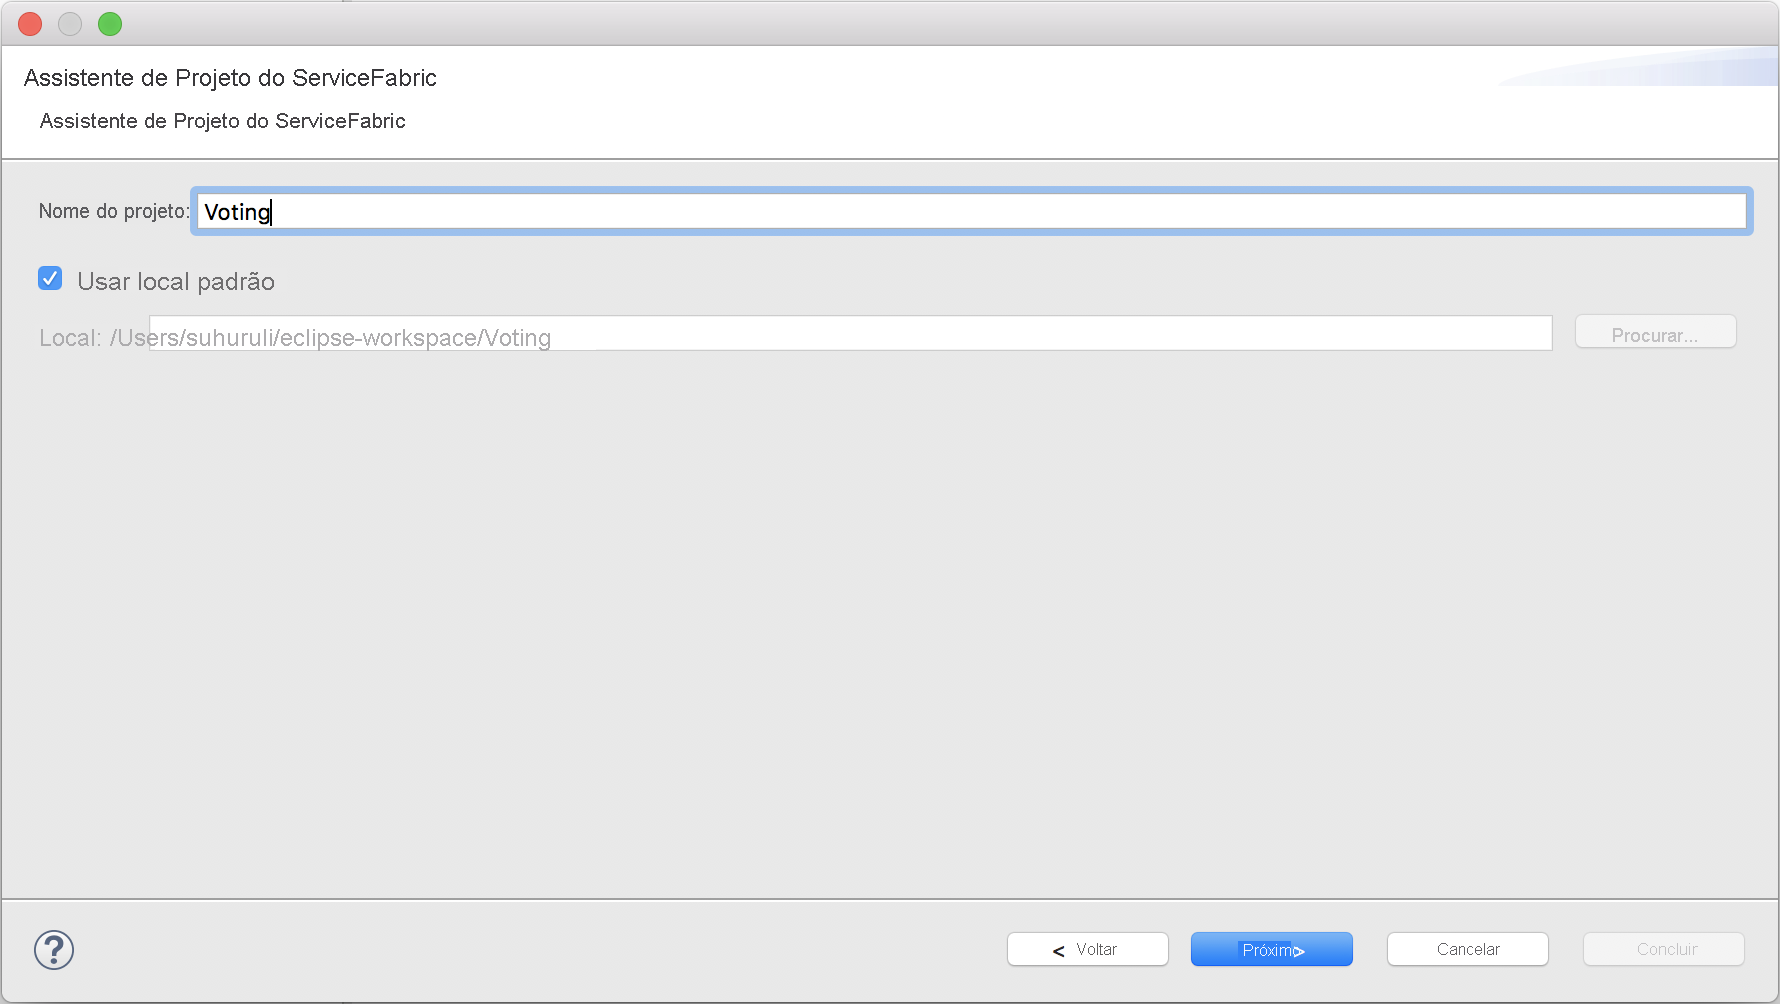
Na caixa de diálogo Assistente de Projeto ServiceFabric, dê ao projeto o nome Voting e selecione Avançar.
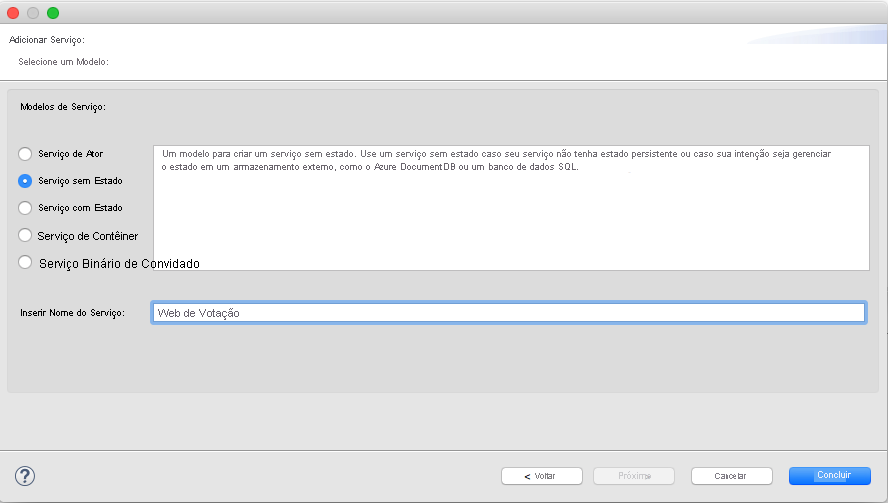
Na página Adicionar Serviço, selecione Serviço Sem Estado e nomeie seu serviço VotingWeb. Selecione Concluir para criar o projeto.
O Eclipse cria um aplicativo e um projeto de serviço e os exibe no Package Explorer.
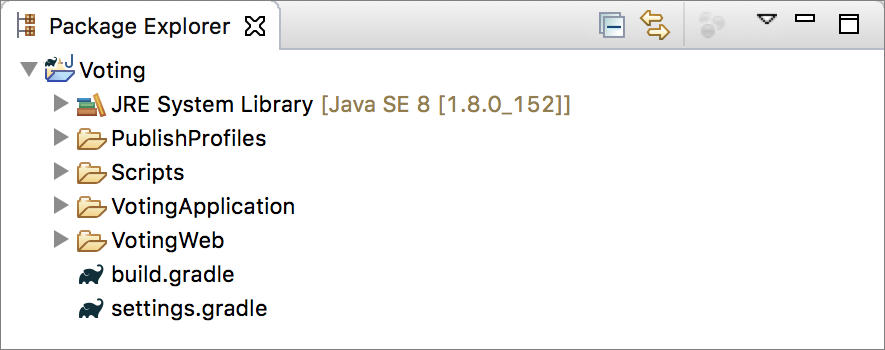
A tabela fornece uma breve descrição de cada item no package explorer na captura de tela anterior.
| Item do Package Explorer | Descrição |
|---|---|
| PublishProfiles | Contém arquivos JSON que descrevem os detalhes do perfil dos clusters local e do Azure Service Fabric. O conteúdo desses arquivos é usado pelo plug-in ao implantar o aplicativo. |
| Scripts | Contém scripts de auxiliar que podem ser usados na linha de comando para gerenciar rapidamente seu aplicativo com um cluster. |
| VotingApplication | Contém o aplicativo do Service Fabric que é enviado por push para o cluster do Service Fabric. |
| VotingWeb | Contém os arquivos de origem de serviço sem estado de front-end junto com o arquivo de compilação gradle relacionado. |
| build.gradle | Arquivo Gradle usado para gerenciar o projeto. |
| settings.gradle | Contém nomes dos projetos do Gradle nessa pasta. |
Adicionar HTML e JavaScript ao serviço VotingWeb
Para adicionar uma interface do usuário que possa ser renderizada pelo serviço sem estado, adicione um arquivo HTML. Esse arquivo HTML é renderizado pelo servidor HTTP leve inserido no serviço sem estado Java.
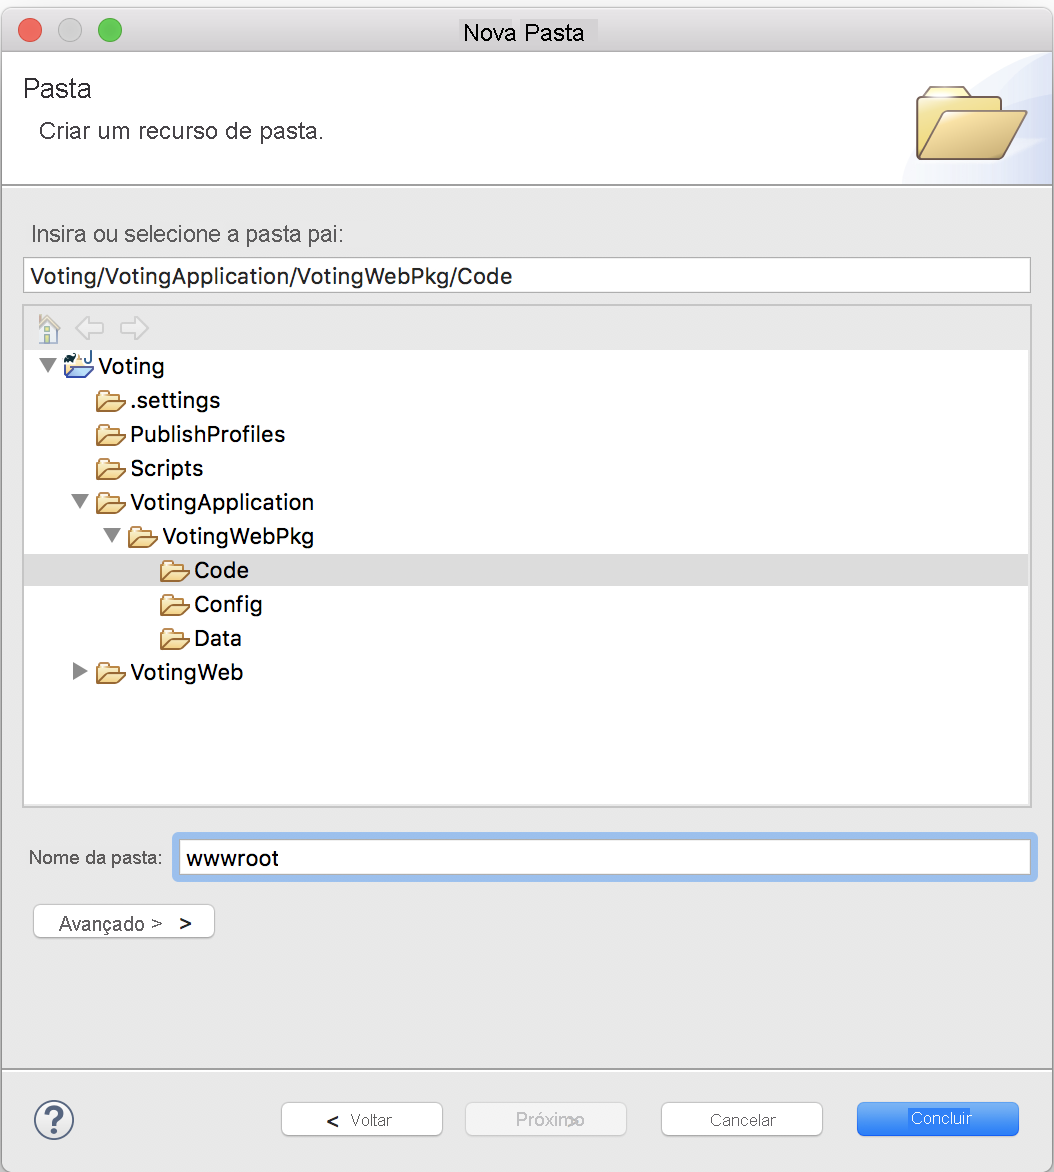
Expanda o diretório VotingApplication para acessar o diretório VotingWebPkg/VotingApplication/Code.
Clique com o botão direito do mouse no diretório Código e selecione Nova>Pasta.
Dê à pasta o nome wwwroot e selecione Concluir.
Adicione um arquivo a wwwroot chamado index.html e cole o conteúdo nele o conteúdo a seguir.
<!DOCTYPE html>
<html>
<script src="https://ajax.googleapis.com/ajax/libs/angularjs/1.6.4/angular.min.js"></script>
<script src="https://cdnjs.cloudflare.com/ajax/libs/angular-ui-bootstrap/0.13.4/ui-bootstrap-tpls.min.js"></script>
<link rel="stylesheet" href="https://maxcdn.bootstrapcdn.com/bootstrap/3.3.7/css/bootstrap.min.css">
<body>

<script>
var app = angular.module('VotingApp', ['ui.bootstrap']);
app.controller("VotingAppController", ['$rootScope', '$scope', '$http', '$timeout', function ($rootScope, $scope, $http, $timeout) {
    $scope.votes = [];

    $scope.refresh = function () {
        $http.get('getStatelessList')
            .then(function successCallback(response) {
        $scope.votes = Object.assign(
            {},
            ...Object.keys(response.data) .
            map(key => ({[decodeURI(key)]: response.data[key]}))
        )
        },
        function errorCallback(response) {
            alert(response);
        });
    };

    $scope.remove = function (item) {
       $http.get("removeItem", {params: { item: encodeURI(item) }})
            .then(function successCallback(response) {
                $scope.refresh();
            },
            function errorCallback(response) {
                alert(response);
            });
    };

    $scope.add = function (item) {
        if (!item) {return;}
        $http.get("addItem", {params: { item: encodeURI(item) }})
            .then(function successCallback(response) {
                $scope.refresh();
            },
            function errorCallback(response) {
                alert(response);
            });
    };
}]);
</script>

<div ng-app="VotingApp" ng-controller="VotingAppController" ng-init="refresh()">
    <div class="container-fluid">
        <div class="row">
            <div class="col-xs-8 col-xs-offset-2 text-center">
                <h2>Service Fabric Voting Sample</h2>
            </div>
        </div>

        <div class="row">
            <div class="col-xs-offset-2">
                <form style="width:50% ! important;" class="center-block">
                    <div class="col-xs-6 form-group">
                        <input id="txtAdd" type="text" class="form-control" placeholder="Add voting option" ng-model="item" />
                    </div>
                    <button id="btnAdd" class="btn btn-default" ng-click="add(item)">
                        <span class="glyphicon glyphicon-plus" aria-hidden="true"></span>
                        Add
                    </button>
                </form>
            </div>
        </div>

        <hr />

        <div class="row">
            <div class="col-xs-8 col-xs-offset-2">
                <div class="row">
                    <div class="col-xs-4">
                        Click to vote
                    </div>
                </div>
                <div class="row top-buffer" ng-repeat="(key, value)  in votes">
                    <div class="col-xs-8">
                        <button class="btn btn-success text-left btn-block" ng-click="add(key)">
                            <span class="pull-left">
                                {{key}}
                            </span>
                            <span class="badge pull-right">
                                {{value}} Votes
                            </span>
                        </button>
                    </div>
                    <div class="col-xs-4">
                        <button class="btn btn-danger pull-right btn-block" ng-click="remove(key)">
                            <span class="glyphicon glyphicon-remove" aria-hidden="true"></span>
                            Remove
                        </button>
                    </div>
                </div>
            </div>
        </div>
    </div>
</div>

</body>
</html>
Atualize o arquivo VotingWeb.java
No subprojeto VotingWeb, abra o arquivo VotingWeb/src/statelessservice/VotingWeb.java. O serviço VotingWeb é o gateway para o serviço sem estado e é responsável por configurar o ouvinte de comunicação para a API de front-end.
Substitua o método createServiceInstanceListeners existente no arquivo com que vem abaixo e salve as alterações.
@Override
protected List<ServiceInstanceListener> createServiceInstanceListeners() {

    EndpointResourceDescription endpoint = this.getServiceContext().getCodePackageActivationContext().getEndpoint(webEndpointName);
    int port = endpoint.getPort();

    List<ServiceInstanceListener> listeners = new ArrayList<ServiceInstanceListener>();
    listeners.add(new ServiceInstanceListener((context) -> new HttpCommunicationListener(context, port)));
    return listeners;
}
Adicionar o arquivo HTTPCommunicationListener.java
O ouvinte de comunicação HTTP atua como um controlador que configura o servidor HTTP e expõe as APIs que definem ações de votação. Clique com o botão direito do mouse no pacote statelessservice na pasta VotingWeb/src/statelessservice e, em seguida, selecione Novo>Arquivo. Dê ao arquivo o nome HttpCommunicationListener.java e selecione Concluir.
Substitua o conteúdo do arquivo pelo seguinte, depois salve as alterações. Posteriormente, em Atualizar o arquivo HttpCommunicationListener.java, esse arquivo será modificado para renderizar, ler e gravar dados de votação do serviço back-end. Por enquanto, o ouvinte simplesmente retorna o HTML estático para o aplicativo de votação.
// ------------------------------------------------------------
//  Copyright (c) Microsoft Corporation.  All rights reserved.
//  Licensed under the MIT License (MIT). See License.txt in the repo root for license information.
// ------------------------------------------------------------

package statelessservice;

import com.google.gson.Gson;
import com.sun.net.httpserver.HttpExchange;
import com.sun.net.httpserver.HttpHandler;
import com.sun.net.httpserver.Headers;

import java.io.File;
import java.io.OutputStream;
import java.io.FileInputStream;

import java.net.InetSocketAddress;
import java.net.URI;

import java.util.HashMap;
import java.util.Map;
import java.util.concurrent.CompletableFuture;
import java.util.logging.Level;
import java.util.logging.Logger;

import microsoft.servicefabric.services.communication.runtime.CommunicationListener;
import microsoft.servicefabric.services.runtime.StatelessServiceContext;
import microsoft.servicefabric.services.client.ServicePartitionKey;
import microsoft.servicefabric.services.remoting.client.ServiceProxyBase;
import microsoft.servicefabric.services.communication.client.TargetReplicaSelector;
import system.fabric.CancellationToken;

public class HttpCommunicationListener implements CommunicationListener {

    private static final Logger logger = Logger.getLogger(HttpCommunicationListener.class.getName());

    private static final String HEADER_CONTENT_TYPE = "Content-Type";
    private static final int STATUS_OK = 200;
    private static final int STATUS_NOT_FOUND = 404;
    private static final int STATUS_ERROR = 500;
    private static final String RESPONSE_NOT_FOUND = "404 (Not Found) \n";
    private static final String MIME = "text/html";
    private static final String ENCODING = "UTF-8";

    private static final String ROOT = "wwwroot/";
    private static final String FILE_NAME = "index.html";
    private StatelessServiceContext context;
    private com.sun.net.httpserver.HttpServer server;
    private ServicePartitionKey partitionKey;
    private final int port;

    public HttpCommunicationListener(StatelessServiceContext context, int port) {
        this.partitionKey = new ServicePartitionKey(0);
        this.context = context;
        this.port = port;
    }

    // Called by openAsync when the class is instantiated
    public void start() {
        try {
            logger.log(Level.INFO, "Starting Server");
            server = com.sun.net.httpserver.HttpServer.create(new InetSocketAddress(this.port), 0);
        } catch (Exception ex) {
            logger.log(Level.SEVERE, null, ex);
            throw new RuntimeException(ex);
        }

        // Responsible for rendering the HTML layout described in the previous step
        server.createContext("/", new HttpHandler() {
            @Override
            public void handle(HttpExchange t) {
                try {
                    File file = new File(ROOT + FILE_NAME).getCanonicalFile();

                    if (!file.isFile()) {
                      // Object does not exist or is not a file: reject with 404 error.
                      t.sendResponseHeaders(STATUS_NOT_FOUND, RESPONSE_NOT_FOUND.length());
                      OutputStream os = t.getResponseBody();
                      os.write(RESPONSE_NOT_FOUND.getBytes());
                      os.close();
                    } else {
                      Headers h = t.getResponseHeaders();
                      h.set(HEADER_CONTENT_TYPE, MIME);
                      t.sendResponseHeaders(STATUS_OK, 0);

                      OutputStream os = t.getResponseBody();
                      FileInputStream fs = new FileInputStream(file);
                      final byte[] buffer = new byte[0x10000];
                      int count = 0;
                      while ((count = fs.read(buffer)) >= 0) {
                        os.write(buffer,0,count);
                      }

                      fs.close();
                      os.close();
                    }
                } catch (Exception e) {
                    logger.log(Level.WARNING, null, e);
                }
            }
        });

        /*
        [Replace this entire comment block in the 'Connect the services' section]
        */

        server.setExecutor(null);
        server.start();
    }

    //Helper method to parse raw HTTP requests
    private Map<String, String> queryToMap(String query){
        Map<String, String> result = new HashMap<String, String>();
        for (String param : query.split("&")) {
            String pair[] = param.split("=");
            if (pair.length>1) {
                result.put(pair[0], pair[1]);
            }else{
                result.put(pair[0], "");
            }
        }
        return result;
    }

    //Called closeAsync when the service is shut down
    private void stop() {
        if (null != server)
            server.stop(0);
    }

    //Called by the Service Fabric runtime when this service is created on a node
    @Override
    public CompletableFuture<String> openAsync(CancellationToken cancellationToken) {
        this.start();
                    logger.log(Level.INFO, "Opened Server");
        String publishUri = String.format("http://%s:%d/", this.context.getNodeContext().getIpAddressOrFQDN(), port);
        return CompletableFuture.completedFuture(publishUri);
    }

    //Called by the Service Fabric runtime when the service is shut down
    @Override
    public CompletableFuture<?> closeAsync(CancellationToken cancellationToken) {
        this.stop();
        return CompletableFuture.completedFuture(true);
    }

    //Called by the Service Fabric runtime to forcibly shut this listener down
    @Override
    public void abort() {
        this.stop();
    }
}
Configurar a porta ouvinte
Quando o serviço de front-end do serviço VotingWeb é criado, o Service Fabric seleciona aleatoriamente uma porta na qual o serviço deve escutar. O serviço VotingWeb age como o front-end para este aplicativo e aceita o tráfego externo, portanto, vamos associar esse serviço a uma porta fixa e bem conhecida. No Gerenciador de Pacote, abra VotingApplication/VotingWebPkg/ServiceManifest.xml. Localize o recurso Ponto de extremidade na seção Recursos e altere o valor da Porta para 8080 (continuaremos usando essa porta em todo o tutorial). Para implantar e executar o aplicativo localmente, a porta de escuta do aplicativo deve estar aberta e disponível no computador. Cole o seguinte snippet de código a seguir no elemento ServiceManifest (ou seja, logo abaixo do elemento <DataPackage>).
<Resources>
    <Endpoints>
        <!-- This endpoint is used by the communication listener to obtain the port on which to
            listen. Please note that if your service is partitioned, this port is shared with
            replicas of different partitions that are placed in your code. -->
        <Endpoint Name="WebEndpoint" Protocol="http" Port="8080" />
    </Endpoints>
  </Resources>
Adicionar um serviço de back-end com estado ao seu aplicativo
Agora que o esqueleto do serviço de API Web Java foi concluído, vamos continuar e concluir o serviço de back-end com estado.
O Service Fabric permite que você armazene seus dados de forma consistente e confiável diretamente em seu serviço usando as coleções confiáveis. Coleções Confiáveis são um conjunto de classes de coleção confiável e altamente disponível. O uso dessas classes é conhecido por qualquer pessoa que tenha usado coleções de Java.
No Package Explorer, clique com o botão direito do mouse em Voting dentro do projeto de aplicativo e selecione Service Fabric>Adicionar Serviço do Service Fabric.
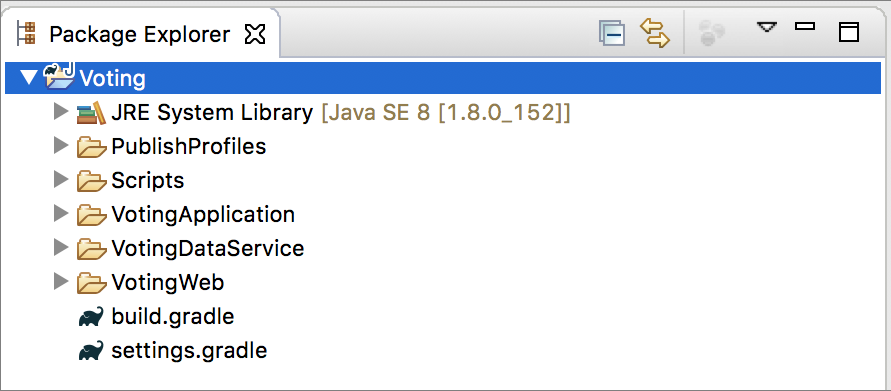
Na caixa de diálogo Adicionar Serviço, selecione Serviço com Estado e dê a ele o nome VotingDataService e selecione Adicionar Serviço.
Depois de criar seu projeto de serviço, você terá dois serviços em seu aplicativo. Conforme continua a criar o aplicativo, você pode adicionar mais serviços da mesma forma. Cada um pode seu próprio controle de versão e ser atualizado de forma independente.
O Eclipse cria um projeto de serviço e o exibe no Package Explorer.
Adicionar o arquivo VotingDataService.java
O arquivo VotingDataService.java contém os métodos que contêm a lógica para recuperar, adicionar e remover votos das coleções confiáveis. Adicione os métodos de classe VotingDataService a seguir ao arquivo VotingDataService/src/statefulservice/VotingDataService.java.
package statefulservice;

import java.util.HashMap;
import java.util.ArrayList;
import java.util.List;
import java.util.concurrent.CompletableFuture;
import java.util.concurrent.atomic.AtomicInteger;

import microsoft.servicefabric.services.communication.runtime.ServiceReplicaListener;

import microsoft.servicefabric.services.runtime.StatefulService;

import microsoft.servicefabric.services.remoting.fabrictransport.runtime.FabricTransportServiceRemotingListener;

import microsoft.servicefabric.data.ReliableStateManager;
import microsoft.servicefabric.data.Transaction;
import microsoft.servicefabric.data.collections.ReliableHashMap;
import microsoft.servicefabric.data.utilities.AsyncEnumeration;
import microsoft.servicefabric.data.utilities.KeyValuePair;

import system.fabric.StatefulServiceContext;

import rpcmethods.VotingRPC;

class VotingDataService extends StatefulService implements VotingRPC {
    private static final String MAP_NAME = "votesMap";
    private ReliableStateManager stateManager;

    protected VotingDataService (StatefulServiceContext statefulServiceContext) {
        super (statefulServiceContext);
    }

    @Override
    protected List<ServiceReplicaListener> createServiceReplicaListeners() {
        this.stateManager = this.getReliableStateManager();
        ArrayList<ServiceReplicaListener> listeners = new ArrayList<>();

        listeners.add(new ServiceReplicaListener((context) -> {
            return new FabricTransportServiceRemotingListener(context,this);
        }));

        return listeners;
    }

    // Method that will be invoked via RPC from the front end to retrieve the complete set of votes in the map
    public CompletableFuture<HashMap<String,String>> getList() {
        HashMap<String, String> tempMap = new HashMap<String, String>();

        try {

            ReliableHashMap<String, String> votesMap = stateManager
                    .<String, String> getOrAddReliableHashMapAsync(MAP_NAME).get();

            Transaction tx = stateManager.createTransaction();
            AsyncEnumeration<KeyValuePair<String, String>> kv = votesMap.keyValuesAsync(tx).get();
            while (kv.hasMoreElementsAsync().get()) {
                KeyValuePair<String, String> k = kv.nextElementAsync().get();
                tempMap.put(k.getKey(), k.getValue());
            }

            tx.close();


        } catch (Exception e) {
            e.printStackTrace();
        }

        return CompletableFuture.completedFuture(tempMap);
    }

    // Method that will be invoked via RPC from the front end to add an item to the votes list or to increase the
    // vote count for a particular item
    public CompletableFuture<Integer> addItem(String itemToAdd) {
        AtomicInteger status = new AtomicInteger(-1);

        try {

            ReliableHashMap<String, String> votesMap = stateManager
                    .<String, String> getOrAddReliableHashMapAsync(MAP_NAME).get();

            Transaction tx = stateManager.createTransaction();
            votesMap.computeAsync(tx, itemToAdd, (k, v) -> {
                if (v == null) {
                    return "1";
                }
                else {
                    int numVotes = Integer.parseInt(v);
                    numVotes = numVotes + 1;
                    return Integer.toString(numVotes);
                }
            }).get();

            tx.commitAsync().get();
            tx.close();

            status.set(1);
        } catch (Exception e) {
            e.printStackTrace();
        }

        return CompletableFuture.completedFuture(new Integer(status.get()));
    }

    // Method that will be invoked via RPC from the front end to remove an item
    public CompletableFuture<Integer> removeItem(String itemToRemove) {
        AtomicInteger status = new AtomicInteger(-1);
        try {
            ReliableHashMap<String, String> votesMap = stateManager
                    .<String, String> getOrAddReliableHashMapAsync(MAP_NAME).get();

            Transaction tx = stateManager.createTransaction();
            votesMap.removeAsync(tx, itemToRemove).get();
            tx.commitAsync().get();
            tx.close();

            status.set(1);
        } catch (Exception e) {
            e.printStackTrace();
        }

        return CompletableFuture.completedFuture(new Integer(status.get()));
    }

}
O esqueleto do serviço de front-end sem estado e do serviço de back-end foi criado.
Criar a interface de comunicação para o aplicativo
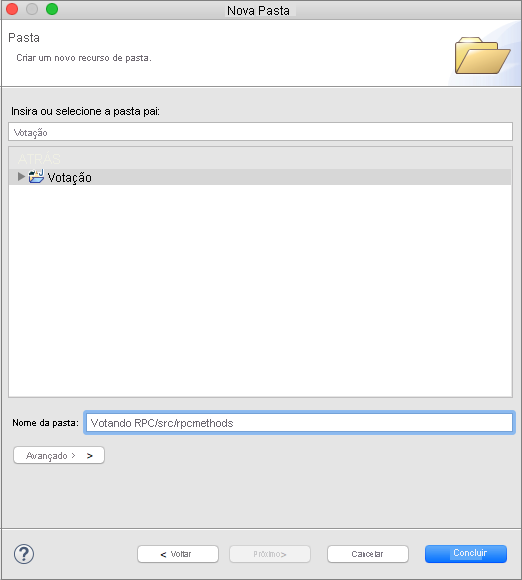
A próxima etapa é conectar o serviço sem estado de front-end e o serviço de back-end. Ambos serviços utilizam uma interface chamada VotingRPC, que define as operações do aplicativo de votação. Essa interface é implementada pelos serviços front-end e back-end para permitir RPCs (chamadas de procedimento remoto) entre os dois serviços. O inconveniente é que o Eclipse não é compatível com a adição de subprojetos do Gradle, portanto o pacote que contém essa interface deve ser adicionado manualmente.
Clique com o botão direito do mouse no projeto Voting no Package Explorer e selecione Nova>Pasta. Dê à pasta o nome VotingRPC/src/rpcmethods.
Crie um arquivo em Voting/VotingRPC/src/rpcmethods chamado VotingRPC.java e cole o conteúdo a seguir dentro do arquivo VotingRPC.java.
package rpcmethods;

import java.util.ArrayList;
import java.util.concurrent.CompletableFuture;
import java.util.List;
import java.util.HashMap;

import microsoft.servicefabric.services.remoting.Service;

public interface VotingRPC extends Service {
    CompletableFuture<HashMap<String, String>> getList();

    CompletableFuture<Integer> addItem(String itemToAdd);

    CompletableFuture<Integer> removeItem(String itemToRemove);
}
Crie um arquivo vazio chamado build.gradle no diretório Voting/VotingRPC e cole o seguinte dentro dele. Este arquivo gradle é usado para compilar e criar o arquivo jar que é importado por outros serviços.
apply plugin: 'java'
apply plugin: 'eclipse'

sourceSets {
  main {
     java.srcDirs = ['src']
     output.classesDir = 'out/classes'
      resources {
       srcDirs = ['src']
     }
   }
}

clean.doFirst {
    delete "${projectDir}/out"
    delete "${projectDir}/VotingRPC.jar"
}

repositories {
    mavenCentral()
}

dependencies {
    compile ('com.microsoft.servicefabric:sf-actors:1.0.0')
}

jar {
    from configurations.compile.collect {
        (it.isDirectory() && !it.getName().contains("native")) ? it : zipTree(it)}

    manifest {
            attributes(
            'Main-Class': 'rpcmethods.VotingRPC')
        baseName "VotingRPC"
        destinationDir = file('./')
    }

    exclude 'META-INF/*.RSA', 'META-INF/*.SF','META-INF/*.DSA'
}

defaultTasks 'clean', 'jar'
No arquivo Voting/settings.gradle, adicione uma linha para incluir o projeto recém-criado na build.
include ':VotingRPC'No arquivo Voting/VotingWeb/src/statelessservice/HttpCommunicationListener.java, substitua o bloco de comentário pelo conteúdo a seguir.
server.createContext("/getStatelessList", new HttpHandler() {
    @Override
    public void handle(HttpExchange t) {
        try {
            t.sendResponseHeaders(STATUS_OK,0);
            OutputStream os = t.getResponseBody();

            HashMap<String,String> list = ServiceProxyBase.create(VotingRPC.class, new URI("fabric:/VotingApplication/VotingDataService"), partitionKey, TargetReplicaSelector.DEFAULT, "").getList().get();
            String json = new Gson().toJson(list);
            os.write(json.getBytes(ENCODING));
            os.close();
        } catch (Exception e) {
            logger.log(Level.WARNING, null, e);
        }
    }
});

server.createContext("/removeItem", new HttpHandler() {
    @Override
    public void handle(HttpExchange t) {
        try {
            OutputStream os = t.getResponseBody();
            URI r = t.getRequestURI();

            Map<String, String> params = queryToMap(r.getQuery());
            String itemToRemove = params.get("item");

            Integer num = ServiceProxyBase.create(VotingRPC.class, new URI("fabric:/VotingApplication/VotingDataService"), partitionKey, TargetReplicaSelector.DEFAULT, "").removeItem(itemToRemove).get();

            if (num != 1)
            {
                t.sendResponseHeaders(STATUS_ERROR, 0);
            } else {
                t.sendResponseHeaders(STATUS_OK,0);
            }

            String json = new Gson().toJson(num);
            os.write(json.getBytes(ENCODING));
            os.close();
        } catch (Exception e) {
            logger.log(Level.WARNING, null, e);
        }

    }
});

server.createContext("/addItem", new HttpHandler() {
    @Override
    public void handle(HttpExchange t) {
        try {
            URI r = t.getRequestURI();
            Map<String, String> params = queryToMap(r.getQuery());
            String itemToAdd = params.get("item");

            OutputStream os = t.getResponseBody();
            Integer num = ServiceProxyBase.create(VotingRPC.class, new URI("fabric:/VotingApplication/VotingDataService"), partitionKey, TargetReplicaSelector.DEFAULT, "").addItem(itemToAdd).get();
            if (num != 1)
            {
                t.sendResponseHeaders(STATUS_ERROR, 0);
            } else {
                t.sendResponseHeaders(STATUS_OK,0);
            }

            String json = new Gson().toJson(num);
            os.write(json.getBytes(ENCODING));
            os.close();
        } catch (Exception e) {
            logger.log(Level.WARNING, null, e);
        }
    }
});
Adicione a instrução de importação apropriada na parte superior do arquivo Voting/VotingWeb/src/statelessservice/HttpCommunicationListener.java.
import rpcmethods.VotingRPC;
Nesse estágio, a funcionalidade para interfaces RPC, front-end e back-end estão completas. A próxima etapa é configurar os scripts do Gradle adequadamente antes de implantar um cluster do Service Fabric.
Percorrer o aplicativo de exemplo de votação
O aplicativo de votação consiste em dois serviços:
- Serviço de front-end da Web (VotingWeb) – um serviço de front-end da Web Java que fornece a página da Web e expõe APIs Web para se comunicar com o serviço de back-end.
- Serviço de back-end (VotingDataService) - um serviço Web Java que define métodos invocados por meio de chamadas RPC (procedimento remoto) para persistir os votos.
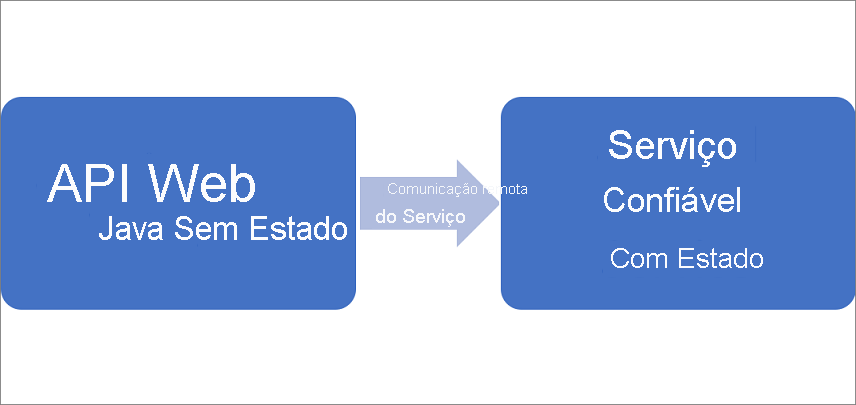
Quando você executa uma ação no aplicativo (adicionar item, votar, remover item), os seguintes eventos ocorrem:
Um JavaScript envia a solicitação pertinente para a API Web no serviço de front-end da Web como uma solicitação HTTP.
O serviço Web de front-end usa a funcionalidade interna de Comunicação Remota de serviço do Service Fabric para localizar e encaminhar a solicitação para o serviço de back-end.
O serviço de back-end define métodos que atualizam o resultado em um dicionário confiável. O conteúdo desse dicionário confiável é replicado em vários nós no cluster e persistido no disco. Todos os dados do aplicativo são armazenados no cluster.
Configurar scripts do Gradle
Nesta seção, os scripts do Gradle para o projeto são configurados.
Substitua o conteúdo do aquivo Voting/build.gradle pelo que segue.
apply plugin: 'java'
apply plugin: 'eclipse'

subprojects {
    apply plugin: 'java'
}

defaultTasks 'clean', 'jar', 'copyDeps'
Substitua o conteúdo do arquivo Voting/VotingWeb/build.gradle pelo seguinte.
apply plugin: 'java'
apply plugin: 'eclipse'

sourceSets {
  main {
     java.srcDirs = ['src']
     output.classesDir = 'out/classes'
      resources {
       srcDirs = ['src']
     }
   }
}

clean.doFirst {
    delete "${projectDir}/../lib"
    delete "${projectDir}/out"
    delete "${projectDir}/../VotingApplication/VotingWebPkg/Code/lib"
    delete "${projectDir}/../VotingApplication/VotingWebPkg/Code/VotingWeb.jar"
}

repositories {
    mavenCentral()
}

dependencies {
    compile ('com.microsoft.servicefabric:sf-actors:1.0.0-preview1')
    compile project(':VotingRPC')
}

task explodeDeps(type: Copy, dependsOn:configurations.compile) { task ->
    configurations.compile.filter {!it.toString().contains("native")}.each{
        from it
    }

    configurations.compile.filter {it.toString().contains("native")}.each{
        from zipTree(it)
    }
    into "../lib/"
    include "lib*.so", "*.jar"
}

task copyDeps<< {
    copy {
        from("../lib/")
        into("../VotingApplication/VotingWebPkg/Code/lib")
        include('lib*.so')
    }
}

compileJava.dependsOn(explodeDeps)

jar {
    from configurations.compile.collect {(it.isDirectory() && !it.getName().contains("native")) ? it : zipTree(it)}

    manifest {
        attributes(
            'Main-Class': 'statelessservice.VotingWebServiceHost')
        baseName "VotingWeb"
        destinationDir = file('../VotingApplication/VotingWebPkg/Code/')
    }

    exclude 'META-INF/*.RSA', 'META-INF/*.SF','META-INF/*.DSA'
}

defaultTasks 'clean', 'jar', 'copyDeps'
Substitua o conteúdo do arquivo Voting/VotingDataService/build.gradle.
apply plugin: 'java'
apply plugin: 'eclipse'

sourceSets {
  main {
     java.srcDirs = ['src']
     output.classesDir = 'out/classes'
      resources {
       srcDirs = ['src']
     }
   }
}

clean.doFirst {
    delete "${projectDir}/../lib"
    delete "${projectDir}/out"
    delete "${projectDir}/../VotingApplication/VotingDataServicePkg/Code/lib"
    delete "${projectDir}/../VotingApplication/VotingDataServicePkg/Code/VotingDataService.jar"
}

repositories {
    mavenCentral()
}

dependencies {
    compile ('com.microsoft.servicefabric:sf-actors:1.0.0-preview1')
    compile project(':VotingRPC')
}

task explodeDeps(type: Copy, dependsOn:configurations.compile) { task ->
    configurations.compile.filter {!it.toString().contains("native")}.each{
        from it
    }

    configurations.compile.filter {it.toString().contains("native")}.each{
        from zipTree(it)
    }
    into "../lib/"
    include "lib*.so", "*.jar"
}

compileJava.dependsOn(explodeDeps)

task copyDeps<< {
    copy {
        from("../lib/")
        into("../VotingApplication/VotingDataServicePkg/Code/lib")
        include('lib*.so')
    }
}

jar {
    from configurations.compile.collect {
        (it.isDirectory() && !it.getName().contains("native")) ? it : zipTree(it)}

    manifest {
        attributes('Main-Class': 'statefulservice.VotingDataServiceHost')

        baseName "VotingDataService"
        destinationDir = file('../VotingApplication/VotingDataServicePkg/Code/')
    }

    exclude 'META-INF/*.RSA', 'META-INF/*.SF','META-INF/*.DSA'
}

defaultTasks 'clean', 'jar', 'copyDeps'
Implantar o aplicativo no cluster local
Aqui, o aplicativo está pronto para ser implantado em um cluster local do Service Fabric.
Clique com o botão direito do mouse no projeto Voting no Package Explorer e selecione Service Fabric>Criar Aplicativo para criar seu aplicativo.
Executar o cluster local do Service Fabric. Esta etapa depende do ambiente de desenvolvimento (Mac ou Linux).
Se você estiver usando um Mac, execute o cluster local com o seguinte comando: Substitua o comando passado para o parâmetro - v pelo caminho para seu próprio workspace.
docker run -itd -p 19080:19080 -p 8080:8080 -p --name sfonebox mcr.microsoft.com/service-fabric/onebox:latestConsulte instruções mais detalhadas no guia de instalação do OS X.
Se você estiver executando em um computador Linux, inicie o cluster local com o seguinte comando:
sudo /opt/microsoft/sdk/servicefabric/common/clustersetup/devclustersetup.shConsulte instruções mais detalhadas no guia de instalação do Linux.
No Package Explorer do Eclipse, clique com o botão direito do mouse no projeto Voting e selecione Service Fabric>Publicar Aplicativo
Na janela Publicar Aplicativo, selecione Local.json na lista suspensa e Publicar.
Vá para o seu navegador da Web e acesse http://localhost:8080 para exibir o aplicativo em execução no cluster local do Service Fabric.
Próximas etapas
Nesta parte do tutorial, você aprendeu a:
- Criar serviço Java como um serviço confiável com estado
- Criar serviço Java como um serviço Web sem estado
- Adicionar uma interface Java para lidar com RPC (chamadas de procedimento remoto) entre os serviços
- Configurar seus scripts Gradle
- Criar e implantar o aplicativo em um cluster local do Service Fabric
Prosseguir para o próximo tutorial:
Comentários
Em breve: Ao longo de 2024, eliminaremos os problemas do GitHub como o mecanismo de comentários para conteúdo e o substituiremos por um novo sistema de comentários. Para obter mais informações, consulte https://aka.ms/ContentUserFeedback.
Enviar e exibir comentários de